Torta Caprese (Flourless Chocolate Almond Cake)

This cake is my new dinner party go-to. The cake itself has it all; it’s intensely chocolate-y, rich and moist, the perfect dessert cake and between you and me, it is INCREDIBLY easy (yes, I am shouting at you). It takes very little time, dirties very few dishes and keeps well (although it never lasts long around here!) To serve, simply dust with icing sugar and top with berries and ice-cream.

Image

Ingredients (serves 6-8)
200g butter
200g dark chocolate
4 eggs, separated
170g caster sugar
1 teaspoon vanilla extract
250g almond meal
Icing sugar, to dust
Ice cream & berries, to serve

Image

Method
Preheat oven to 170 degrees C (or around 150 fan-forced). Grease & line a 24cm cake pan with baking paper.

Melt the butter and set aside.

Process (or finely chop) the chocolate until it is in tiny bits, but still retains a little texture.

Place egg yolks, sugar & vanilla in a medium bowl and beat until pale and thick. Fold in chocolate, butter and almond meal (mixture will be very thick)

In a separate bowl, whisk the eggwhites until soft peaks form. Gently fold in chocolate mixture, ensuring you don’t knock the air out.

Spoon into the prepared pan, level the top and bake for 50-60 minutes or until just firm to the touch.

Image

Set aside to cool in the pan, then turn out.

Serve while still warm with icing sugar, berries and ice cream. Bellissimo!

Image

Adapted from ‘Torta Caprese’ in delicious. ‘Wicked: Sinful desserts from your favourite chefs’.

Red Velvet Crinkle Cookies

I love Christmas, and I particularly love Christmas baking. Whether it be for friends, teachers, family or just as a special treat for me, baked goods around Christmas time seem to taste extra delicious. I have long wanted to make these cookies and finally had the time today – and boy are they good, a perfect way to celebrate the end of the school year for my sister and my first year uni results which were released today 🙂

thumb_IMG_1366_1024

Ingredients (makes approx. 36 cookies)
100g butter
1 ½ cups brown sugar
1 tspn vanilla extract
2 eggs
100g dark chocolate, melted
1 ¼ cups flour, sifted
2 tspns baking powder, sifted
¼ cup cocoa, sifted
1 tablespoon red food colouring (depending on strength & desired colour, mine could have been a bit redder)
150g extra dark chocolate, roughly chopped
¼ cup sugar
¼ cup icing (powdered) sugar

thumb_IMG_1362_1024

Method
Place butter, brown sugar & vanilla in a large bowl and beat with an electric mixer for 3-5mins or until light and well combined. Add eggs one at a time, beating well after each addition. Add the melted chocolate and beat until combined. Slowly add the flour, baking powder, cocoa and food colouring and beat until a smooth dough forms.

Image

Fold through the chocolate chunks and refrigerate, covered, for an hour.

Preheat oven to 160°C fan-forced. Roll dessert spoons of the dough into the white sugar, shape them gently into balls and then toss in icing sugar. Place them on lined baking trays allowing plenty of room for spreading.

Image

Bake the cookies for 12-14mins or until the surface is cracked and the edges are slightly crispy. Don’t worry if the centre of the cookies looks undercooked, it will harden while cooling and be deliciously chewy. Enjoy!

thumb_IMG_1363_1024

Adapted from the Red Velvet Crackle Cookies recipe in the Donna Hay Magazine Dec/Jan 2014

Giant Chocolate Cupcake

I love giant cupcakes. They’re so much fun to make, decorate and, more importantly, to eat. This recipe is for quite an intricate giant cupcake but it is easily adaptable – if you don’t want the bother of working with fondant you can just double the buttercream and ice the cake with that. The cupcake case is also optional (but I think makes the end product look so much more professional). Of course, you could also make the cake batter from scratch but do keep in mind that it is quite a time-consuming process already and the box mixes are relatively stable and so good for cutting and shaping.

The cupcake easily serves 10 adults and would be perfect for a kid’s party serving up to 20 children who have eaten other party food.

1240264_10151808035564463_1688643197_n

Equipment
Silicone giant cupcake kit
Turntable
Serving plate
Pastry brush

Ingredients
Wilton candy melts
2 boxes chocolate mud cake mix

400g sifted icing sugar
1-2 tablespoons milk
2 tspns vanilla extract
125g unsalted butter

White fondant icing
Blue food colouring
Red food colouring
Yellow food colouring
Large sprinkles (pre-made using fondant)
1 red gumboil

Method
Make cupcake case by pouring a small amount of melted melts into the silicone bottom case and, using a pastry brush, spreading it until the entire inside of the case is thinly coated. Refrigerate for 20mins and repeat. To remove from silicone once completely set, loosen by pulling  & pinching edges away from the chocolate & then gently peel down the sides of the mould.

Image

Make cake according to packet instructions and fill greased (spray oil) cases 2/3 full. Bake in moderate oven (175°C) for 40-70 mins (bottom will need longer than top) or until an inserted skewer comes out clean. Leave in silicone moulds for at least half an hour or until cool. Then carefully peel off silicone, ensuring the cake is supported at all times.

Using a serrated bread knife, trim around bottom cake so all crunchy edges are removed. Level top (of base) and then cut base in half. Cut off bottom layer off top piece. Level base (of top).

Make buttercream by beating ingredients until light and fluffy.

Put a 1cm thick coating of buttercream between 2 bottom layers of cake and then between the base and top (ensure level – cut if necessary). Then put a thin layer of buttercream on the inside of the chocolate case and gently ease cake into it.

Cover top of cake liberally with buttercream to form a protective barrier against crumbs.

Image

Transfer cake onto a cake board on a turntable. Make a thin sausage out of white fondant (or a thick one for a really cartoon-ish soft serve effect) and put on cake in a spiral manner to achieve a ‘soft serve effect’ in the end.

photo-12

Roll out fondant until thin & large enough to cover top of cake and gently place on the cake. Gently massage fondant onto cake, hugging the curves & taking particular care not to pleat the fondant. Cut off excess if necessary and tuck the bottom up so all buttercream is concealed. Decorate with giant “sprinkles” made from red, yellow & blue fondant icing and place the gumball as a cherry on top.

photo-16-e1338942811453

Image

Pigs in Mud Cake

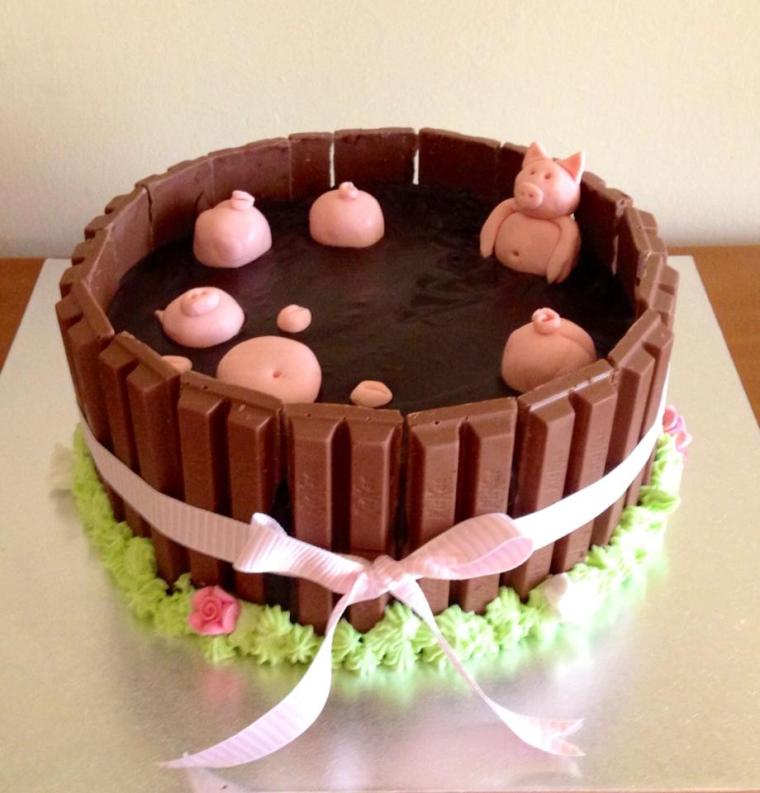
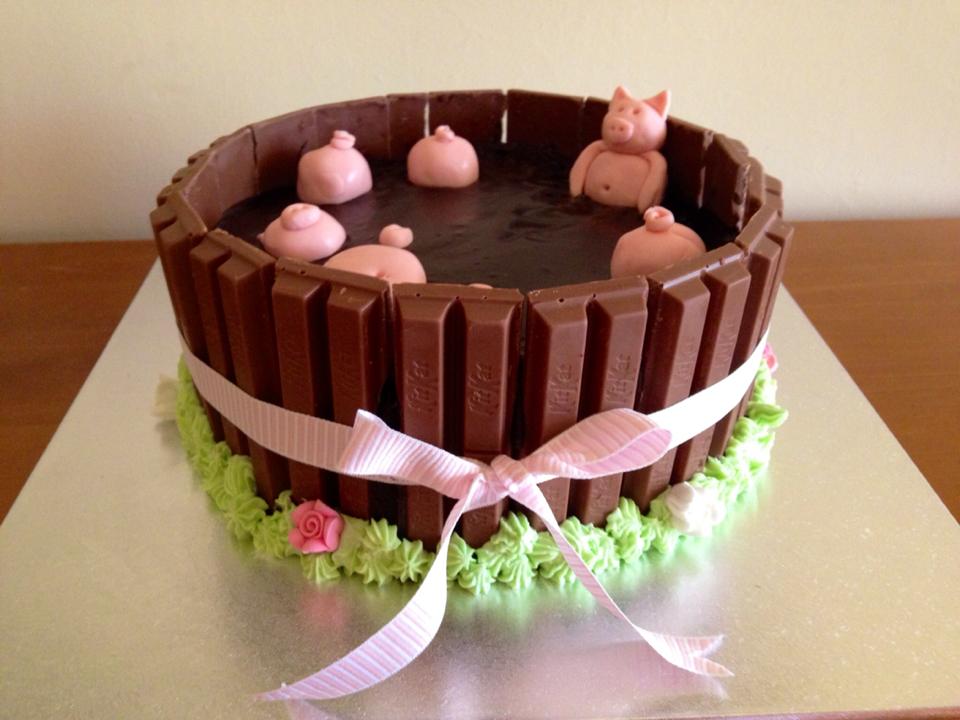
I’ve admired this cake on Pinterest for a while now and so when I was asked to make a cake for my Aunt’s birthday a few weeks back, it seemed the perfect choice. It’s very easy to make (and could be made even easier by using a packet cake) but is memorable and super cute so is excellent if you’re short of time (or patience) like I am. It would also be very popular at a children’s birthday party or as a present for a friend with a sense of humour!

5305_10151782766554463_723893259_n

Ingredients (serves 8-10)
Cake
1 cup water
1 ½ cups caster sugar
125g butter, chopped
20g cocoa powder
½ teaspoon bicarb soda
1 ½ cups self-raising flour
2 eggs

Frosting
90g butter, chopped
⅓ cup water
½ cup caster sugar
1 ½ cups icing sugar
⅓ cup cocoa powder

Chocolate Ganache
400g dark chocolate
200ml cream

Decorations
4 large blocks of Kit-Kats
Pink ribbon
White fondant icing
Flesh/coral food colouring
Green buttercream (if desired)
Sugar flowers (if desired)

Image

Method
To make the cake: preheat oven to 180°C/160°C fan-forced. Grease and line a 20cm round cake pan.

Combine the water, sugar, butter & sifted cocoa and soda in a small saucepan; stir over heat, without boiling, until sugar dissolves. Bring to the boil then reduce heat; simmer, uncovered, 5 minutes. Transfer mixture to medium bowl; cool to room temperature.

Add flour and eggs to bowl; beat with electric mixer until smooth and pale in colour. Pour into pan and bake about 25-30mins (check regularly from 15 mins as ovens vary considerably).

Stand cake in pan 10 mins before turning, top-side up, onto wire rack to cool.

To make frosting: combine butter, water and caster sugar in a small saucepan; stir over low heat, without boiling, until sugar dissolves. Sift icing sugar and cocoa in small bowls then gradually stir in hot butter mixture. Cover, refrigerate until frosting thickens. Beat with a wooden spoon until spreadable.

Break Kit-Kats into pairs (be careful as they can break easily) and get out serving dish/cake board.

Once cake is completely cool, cut carefully in half and level the top. “Glue” bottom of cake to serving dish/cake board with a little bit of frosting. Sandwich cakes with a generous amount of frosting and then coat the sides and top with the remaining frosting.

Working quickly, place the Kit Kats around the edge of the cake until the cake is completely surrounded. This will act as the “fence” of the pig pen. Tie the ribbon around it to fasten.

To make the ganache, gently heat chocolate and cream in a saucepan and stir until melted and combined. Put in fridge to cool.

Image

Meanwhile, colour modelling fondant (I use Orchard) with coral/flesh colour until desired pig colour reached. First I made the three little bottoms by making little balls, making the butt crack using a skewer and making a little hole to place a tail. To make the tails, make a thin worm shape, twist it so it looks like a corkscrew and attach using a tiny bit of water.  Then make two bellies with holes for belly buttons and two faces which are made by one ball with a smaller ball on top for a snout, holes for eyes and nostrils, and little triangles for ears. Faces which are one ball with a smaller ball for a snout and little triangles for ears. Finally, make four little trotters for the floating pig and arms ending in trotters for the sitting pig (it’s really a trial and error process, keep trying until you’re happy with the shapes and proportions).

Remove the ribbon from the Kit Kats once they are firmly attached to the sides of the cake (so it doesn’t get dirty in this process), and carefully pour ganache onto the top of the cake to make the mud. While still soft, position pigs as desired and make ‘ripples’ using the back of a teaspoon.

Refrigerate until ganache is firm. Then return ribbon to place, add buttercream “grass” and sugar flowers if desired, and serve. Enjoy!

Image

Cake recipe from Women’s Weekly Classic Cakes (as Family Chocolate Cake), inspiration from various pinterest posts.

Mars Bar Slice

This delicious, easy slice is a winner with kids & adults, and always sells  well at fetes and cake stalls.

Image

Ingredients
3 x 58g Mars Bars, chopped
90g butter
2 cups Rice Bubbles
200g milk chocolate

Method
Line a slice tray with baking paper.

Combine Mars Bars and butter in a small saucepan over a low heat, stirring constantly, until the mixture is smooth.

Stir in Rice Bubbles and press the mixture firmly and evenly into the lined tray.

Melt the chocolate in a bowl over a saucepan of hot water (or in the microwave) and stir until completely smooth.

Quickly spread the melted chocolate evenly over the slice mixture and refrigerate until set.

Once set, cut into rectangles or squares and enjoy.

Image

Recipe adapted from ‘Mars Bar Slice’ on bestrecipes.com.au

NB: Snickers can be used as a substitute for Mars Bars

Snickers Cupcakes!

The exclamation mark in the title is necessary because these are the best cupcakes I have ever eaten (and I’ve sampled A LOT of cupcakes in my time). I made them for a family birthday party by combining a number of different recipes so that these cupcakes are like a deconstructed Snickers. Everyone went crazy for them, not that I blame them, because who doesn’t love Snickers? With a dense, fudgy chocolate base, a light and fluffy peanut-nougat icing and oodles of caramel, these cupcakes are to die for and I can imagine them becoming a firm family favourite.
EDIT 2015: Still a winner! I made these for my 21st birthday celebrations with family & friends and the went down a treat 🙂 
Elise August 2015 182

Image

Ingredients (makes around 30)
Flourless Chocolate Cupcakes
350g butter
450g dark cooking chocolate, chopped
2 ½ cups caster sugar
1 ½ cups almond meal
2 cups cocoa
10 eggs
2 tspns vanilla extract

Peanut Nougat Frosting
1 cup smooth peanut butter
250g butter, softened
4 tspns vanilla extract
4 cups icing sugar
2 tblspns milk
Salted peanuts (chopped), remaining caramel, melted dark chocolate & chopped snickers, to decorate

Caramel
100g butter
⅔ cup soft brown sugar
¼ cup golden syrup
½ cup cream

Method
Preheat oven to 140°C. Line 3 12-hole muffin trays with patty pans (about 30).

Combine butter, chocolate and sugar in a heavy-based saucepan over a low heat. Mix continuously until melted and smooth. Sift the almond meal and cocoa into a large bowl. Add the chocolate mixture and beat for 1min on a low speed. Add eggs two at a time, beating after each addition until combined. Add vanilla and beat until combined. Divide mixture evenly between patty pans (filling each about ¾ full) and then bake for  30mins or until a fine skewer inserted comes out clean. Remove from the tray and let cupcakes cool on a wire rack completely before icing and decorating.

As cupcakes are baking, make the caramel sauce. Combine the butter, sugar, golden syrup and cream in a heavy-based saucepan over a medium heat. Stir occasionally until the sugar has dissolved. Turn up the heat and boil for at least 5 mins. Take off the heat and cool to room temperature.

Image

Once the cupcakes are cooled, dig a small hole at the top of the cakes with a teaspoon.

Image

Fill the holes with the cooled caramel.

Image

To make the frosting, beat peanut butter and butter until smooth. Add vanilla and slowly add the icing sugar. Add the milk and beat until just combined.

Using a piping bag with a star attachment, pipe the frosting in a circular motion onto the cupcakes, starting around the edge so that you form a soft-serve ice-cream effect. Drizzle with remaining caramel sauce, melted dark chocolate and then top with salted peanuts & chopped snickers. Enjoy!

Image

Elise August 2015 182

Cupcake recipe adapted from the Crabapple Cupcake Bakery Cookbook.

Peanut Butter Cookies with Chocolate Chunks

Image

Wow! These cookies are to die for. Based on a Curtis Stone recipe I found in LA last year (but waited until SwotVac to try for procrastibaking purposes), these cookies are so ridiculously chewy and chocolatey and perfect that even the sun wanted in (photographic evidence above and below). Warning: highly addictive.

Ingredients
1 cup flour
½ tspn baking soda
1 cup crunchy peanut butter
1 cup brown sugar
125g butter, softened
1 ½ tblspns honey
1 large egg
1 tspn vanilla extract
155g dark chocolate, roughly chopped

Image


Method
Preheat oven to 180°C (160°C fan-forced) and line 3 large baking trays with baking paper.

Sift the baking soda and flour into a medium bowl. Set aside.

Using an electric mixer, beat the peanut butter, brown sugar, butter, honey, egg, and vanilla in a large bowl until well combined.

Stir the dry ingredients into the peanut mixture in 2 additions.

Stir in the chopped chocolate.

Scoop a heaped teaspoon (so that it is about the size of a ping pong ball) of dough for each cookie onto the prepared baking sheet (spacing so there is room for spreading).

Bake for about 7 minutes, or until the cookies are starting to turn golden but are still soft to the touch.

Cool the cookies on the tray for 5-10 mins (this is where they will harden slightly) and then transfer to a cooling rack or eat warm.

Makes around 36 cookies, provided you don’t eat too much dough (not that I would ever do that or anything).

IMG_3347

Recipe from Curtis Stone

Chocolate Easter Nests

5Q5Eso4wTuuPv1lzkCmaHQ_thumb_28e2

This recipe is incredibly quick & easy (only 5 steps & 4 ingredients) so it’s perfect for making with the kids. The nests look adorable and, most importantly, taste even better –  I’ve never met someone who hasn’t loved them!

TyFF4FB8SsqOZekDaturcA_thumb_28f1

Ingredients
1x 100g packet Chang’s Original Fried Noodles (or equivalent)
2 tbspns crunchy peanut butter
200g dark chocolate melts
1 bag of Cadbury “Mini Eggs” (or equivalent)

Method
Microwave peanut butter and chocolate until melted.

Mix until it is a smooth paste.

Add the noodles and coat them well.

Spoon the mixture onto grease-proof paper and shape into small nests.

Top with three mini eggs and then place in the refrigerator until set.

7hKQ+mHFRs+g2v7A79ugiw_thumb_28e8

Adapted from Chang’s Original Fried Noodles ‘Chocolate Spiders’ recipe.

Grasshopper Pie

Image

Happy St Patrick’s Day everyone! In honour of the occasion I have decided to post a green recipe. I sadly lack good taste when it comes to my food and drink and love horrendously fake hues (I have a real thing for blue cocktails) and so this pie is right up my alley 🙂 I also love the classic combination of mint and chocolate so this dessert hits all the right notes for me. I choose to use marshmallows instead of gelatine in this recipe as I find it makes it faster to make and less fiddly – although it does take a while for it to set. I tend to serve mine with a little bit of whipped cream and some chocolate curls.

Ingredients (serves 8)
20 oreos (with filling removed)
100g butter, melted
¾ cup milk
24 large, white marshmallows (approx. 180g)
¼ cup creme de menthe liqueur
2 tblspns white creme de cacao liqueur
1 cup whipped cream
1-2 drops green food colouring

Image

Method
Preheat oven to 180°C. In a food processor process oreos until they resemble large crumbs. Mix in butter and then pat into the bottom and sides of a 25cm pie dish.

Bake for 5-10mins, remove from oven and cool completely. Once cooled, place into the freezer to chill.

In a saucepan melt marshmallows in the milk over a medium heat. Remove from the heat and add creme de menthe and creme de cacao. Mix well. Add food colouring and then fold in whipped cream.

Pour into chilled pie shell and freeze for 3-4 hours.

Serve with whipped cream and chocolate shavings.

img_0011_out

Adapted from Grandma’s recipe.

Chocolate, Date & Almond Torte

First thing’s first, I want to apologise for my lack of blogging lately. I’ve just started uni so it’s been a bit of a challenge trying to juggle everything BUT I certainly hope to do better in future. This torte is my go-to dinner party dessert, particularly in summer.  It is relatively quick and easy, always tasty and has never failed me yet. I also love that it only uses ingredients I have constantly on hand but looks a bit exotic and special. I love it served with raspberry coulis and dusted with a little icing sugar (as pictured here).

Amber-Adelaide 608

Ingredients (serves 8-10)
4 egg whites
165g caster sugar
200g pitted dates
200g raw almonds (skin on)
200g dark cooking chocolate
Icing sugar, to dust
Berry coulis, to serve

Amber-Adelaide 609

Method
Preheat oven to 170°C. Grease and line the base of a 22-23cm springform cake pan.

Place dates, almonds and chocolate in a food processor in 2 batches. Process until mixture resembles coarse breadcrumbs.

Whisk the eggwhites until soft peaks form. Gradually add sugar, beating until sugar dissolves and stiff peaks form.

Transfer date mixture to a large bowl. Fold in a little beaten eggwhite to loosen date mixture, then gently fold in the remaining egg whites.

Spoon batter into prepared tin and bake 60-70mins, or until torte is firm at the outer edge & moist but not wet in the centre.

Cool in pan. Dust with icing sugar and then slice torte, serving with berry coulis.

Amber-Adelaide 611

Adapted from Delicious Magazine June 2005