Coconut & Raspberry Bread

This is a ‘bread’ like banana bread, in that it’s really more like a bread-shaped cake. Name aside, it’s super simple to make and perfect for brunch, afternoon tea or dessert. I like it because it’s deliciously moist and not too sweet, but feel free to dust it with icing sugar to make it extra decadent. thumb_img_2444_1024

Ingredients (serves 8-10)
1 ¾ cups desiccated coconut
1 ½ cups coconut milk (I use Vitasoy unsweetened coconut milk found in the longlife milk section at most supermarkets)
¾ cup caster sugar
1 egg
1 teaspoon vanilla essence
1 ⅔ cups self-raising flour
1 cup frozen raspberries

thumb_img_2420_1024

Method
Add the coconut and coconut milk to a large bowl and stir to combine. Cover with Gladwrap and let it stand for 30 minutes.

Preheat the oven to 170°C. Spray a loaf pan with cooking oil and line with baking paper, ensuring you have overhang at both sides to help get it out.

Stir sugar, egg and vanilla essence in to the coconut mixture. Gently stir in the flour and then fold through the frozen raspberries.

Spoon into prepared pan and bake for 1 hour and 10 minutes, or until a skewer inserted come out clean. Cool in pan for 5 minutes, then lift onto a wire rack to cool completely.

Dust with icing sugar to serve if desired. Enjoy!

thumb_img_2449_1024It’s also delicious toasted with margarine or butter!

Recipe adapted from a 2006 issue of Super Food Ideas.

Advertisement

Honeycomb

This is an old family recipe for delicious honeycomb – perfect enjoyed by itself, dipped in chocolate to make home-made ‘crunchies’, or as decorations on cakes.

Note: best consumed on the day it is made and stored immediately in an airtight container so it doesn’t go sticky.

thumb_IMG_2210_1024

Ingredients
6 tablespoons white sugar
2 tablespoons honey
½ tablespoon water
1 teaspoon bicarb soda

Method

Place a sheet of non-stick baking paper on a tray.

Place sugar, honey and water in a medium saucepan over high heat.

Bring to the boil. Boil for 3 minutes or until deep golden in colour.

Take off the heat and lightly sprinkle over bicarb soda, stirring any lumps if required (but otherwise leaving it to froth and bubble).

Pour mixture onto prepared tray (don’t spread it too much or you will lose aeration), and allow it to set at room temperature.

thumb_IMG_2193_1024

Once set, break it into desired size pieces. Enjoy!

Recipe adapted from my Great Grandmother, Doreen James.

2 Minute Nutella Mug Cake

You know when it’s 9pm in the middle of winter and you have a hankering for something sweet? You don’t feel like going to much effort but something comforting and warm and chocolate-y would really hit the spot? Well, have I got a recipe for you!

This mug cake is deliciously warm and chocolate-y with a heavenly layer of oozy Nutella goodness in the middle and, as a bonus, is gluten free. It also doesn’t have that springy, rubbery texture you often get in mug cakes because of the almond meal. The real clincher for me though, is that it only takes about a minute to throw together and then a further minute to cook in the microwave. Washing up is also minimal – hallelujah! Need more convincing? See below:

thumb_IMG_1996_1024

Ingredients (serves 1)
¼ cup almond meal (hazelnut would also work well)
2 tablespoons Dutch cocoa powder
2 tablespoons caster sugar
1 ½ tablespoons coconut oil, at room temperature
1 egg
1 tablespoon milk
2 tablespoons Nutella
Icing sugar, to dust
Vanilla ice cream, to serve

thumb_IMG_2014_1024

Method
Combine almond meal, cocoa powder and caster sugar in a medium bowl. Add coconut oil, egg, milk and one tablespoon of the Nutella, and stir until smooth.

Spoon ¾ of the mixture into a 310ml capacity microwave safe mug. Spoon remaining tablespoon of Nutella into the centre, then cover with the remaining mixture.

Microwave on high for 1 minute (this is for a 1000 watt microwave, adjust as necessary).

Serve dusted with icing sugar and topped with a scoop of vanilla ice cream. Enjoy!

thumb_IMG_2005_1024

Adapted from a Sunbeam recipe on taste.com.au

Chocolate Fudge Brownies

These chewy, fudgy chocolate brownies, created by the domestic goddess Nigella herself, are my reliable go-to goodies when asked to bring a plate for morning or afternoon teas. They are best eaten on the day made (which often means I get up early on the day to make them) and are ridiculously good warmed with a scoop of vanilla ice-cream.

thumb_IMG_1939_1024

Ingredients (makes 16 large brownies)
200g good-quality dark chocolate
250g salted butter
1¾ cups brown sugar
4 eggs
⅓ cup cocoa
1¼ cups plain flour
¼ teaspoon baking powder

thumb_IMG_1952_1024

Method
Preheat oven to 160°C fan-forced. Line a 20cm x 30cm rectangular tin with baking paper.

Melt chocolate and butter in the microwave (or on the stovetop) and stir until smooth. Allow to cool slightly.

Place sugar, eggs, cocoa, flour and baking powder in a large bowl. Pour in chocolate mixture and mix until combined.

Pour into prepared tin and bake for 35-45 minutes or until set on top (but should still be gooey in the middle). Leave to cool slightly in tin.

Cut into 16 evenly sizes pieces. Enjoy!

thumb_IMG_1947_1024

Recipe adapted from Nigella Lawson.

NB: Can be kept in an airtight container at room temperature for up to 3 days, but in my opinion, the fresher the better.


Powder Puffs with Strawberries & Cream

This is probably my most requested recipe and I feel terrible for having kept it in the Bills/Payne/James/Hockney family vault for so long! My Mum (and her mother and grandmother before her) makes powder puffs for special occasions and they are always incredibly popular. They’re dead easy to make and the “sponge biscuits” keep in an airtight container for ages**. The only trick is to fill them with cream far enough in advance so they soften up – then they’re like eating sweet, fluffy clouds. I love them filled with strawberries and cream, lightly dusted with icing sugar, but you could fill them with just about anything.

thumb_IMG_1895_1024

Ingredients (makes approximately 45 sandwiched powder puffs)
3 eggs
¾ cup sugar
½ cup plain flour
½ cup cornflour
1 teaspoon cream of tartar
½ teaspoon bicarb soda

To fill
Whipped, sweetened cream flavoured with a drop or two of vanilla extract
Strawberries, thinly sliced

thumb_IMG_1896_1024

Method
Preheat the oven to 200°C (or 180°C fan-forced). Line 3 large baking trays with baking paper (you will fill approximately 6 trays due to spreading, but I just rotate and re-use the trays).

Beat eggs and sugar in a large bowl with electric mixers until light and fluffy. Add in sifted flours, cream of tartar and bicarb soda and mix until just combined.

Drop ½ teaspoons’ worth of the mixture onto the prepared trays, leaving plenty of room to spread (I usually fit 12-15 on my large trays). Bake for 6 minutes* and then leave to cool slightly, before removing from the tray with a metal spatula and letting them cool completely on a wire cake rack. Repeat this process with the remaining mixture.

2-3 hours before serving, match each sponge biscuit with another of approximately equal size. Spread each ‘biscuit’ generously with thickened, sweetened cream and add sliced strawberries to one half before sandwiching them together.

Dust with a little icing sugar just before serving. Enjoy!

Notes:
*They will harden like a biscuit (they’re supposed to, don’t worry), but will soften when you add the cream later.
** Store in an airtight container with grease-proof paper between each layer so they don’t stickthumb_IMG_1897_1024.jpg

Adapted from a very old family recipe.

White Chocolate Mud Graduation Cupcakes

These cupcakes are super cute and very simple to make. They are perfect as a gift for someone graduating or to serve at a graduation party!

thumb_IMG_1602_1024

Ingredients (makes ~20 cupcakes)
2 cups plain flour
¾ teaspoon baking powder
250g butter, chopped
1 cup milk
2 cups caster sugar
150g white chocolate melts
2 eggs, whisked
1 teaspoon vanilla extract

White chocolate ganache frosting
½ cup cream
300g white chocolate melts
~ 2 cups icing sugar

To decorate
20 squares of thin dark chocolate
20 Maltesers
20 small pieces of black liquorice, cut to look like tassles

thumb_IMG_1586_1024

Method
Fill cupcake tins with 20 large patty pans.

Sift flour & baking powder in a large bowl. Make a well in the centre and set aside.

Put butter, milk, caster sugar and white chocolate into a medium saucepan over medium heat. Stir continuously until the chocolate and butter have melted, and the sugar has fully dissolved. Remove from heat and cool until just warm.

Preheat the oven to 155°C.

Add the eggs and vanilla extract to the cooled chocolate mixture and stir until just combined. Pour into the well in the flour, and gently mix until combined.

Divide mixture evenly between cupcake cases (filled almost to the top, they don’t rise much). Bake for approx. 25-30 minutes, or until a skewer inserted comes out clean.

Cool completely on wire racks before icing.

While the cakes cool, divide your chocolate squares (if needed) and cut the liquorice to make tassels of an appropriate size for your chocolate squares.

To make the frosting, melt the white chocolate and add the cream. Stir to combine. Add the icing sugar, half a cup at a time, until desired consistency reached.

Ice the cupcakes with the frosting and then top with a Malteser just off-centre. Attach a liquorice tassel to each chocolate square using left over frosting (make sure you wipe away any excess that may leak out) and then sit the ‘hat’ on an angle on top of the Malteser.

Enjoy!

thumb_IMG_1612_1024

Recipes adapted from the ‘Crabapple Bakery Cupcake Cookbook’s.
Decoration ideas from the Australian Women’s Weekly ‘Classic Cupcakes’ cookbook.

Neapolitan Easter Layer Cake

thumb_IMG_1510_1024

This cake is surprisingly quick & easy to whip up and makes the perfect centre piece to an Easter celebration. This cake is very rich so small pieces are recommended, especially when consumed in addition to chocolate eggs on Easter Sunday!

Of course, this cake doesn’t need to be Easter-themed at all, just omit the mini eggs and decorate as desired.

thumb_IMG_1483_1024

Ingredients (layer cake serves up to 20 + 6 cupcakes out of the vanilla cake mix)
For the white & pink layers
190g butter, softened
2 teaspoons vanilla extract
410g caster sugar
4 eggs
1½ cups plain flour
¾ cup self-raising flour
½ teaspoon bicarb soda
¾ cup milk
Pink food colouring

For the chocolate layer
60g butter
1 teaspoon vanilla extract
140g caster sugar
1 egg
100g self-raising flour
¼ cup cocoa
80ml water

For the vanilla buttercream
200g butter, softened
½ cup milk
1 tblspn vanilla extract
8 cups icing sugar

To decorate
150g dark chocolate
1 ½ bags Cadbury mini eggs, or easter eggs of your choice

thumb_IMG_1508_1024

Method
Grease & line three 20cm cake tins and line a 6-hole muffin tin with patty pans. Preheat oven to 180°C or 160°C fan-forced.

To make the vanilla cake layers, add the butter, vanilla, caster sugar, eggs, flours, bicarb soda and milk to a large bowl. Beat for 1-2 minutes with an electric mixer until completely combined and lighter in colour.

Fill the 6 patty pans approximately ¾ full with cake batter and set aside.

Divide the remaining vanilla batter into halves and colour one half pink with food colouring (this time I only used a couple of drops, but in future I will put in more for a more vibrant colour). Spread white mixture into one prepared tin and pink mixture into another, and set aside.

To make the chocolate layer, add butter, vanilla, sugar, egg, flour, cocoa and water into a large bowl. Beat for 1-2 minutes with an electric mixer until completely combined. Spread into remaining cake tin.

Place the three large cakes into the oven and bake for ~40 minutes or until a skewer inserted comes out clean. When they are half way cooked (i.e. after 20 minutes), put the cupcakes into the oven and let them cook for ~20-25 minutes or until a skewer inserted comes out clean.

Cool cakes for 5 minutes in their tins, then gently turn out onto metal cooling racks to cool completely.

Once the cakes are cool, you can start on the frosting. Cream the butter for 1-2 mins in a large bowl using an electric mixer. Add the milk, vanilla and half of the icing sugar and beat for at least 3 mins (until the mixture is light and fluffy). Add the remaining icing sugar and beat for a further 3 mins or until of a spreadable consistency. Add extra milk if too dry or extra icing sugar if too wet.

Spread frosting over the top of each of your cupcakes and top with a mini egg if desired.

To assemble the layer cake, put a small amount of frosting in the middle of a cake stand (or plate/cake board/ whatever you want your cake to be displayed on) and gently place your chocolate layer on top. Top the cake with a generous layer of frosting and smoothe it out to the edges so you have an even layer. Gently place the pink layer directly on top, ensuring that it is flat and in-line with the chocolate layer (if the cake is wonky at all, shave some of the cake off with a knife so it sits flat, or add more frosting where it is thinner). Top the pink layer with a generous dollop of frosting and, again, smoothe it out to the edges so it’s evenly spread. Gently place the white cake on top, again making alterations if necessary so that it is flat and even.

Coat top and sides of the cake with a thin layer of frosting and don’t worry if you get crumbs in this layer (it is known as the ‘crumb coat’). Put the cake in the freezer for 10 minutes or until set. Top with another layer of frosting and smoothe with a palette knife so you have a neat, even surface. Return to the freezer for a further 10 minutes to set.

While the cake is in the freezer, melt your chocolate ready for the drizzle. Once your cake’s frosting is set, pour the melted chocolate onto the top of your cake and allow it to run down the sides. Make sure the entire top of the cake is covered in chocolate. Once the chocolate has set slightly (but not completely!!) top evenly with mini eggs. Leave it for a few further minutes until the chocolate has completely set and then serve. Enjoy!

thumb_IMG_1487_1024

Cake recipes adapted from the ‘cut and keep butter cake’ and the ‘one-bowl chocolate cake’ in the Australian Women’s Weekly Classic Cakes cookbook.

Decoration inspiration from Sainsbury’s Magazine.

Easter Cupcakes 3 Ways

Wow, I can’t believe it’s only 1 week until Easter Sunday!

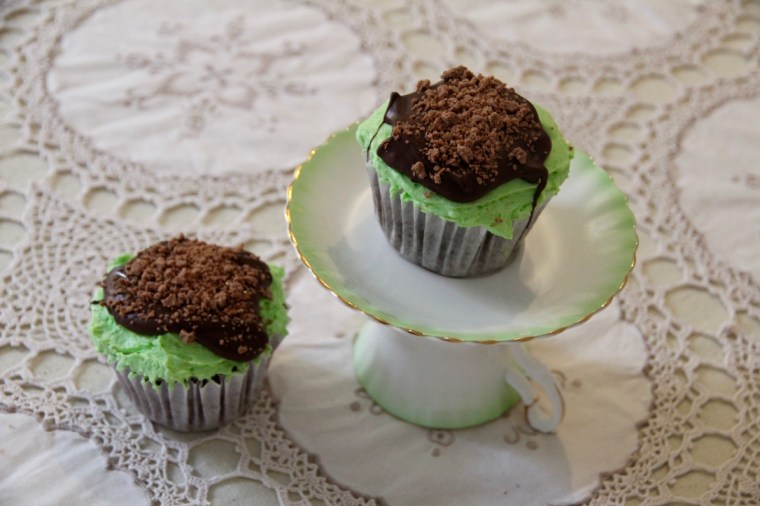
Here are 3 simple ways to decorate cupcakes for Easter. I used my favourite dark chocolate mud cupcake recipe for the cakes, but they would be equally delicious vanilla or any other flavour of your choice! When I made mine, I just made one batch of the cakes and divided each of the frosting recipes by a third, but feel free to triple the cake recipe if you want 3 full batches, or pick and choose which decorations you’d like 🙂

thumb_IMG_1454_1024

Dark Chocolate Mud Cupcakes Ingredients (makes 12)
90g softened butter
1 cup brown sugar, firmly packed
2 eggs
⅔ cup self-raising flour
2 tablespoons cocoa powder
⅓ cup almond meal
⅔ cup water
60g dark chocolate melts, melted

Method
Preheat the oven to 170°C (150°C fan-forced). Line a 12-hole muffin tin with patty pans.

Beat butter, sugar & eggs in a large bowl with electric mixer until light and fluffy. Add in sifted flour and cocoa, almond meal, water and melted chocolate.

Fill each patty pan approximately ⅔ of the way full. Bake for around 25 minutes or until a skewer inserted comes out clean. Stand cakes in tin for 5 minutes before transferring them to a wire rack to cool.

thumb_IMG_1442_1024.jpg

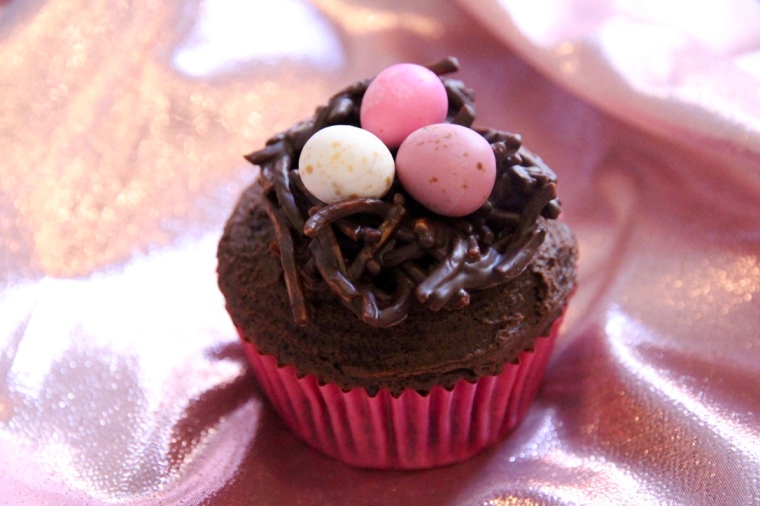
Dark Chocolate Easter Nest Cupcake Ingredients (makes 12)
Dark chocolate frosting: 
125g butter, softened
1 ½ cups icing sugar
2 tablespoons dutch cocoa powder
2 tablespoons milk

Chocolate Easter Nests
1x 100g packet Chang’s Original Fried Noodles (or equivalent)
2 tbspns crunchy peanut butter
200g dark chocolate melts
1 bag of Cadbury “Mini Eggs” (or equivalent)

Method
To make the nests, microwave peanut butter and chocolate until melted. Mix until it is a smooth paste. Add the noodles and coat them well.

Spoon the mixture onto grease-proof paper and shape into nests small enough to fit on top of your cupcakes. Top with three mini eggs and then place in the refrigerator until set.

While the nests are setting, make the frosting. Beat butter in a medium bowl with electric mixer until light and fluffy. Beat in icing sugar, cocoa and milk in two batches. If the frosting is too stiff, add more milk. If it’s too runny, add more icing sugar or cocoa.

To decorate, spread each cupcake generously with frosting and top with a nest.

IMG_3536

Bright Springtime Easter Cupcake Ingredients (makes 12)
Vanilla frosting:
125g butter, softened
1 ½ cups icing sugar
2 tablespoons milk
2 teaspoons vanilla essence (or flavouring of your choice)
Green food colouring

To decorate:
Wilton grass icing nozzle tip
1 bag of Cadbury “Mini Eggs” or equivalent

Method
To make the frosting, beat butter in a medium bowl with electric mixer until light and fluffy. Beat in icing sugar, vanilla and milk in two batches. Add green food colouring until desired colour is reached (start slowly, the colouring is often very strong!) If the frosting is too stiff, add more milk. If it’s too runny, add more icing sugar.

Spoon frosting into a piping bag with a grass tip attachment. Pipe frosting vertically onto the cupcake until each cupcake is fully covered. Top with 3 mini eggs.

thumb_IMG_1433_1024

Bunny Behind Cupcake Ingredients (makes 12)
Vanilla frosting:
125g butter, softened
1 ½ cups icing sugar
2 tablespoons milk
2 teaspoons vanilla essence (or flavouring of your choice)
Green food colouring

Decorations
12 Ferrero Raffaello white chocolate truffles (or equivalent)
36 white mini marshmallows
Pink icing pen (or alternatively use pink icing, fondant or melted pink candy melts)
Milo (Australian malt powder) or crushed chocolate biscuits, for the soil

Method
To make the frosting, beat butter in a medium bowl with electric mixer until light and fluffy. Beat in icing sugar, vanilla and milk in two batches. Add green food colouring until desired colour is reached (start slowly, the colouring is often very strong!) If the frosting is too stiff, add more milk. If it’s too runny, add more icing sugar.

Top each cupcake with a generous layer of frosting, but be sure to leave aside a small amount of frosting to use as ‘glue’. Smoothe the top of each cupcake so you have a flat surface to work with. Sprinkle milo or crushed chocolate biscuits onto the frosting (but leave a border of green around the edge); this makes the ‘soil’. Firmly place a Raffaelo truffle into roughly the centre of your soil on each cake.

To make the tails, shape mini marshmallows into spheres and press firmly down. Attach each tail, using a small amount of frosting (so the green doesn’t show), to the Raffaelos (I chose to do mine to one side but I have seen them work top and centre).

To make the bunny’s feet, flatten 2 white marshmallows per bunny and squeeze in the centre to give a foot-like shape. Using your icing pen, draw on foot and toe-pads. Attach, toes down to the Raffaelos using a tiny amount of icing on the top back-side of each foot.

thumb_IMG_1454_1024

Frosting recipes adapted from the Australian Women’s Weekly ‘Cupcakes by Colour’ cookbook.


Chocolate Mint Sundae Cupcakes

Chocolate and mint are a match made in heaven and these cupcakes combine them in one deliciously compact package. The cupcakes are a dark chocolate mudcake which, to me, are the perfect blend of light and rich. They are then topped with a generous layer of fluffy mint buttercream (which tastes exactly like peppermint ice-cream I might add), melted dark chocolate and a crumbled Flake bar – what’s not to love?! These are also a gorgeous shade of green – perfect for St Patrick’s Day!

thumb_IMG_1481_1024

Ingredients (makes 12)
90g softened butter
1 cup brown sugar, firmly packed
2 eggs
⅔ cup self-raising flour
2 tablespoons cocoa powder
⅓ cup almond meal
⅔ cup water
60g dark chocolate melts, melted

Peppermint Buttercream Frosting
125g butter, softened
1 ½ cups icing sugar
2 tablespoons milk
Peppermint essence
Green food colouring

To decorate
1 large Flake bar, crumbled
30g dark chocolate melts, melted

thumb_IMG_1480_1024

Method
Preheat the oven to 170°C (150°C fan-forced). Line a 12-hole muffin tin with patty pans.

Beat butter, sugar & eggs in a large bowl with electric mixer until light and fluffy. Add in sifted flour and cocoa, almond meal, water and melted chocolate.

Fill each patty pan approximately ⅔ of the way full. Bake for around 25 minutes or until a skewer inserted comes out clean. Stand cakes in tin for 5 minutes before transferring them to a wire rack to cool.

Once cakes are fully cool, you can make the frosting. Beat butter in a medium bowl with electric mixer until light and fluffy. Beat in icing sugar and milk and a drop each of peppermint essence and green food colouring  (or until desired colour and flavour reached).

Ice cupcakes with a generous layer of frosting. To decorate, dollop each cupcake with dark chocolate and spread it so that it looks as though it is dripping slightly down the cakes. Top with crumbled Flake.

Enjoy!

thumb_IMG_1477_1024

Adapted from The Australian Women’s Weekly ‘Cupcakes by Colour’ cookbook

Carrot Cake with Lemon Cream Cheese Frosting

I love this cake, it’s so quick and effortless to put together and is absolutely delicious (also, because it contains carrot it’s basically a salad, right?!). It’s great at any time of year but is particularly good as a treat around Easter for someone who doesn’t like chocolate or for people who are chocolated out!

thumb_IMG_1330_1024

Ingredients (serves 8-10)
1 ½ cups grated carrot (lightly packed)
½ cup chopped walnuts
1 cup plain flour
2 eggs
1 teaspoon bicarb soda
1 cup caster sugar
1 teaspoon mixed spice
¾ cup vegetable oil
½ teaspoon salt
½ teaspoon vanilla

Lemon Cream Cheese Frosting:
40g (1 tablespoon) softened butter
60g cream cheese (e.g. Philadelphia)
1 teaspoon lemon rind
1 ½ cups icing sugar, sifted

To decorate (if desired):
Extra chopped walnuts
The thin end of a small carrot cut into 2 halves
4 sprigs of coriander

thumb_IMG_1336_1024

Method
Preheat oven to 180°C (160°C fan-forced).

Grease an 8″ round cake pan with margarine and line the base with baking paper.

Combine eggs, sugar, oil, vanilla & sifted dry ingredients  in a large bowl & beat on low speed.

Stir in carrots & walnuts. Mix well.

Pour mixture into the prepared cake tin and bake in the oven for approx. 40 – 45mins or until a skewer inserted in the middle of the cake comes out clean.

Let the cake cool in the tin for 5-10 minutes, before placing it on a wire rack to cool completely.

thumb_IMG_1231_1024

To make the cream cheese frosting, beat butter & cream cheese until smooth and creamy. Add in the lemon rind and icing sugar and beat until smooth. Spread evenly over the top and sides of the cake.

If desired, decorate by placing the finely chopped walnuts around the edge of the cake and the carrot pieces in the centre of the cake with two coriander sprigs above each carrot. Enjoy!

thumb_IMG_1337_1024

Recipe from Aunty Cynth