Ingredients (makes approx. 25 large round cookies) 125g butter ½ cup sugar 1 teaspoons vanilla extract 1 egg 1 ½ cups plain flour 2 teaspoons mixed spice 1 teaspoon baking powder
Approx 200g white fondant icing Icing sugar Vanilla essence Red and green food colouring
Method Cream butter, sugar & vanilla using electric beaters until well combined. Add the egg and beat until light and fluffy.
Using a wooden spoon or silicone spatula, mix sifted dry ingredients into wet ingredients until a dough forms. Knead gently for 1-2 minutes on a lightly floured bench and then divide into 2 roughly equal pieces, cover with clingfilm and refrigerate for at least 30 minutes.
Preheat oven to 180°C (160 fan-forced). Roll out dough onto a lightly floured surface using a rolling pin until you reach your desired thickness (I like mine around 5-6mm) and cut out circles using a large round cookie cutter. Repeat until you have used all the dough.
Place onto a baking tray (they don’t have to be spread out much as they don’t really expand) and bake for approximately 12-15 minutes, or until lightly golden.
While the cookies cool, make your vanilla glaze by combining vanilla essence and icing sugar until you have a thick syrup consistency.
Divide your fondant icing into 3 roughly equal parts. Colour one red, one green and leave the other white.
Roll out your fondant using a rolling pin on a surface lightly dusted with icing sugar until 3-4mm thick. Use the same round cutter as for the cookie to cut out circles of fondant.
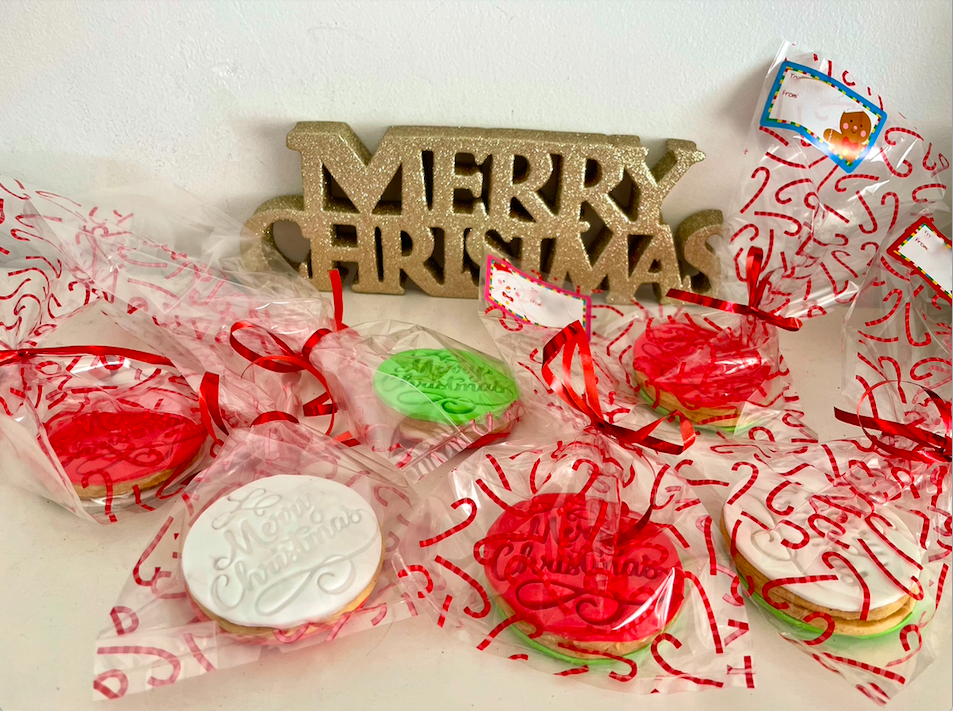
Brush each cookie with a small amount of the vanilla glaze and the top with fondant. Press down gently to ensure the fondant has adhered completely to the cookie. Stamp with a ‘Merry Christmas’ cookie stamp or decorate as desired. Repeat until all cookies have been decorated. Enjoy!
Recipe adapted from ‘The Best Valentine Sugar Cookies’ on Alice & Lois.com
It feels a bit cheeky to call this a recipe as it’s so easy and basically impossible to mess up, but it’s been my most requested ‘recipe’ among my friends and it’s about time I shared it. Adjust it to suit your palate (no two guacamoles I make are exactly the same), but here is the basis of the guacamole that features prominently at most Bills gatherings. We usually serve it with salted corn chips, but it also works well with flavoured Doritos, crackers, veggie sticks, or my sister’s weird but delicious favourite, salt and vinegar chips. Of course it is also a perfect addition to tacos, burritos and nachos.
Warning: once you make it for your friends, you will never be allowed to bring anything else to a party… ever!
Ingredients (makes enough for 1 packet of corn chips) 2 ripe avocados
1 medium sized clove of garlic, finely diced
2 teaspoons tomato, finely chopped
3 teaspoons lime juice
2 teaspoons sweet chilli sauce
1 teaspoon Tabasco sauce (optional)
Salt
Pepper
Coriander leaves, to serve
Corn chips, to serve
Ft. Adelaide Crows scarf in the background because it’s AFL Grand Final Day!!
Cut up the avocados into small cubes and scoop into a medium sized bowl. Mash gently with a fork until mostly squashed but with some lumps (I prefer the term ‘texture’) remaining.
Dice the garlic (making the pieces as small as possible) and tomato and add to the avocado. Gently stir through with the fork.
Add in the lime juice, sweet chilli sauce and tabasco sauce (if desired). Stir until combined. Season with salt and pepper. Taste it and add more of any of the ingredients until it’s balanced and to your liking.
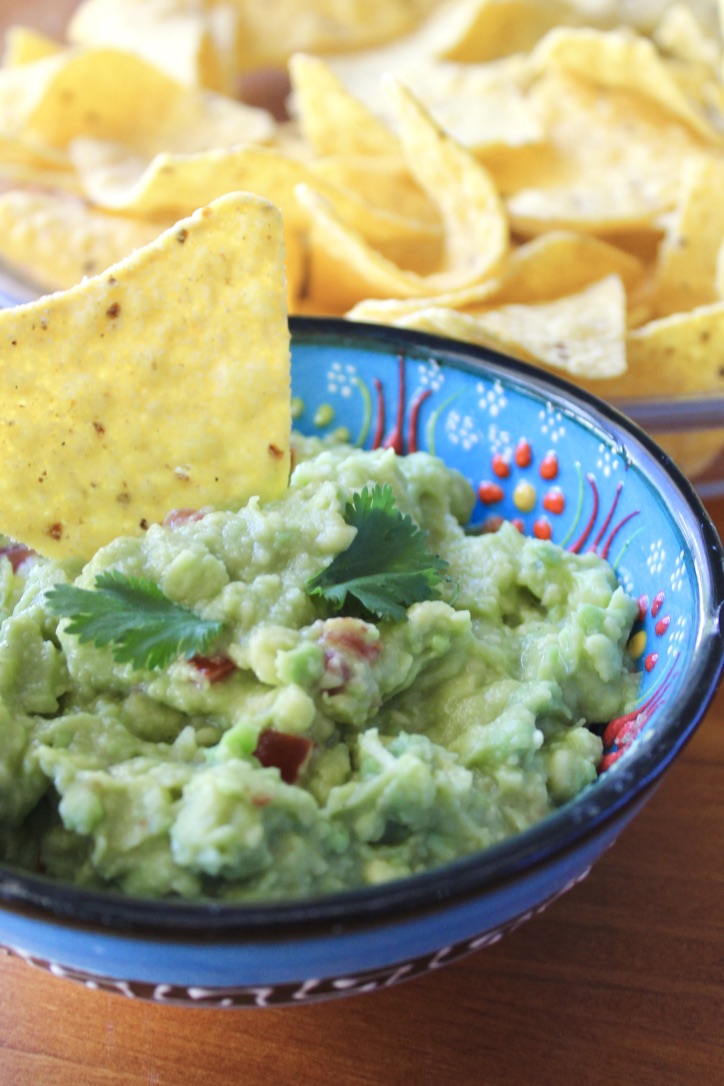
Transfer into a small serving bowl, top with a couple of coriander leaves and enjoy!
Recipe adapted from Emma, my neighbour from Canberra.
And because it’s always stuck in my head, enjoy the horrendously catchy ‘Guacamole Song’ here!!
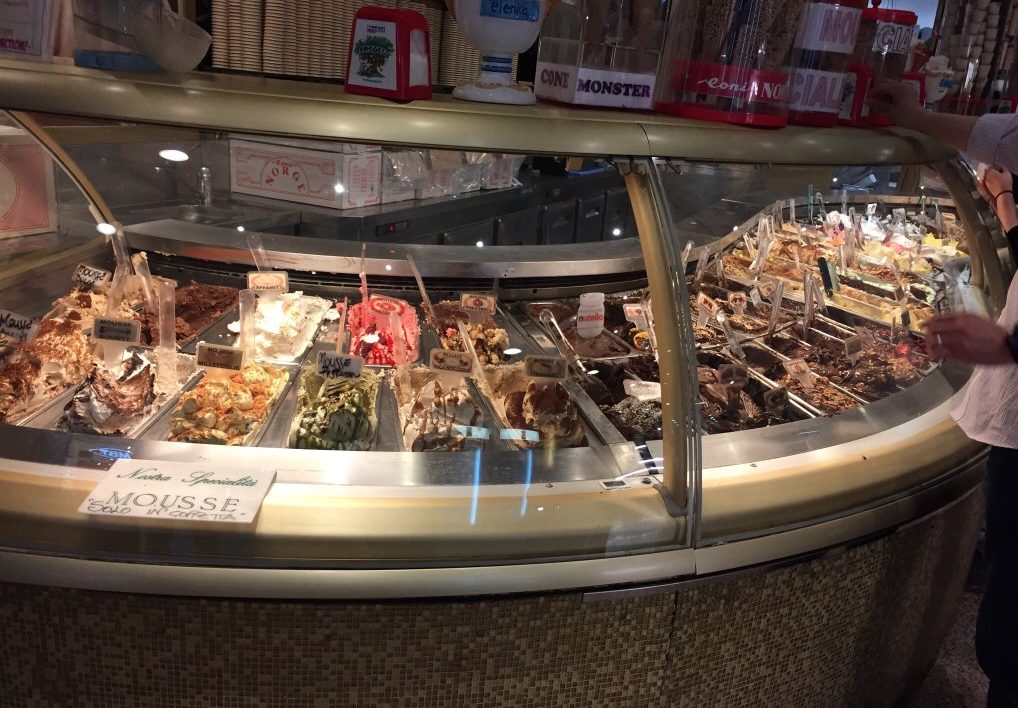
Rome, the Eternal City, rightly has a reputation as being a foodie mecca. Despite it’s growing international food scene, the heart (or stomach?!) of food in Rome still lies in its world-renowned pizzerias, trattorias and gelaterias.
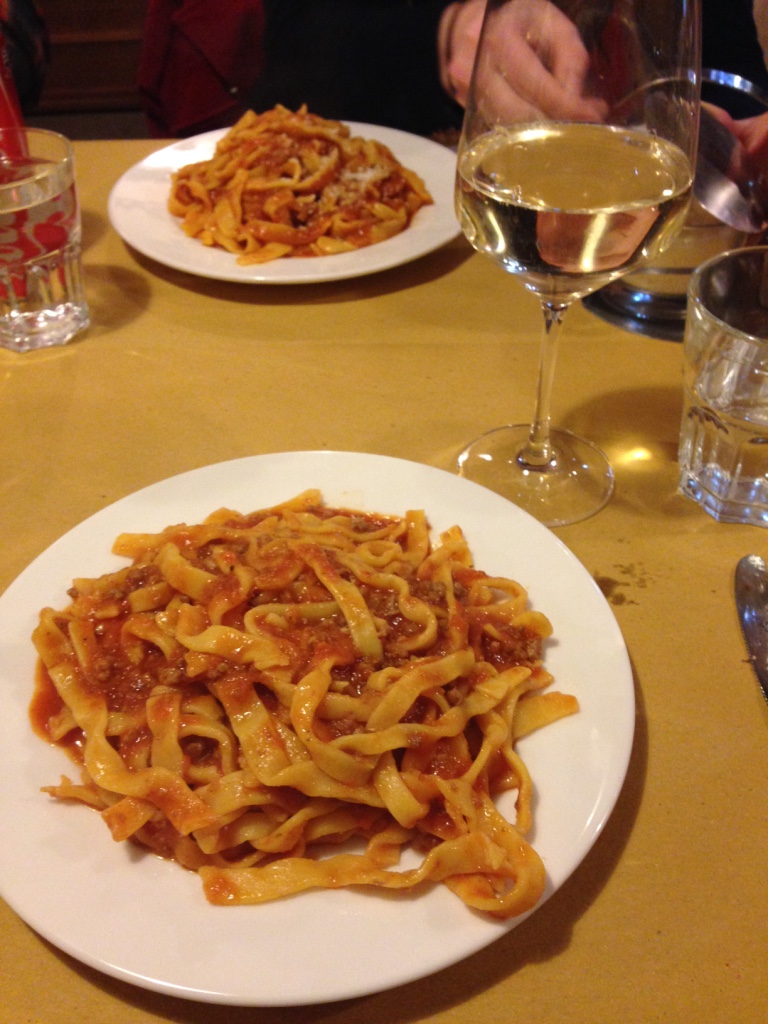
Delicious pasta at a Roman Trattoria
I have been lucky enough to visit Rome twice (throwing coins over your shoulder into the Trevi Fountain must work!) and both times I have made it a personal mission to taste test as much gelato as I could get my hands on.
Legend has it that if you throw a coin with your right hand over your left shoulder into the Trevi Fountain, you will return to Rome.
Yes, despite it being winter on both occasions I ensured I had at least one gelato a day (proving that not all heroes wear capes!), and in my quest for the best gelato, sampled a large array of flavours, in both cups and cones, coloured and flavoured naturally and not-so-naturally, and made using traditional and modern techniques. Along with my sister, we researched where the gelato hotspots were throughout Rome and tried to ‘do as the Romans do’ and sample gelaterias where the locals congregated.
After all of this *rigorous* experimentation, I can say with some (questionable) authority that I have found the best gelato in Rome. So, without further ado, I present to you my top 3 gelaterias in Rome.
Number 3: il Gelato di San Crispino
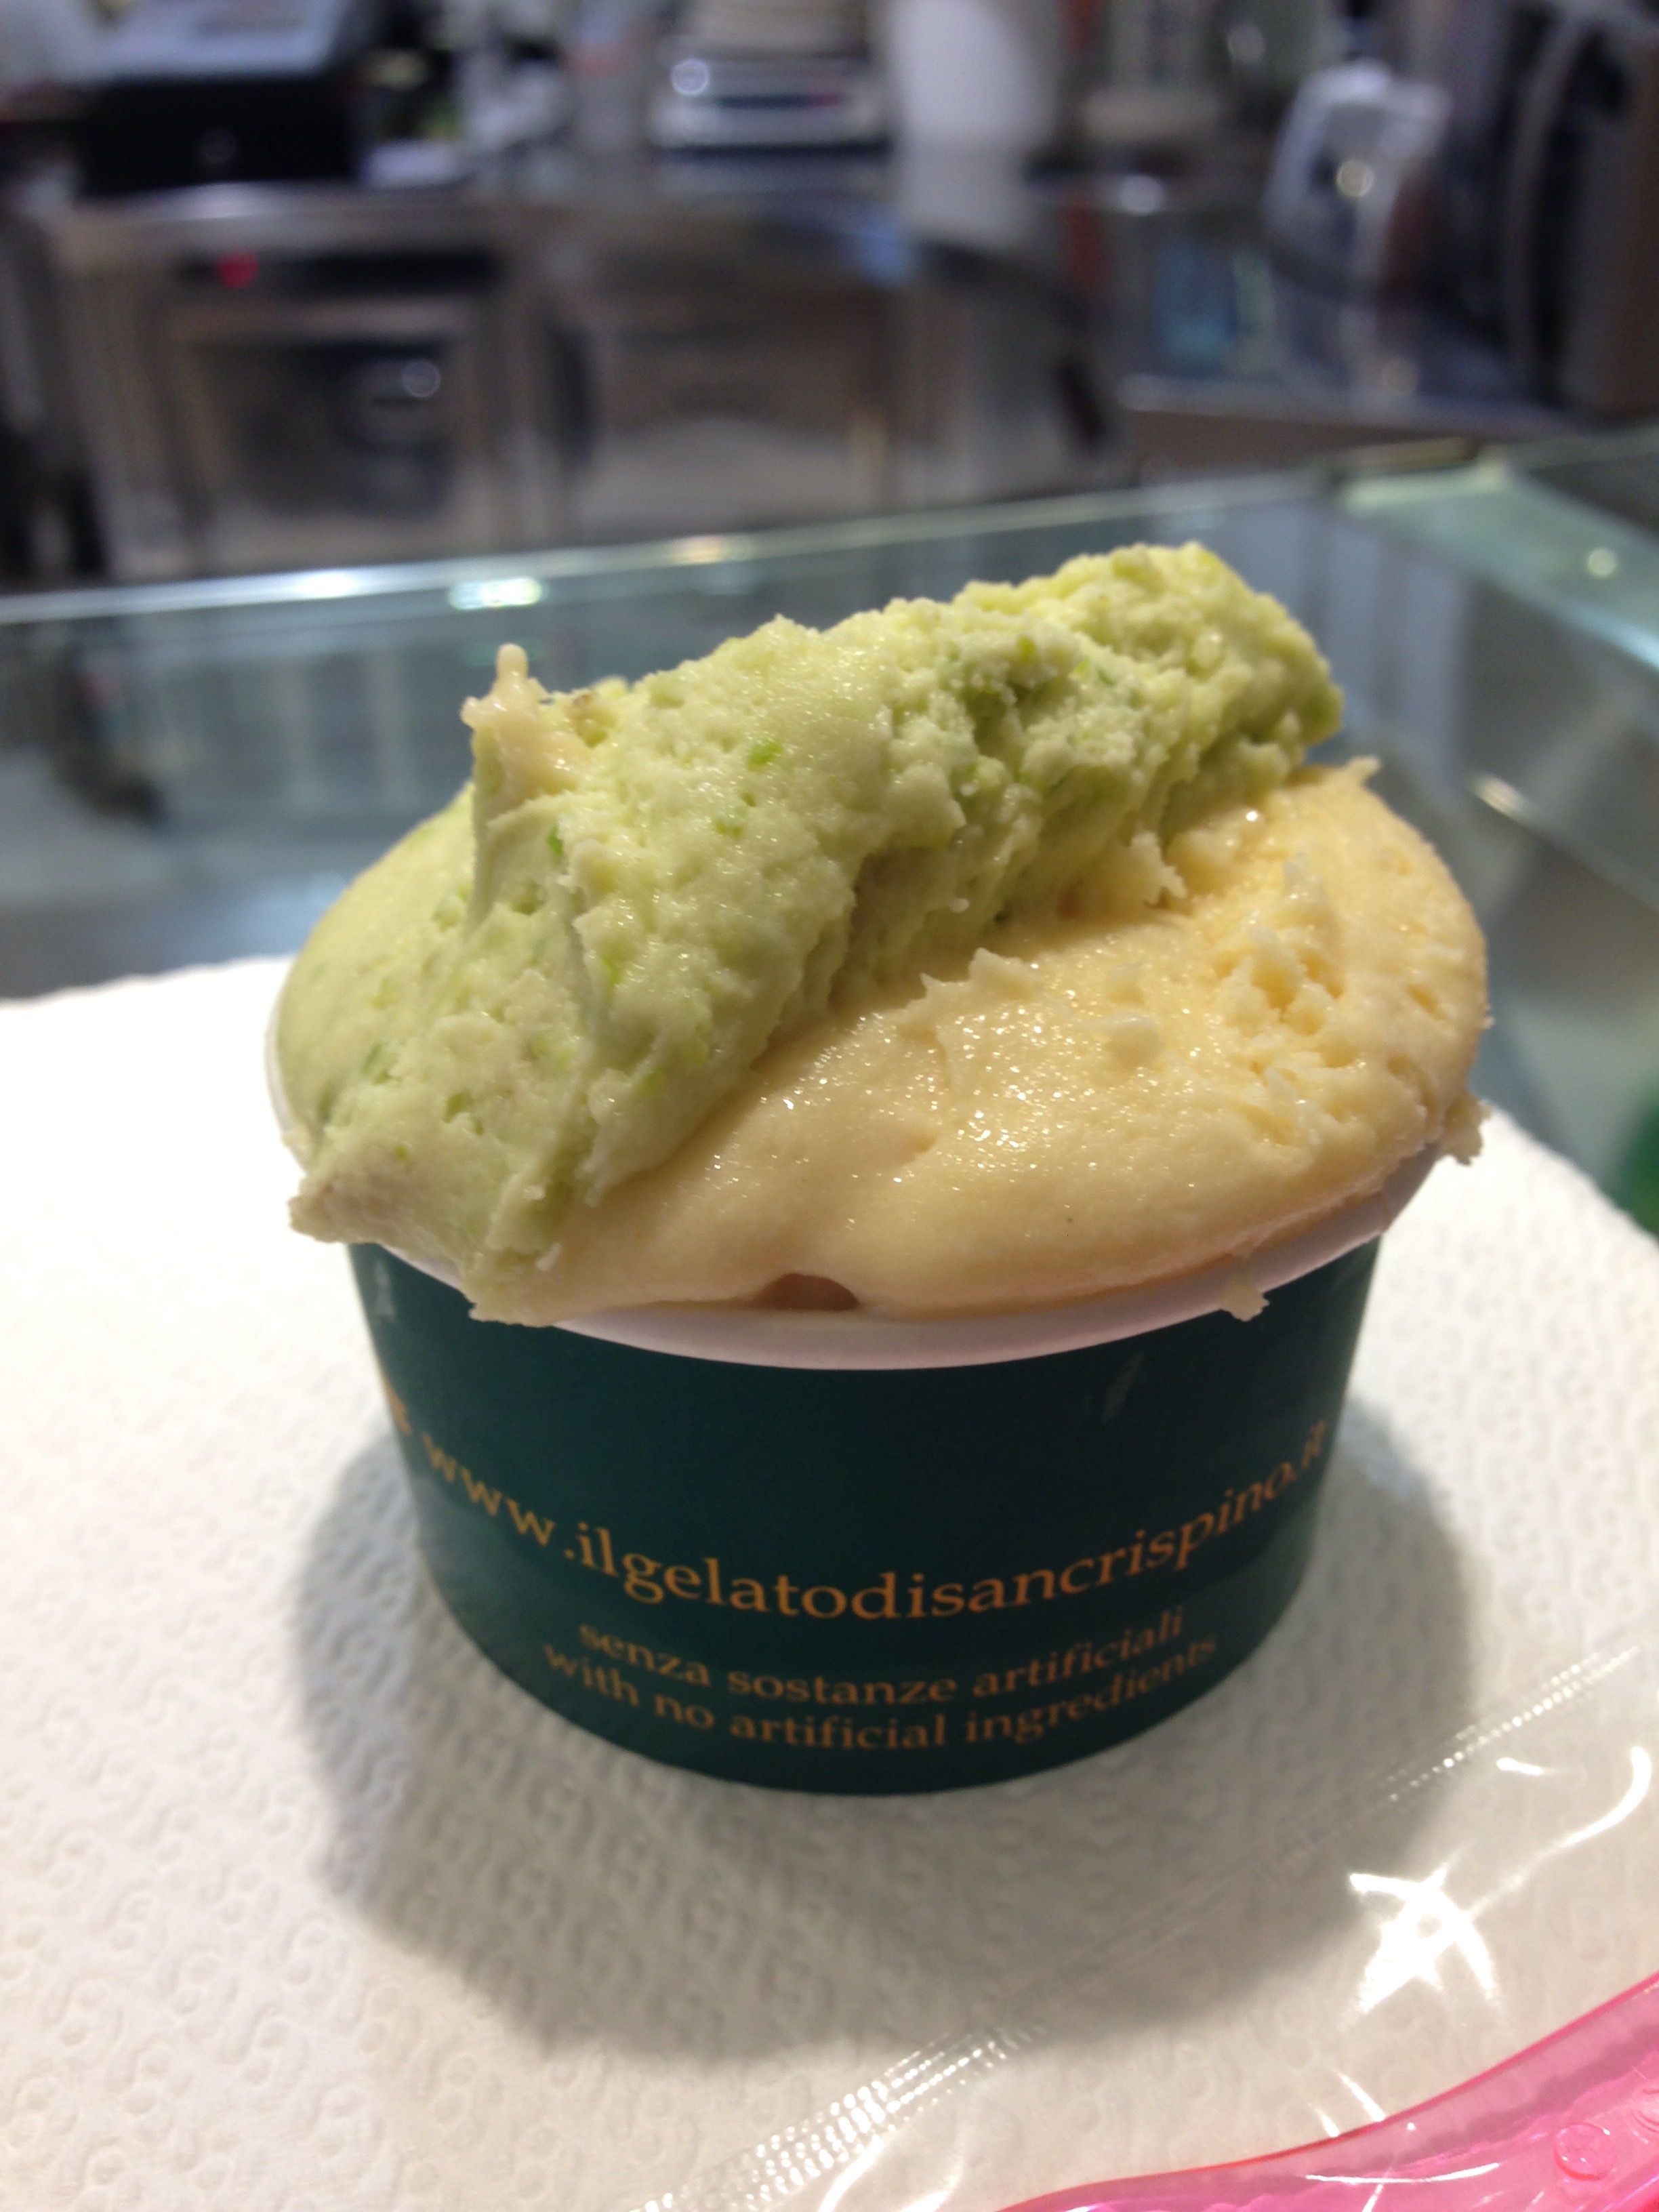
Delicious pistachio and honey gelato
The most traditional of my top 3, San Crispino (which conveniently has 2 shops located in the historical centre of Rome), takes its gelato very seriously and prides itself on using high quality, seasonal ingredients and not using artificial colourings, preservatives or chemical emulsifiers.
San Crispino was recommended to us by our Rome walking tour guide and has many certificates of excellence (and long queues at times). After sampling the gelato, I can see why.
Don’t be put off by the rather uninviting decor and not being able to see any gelato upon entering; each flavour is kept in a stainless steel bin with a lid on it so that it is kept at the optimum serving temperature (between -8 and -10°C).
There are fewer flavours here than in many gelaterias as San Crispino strives for quality, not quantity. The flavours that are on offer change regularly with the seasons, but be sure to try their famous Sardinian honey gelato – it’s delicious. Dairy free sorbets and ‘meringue ice creams’ are also available.
il Gelato di San Crispino. Image: TripOrTreats
Locations: Via Acaia, 56, 00183 Roma, Italia (tel. 0670450412)
Piazza della Maddalena 3 – 00186 Roma (tel. 0697601190) Price: From €2.70 Rating: 4.5/5 cupcakes
Top tip: don’t make the mistake of ordering your gelato in a cone, as the ‘gelato craftsmen’ believe this interferes with the flavours of the gelato and only serve it in cups.
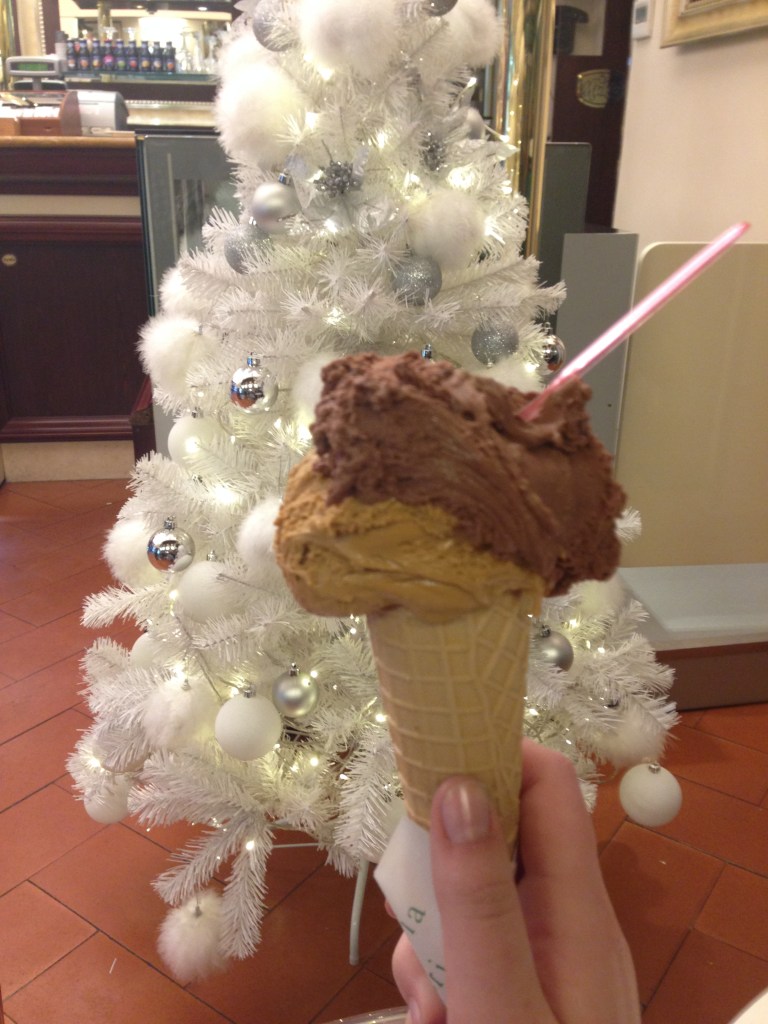
Number 2: Gelateria Valentino
In second place is Gelateria Valentino. In stark contrast to San Crispino, Gelateria Valentino is a brightly coloured feast for the eyes with its rainbow-coloured gelato proudly on display. While still boasting a wide range of natural, seasonal flavours, Valentino also offers some “less natural” varieties (think pretty green mint gelato) and certainly has no qualms about cones – you even get an adorable mini cone when you order your gelato in a cup!
As you can see, the raspberry flavour was a big hit in my family!
My sister was the mastermind who brought us to Gelateria Valentino after reading up reviews on TripAdvisor, many of which confidently declare that it has the best gelato in Rome. With its proximity to the Trevi Fountain, more than 3,600 5-star reviews on TripAdvisor (ranked as #4 for dessert locations in Rome), and huge selection of tempting flavours, it’s not hard to see why Gelateria Valentino does a roaring trade even in the middle of winter.
Our family favourite flavours were: raspberry, Baci, dark chocolate and tiramisu.
Location: Via del Lavatore 96, 00187 Rome, Italy Telephone: +39 06 678 3219 Price: From €2.50 Rating: 4.5/5 cupcakes
Top tip: Gelateria Valentino doesn’t accept credit cards so make sure you have cash on you.
Number 1: La Gelateria Frigidarium
Image: TripAdvisor (I keep eating mine too quickly to take photos!)
In first place is La Gelateria Frigidarium, located near Piazza Navona. Like Gelateria Valentino it is a TripAdvisor award winner with over 3,100 5-star reviews, and it was always buzzing with happy customers, day or night.
Frigidarium has an extraordinary array of mouthwatering flavours on display and you can enjoy your gelato in a cup or cone, and if you’re feeling particularly indulgent, have it coated in chocolate!
Image: TripAdvisor
For me there were several factors that set it apart from its competition. Firstly, the quality was second-to-none. Every flavour I had the pleasure of sampling was rich and creamy without any hint of graininess.
Secondly, everything is generous; the friendly staff were more than happy to let people sample flavours before deciding, the scoops were large and filled the cup or cone to the brim (regardless of what size you ordered), and every variety was packed full of flavour and contained a generous helping of ‘fun bits’ e.g. fresh fruit, cookie chunks or chocolate bar pieces, depending on your chosen flavour.
Finally, what really clinched it the top spot, is its incredible value for money. For just €2 you can enjoy a small cup filled to the brim with 2 flavours of gelato – less than half the price you will pay in most other gelaterias. The price of a large cup at Frigidarium is on par with what many places charge for a small!
Image: TripAdvisor (I keep eating mine too quickly to take photos!)
Those factors, and our desire to sample as many flavours as possible, were what had us coming back to La Gelateria Frigidarium time and time again.
Our picks? You really can’t go wrong! Every flavour we tried was exceptional.
Location: Via del Governo Vecchio 112, 00186 Rome, Italy Telephone: +39 334 995 1184 Price: From €2 Rating: 5/5 cupcakes
Top tip: Visit here first, otherwise the thought of all the Frigidarium gelato you could have been enjoying will haunt you until your dying day.
Well, there you have it folks, my top 3 gelaterias in Rome. Chasing any one of them will guarantee you an excellent gelato.
Let me know, do you agree with me? Disagree? Have you found an amazing top-secret Roman gelateria I should visit on my next trip? Please comment below, I’d love to hear about it 🙂
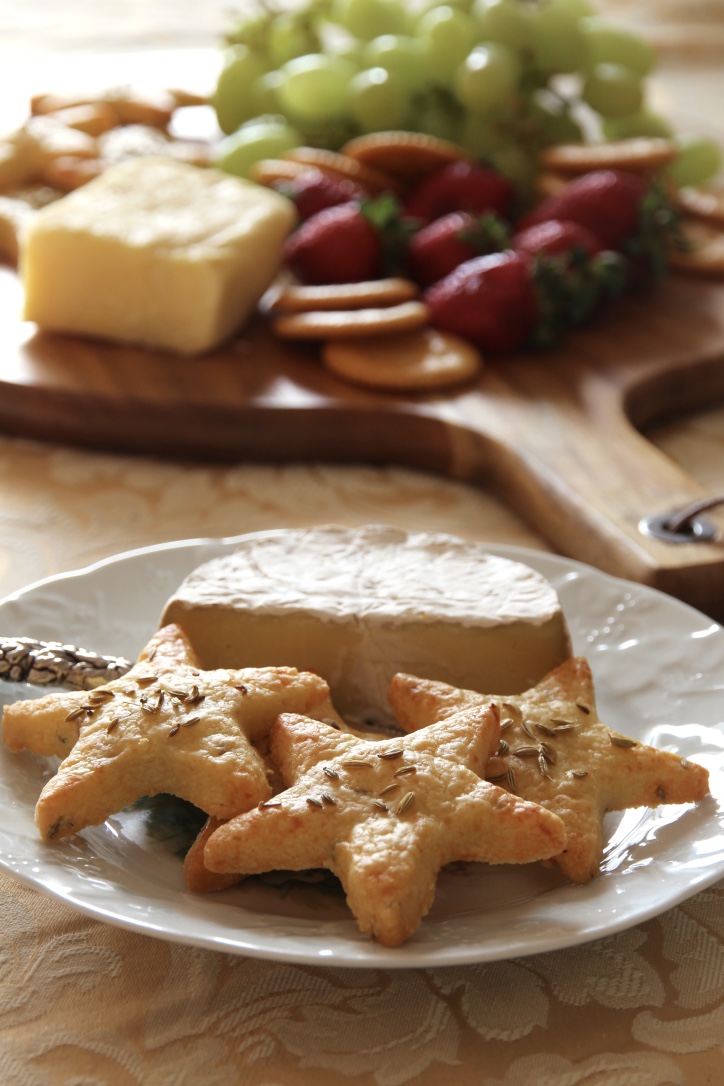
These crumbly, flavoursome biscuits are perfect for entertaining. Try them on a cheese platter or serve by themselves with a good red wine. Delicious!
Ingredients (makes ~35 medium stars) 120g parmesan cheese, roughly chopped
1 cup plain flour
1 tablespoon cornflour
150g cold butter, chopped
2⅓ teaspoons fennel seeds, plus extra for decoration
1 tablespoon milk, plus extra for brushing
Blitz the parmesan in a food processor until finely grated. Add flour and cornflour and process until combined. With the motor running, add the butter and blitz until fine crumbs form. Add fennel seeds and milk and blitz until a dough forms.
Turn out onto a lightly floured surface and knead for 20 seconds. Cover dough in Gladwrap and refrigerate for 30 minutes.
Preheat oven to 180°C (~160°C fan-forced). Line 3 baking trays with baking paper.
Roll dough out with a rolling pin until approximately 5mm thick. Cut out medium stars (or other shape of your choosing) and place on prepared trays. Brush each biscuit with a small amount of milk and sprinkle with extra fennel seeds.
Bake for 12-15 minutes or until golden. Enjoy!
Adapted from Donna Hay’s ‘Fennel and Parmesan Biscuits’.
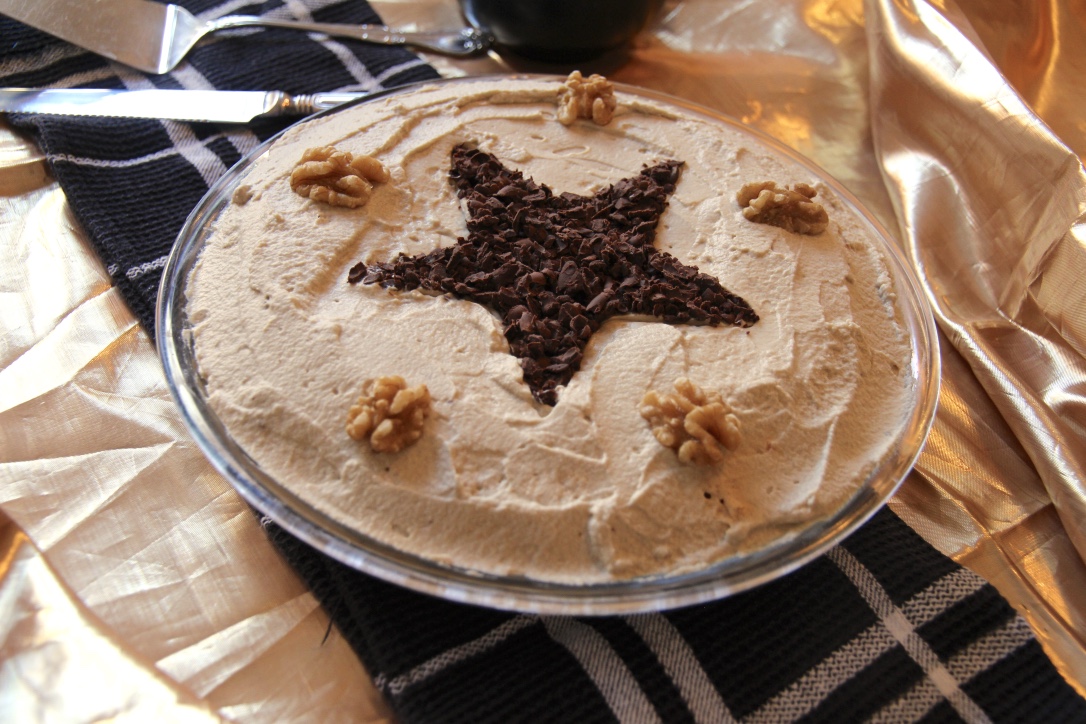
While the ingredients for this torte look a little odd (particularly the Jatz biscuits!) the end result is absolutely delicious – the torte is crisp on the outside and chewy on the inside with a subtle coffee flavour. It’s a firm family favourite that always disappears far too quickly.
Ingredients (serves 6-8) 3 egg whites
1 cup caster sugar
½ teaspoon white vinegar
1 teaspoon vanilla extract
20 Jatz biscuits, crushed
⅔ cup walnuts
1 tablespoon icing sugar
½ teaspoon vanilla extract
1 teaspoon instant coffee (dissolved in a small amount of water)
1 cup cream
Chocolate shavings (to decorate)
Walnuts (to decorate)
Preheat oven to 180°C (160°C fan-forced). Line a 9″ pie plate with baking paper.
Beat egg whites until stiff peaks form. Gradually add caster sugar, vinegar and vanilla and beat until very stiff. Fold in Jatz biscuits and walnuts. Spread in prepared pie plate and smooth the top.
Bake for 35 minutes. Prop open the oven door and allow to cool in the oven for approximately 20 minutes. Then transfer to a wire rack and allow to cool completely. Trim the baking paper so it can no longer be seen.
To make the coffee cream, add icing sugar, vanilla, coffee and cream to a medium bowl and bit until thickened and stiff.
Spread generously over the cooled torte and, if desired, decorate with chocolate shavings and extra walnuts. Keep in the fridge until ready to serve. Enjoy!
This cheat’s apple pie uses pre-made pastry which allows you to spend more time decorating. I used pink lady apples because that’s what we had in the house, but it would work well with granny smith apples instead (but you may want to add in a little more sugar). Happy baking!
Ingredients (serves 8) 5 medium apples peeled, cored and chopped into cubes ½ cup water ¼ cup caster sugar 2 teaspoons lemon rind 3 teaspoons ground cinnamon 3 sheets shortcrust pastry, thawed 1 egg, lightly beaten
Method
Grease a 25cm pie dish. Preheat oven to 180°C.
Peel, core and chop your apples. Place the apples and the water in a large saucepan and bring to the boil. Reduce the heat and simmer, covered, for about 6-7 minutes or until the apples soften. Drain all water. Stir in sugar, lemon rind and cinnamon.
Line pie dish with pastry (you may need to join 2 pieces together) and prick the bottom with a fork. Top with baking paper and pie weights or rice and bake for approximately 20-25 minutes or until lightly golden. Remove the pie weights and allow to cool.
Meanwhile, use the offcuts from the first 2 pieces of pastry to cut out leaves and flowers using cookie cutters.
Using the third piece of pastry, cut 6 thin strips, 2 thick strips and 6 very thin strips (to form 2 braids). Use the excess pastry to cut more leaves and flowers.
Spoon the apple mixture into the cooled pie base. Top with pastry strips and braids in a woven lattice design. Use the pastry leaves and flowers to decorate the edges. Gently brush the pastry with the beaten egg.
Bake for 25-35 minutes or until pastry is golden and crisp. Serve with cream or ice-cream. Enjoy!
Adapted from the Australian Women’s Weekly ‘Apple Pie’.
This banana bread is super simple to make and is a perfect way to use up ‘dead’ bananas. It travels well so is great in kids’ lunch boxes, and will last for ~2 months in the freezer.
Ingredients (serves 8-10) 125g butter, softened
¾ cup caster sugar
2 eggs
2 teaspoons vanilla essence
3 overripe bananas
1 ¾ cups plain flour
1 teaspoon bicarb soda
½ cup milk chocolate chips (optional)
Method Preheat your oven to 180°C (160°C fan-forced). Grease and line a 1-litre loaf pan.
Cream the butter and sugar with a handheld mixer until pale and thick. Beat in the eggs, vanilla and banana, followed by the flour and bicarb soda, beating until just combined. If desired, stir through the chocolate chips until evenly dispersed.
Pour the mixture into your prepared pan, smooth over the top and then bake for 55-60 minutes or until a skewer inserted in the thickest part of the bread comes out clean.
Allow to cool in the tin for 5 minutes before transferring to a wire rack to cool completely.
Enjoy! I love mine fresh for the first few days and then toasted with a bit of margarine.
Adapted from Matt Preston’s “Rock Star Banana Bread” from his Cook Book.
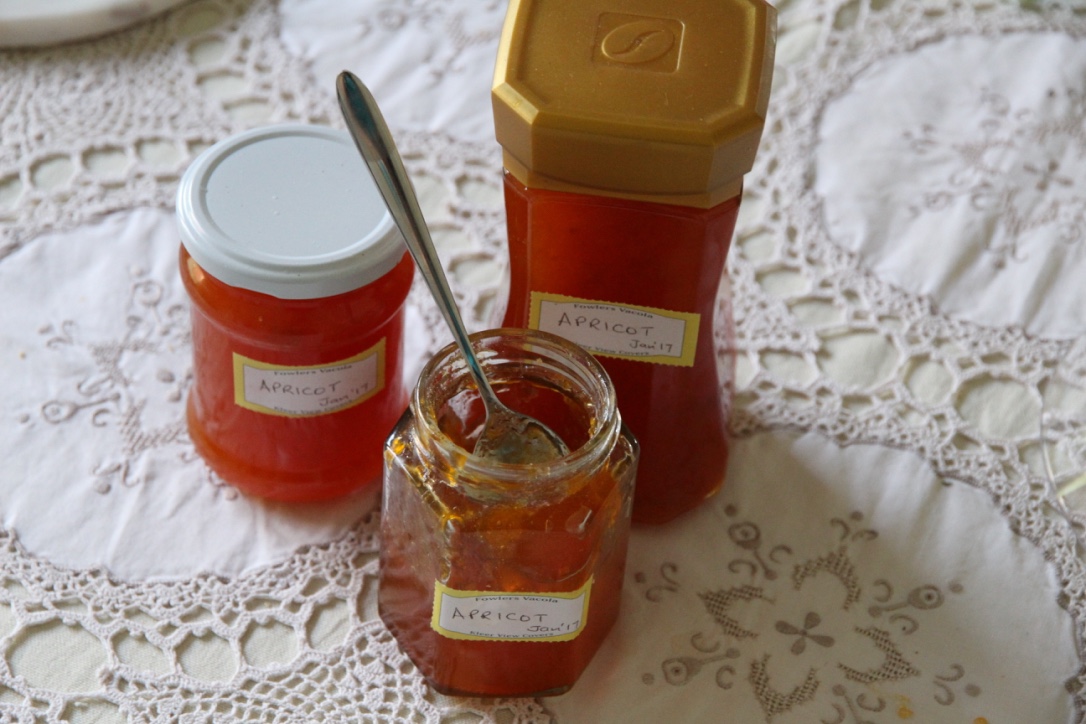
One of our traditions when we go down to the family beach house at Victor Harbor is to eat homemade apricot jam on toast for breakfast while enjoying the sea view and, when we’re lucky, watching dolphins frolic in the waves.
The view from the house
Because I have such fond memories associated with it, apricot is my favourite jam flavour, especially when homemade with local (or even better homegrown) apricots. This is Mum’s recipe and makes approximately 4 cups of sweet and tangy apricot goodness.
Ingredients (makes 4 cups) 1kg fresh apricots, halved with the kernels removed
1 vanilla bean, halved lengthways
1 cup water
1kg white sugar
Method Sterilise jars by putting them and their lids through the hottest cycle of your dishwasher without detergent, or by standing the jars in the oven on the lowest temperature for 30 minutes.
Combine apricots, vanilla and water in a large saucepan. Bring to the boil. Reduce heat, and simmer, covered, for about 15 minutes or until pulpy.
Add sugar and stir over a high heat, without boiling, until the sugar dissolves. Bring to the boil and boil, uncovered and without stirring, for around 35 minutes or until the jam jells when tested.
Discard the vanilla bean and pour the hot jam into sterilised jars; sealing immediately. Label the jars with the date once cool.
Enjoy! Delicious on toast or scones with cream.
Adapted from the Australian Women’s Weekly ‘Apricot & Vanilla Bean Jam’
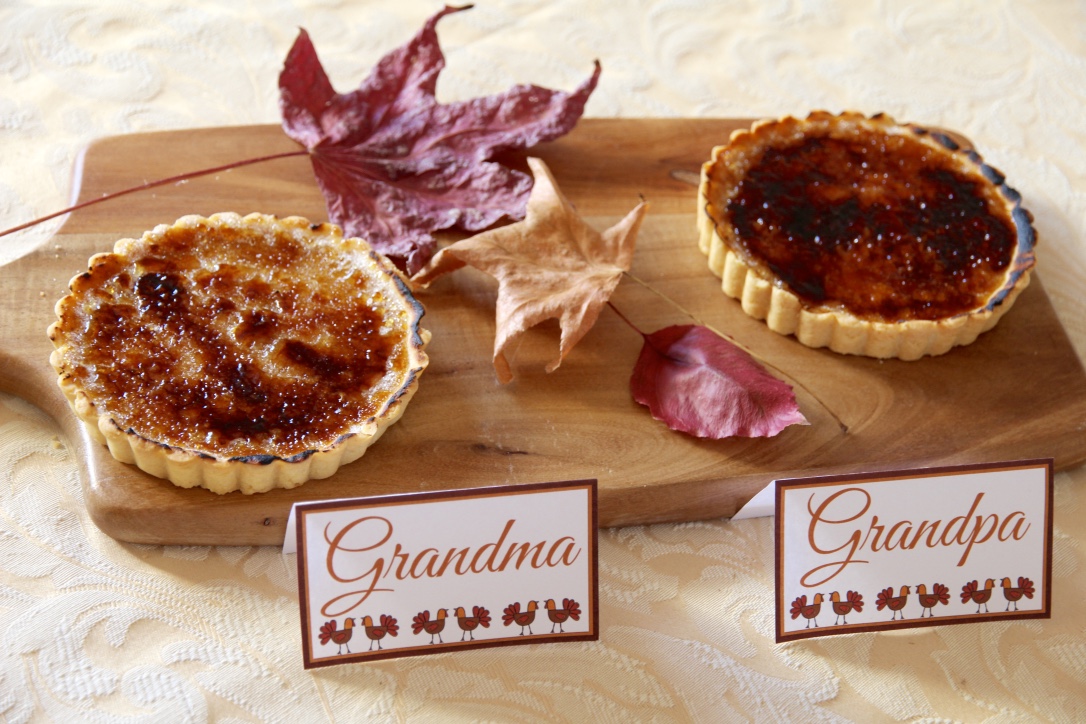
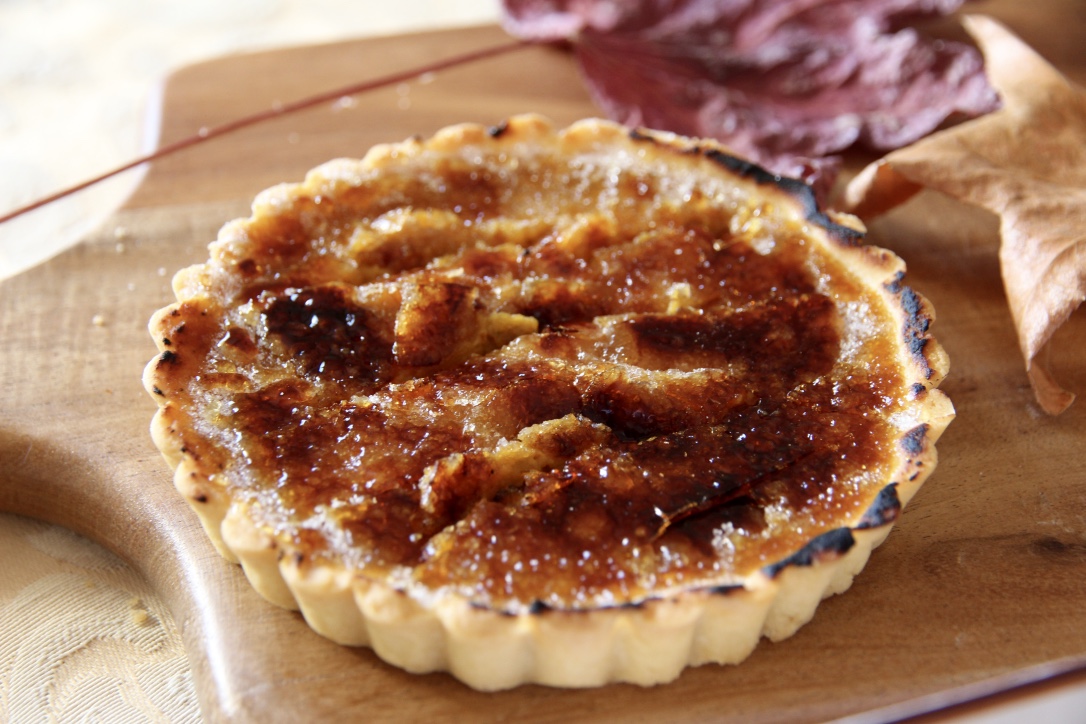
Thanksgiving is almost upon us and while my family doesn’t celebrate it, we have developed a fondness for pumpkin pie since the first pumpkin pie I made for “Chrisgiving” in 2014. To change things up this year, I decided to make individual pies for everyone and for crunch, added a brûlée topping. Yum!
It was my first time using a blowtorch so some bits got a little darker than anticipated – lots of fun though!
Filling 2 cups pumpkin puree (made by roasting 1 whole butternut pumpkin (skinless), blitzing it into a smooth paste in a blender and then putting it in a sieve for an hour to remove the excess juice)
3 large eggs
½ cup sugar
⅓ cup brown sugar
¾ cup cream
1 ½ teaspoons vanilla extract
1 ½ teaspoons ground cinnamon
1 teaspoon ground nutmeg
½ teaspoon ground ginger
¼ teaspoon ground cloves
A pinch of salt
1 quick grind of pepper
Brûlée Topping Caster sugar
Method For the pastry, place flour, butter and icing sugar in a food processor and process until the mixture resembles fine breadcrumbs. Add egg yolk and 2 tblspns cold water and process until the mixture comes together in a smooth ball. Enclose in a plastic wrap and chill for 30mins.
Preheat the oven to 190°C. Grease 8 10cm loose-bottomed tart pans well with margarine and canola oil spray.
Roll out pastry on a lightly floured surface and lift pastry into a tin, easing into the sides & trimming the excess. Repeat with the remaining tins. Chill the pastry in the tins for 15mins. Line the pastry with baking paper and fill with pastry weights. Blind-bake for 10mins, then remove paper and weights and return to the oven for 5mins or until crisp and lightly golden. Allow to cool slightly.
Meanwhile, whisk eggs and sugar until smooth. Add the pumpkin puree, cream, vanilla and spices and stir until all incorporated.
Remove the baking paper and pie weights and pour mixture into pastry cases. Bake pies in the oven for 10 minutes before reducing the heat to 160°C fan-forced and baking for a further 20-25 minutes, or until the filling has set.
Allow to cool completely before gently removing pies from the tins. These can be served without the brûlée topping as mini pumpkin pies.
To create the brûlée topping, sprinkle the tops of the pies liberally with caster sugar and then heat with a blowtorch until the sugar has melted and formed a crisp coating. Serve with ice cream or whipped cream. Enjoy!
Pastry recipe adapted from the delicious. ‘Sweet’ cookbook and pumpkin pie filling recipe from Inspired Taste.net
This fudge is so easy it almost doesn’t qualify as a recipe. 5 ingredients. 5 steps. 5 minutes. Good as gold!
Ingredients (makes ~30 pieces) ¾ cup good quality peanut butter (smooth or crunchy will work)
225g white chocolate
225g dark chocolate
1 teaspoon vanilla extract
pinch sea salt
Method Line a 12 x 22cm loaf pan with baking paper.
Melt dark and white chocolate in separate bowls in the microwave.
Combine half of the peanut butter with the white chocolate and stir until smooth. Add in vanilla extract and sea salt to taste. Combine the remaining peanut butter with the dark chocolate. Allow both mixtures to cool slightly.
Drop alternate spoonfuls of white and dark chocolate mixtures into the pan and shake to level the mixture. To get the swirly marbled effect, pull a skewer through the mixture.
Refrigerate until set. Cut into squares. Enjoy!
Adapted from ‘Easy Peanut Butter Fudge’ from Cadbury Kitchen.