Salted Caramel Cupcakes

I made these cupcakes for a colleague’s birthday using my favourite vanilla cupcake recipe for the cakes, topped with a generous helping of salted caramel buttercream frosting and then drizzled with some extra caramel. The frosting would be equally good on chocolate cupcakes (like my fudgy flourless chocolate cupcakes or these lighter chocolate cupcakes). To make these even more caramel-y, next time I might scoop out a teaspoon or so of cake from each cooked cupcake and fill it with extra caramel (I don’t like to do things by half, okay?!)

thumb_IMG_2153_1024

Ingredients (makes ~30 large cupcakes)
Salted Caramel
250g caster sugar
75ml water
120ml pouring cream
200g salted butter

Vanilla Cupcakes
2 ¾ cups plain flour
2 tspns baking powder
200g butter, softened
1 ¾ cups caster sugar
4 eggs
1 tblspn vanilla extract
1 cup milk

Salted Caramel Buttercream Frosting 
150g salted butter, softened
3 tablespoons salted caramel
6 cups icing sugar
1 tablespoon milk
Sea salt, to taste

thumb_IMG_2146_1024

Method
To make the caramel, heat the sugar and water in a small saucepan over a medium heat. Without stirring much, watch over the sugar until it becomes a light-brown caramel colour (be patient, it does take a little while, but don’t be tempted to leave it as once it colours it colours quickly!)

image1-3

Add the pouring cream, little by little, while gently stirring (be careful while it foams up as it can spit).

Once the cream is fully incorporated, keep stirring on the heat for a further minute or two (if you want to be scientific, heat it until it reaches 108°C on a sugar thermometer).

image2-2

Remove from the heat and add the butter in small pieces. Stir until smooth and then set aside.

image3-3

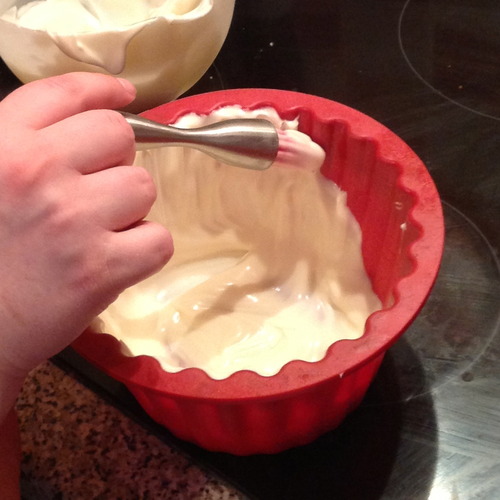
Preheat the oven to 170°C (150°C-ish fan forced). Line two 12-hole muffin trays with patty pans.

To make the cupcakes, sift together the flour and baking powder. In a different bowl, cream the butter for 1-2 mins. Add the caster sugar about a third at a time, beating for 2mins after each addition. After the last of the sugar has been beaten, beat until the mixture is light and fluffy and the sugar dissolved. Add the eggs one at a time, beating for 1 min after each addition or until the mixture is light and fluffy. Add the vanilla and beat until just combined.

Add approximately a third of the flour mixture to the creamed mixture and beat on a low speed until combined. Add half of the milk and beat until combined. Repeat this process until all of the flour and milk is thoroughly combined but be careful not to overbeat (this will toughen the mixture).

Spoon mixture into the patty pans (filling each about ¾ full) and bake for about 18-20mins or until the top springs back when touched. Remove the cupcakes from the trays immediately and cool on a wire rack for at least half an hour before icing.

To make the frosting, cream the butter for 1-2 mins in a large bowl using an electric mixer. Add 2 tablespoons of the salted caramel, a pinch of salt and half of the icing sugar and beat until the mixture is light and fluffy. Add a further 2 tablespoons of caramel and the remaining icing sugar and beat until combined and of a spreadable consistency – add a splash of milk if too dry, more icing sugar if too wet, and add more salted caramel and salt as required until you’re happy with the flavour.

Add frosting into a piping bag fitted with desired nozzle (I used my Wilton 2B tip) and pipe a generous amount of frosting onto each cupcake. Drizzle each cupcake with the remaining salted caramel (I heated mine again so it was easier to drizzle) and enjoy!

thumb_IMG_2141_1024

Salted caramel recipe adapted from ‘Secrets of Macarons’ by José Marechal.

Vanilla cupcake and base buttercream recipes adapted from the Crabapple Bakery Cupcake Cookbook.

Advertisement

Chocolate Mint Sundae Cupcakes

Chocolate and mint are a match made in heaven and these cupcakes combine them in one deliciously compact package. The cupcakes are a dark chocolate mudcake which, to me, are the perfect blend of light and rich. They are then topped with a generous layer of fluffy mint buttercream (which tastes exactly like peppermint ice-cream I might add), melted dark chocolate and a crumbled Flake bar – what’s not to love?! These are also a gorgeous shade of green – perfect for St Patrick’s Day!

thumb_IMG_1481_1024

Ingredients (makes 12)
90g softened butter
1 cup brown sugar, firmly packed
2 eggs
⅔ cup self-raising flour
2 tablespoons cocoa powder
⅓ cup almond meal
⅔ cup water
60g dark chocolate melts, melted

Peppermint Buttercream Frosting
125g butter, softened
1 ½ cups icing sugar
2 tablespoons milk
Peppermint essence
Green food colouring

To decorate
1 large Flake bar, crumbled
30g dark chocolate melts, melted

thumb_IMG_1480_1024

Method
Preheat the oven to 170°C (150°C fan-forced). Line a 12-hole muffin tin with patty pans.

Beat butter, sugar & eggs in a large bowl with electric mixer until light and fluffy. Add in sifted flour and cocoa, almond meal, water and melted chocolate.

Fill each patty pan approximately ⅔ of the way full. Bake for around 25 minutes or until a skewer inserted comes out clean. Stand cakes in tin for 5 minutes before transferring them to a wire rack to cool.

Once cakes are fully cool, you can make the frosting. Beat butter in a medium bowl with electric mixer until light and fluffy. Beat in icing sugar and milk and a drop each of peppermint essence and green food colouring  (or until desired colour and flavour reached).

Ice cupcakes with a generous layer of frosting. To decorate, dollop each cupcake with dark chocolate and spread it so that it looks as though it is dripping slightly down the cakes. Top with crumbled Flake.

Enjoy!

thumb_IMG_1477_1024

Adapted from The Australian Women’s Weekly ‘Cupcakes by Colour’ cookbook

Giant Vanilla Cupcake

I haven’t made a giant cupcake for about 18 months but I’m so glad I found my giant cupcake cases again because they’re so much fun to make (and eat!) They’re also really easily adaptable as you can make them any flavour you like and decorate them in a million different ways. This time I’ve used buttercream roses but you could ice it as simply (or complexly) as you like – there’s a link to my fondant ‘soft serve’ icing instructions at the bottom of the page.image1-16

Ingredients (serves 10-12):
Cake
375g butter, softened
375g caster sugar
6 eggs
1 tablespoon vanilla extract
375g self-raising flour
3 tablespoons milk

Cupcake Case
375g white chocolate melts or Wilton candy melts

Buttercream icing
250g butter, softened
800g icing sugar
1 ½ tablespoons vanilla extract
4 tablespoons of milk
Food colouring

image1-17

Method
Spray silicone giant cupcake pan liberally with canola oil and preheat oven to 160°C fan-forced.

Cream together butter and sugar with an electric mixer until light and fluffy. Add in vanilla and then eggs, one at a time, ensuring that each egg is fully incorporated before adding the next. Add in half of the flour followed by two tablespoons of the milk, and then add remaining flour and milk. Mix until just combined.

Fill the giant cupcake pans, starting with the cupcake top. Fill until approximately 2cm shy of the top of the pan. Then fill the bottom pan with the remaining batter.

Bake in the oven for between 40-70 minutes, checking regularly. Note: the cupcake top will bake faster than the bottom so take it out before the bottom is done. The cake is ready when a skewer inserted into the middle of the cake comes out clean.

Leave cakes in their pans for at least 20 minutes before gently peeling the silicone off and allowing the cakes to cool completely on a cooling rack.

jan-proj3-041-Copy
Image credit: The Pink Whisk

While the cakes are cooling, wash and dry the bottom cupcake pan ready to make the cupcake case. Melt half the chocolate/candy melts and pour into the bottom cupcake pan. Spread evenly up the sides using a pastry brush. Refrigerate for 20 minutes and then repeat with the remaining melts. Refrigerate for 30 minutes and then gently peel off the silicone mould.

tumblr_inline_mmyiwlTG1X1qz4rgp
Image credit: She Who Bakes
tumblr_inline_mmyixnTdp41qz4rgp
Image credit: She Who Bakes
tumblr_inline_mmyj0njISG1qz4rgp
Image credit: She Who Bakes

Using a serrated bread knife, trim around bottom cake so all crunchy edges are removed. Level top (of base) and then cut base in half. Cut off bottom layer off top piece. Level base (of top).

Make buttercream by beating all ingredients but the food colouring until light and fluffy. Set half aside for the crumb coat, and then add the food colouring to the remaining buttercream.

Put a 1cm thick coating of the uncoloured buttercream between 2 bottom layers of cake and then between the base and top (ensure level – cut if necessary). Then put a thin layer of buttercream on the inside of the chocolate case and gently ease cake into it. Cover top of cake liberally with buttercream to form a protective barrier against crumbs.

image1.PNG-2

Put the coloured buttercream into a piping bag fitted with a Wilton 2D nozzle (to make roses) or equivalent, and pipe icing in a rose swirl pattern, starting from the bottom of the cake and working your way up.

Decorate with icing flowers, sprinkles, silver cachous, glitter… basically whatever you like!

image2-15

Alternatively, if you’d prefer a soft-serve, fondant look. Halve the buttercream recipe to only make the crumb coat & then follow these directions: https://bakerholicsanonymous.wordpress.com/recipes-2/cakes/giant-cupcake/

Recipe adapted from ‘Vanilla Giant Cupcake Recipe’ by The Pink Whisk

Red Velvet Christmas Cupcakes

image2-9

Wow! Only a week and a day until Christmas 🙂 It’s warming up around here which means that having the oven on and heating the house isn’t ideal and so I’ve had a couple of organised baking spells to try and minimise the amount of oven time.

I made these cupcakes yesterday for an afternoon tea with friends and they’re easy and delicious (and still soft & moist today).

For decorations, go as crazily festive as you like. There are plenty of cute Christmas sugar icing decorations that are cheap and readily available, you could make up a range of different coloured icings and pipe a wreath on them or something along those lines (if you can be bothered), or do as I did, and cut out some holly out of ready-made fondant icing.

Of course, these cupcakes aren’t reserved just for Christmas time, they would work equally well as birthday cupcakes with piped icing and candles!

image3-2

Ingredients (Makes 24)
Cupcakes
150g softened butter
⅔ cup caster sugar
2 tspns vanilla extract
2 eggs
1 ⅓ cups self raising flour, sifted
4 tblspns cocoa, sifted
½ cup buttermilk
1 ½ tblspns of good quality red food colouring (I use Wilton’s, you may need to adjust the amount depending on the brand you use)

Cream Cheese Icing
500g cream cheese, chopped
100g butter, softened
1 tspn vanilla extract
1 ½ cups icing sugar
2 tblspns milk

To Decorate
Ready made white fondant icing
Red food colouring
Green food colouring
Holly leaf cutter (or stencil)
Sharp Knife

image2-10

Method
Preheat oven to 160°C fan-forced. Place butter, caster sugar and vanilla into a large bowl and beat with electric mixer until pale and creamy. Add the eggs, beating until well combined. Add the flour, cocoa, buttermilk and food colouring and beat on a low speed until just combined.

Divide mixture into cupcake tins lined with (green) patty pans. Bake for 15-20 minutes (depending on your oven) or until a skewer inserted into the middle of the largest cupcake comes out clean. Allow to cool completely on a wire rack.

image2-7

While the cupcakes are cooking and cooling, divide half of the fondant icing into 2 and colour one lot vibrant red, and the other a deep (holly-ish) green. Roll out the green fondant with a rolling pin and cut out 48 holly leaves. Then, using a sharp non-serated knife, mark out a leaf pattern by running the knife through the centre so that it leaves an incision but does not cut through. Then cut diagonal incisions from the centre out so that it looks like the veins of a leaf (see picture below).

image2-11

Pull small pieces of the red fondant off and roll into 48 small balls to make the holly berries.

image1-8

Once the cupcakes are almost completely cool, start making the cream cheese icing. Place the cream cheese and butter into a large bowl and beat with an electric mixer for 8-10 minutes. Add the icing sugar and vanilla and beat for a further 5 minutes or until completely smooth. Add the milk and beat until just combined.

Ice each cupcake with a generous amount of icing and top with 2 leaves and 2 berries. Enjoy!

image3

Recipe adapted from Donna Hay’s recipe ‘red velvet cupcakes with sugared cranberries’.

Giant Chocolate Cupcake

I love giant cupcakes. They’re so much fun to make, decorate and, more importantly, to eat. This recipe is for quite an intricate giant cupcake but it is easily adaptable – if you don’t want the bother of working with fondant you can just double the buttercream and ice the cake with that. The cupcake case is also optional (but I think makes the end product look so much more professional). Of course, you could also make the cake batter from scratch but do keep in mind that it is quite a time-consuming process already and the box mixes are relatively stable and so good for cutting and shaping.

The cupcake easily serves 10 adults and would be perfect for a kid’s party serving up to 20 children who have eaten other party food.

1240264_10151808035564463_1688643197_n

Equipment
Silicone giant cupcake kit
Turntable
Serving plate
Pastry brush

Ingredients
Wilton candy melts
2 boxes chocolate mud cake mix

400g sifted icing sugar
1-2 tablespoons milk
2 tspns vanilla extract
125g unsalted butter

White fondant icing
Blue food colouring
Red food colouring
Yellow food colouring
Large sprinkles (pre-made using fondant)
1 red gumboil

Method
Make cupcake case by pouring a small amount of melted melts into the silicone bottom case and, using a pastry brush, spreading it until the entire inside of the case is thinly coated. Refrigerate for 20mins and repeat. To remove from silicone once completely set, loosen by pulling  & pinching edges away from the chocolate & then gently peel down the sides of the mould.

Image

Make cake according to packet instructions and fill greased (spray oil) cases 2/3 full. Bake in moderate oven (175°C) for 40-70 mins (bottom will need longer than top) or until an inserted skewer comes out clean. Leave in silicone moulds for at least half an hour or until cool. Then carefully peel off silicone, ensuring the cake is supported at all times.

Using a serrated bread knife, trim around bottom cake so all crunchy edges are removed. Level top (of base) and then cut base in half. Cut off bottom layer off top piece. Level base (of top).

Make buttercream by beating ingredients until light and fluffy.

Put a 1cm thick coating of buttercream between 2 bottom layers of cake and then between the base and top (ensure level – cut if necessary). Then put a thin layer of buttercream on the inside of the chocolate case and gently ease cake into it.

Cover top of cake liberally with buttercream to form a protective barrier against crumbs.

Image

Transfer cake onto a cake board on a turntable. Make a thin sausage out of white fondant (or a thick one for a really cartoon-ish soft serve effect) and put on cake in a spiral manner to achieve a ‘soft serve effect’ in the end.

photo-12

Roll out fondant until thin & large enough to cover top of cake and gently place on the cake. Gently massage fondant onto cake, hugging the curves & taking particular care not to pleat the fondant. Cut off excess if necessary and tuck the bottom up so all buttercream is concealed. Decorate with giant “sprinkles” made from red, yellow & blue fondant icing and place the gumball as a cherry on top.

photo-16-e1338942811453

Image