Lemon Meringue Cupcakes

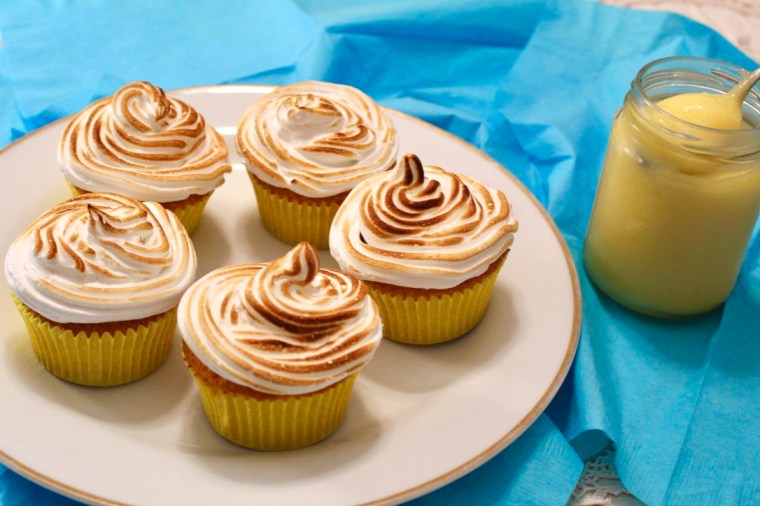
It should be no secret by now that I love lemon meringue. I already have recipes on the blog for a traditional lemon meringue pie and for mini lemon meringue pies, but until now I haven’t had lemon meringue cupcakes.

Luckily, today is the day I rectify that sad scenario. This recipe is a combination of my butterfly cake recipe with my lemon curd and a lightly toasted meringue topping and the result is delicious!

ZwEIXyDFRKiUKpKOaLmYOg_thumb_14cc

Ingredients (makes 12)
Cupcakes
1 cup (125g) self-raising flour
⅔ cup (125g) caster sugar
125g butter, softened
2 eggs
1 teaspoon vanilla extract
2 tablespoons milk

Lemon Curd
½ cup white sugar
1 egg + 1 egg yolk
½ cup fresh lemon juice (approx. 2-3 lemons)
Zest of 1 lemon
55g butter, melted

Meringue
3/4 cup caster sugar
3 egg whites

RjvgcycDTWqZdV6V1mgQbw_thumb_14ce

Method
Preheat oven to 200ºC and line a 12-hole muffin tin with yellow patty pans.

Put all of the ingredients except for the milk into a food processor and blitz until smooth. Pulse while adding the milk until just combined.

Divide batter evenly among the patty pans (I know it doesn’t look like much batter, but they will rise a lot).

Bake for 15-20 minutes or until a skewer inserted comes out clean. Transfer immediately onto a wire rack to cool completely.

While the cakes are baking, start making the lemon curd. Whisk together the sugar, egg and yolk in a large microwave safe bowl until thoroughly combined. Whisk in lemon juice, zest and melted butter.

Cook the curd in the microwave on full power for 50 second intervals, whisking after each interval. You will know your lemon curd is ready when it coats the back of a metal spoon (approximately three 50 second intervals). Allow to cool completely.

Once the cakes and curd are completely cool, use a teaspoon to dig a hole in the centre of each cupcake. Fill the holes with the lemon curd and set aside.

To make the meringue, whisk the egg whites in a clean, dry bowl until soft peaks form. Continue whisking, gradually adding the sugar, 1 tablespoon at a time. Continue whisking until sugar dissolves.

Use a piping bag with a star or plain nozzle to pipe meringue over cupcakes. Use a cook’s blowtorch to lightly toast the meringue. Enjoy!

8OQU0WhdT62FrX85rRILNQ_thumb_14c8

Notes:
– If you don’t have a blowtorch, simply bake the frosted cakes on an oven tray at 220ºC for 3-5 minutes or until the meringue is toasted.
– Any extra lemon curd can be stored in a sterilised container in the fridge for up to 2 weeks.

STHQ8HcJSZCShKst33UmNw_thumb_14c5

Cupcake recipe from Nigella Lawson’s How to be a Domestic Goddess
Lemon curd recipe from My Baking Addiction
Meringue recipe from Taste.com.au

Advertisement

Christmas Wreath Cupcakes

thumb_img_2654_1024

Ingredients (makes 24)
24 cupcakes of your desired flavour (red velvetflourless chocolate or Christmas spice work well)
250g butter, softened
3 cups icing sugar
4 tablespoons milk
Optional: Peppermint essence
Green food colouring
Red mini M&Ms

thumb_img_2651_1024

Method
Beat butter in a medium bowl with electric mixer until light and fluffy. Beat in icing sugar, milk, and, if desired, 1-2 drops of peppermint essence.

Spread thin layer of the frosting over each cupcake.

Colour remaining icing with 1-2 drops of green food colouring. Spoon into a piping bag with a star attachment and pipe icing in a ring around the edge of the cupcakes to make a wreath. Top with red M&Ms. Enjoy!

thumb_img_2658_1024

#birthdaycakegoals & My Baking Inspiration

I intended to do this as a Mother’s Day tribute… then to post it around my Birthday… but this year has got away from me, and it has only been this weekend while sorting through old photos that this post has been able to become a reality.

A lot of people ask me where I get my motivation to bake from and how I can be bothered to take the time necessary to make my creations look good. Well, the answer is simple: my Mum is my biggest baking inspiration, and I attribute much of my motivation to her exquisite birthday cake creations over the years which are a feast for the eyes as much as for the tastebuds.

While I agree that it’s the taste of the food that counts the most, I think we “eat with our eyes” (to borrow an old MasterChef cliché) and how food is presented really does matter, as it can enhance or detract from the whole experience. I also really enjoy the challenge and creativity involved in making my food look as good as I can and find it as, if not more, fulfilling than eating the end product!

Without further ado, I present to you a small selection of Mum’s finest cakes from my childhood, the very creations that inspired my love of baking (please excuse the 90s-00s photo quality):

Hand made figurines for my Peter Rabbit themed 4th Birthday party.

thumb_img_4064_1024Bananas in Pyjamas cakes for my sister Laura’s 2nd Birthday

thumb_img_4059_1024
My gorgeous 1st Birthday cake 

thumb_img_4073_1024A beautiful fairytale castle cake for Laura’s 4th Birthday 

thumb_img_4062_1024An Ariel cake for my mermaid-themed 5th Birthday party

thumb_img_4068_1024A sleeping dragon cake for my magical 7th Birthday party 

thumb_img_4038_1024A Johnson cake (from Johnson and Friends) for my 3rd birthday 

thumb_img_4075_1024A ‘Forever Friends’ cake for Laura’s 5th Birthday

thumb_img_4106_1024The cake for my 10th Birthday ten-pin bowling party

thumb_img_4104_1024A Shirley Barber inspired fairy cake for my 6th Birthday party

thumb_img_4096_1024A ‘Spot the Dog’ cake for Laura’s 1st Birthday 

thumb_img_4101_1024My 2nd Birthday cake 

thumb_img_4082_1024Laura’s 7th Birthday ballerina cake 

Mum, you’re a superstar! Thank you for the all the incredible memories from my childhood and for putting so much effort in to make each and every birthday feel so special. You’re the very definition of #Mumgoals – I love you so so much xx

Peanut Butter, Caramel & Chocolate Drip Cake

thumb_IMG_2205_1024

This cake is highly over-the-top, but highly delicious. 3 layers of rich dark chocolate cake slathered in salted caramel sauce and peanut butter frosting, draped in chocolate ganache and topped with all things good: honeycomb, caramel macarons, peanut brittle, maltesers, snickers pods, jersey caramels and caramel popcorn.

thumb_IMG_2210_1024

Ingredients (serves 16)
Chocolate Layer Cake
2 boxes dark chocolate cake ( I used Betty Crocker moist devil’s food cake)

Salted Caramel Filling 

Peanut Butter Frosting
1 ½ cups smooth peanut butter
375g butter, softened
6 teaspoons vanilla extract
6 cups icing sugar
3 tablespoons milk

Dark Chocolate Ganache
170g dark chocolate melts
¾ cup cream
1 ½ teaspoons corn syrup

Toppings
1 x packet Snickers pods
1 x packet caramel popcorn
1 x packet jersey caramels (halved diagonally)
1 x packet peanut brittle
1 x packet Maltesers
Salted caramel macarons (optional)
Honeycomb

thumb_IMG_2219_1024

Method
Make 4 cakes, according to packet instructions, by halving the batter from each cake mix. Carefully trim cooked cakes where necessary to ensure they are perfectly flat, and use the best 3 (freeze the 4th for another time, or add a 4th layer if you really want to impress).

To make the frosting, beat peanut butter and butter until smooth. Add vanilla and slowly add the icing sugar. Add the milk and beat until just combined.

Spread a generous layer of frosting onto the bottom cake layer, and then top with caramel filling. Repeat with the remaining layer/s.

image2-7.JPG

Spread frosting onto the top and sides of the cake – don’t worry if you get crumbs in it, this is called the crumb coat. Using a spatula or protractor (as I did!), scrape off excess frosting so you have a thin smooth layer.

Refrigerate cake for 30 minutes or until frosting is firm. Add a second layer of frosting onto the top and sides of cake, using the protractor again to scrape off the excess and create a smooth finish. Refrigerate for a further 30 minutes.

thumb_IMG_2187_1024

Place chocolate melts into medium bowl and set aside. Heat cream in a saucepan over medium-high heat just until it almost starts to simmer. Remove from heat and pour over chocolate. Let sit for about 5 minutes and then stir with a wooden spoon until chocolate is completely melted and smooth. Stir in corn syrup.

Use a spoon to add a few purposeful drips over the top edge of the cake. Then spoon more ganache on top of the cake, allowing it to drip at varying points around the cake.

Top cake with honeycomb, caramel popcorn, maltesers, jersey caramels, pods and macarons. Enjoy!

thumb_IMG_2238_1024

thumb_IMG_2199_1024

Easter Cupcakes 3 Ways

Wow, I can’t believe it’s only 1 week until Easter Sunday!

Here are 3 simple ways to decorate cupcakes for Easter. I used my favourite dark chocolate mud cupcake recipe for the cakes, but they would be equally delicious vanilla or any other flavour of your choice! When I made mine, I just made one batch of the cakes and divided each of the frosting recipes by a third, but feel free to triple the cake recipe if you want 3 full batches, or pick and choose which decorations you’d like 🙂

thumb_IMG_1454_1024

Dark Chocolate Mud Cupcakes Ingredients (makes 12)
90g softened butter
1 cup brown sugar, firmly packed
2 eggs
⅔ cup self-raising flour
2 tablespoons cocoa powder
⅓ cup almond meal
⅔ cup water
60g dark chocolate melts, melted

Method
Preheat the oven to 170°C (150°C fan-forced). Line a 12-hole muffin tin with patty pans.

Beat butter, sugar & eggs in a large bowl with electric mixer until light and fluffy. Add in sifted flour and cocoa, almond meal, water and melted chocolate.

Fill each patty pan approximately ⅔ of the way full. Bake for around 25 minutes or until a skewer inserted comes out clean. Stand cakes in tin for 5 minutes before transferring them to a wire rack to cool.

thumb_IMG_1442_1024.jpg

Dark Chocolate Easter Nest Cupcake Ingredients (makes 12)
Dark chocolate frosting: 
125g butter, softened
1 ½ cups icing sugar
2 tablespoons dutch cocoa powder
2 tablespoons milk

Chocolate Easter Nests
1x 100g packet Chang’s Original Fried Noodles (or equivalent)
2 tbspns crunchy peanut butter
200g dark chocolate melts
1 bag of Cadbury “Mini Eggs” (or equivalent)

Method
To make the nests, microwave peanut butter and chocolate until melted. Mix until it is a smooth paste. Add the noodles and coat them well.

Spoon the mixture onto grease-proof paper and shape into nests small enough to fit on top of your cupcakes. Top with three mini eggs and then place in the refrigerator until set.

While the nests are setting, make the frosting. Beat butter in a medium bowl with electric mixer until light and fluffy. Beat in icing sugar, cocoa and milk in two batches. If the frosting is too stiff, add more milk. If it’s too runny, add more icing sugar or cocoa.

To decorate, spread each cupcake generously with frosting and top with a nest.

IMG_3536

Bright Springtime Easter Cupcake Ingredients (makes 12)
Vanilla frosting:
125g butter, softened
1 ½ cups icing sugar
2 tablespoons milk
2 teaspoons vanilla essence (or flavouring of your choice)
Green food colouring

To decorate:
Wilton grass icing nozzle tip
1 bag of Cadbury “Mini Eggs” or equivalent

Method
To make the frosting, beat butter in a medium bowl with electric mixer until light and fluffy. Beat in icing sugar, vanilla and milk in two batches. Add green food colouring until desired colour is reached (start slowly, the colouring is often very strong!) If the frosting is too stiff, add more milk. If it’s too runny, add more icing sugar.

Spoon frosting into a piping bag with a grass tip attachment. Pipe frosting vertically onto the cupcake until each cupcake is fully covered. Top with 3 mini eggs.

thumb_IMG_1433_1024

Bunny Behind Cupcake Ingredients (makes 12)
Vanilla frosting:
125g butter, softened
1 ½ cups icing sugar
2 tablespoons milk
2 teaspoons vanilla essence (or flavouring of your choice)
Green food colouring

Decorations
12 Ferrero Raffaello white chocolate truffles (or equivalent)
36 white mini marshmallows
Pink icing pen (or alternatively use pink icing, fondant or melted pink candy melts)
Milo (Australian malt powder) or crushed chocolate biscuits, for the soil

Method
To make the frosting, beat butter in a medium bowl with electric mixer until light and fluffy. Beat in icing sugar, vanilla and milk in two batches. Add green food colouring until desired colour is reached (start slowly, the colouring is often very strong!) If the frosting is too stiff, add more milk. If it’s too runny, add more icing sugar.

Top each cupcake with a generous layer of frosting, but be sure to leave aside a small amount of frosting to use as ‘glue’. Smoothe the top of each cupcake so you have a flat surface to work with. Sprinkle milo or crushed chocolate biscuits onto the frosting (but leave a border of green around the edge); this makes the ‘soil’. Firmly place a Raffaelo truffle into roughly the centre of your soil on each cake.

To make the tails, shape mini marshmallows into spheres and press firmly down. Attach each tail, using a small amount of frosting (so the green doesn’t show), to the Raffaelos (I chose to do mine to one side but I have seen them work top and centre).

To make the bunny’s feet, flatten 2 white marshmallows per bunny and squeeze in the centre to give a foot-like shape. Using your icing pen, draw on foot and toe-pads. Attach, toes down to the Raffaelos using a tiny amount of icing on the top back-side of each foot.

thumb_IMG_1454_1024

Frosting recipes adapted from the Australian Women’s Weekly ‘Cupcakes by Colour’ cookbook.


Peanut Butter ‘Pupcakes’

This may seem like an odd thing to post, but anyone who knows me knows that I’m a very devoted ‘dogmother’ to gorgeous toy cavoodle named Bailey:

image4

Bailey turned one on Thursday and we hosted a ‘pawty’ for her at a local dog park (check our her invitations below!!).

Screen Shot 2015-09-07 at 9.59.22 am

To celebrate the occasion I made a batch of mini ‘pupcakes’ iced with Bailey’s beloved peanut butter. There are a huge number of dog-friendly cupcake recipes out there but this one appealed to me as it’s relatively healthy, refined sugar free & uses ingredients I had on hand.

1x the recipe made 4 large cupcakes & 24 mini cakes. The texture is very dense as the the binding agents are banana & apple sauce, but they certainly passed the puppy taste test! They also don’t brown much in the oven (even when they’re done) as there’s no refined sugar to ‘caramelise’, so insert a skewer to ensure they’re cooked.

image1

Ingredients
Coconut oil (to grease pans)
1 ½ cups wholemeal flour (or white flour if desired)
1 ½ teaspoons baking powder
1 very ripe banana, mashed
¼ cup unsweetened apple sauce
1 tablespoon pure maple syrup
1 cup water

To decorate
Organic, smooth peanut butter
Small dog biscuits

image1-2
One of the pawty guests, GB, enjoying a pupcake
image2-3
Bailey eating a pupcake

Method
Preheat oven to 180°C (or 160°C fan-forced). Grease a 24-hole mini muffin tin & 4 holes of a muffin tin, with coconut oil/canola oil.

In a medium bowl, combine flour and baking powder.

In a large bowl, cream the applesauce, banana and maple syrup with electric beaters. Add a quarter of the flour mixture, followed by ¼ cup water and beat until combined. Repeat until all is incorporated.

image3
Bailey was more than happy to taste test!

Spoon the mixture into the prepared tins, filling the mini muffin trays to very near the top and filling the muffin tins ¾ full.

Bake the mini cakes for 10-15 minutes or until a skewer inserted comes out clean. Cook the large cupcakes for approximately 25 minutes.

Once cool, “ice” with a thin layer of smooth peanut butter and top with a dog biscuit.

Watch your furry friend enjoy!

image1

Happy Birthday Bailey!!

image2-19

Recipe adapted from a number online; largely from Morsels & Moonshine.

Vanilla Raspberry Layer Cake

Well.. I lied. I completely intended to blog more in the last few weeks (as evidenced by my last post!) but I’ve just been too busy. I had my 21st Birthday to plan, uni assessments galore, the Psychology ball to organise, and now Laura’s 18th is coming up in a couple of weeks. Yikes, I get exhausted just thinking about it all! However, while I haven’t been blogging, I have been baking.

Here is the cake I made for my 21st Birthday afternoon tea – triple layer vanilla cake with a tangy raspberry filling & super glossy meringue frosting, topped with vanilla bean macarons. The raspberry filling was perfect as, otherwise, this cake was going to be too sweet, so I would certainly recommend leaving it (or perhaps substituting it for a tangy lemon curd if you’re not a raspberry fan) to cut the sweetness from the frosting.

Elise's 21st Birthday 039
Don’t worry, the empty plates in the background didn’t stay empty!

For my 21st birthday cake, I used 2 packets of Betty Crocker’s SuperMoist Vanilla cake mix, with some extra vanilla added so they tasted more ‘home-made’ divided into 3 20cm lined pans. I did this for 2 main reasons; it saved a lot of time (and time was precious as I had so much other cooking to do!), and because it reliably produces an even, stable, fine-crumbed cake that is easy to work with. If you don’t want to use cake mixes, just make a double batch of your favourite vanilla/butter cake and that will work as well 🙂

The raspberry filling needs to be made at least a day ahead but keeps well in the fridge so can be made up to a week ahead.

I also made the macaron shells a couple of days ahead to save me some stress on the actual party day.

The frosting should be made the day of serving as it does not keep particularly well.

Ingredients

For the raspberry filling (make at least a day ahead)
340g frozen raspberries
⅔ cups water
½ cup white, granulated sugar
1 tblspn lemon juice
2 ½ tblspns cornstarch dissolved in ¼ cup of water

For the cake
2 boxes Betty Crocker’s SuperMoist Vanilla cake mix (made following instructions, so add the eggs, milk, butter etc. as specified by the box)
½ tablespoon vanilla extract

For the meringue frosting
6 egg whites
1 ¾ cups caster sugar
2 tblspns liquid glucose (or light corn syrup)
¼ teaspoon cream of tartar
2 teaspoons vanilla extract

For the macarons
https://bakerholicsanonymous.wordpress.com/recipes-2/cookies-biscuits-macarons/vanilla-bean-macarons/

Elise's 21st Birthday 048

Method
To make the raspberry filling:
In a saucepan combine the raspberries, water, sugar, and lemon juice. Bring to boil and simmer for 15-20mins  or until the raspberries have broken down.
Remove the mixture from the heat and strain with a fine mesh sieve. Return the stained mixture to the heat. Dissolve the cornstarch in water. Whisk the cornstarch mix into the raspberry mixture.
Bring the mixture back to a boil and simmer for 5 more minutes, stirring occasionally. Remove from heat and cool completely.
Refrigerate overnight to set.

To make the cakes: Line & grease 3 20cm cake pans. Set oven to temperature specified by the cake mix boxes. Make cakes according to box instructions, add ½ teaspoon of vanilla extract to each cake mix & divide mixture among the three pans. Bake for specified time, or until a skewer inserted comes out clean.

To assemble the cake: Carefully place a cake layer on your serving platter. Top with a generous amount of raspberry filling and spread gently using a spatula to make an even layer. Top with another cake layer and repeat. Finally, top with the final cake, ready to be frosted.

Elise August 2015 111

To make the meringue frosting: Add egg whites, sugar, liquid glucose and cream of tartar, and simmer over a pot of water (not boiling), whisking constantly but gently, until temperature reaches 54°C on a thermometer (be patient, it does get there eventually!).
Beat heated mixture with electric beaters on a low speed for 2 minutes, then increase the speed to medium and beat for 2 more minutes. Increase the speed to high and beat until it is very thick and glossy, about 5 minutes.
Add vanilla and beat to combine.
Frost cake immediately by piling the frosting on top of the cake and, using a metal spatula, gently spreading from the top down. Smoothe as much as possible with your spatula.

Top with 6 macarons, 3 of each colour and a candle (if desired).

Serve each piece with a macaron & enjoy!

Elise's 21st Birthday 048

Elise August 2015 131

Elise August 2015 132

Raspberry filling recipe adapted from: Pinterest (various sources with the same basic recipe)

Meringue frosting recipe adapted from Sweetapolita’s ‘Perfectly Pink Angel Food Cake’ http://sweetapolita.com/2015/05/perfectly-pink-angel-food-cake/

Carrot Cake with Lemon Cream Cheese Frosting

I love this cake, it’s so quick and effortless to put together and is absolutely delicious (also, because it contains carrot it’s basically a salad, right?!). It’s great at any time of year but is particularly good as a treat around Easter for someone who doesn’t like chocolate or for people who are chocolated out!

thumb_IMG_1330_1024

Ingredients (serves 8-10)
1 ½ cups grated carrot (lightly packed)
½ cup chopped walnuts
1 cup plain flour
2 eggs
1 teaspoon bicarb soda
1 cup caster sugar
1 teaspoon mixed spice
¾ cup vegetable oil
½ teaspoon salt
½ teaspoon vanilla

Lemon Cream Cheese Frosting:
40g (1 tablespoon) softened butter
60g cream cheese (e.g. Philadelphia)
1 teaspoon lemon rind
1 ½ cups icing sugar, sifted

To decorate (if desired):
Extra chopped walnuts
The thin end of a small carrot cut into 2 halves
4 sprigs of coriander

thumb_IMG_1336_1024

Method
Preheat oven to 180°C (160°C fan-forced).

Grease an 8″ round cake pan with margarine and line the base with baking paper.

Combine eggs, sugar, oil, vanilla & sifted dry ingredients  in a large bowl & beat on low speed.

Stir in carrots & walnuts. Mix well.

Pour mixture into the prepared cake tin and bake in the oven for approx. 40 – 45mins or until a skewer inserted in the middle of the cake comes out clean.

Let the cake cool in the tin for 5-10 minutes, before placing it on a wire rack to cool completely.

thumb_IMG_1231_1024

To make the cream cheese frosting, beat butter & cream cheese until smooth and creamy. Add in the lemon rind and icing sugar and beat until smooth. Spread evenly over the top and sides of the cake.

If desired, decorate by placing the finely chopped walnuts around the edge of the cake and the carrot pieces in the centre of the cake with two coriander sprigs above each carrot. Enjoy!

thumb_IMG_1337_1024

Recipe from Aunty Cynth

Red Velvet Christmas Cupcakes

image2-9

Wow! Only a week and a day until Christmas 🙂 It’s warming up around here which means that having the oven on and heating the house isn’t ideal and so I’ve had a couple of organised baking spells to try and minimise the amount of oven time.

I made these cupcakes yesterday for an afternoon tea with friends and they’re easy and delicious (and still soft & moist today).

For decorations, go as crazily festive as you like. There are plenty of cute Christmas sugar icing decorations that are cheap and readily available, you could make up a range of different coloured icings and pipe a wreath on them or something along those lines (if you can be bothered), or do as I did, and cut out some holly out of ready-made fondant icing.

Of course, these cupcakes aren’t reserved just for Christmas time, they would work equally well as birthday cupcakes with piped icing and candles!

image3-2

Ingredients (Makes 24)
Cupcakes
150g softened butter
⅔ cup caster sugar
2 tspns vanilla extract
2 eggs
1 ⅓ cups self raising flour, sifted
4 tblspns cocoa, sifted
½ cup buttermilk
1 ½ tblspns of good quality red food colouring (I use Wilton’s, you may need to adjust the amount depending on the brand you use)

Cream Cheese Icing
500g cream cheese, chopped
100g butter, softened
1 tspn vanilla extract
1 ½ cups icing sugar
2 tblspns milk

To Decorate
Ready made white fondant icing
Red food colouring
Green food colouring
Holly leaf cutter (or stencil)
Sharp Knife

image2-10

Method
Preheat oven to 160°C fan-forced. Place butter, caster sugar and vanilla into a large bowl and beat with electric mixer until pale and creamy. Add the eggs, beating until well combined. Add the flour, cocoa, buttermilk and food colouring and beat on a low speed until just combined.

Divide mixture into cupcake tins lined with (green) patty pans. Bake for 15-20 minutes (depending on your oven) or until a skewer inserted into the middle of the largest cupcake comes out clean. Allow to cool completely on a wire rack.

image2-7

While the cupcakes are cooking and cooling, divide half of the fondant icing into 2 and colour one lot vibrant red, and the other a deep (holly-ish) green. Roll out the green fondant with a rolling pin and cut out 48 holly leaves. Then, using a sharp non-serated knife, mark out a leaf pattern by running the knife through the centre so that it leaves an incision but does not cut through. Then cut diagonal incisions from the centre out so that it looks like the veins of a leaf (see picture below).

image2-11

Pull small pieces of the red fondant off and roll into 48 small balls to make the holly berries.

image1-8

Once the cupcakes are almost completely cool, start making the cream cheese icing. Place the cream cheese and butter into a large bowl and beat with an electric mixer for 8-10 minutes. Add the icing sugar and vanilla and beat for a further 5 minutes or until completely smooth. Add the milk and beat until just combined.

Ice each cupcake with a generous amount of icing and top with 2 leaves and 2 berries. Enjoy!

image3

Recipe adapted from Donna Hay’s recipe ‘red velvet cupcakes with sugared cranberries’.

Celebration Sponge Cake

image1

I made this sponge cake over the weekend for my Grandma’s 80th Birthday. I really wanted to make something special as it is widely accepted that my Grandma is one of the most amazing humans on the planet (really, she’s exceptional). This cake looked amazing, tasted delicious and is very adaptable – you can use any fruit that’s in season to put on top, and fill it with anything you like. If I was in a rush I would even be inclined to buy a sponge cake, cut in half and decorate it to get the effect with minimal time and effort.

Ingredients
For the sponge: 
3 eggs, separated
1 cup caster sugar
½ cup cold water
1 teaspoon vanilla extract
2 teaspoons baking powder
1 cup plain flour
1 tbsp cornflour

For the sweetened, thickened cream:
500ml thickened cream
Icing sugar (to taste)
Vanilla extract (to taste)

For the jam: https://bakerholicsanonymous.wordpress.com/recipes-2/frostings-icing-condiments/raspberry-jam/, alternatively you can use store bought (but it is likely to be sweeter)

For decorating: 
2 punnets fresh strawberries
1 punnet fresh raspberries
1 punnet fresh blueberries
1 pomegranate
Fresh mint

For the macarons: https://bakerholicsanonymous.wordpress.com/recipes-2/cookies-biscuits-macarons/raspberry-macarons/ (with the raspberry jam to sandwich)

Method
Make the raspberry jam according to instructions.

If desired, make the macarons according to instructions. Sandwich with some of the jam.

For the sponge: 

Preheat oven to 160°C (fan-forced). Grease two 20cm round, shallow tins and line the bases with baking paper.

Use electric beaters to beat the egg yolks, sugar, water, and vanilla for approximately 10 minutes, until very pale and thick. Wash the beaters and then, in a separate bowl, beat the egg whites and baking powder until stiff peaks form.

Fold the sifted flours into the yolk mixture and then gently mix in the egg whites.

Divide evenly between the tins and bake for 20 minutes or until springy in the centre and the cake has come away from the sides of the tins.

Gently turn cakes, face up, onto wire cooling racks with clean tea towels on them (this stops the wire from denting your cakes). Leave to cool entirely.

For the Cream

Add cream, icing sugar (to taste) and vanilla extract (to taste) into a large stick blender/master container (or bowl) and blend until the cream is very thick.

To Assemble 

Lay one of your sponges top-down on your serving platter.

Spread with raspberry jam (or desired filling).

image2-4

Spread a generous layer of whipped cream on top.

image1-4

Top with strawberry slices, chopped evenly.

image2-3

Gently place the other sponge, top-side up onto the cake.

image1-3

Top liberally with cream and spread it evenly, right out to the edge (but not down the edge, you still want to see the cake).

image2-2

Top with fruit and mint leaves (the more the better often for aesthetics – and flavour!) And, if desired, place macarons with a blob of cream and a raspberry on top, evenly around the cake.

10805270_10152794404659463_823488353_n

Enjoy!

Recipe from Grandma