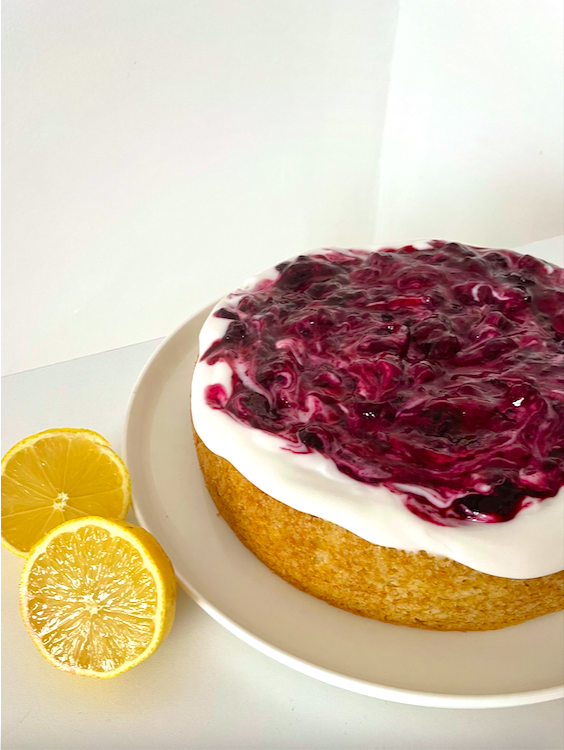
Don’t be put off by the title, you’d never guess that this tender, zesty lemon cake is vegan. Feel free to omit the icing if you’re not a big fan of coconut.
Ingredients (serves 10-12) 1¾ cups flour 1½ teaspoons baking powder ½ teaspoon bicarb soda ¼ teaspoon fine salt ⅔ cup canola oil ¾ cup caster sugar 1 cup full fat coconut milk (including as much of the thicker cream as possible) Zest of 2 lemons, plus 45ml lemon juice 1 teaspoon vanilla extract
Blueberry compote 1 cup fresh blueberries 1 tablespoon lemon juice 1 tablespoon caster sugar 1½ teaspoons cornflour
Preheat the oven to 180°C (160°C fan-forced). Grease the sides and line the base of a 20cm round cake tin with baking paper.
In a large bowl, combine the flour, baking powder, bicarb soda and salt.
In another bowl, whisk together the oil, sugar and coconut milk, then add in the lemon zest, juice and vanilla.
Pour the wet ingredients into the bowl of dry ingredients, whisking to combine, then pour into the prepared tin and bake for 30–35 minutes or until a skewer inserted comes out clean. Leave the cake to cool completely in its tin.
To make the blueberry compote, place the blueberries, lemon juice, sugar and 50ml of cold water into a small saucepan and bring to the boil. Turn down the heat and leave to simmer, stirring occasionally, until the blueberries have softened. Remove from the heat.
Combine the conflour with 1½ teaspoons of cold water in a small cup. Stir the paste into the blueberries, put back on a medium heat and stir for about 30 seconds, or until thickened. Pour into a jug to cool and set.
To make the icing, combine yoghurt, vanilla and icing sugar in a small bowl.
Just before serving, invert the cake onto a serving plate or cake stand and top with icing and compote (I like to swirl the two together). Enjoy!
Adapted from ‘Lemon Tendercake with Blueberry Compote’ in Nigella Lawson’s At My Table.
Preheat oven to 150°C fan-forced. Do NOT grease or line the tin (unlike most other bakes, we want the cake to stick to the sides of the tin).
Scrape out passionfruit pulp into a jug and whisk vigorously. If under 180ml, add some orange juice or water to make up the shortfall.
Weigh the sugar in a medium bowl. Take out 2 tablespoons’ worth to add to the egg whites later. Add the flour, baking powder and salt to the bowl and set aside.
Place the egg whites and cream of tartar into the bowl of a stand mixer. Using the whisk attachment, whip on medium-high speed until the egg whites are stiff and white. Start adding the reserved sugar to the egg whites gradually (about a teaspoon every 30 seconds) and beat until you have a white, smooth, glossy mixture.
Put the oil, egg yolks and passionfruit in a wide bowl and whisk to combine. Sift the dry ingredients over the yolk mix and combine with a silicone spatula to form a loose batter. Gently fold in one-third of the egg white mixture. Then add in the remaining egg white mixture and gently combine until no white streaks remain.
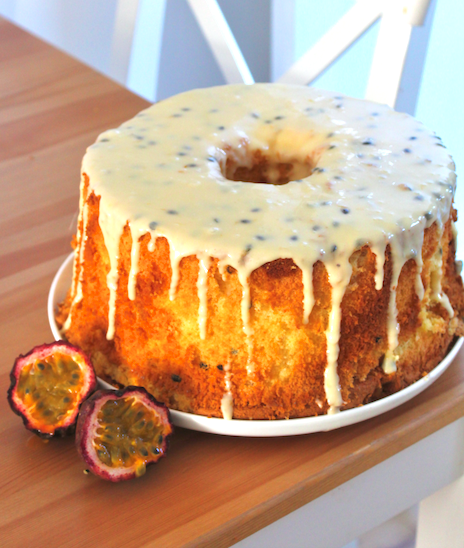
Pour the mixture into the cake tin, wiping away any batter smears around the sides or centre of the tin. Bake for 55-60 minutes or until golden and the cake around the centre tube looks dry. Wearing oven mitts, remove from the oven and immediately invert the centre tube onto a bottle. Let it hang for 2-3 hours or until the tin is completely cool.
To release the cooled cake, run a thin knife around the edge of the tin, ensuring you get right to the bottom. Turn the chiffon cake out onto a serving plate.
To make the passionfruit sour cream glaze, sift the icing sugar into the bowl of a stand mixer and add the sour cream and passionfruit. Using the paddle attachment, beat on a low speed at first, then increase to medium until combined. Add a little extra icing sugar if too wet, or a small amount of sour cream if too thick.
Spoon the glaze around the outer edge of the cake first, then over the top. Leave to set for 15 minutes before serving. Enjoy!
Recipe adapted from ‘Passionfruit cloud chiffon cake’ in Natalie Paull’s Beatrix Bakes
This ultra soft, fluffy cake is heavy on the spices and topped with a delicious brown butter cream cheese frosting. The cake’s texture comes from using cake flour rather than ordinary flour which is lower in protein and gives you a tender, light crumb every time. Please don’t be tempted to use ordinary flour – it’s worth the fuss of buying (or making your own) I promise!
I use the Christina Tosi Milk Bar method for this cake – making a large sheet cake, cutting it into three layers with a six inch cake ring and constructing it using six inch acetate. It cooks faster, doesn’t require multiple cake tins and ensures perfectly even layers every time. If you don’t have this equipment, you can make a four-layered version with two 18cm round cake tins – just increase the baking time by about 10-20mins, carefully slice each cake in half and divide the frosting into quarters rather than thirds.
Ingredients (serves 14) 380g brown sugar 350g cake flour 1 tablespoon ground cinnamon 1 teaspoon mixed spice 1 teaspoon ground ginger ½ teaspoon ground nutmeg ½ teaspoon ground cloves 1½ teaspoons bicarb soda 1 teaspoon fine salt 200g sour cream (full fat) 200ml milk (full cream) 4 eggs 100ml canola oil 1 tablespoon vanilla bean paste 400g tinned apple pieces
Preheat the oven to 180°C (160°C fan-forced) and grease and line a 9 by 13 inch quarter sheet pan with baking paper.
Using a stand mixer fitted with a paddle attachment, mix the brown sugar, flour, spices, baking powder, bicarb soda and salt on low speed until combined.
Pour the sour cream, milk, eggs, oil and vanilla into a jug and whisk to combine. Pour the mixture into the dry ingredients and mix on low speed until just combined, scraping the bowl with a spatula to ensure all ingredients are integrated.
Gently fold the apple pieces through the batter with a spatula.
Pour the mixture into the prepared pan and bake for 30-40 minutes or until a skewer inserted comes out clean. Allow the cake to cool in the pan for 10 minutes before gently turning onto a wire rack to cool completely.
While the cake is baking, make the brown butter for the frosting. Heat the butter in a small saucepan over medium heat, stirring continuously. Once the butter has melted, boiled, the foaming subsides and the butter has sufficiently browned (I like mine quite dark), transfer the butter into a bowl and refrigerate until set and firm.
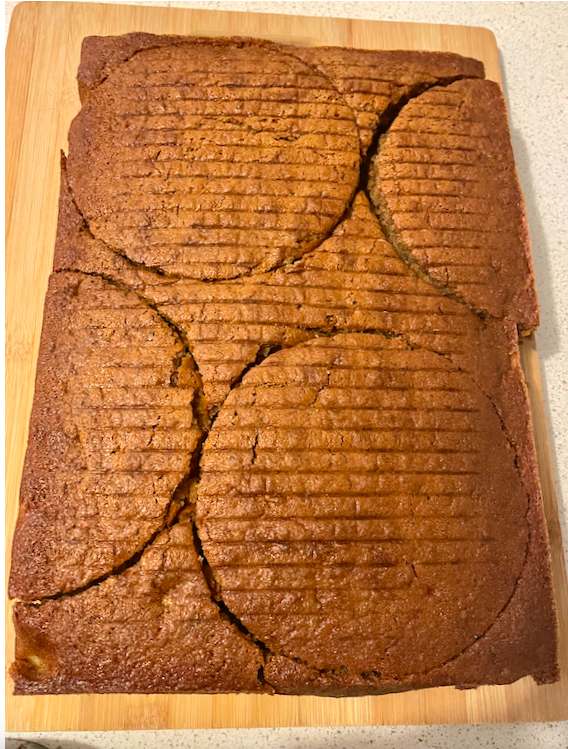
Once the cake is completely cooled, place it onto a large chopping/bread board. Using the picture below as a guide, use a six inch metal cake cutter to cut out two full rounds of cake and two half pieces.
To make the frosting, beat the set brown butter in a stand mixer with a paddle attachment on a medium speed for 4-5 minutes or until completely smooth. Add the cream cheese and mix for a further 2 minutes, scraping down the sides of the bowl at regular intervals to ensure no lumps. Add the icing sugar, sour cream and vanilla and beat for a further 2-3 minutes or until the icing is fluffy and light.
Clean the cake ring and then place onto a plate or cake stand. Line the inside of the cake ring with a ‘collar’ of acetate. Place the two half pieces of cake at the bottom and press down firmly. If there are any gaps, use extra cake scraps to fill in the holes and press down very firmly to make one even layer. Top with approximately one-third of the frosting, using a cranked spatula to spread right to the edges.
Repeat with the remaining cake and frosting. Place cake in the fridge for at least 3 hours to set.
Gently slide off the cake ring and peel away the acetate strip. Keep refrigerated until approximately half an hour before serving. Cut into pieces (I like to use this method) and serve. Enjoy!
Cake adapted from ‘Spiced apple layer cake with brown butter cream cheese icing’ in Emelia Jackson’s First, Cream the Butter and Sugar.
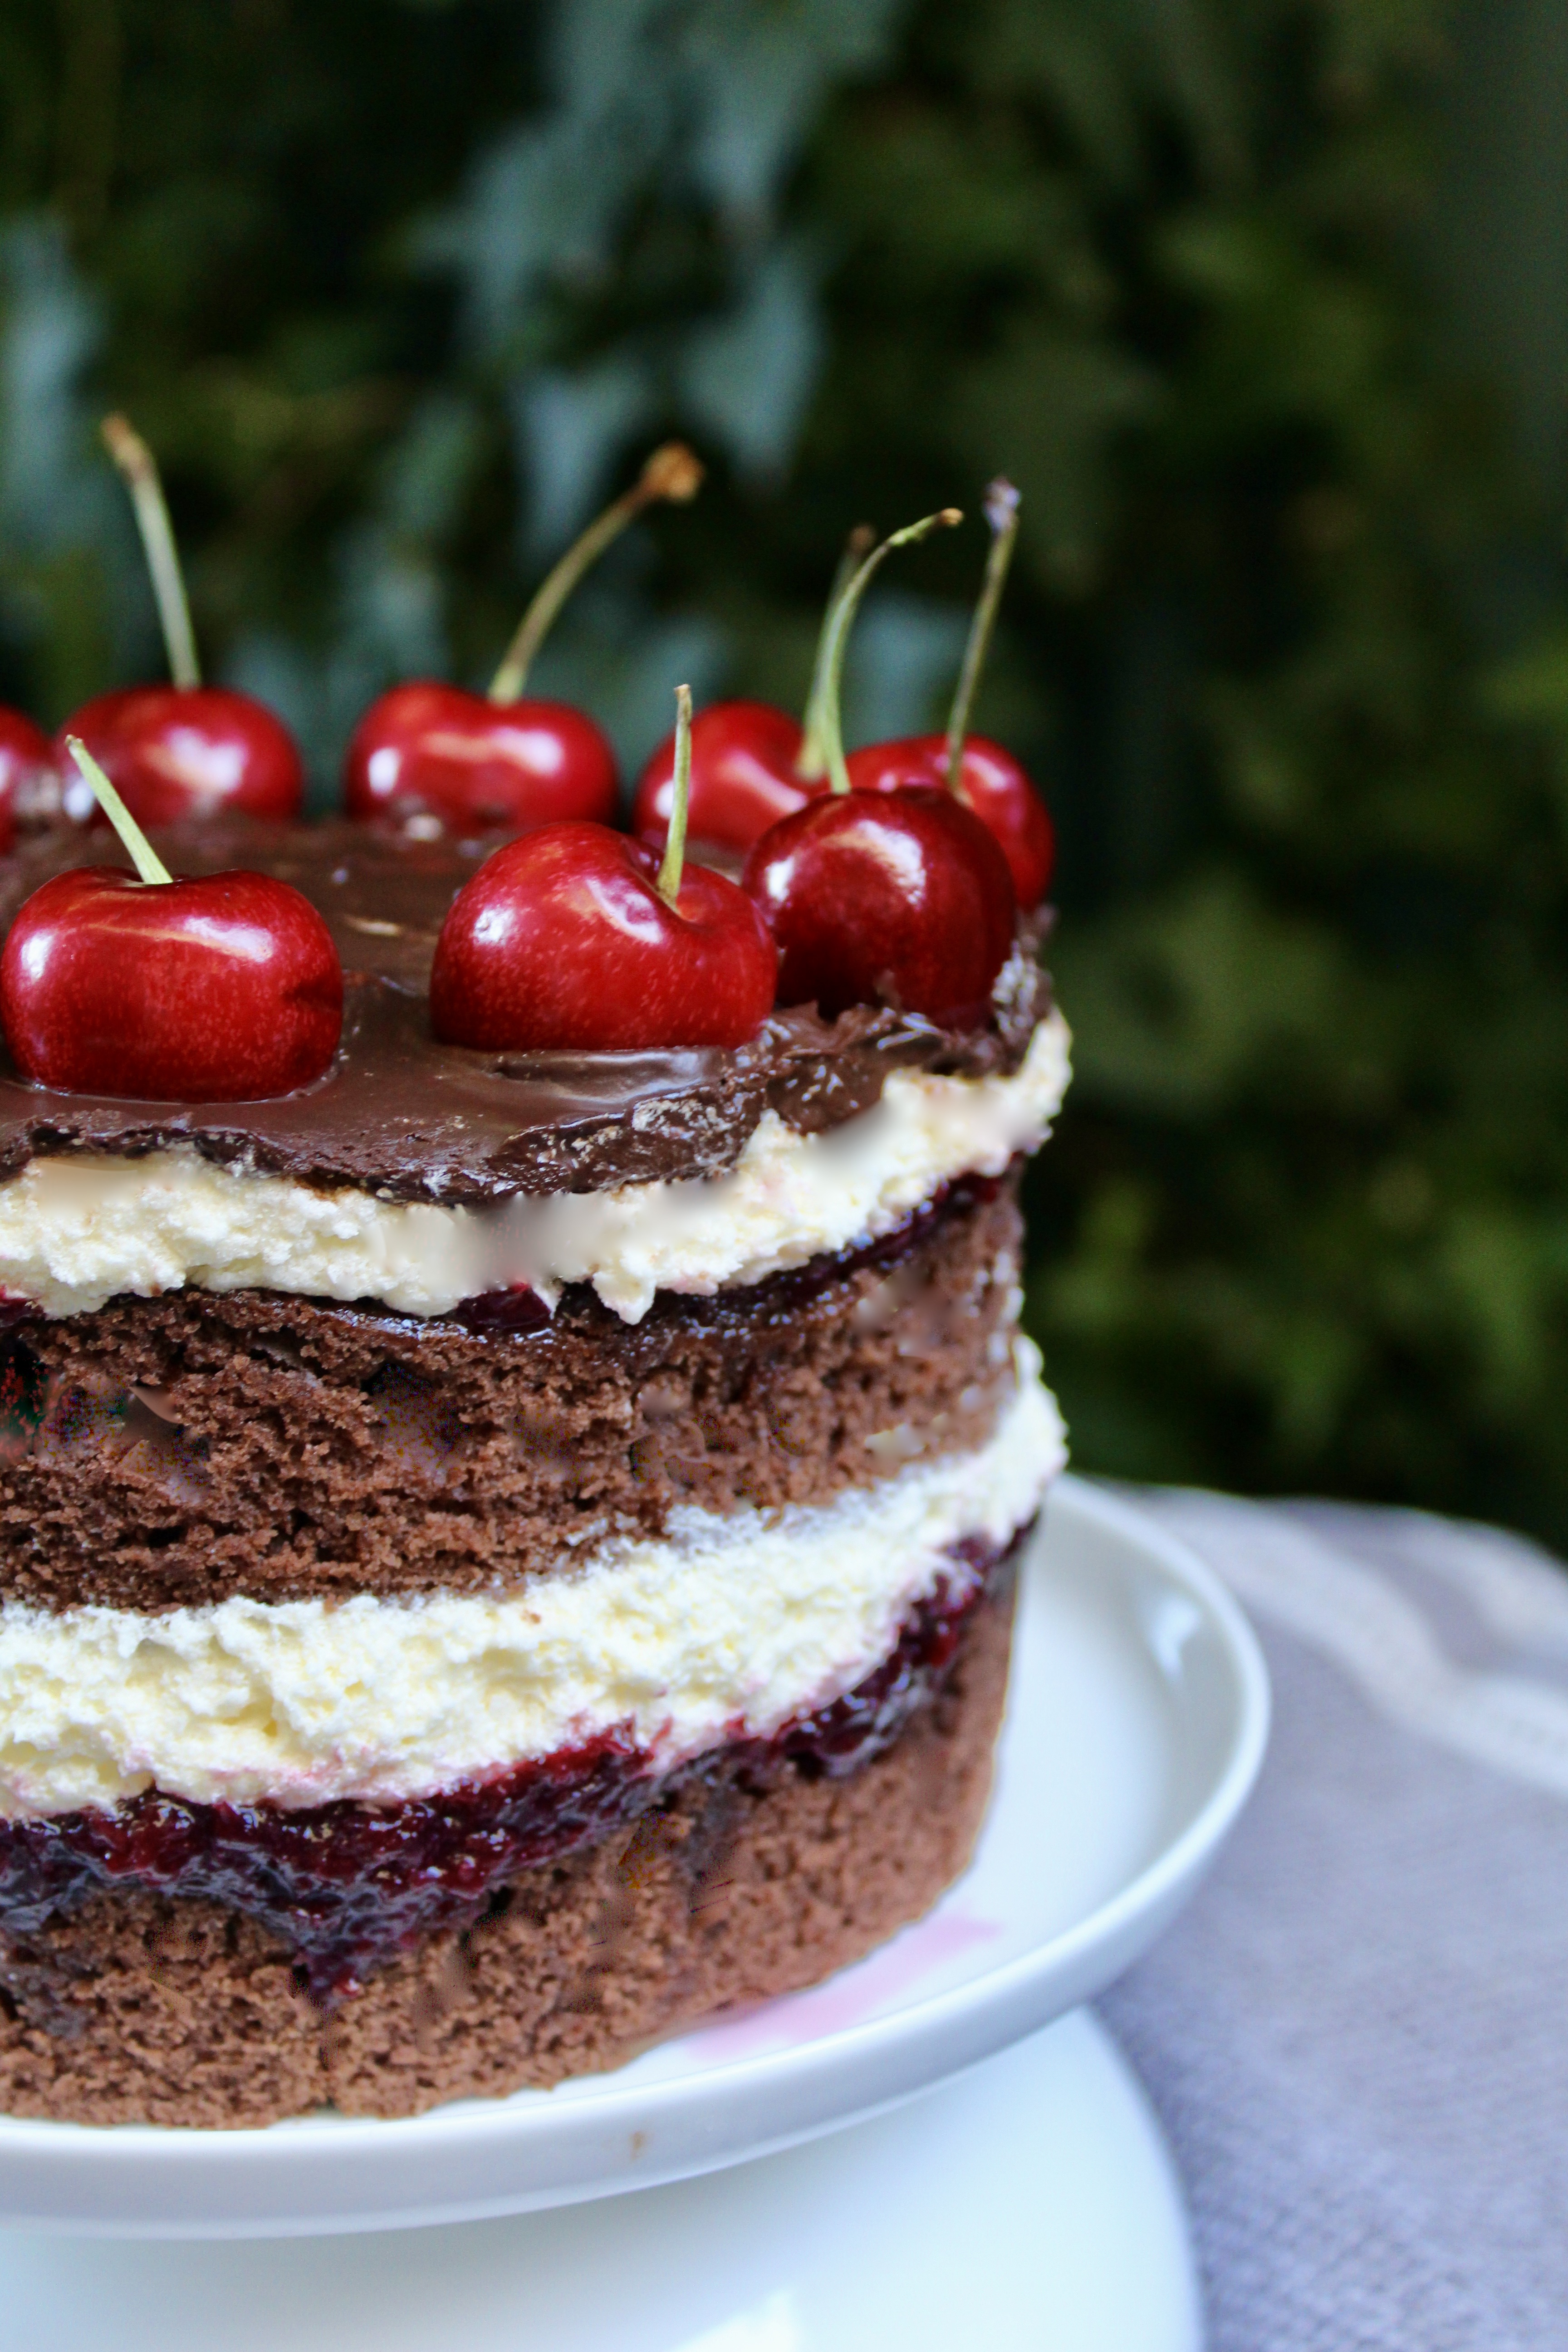
Black forest cakes are a tried and true favourite for a reason – especially when cherries are in season and at their most flavoursome. This is another cake using the Milk Bar method of cutting out rounds from a large rectangular sponge cake, ensuring you get perfectly even layers every time.
While I made this into a 2-layer cake this time as it was a gift for a couple in quarantine who didn’t need a giant cake, the recipe actually makes a 3-layer cake.
Ingredients (serves 12-14) Equipment 9 x 13 inch “quarter sheet pan”* A 6 inch cake ring* 6 inch wide acetate roll Sticky tape
Chocolate Ganache 120g dark chocolate melts 90ml cream
Cherry Jam 225g fresh or frozen cherries (pitted and chopped finely) 25g caster sugar 1 tablespoon cornflour
Buttercream 115g butter, roughly chopped, room temperature 2 teaspoons vanilla extract 2 cups icing sugar 1 tablespoons full-fat greek yoghurt, room temperature ½-1 tablespoon full-cream milk, room temperature
Cherry MilkSoak 40ml full-cream milk 25ml kirsch (cherry liqueur) or cherry juice
10-12 large fresh cherries, to decorate
Method
Chocolate Ganache Add the dark chocolate and cream to a small saucepan and stir over a low heat until the chocolate is nearly melted. Remove from the heat and continue stirring until the chocolate is fully melted and smooth. Set aside (at room temperature).
Cake Preheat oven to 180°C (160°C fan-forced). Spray the base and sides of a quarter sheet pan with cooking oil and line the base with baking paper.
Cream the butter and sugar together in a stand mixer, or a large bowl if using a hand mixer, on a medium speed until light and fluffy. Add the eggs and beat on high until combined.
Add the buttermilk, oil, 2 tablespoons of your pre-prepared chocolate ganache, vanilla and coffee into a small bowl and stir until the coffee has dissolved. Add this chocolate mixture into the the butter mix and beat on high for a few minutes, scraping down the bowl as required.
Sift the flour, cornflour, cocoa powder and baking powder into the batter. Beat on low until the mixture has just combined, and then pour the batter into the lined cake tin. Smooth out flat and tap the tray gently against the bench a few times to get out any air bubbles.
Bake for 25-35 minutes, or until a skewer inserted into the middle comes out clean. Leave to cool in the tin for about 15 minutes and then remove from the tin and place on a wire rack to cool completely.
Cherry Jam Place the cherries, caster sugar and cornflour into a saucepan over a medium heat. Stirring constantly, bring the mixture to the boil. Reduce the heat slightly and continue to stir until thickened.
Buttercream Beat butter in a large mixing bowl with an electric mixer on medium speed for 1-2 minutes until butter is pale and creamy.
Add vanilla and 1 cup of icing sugar. Beat on a low speed to combine, then turn up to medium and mix for 30 seconds. Add the remaining icing sugar along with the greek yoghurt. Beat on medium speed until light and fluffy. If too stiff, add milk. If too wet, add extra icing sugar. It should be fluffy and spreadable.
Cherry Milk Soak Add milk and kirsch to a small bowl and whisk to combine.
Assembling the Cake Place your cake on a large chopping/bread board. Using the picture below as a guide, use a 6 inch metal cake cutter to cut out 2 rounds of cake and then two half pieces.
Image courtesy of ‘What Charlotte Baked’
Place the 6 inch cake ring onto a plate or cake stand. Line the inside of the cake ring with a ‘collar’ of acetate, taping the edges together to join.
Place the two half pieces of cake at the bottom and press down firmly. If there are any gaps, use extra cake scraps to fill in the holes and press down very firmly to make one even layer. Carefully remove the cake ring (but leave the acetate).
Spoon 2 tablespoons of the milk soak over the cake layer. Allow to soak for about a minute. Spoon approximately one third of the chocolate ganache onto the cake layer, and spread evenly, ensuring the ganache gets right to the edges of the cake. Spoon half of the cherry filling on top of the ganache and spread out evenly to the edges of the cake. Add a few tablespoons of buttercream on top and smooth with a spatula to ensure the layer is (roughly) even.
Repeat this process for the second layer: cake, cherry milk soak, chocolate ganache, the remaining cherry jam and a thick layer of buttercream. If you need to, attach another round of acetate on top of your current cake collar (using tape to join the two collars) to ensure it is tall enough that all cake is supported.
Add the final layer of cake, spoon with the remaining milk soak and then top with the remaining chocolate ganache. Decorate with a ring of cherries and place in the fridge to set for a few hours. While the cake sets, add any remaining buttercream to the cake offcuts and enjoy as a snack!
Remove the cake from the fridge and gently peel away the acetate strip/s just before serving. Enjoy!
Recipe adapted from What Charlotte Baked ‘Black Forest Naked Cake’. Buttercream recipe adapted from The Sweetest Menu ‘Milk Bar Birthday Cake’.
*If you don’t have a quarter sheet pan and/or round cutter, you can use two 8 inch/three 6 inch round cake pans
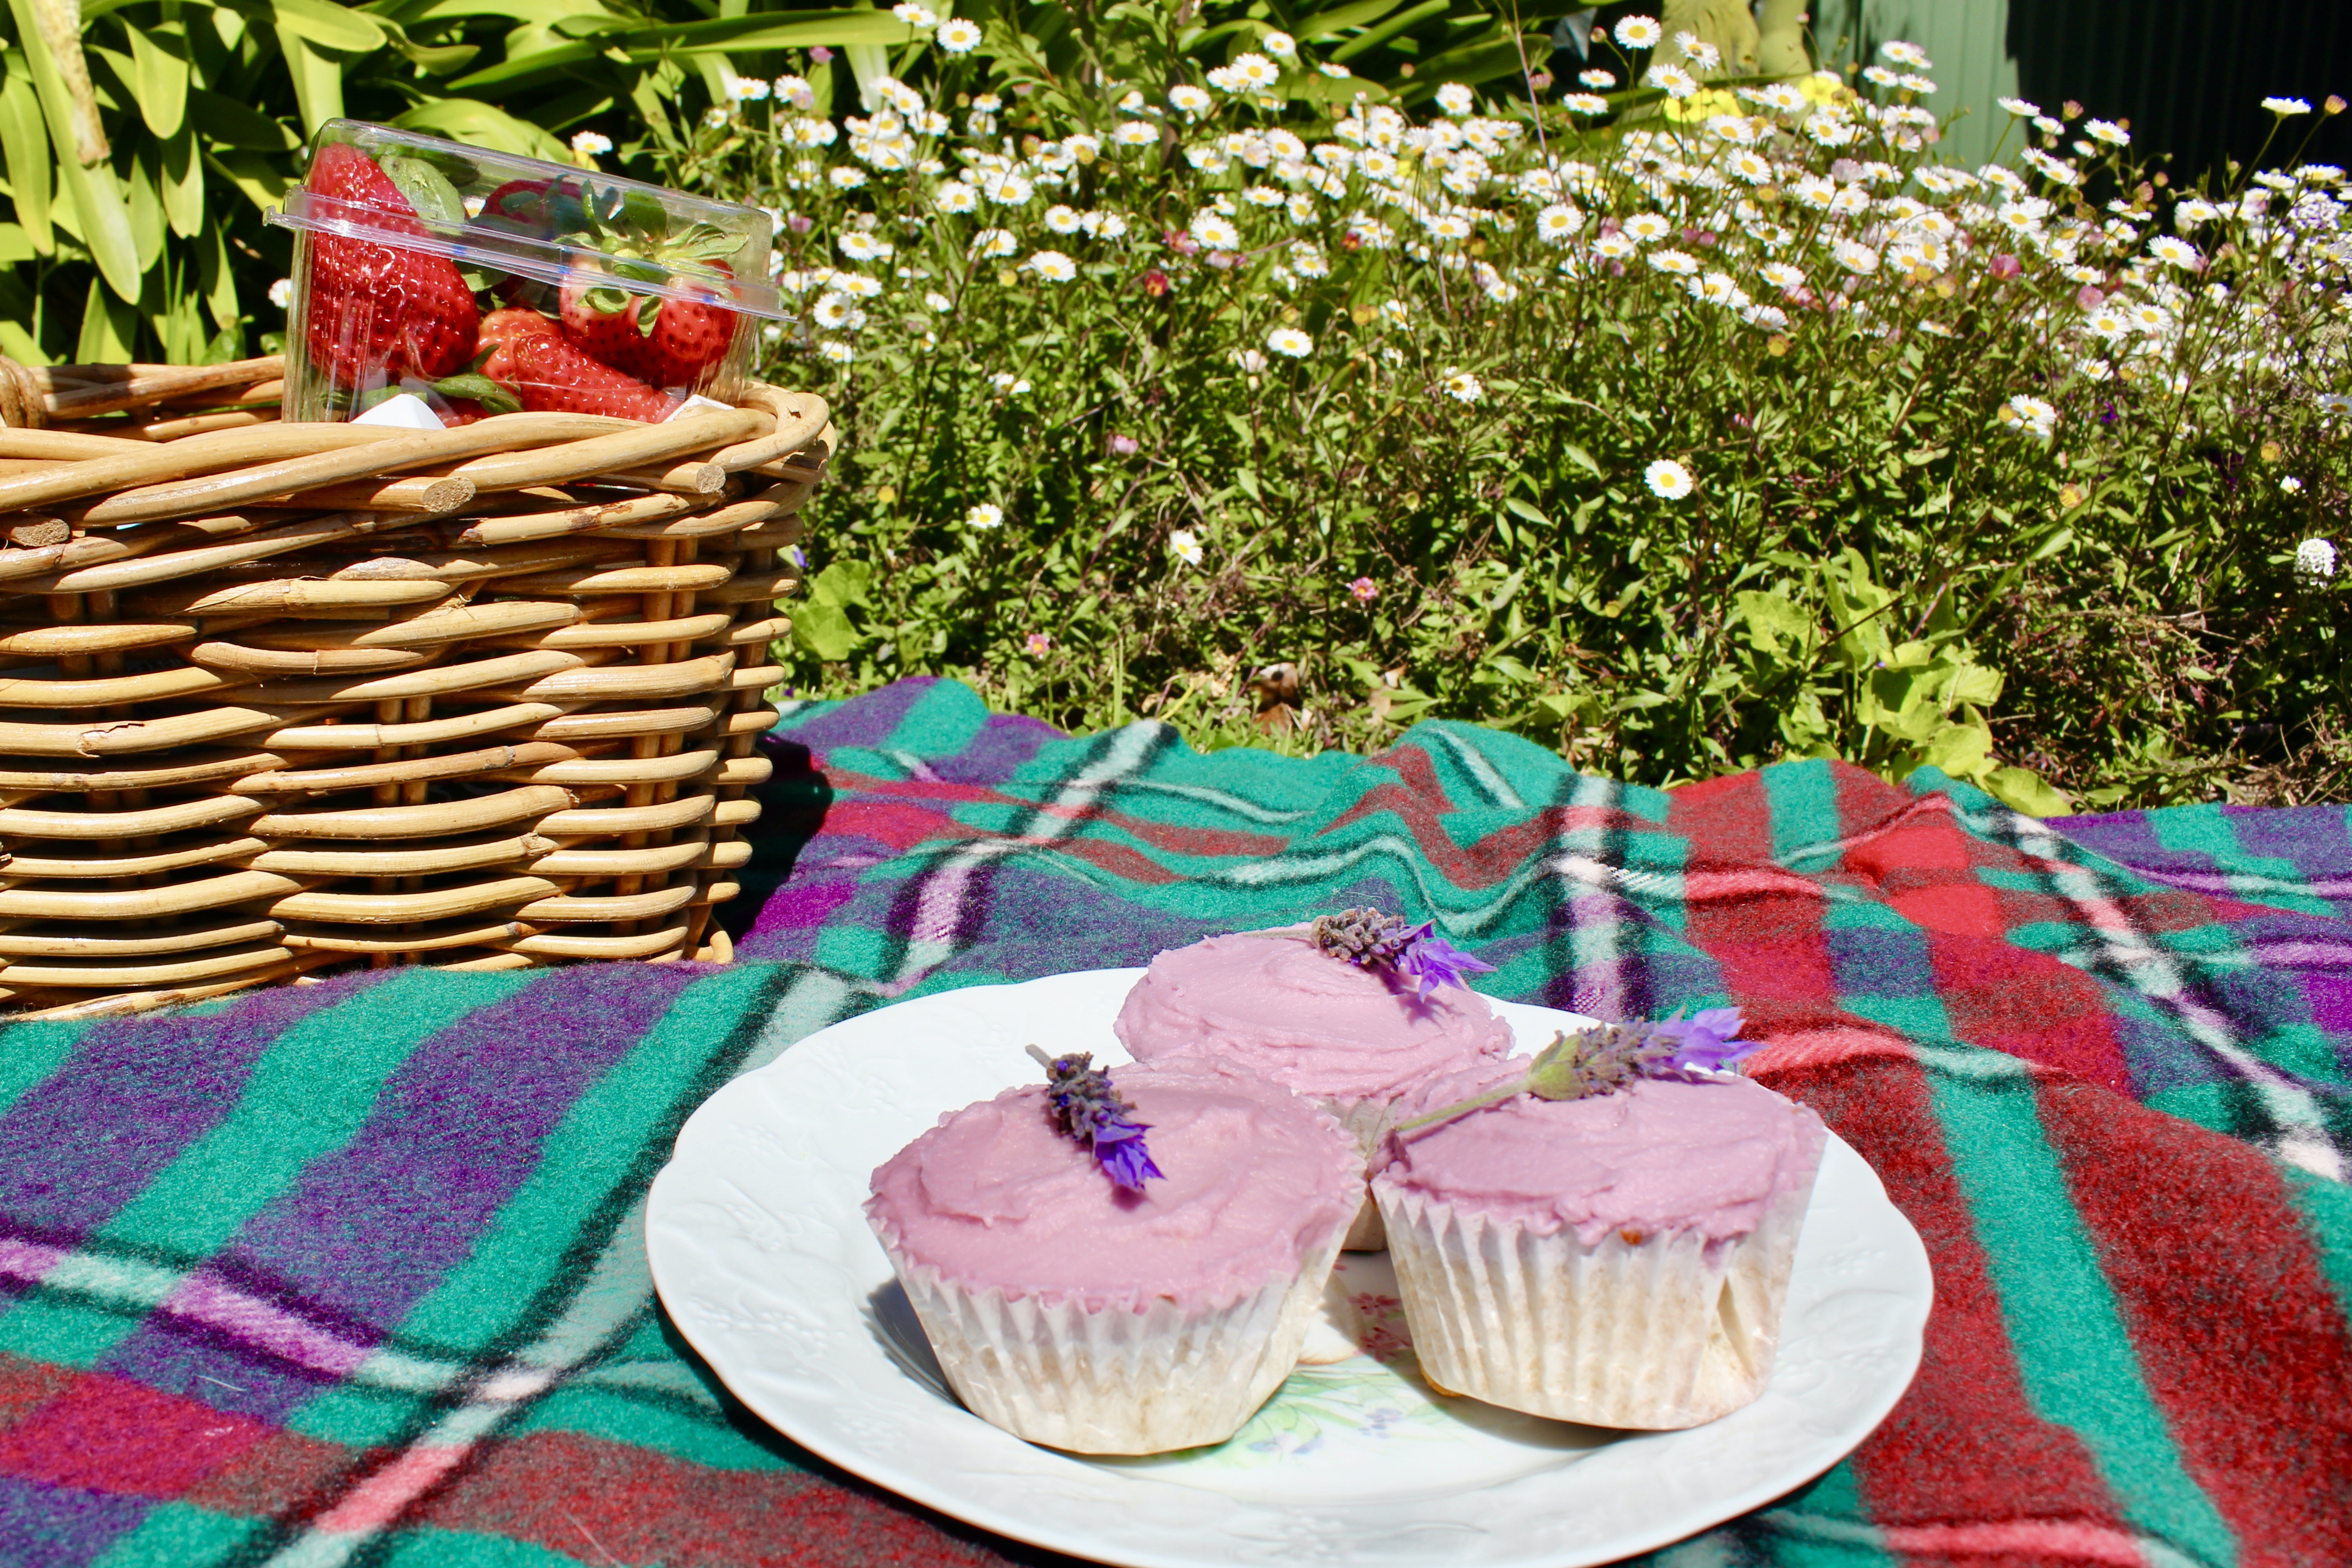
I’ve always been intrigued by floral desserts and these cupcakes, inspired by the Hummingbird Bakery, have been on my to-bake list for years. With socially distanced spring picnics all the rage at the moment, I thought now was the perfect time to give them a try. I admit, I was a little worried that they might taste like Grandma’s soap, but I’ve made sure the lavender flavour is subtle, resulting in a delicious vanilla cupcake with a floral back note. If you’re keen to up your picnic game and try something new, give these a go!
I bought my dried lavender flowers from the Essential Ingredient online store, but it’s available at many gourmet and specialty food stores.
Icing ¼ cup milk ¼ tablespoon dried lavender flowers 100g butter, softened ¾ tablespoon vanilla extract 4 cups icing sugar A few drops of purple food colouring 24 small sprigs of fresh lavender (to decorate)
Method Put the milk and dried lavender in a jug, cover with clingfilm and refrigerate for 2 hours. Repeat with the milk and dried lavender for the icing (in a separate jug/bowl).
Preheat the oven to 170°C (150°C fan forced). Line two 12-hole muffin trays with patty pans. Strain the lavender infused milk (for the cupcakes, discarding the dried lavender) and allow the milk to reach room temperature.
Sift together the flour and baking powder. In a different bowl, cream the butter with an electric mixer for 1-2 minutes. Add the caster sugar about a third at a time, beating for 2 minutes after each addition. After the last of the sugar has been beaten, beat until the mixture is light and fluffy and the sugar has dissolved. Add the eggs one at a time, beating for 1 minute after each addition or until the mixture is light and fluffy. Add the vanilla and beat until just combined.
Add approximately a third of the flour mixture to the creamed mixture and beat on a low speed until combined. Add half of the infused milk and beat until combined. Repeat this process until all of the flour and milk is just combined.
Spoon mixture into the patty pans (filling each about ¾ full) and bake for 18-20 minutes or until the top springs back when touched. Remove the cupcakes from the trays immediately and cool on a wire rack.
To make the icing, strain the remaining lavender infused milk (once again discarding the dried lavender). Cream the butter for 1-2 minutes in a large bowl using an electric mixer. Add the infused milk, vanilla and half of the icing sugar and beat for at least 3 minutes, until the mixture is light and fluffy. Add the remaining icing sugar and beat for a further 3 minutes or until the icing is a spreadable consistency. Add the purple food colouring a tiny bit at a time until the desired colour has been achieved. Add extra milk (plain/not-infused is fine) if too dry or extra icing sugar if too wet.
Once the cupcakes have cooled completely, use a spatula to apply a generous layer of icing to each cake and top with a sprig of fresh lavender. Enjoy!
Recipe adapted from the Crabapple Cupcake Bakery. Flavour inspired by the Hummingbird Bakery Cookbook
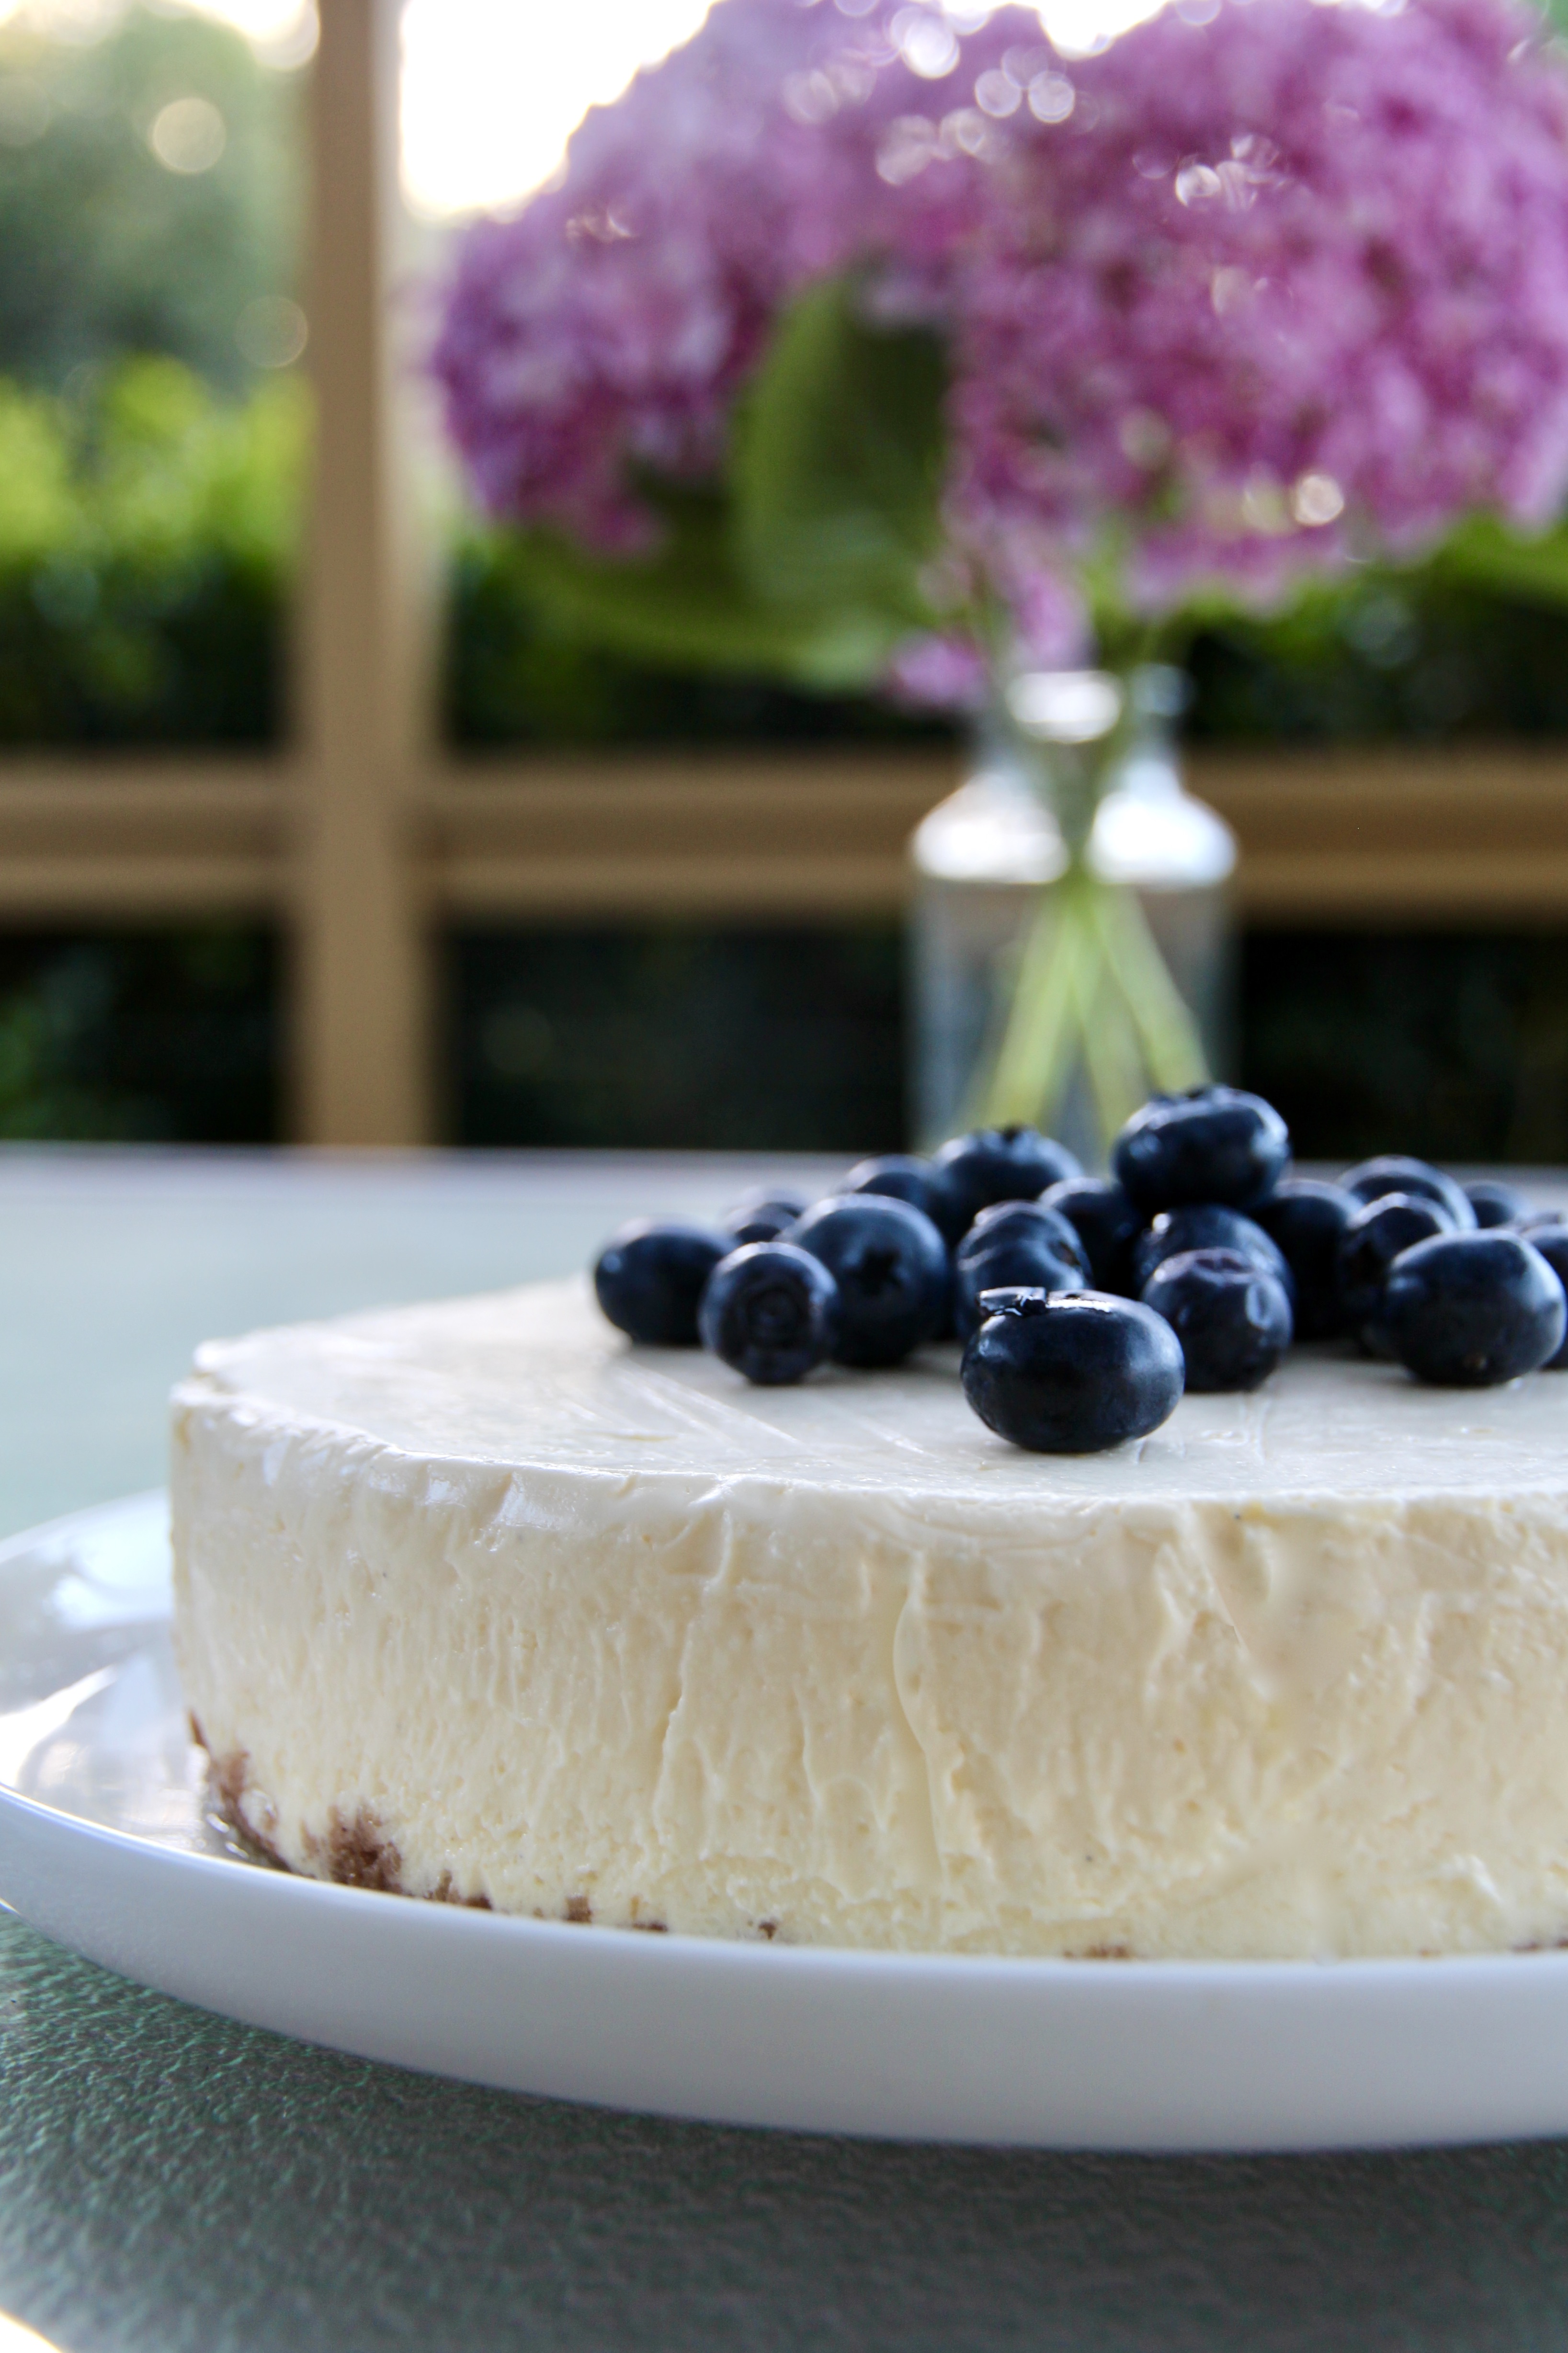
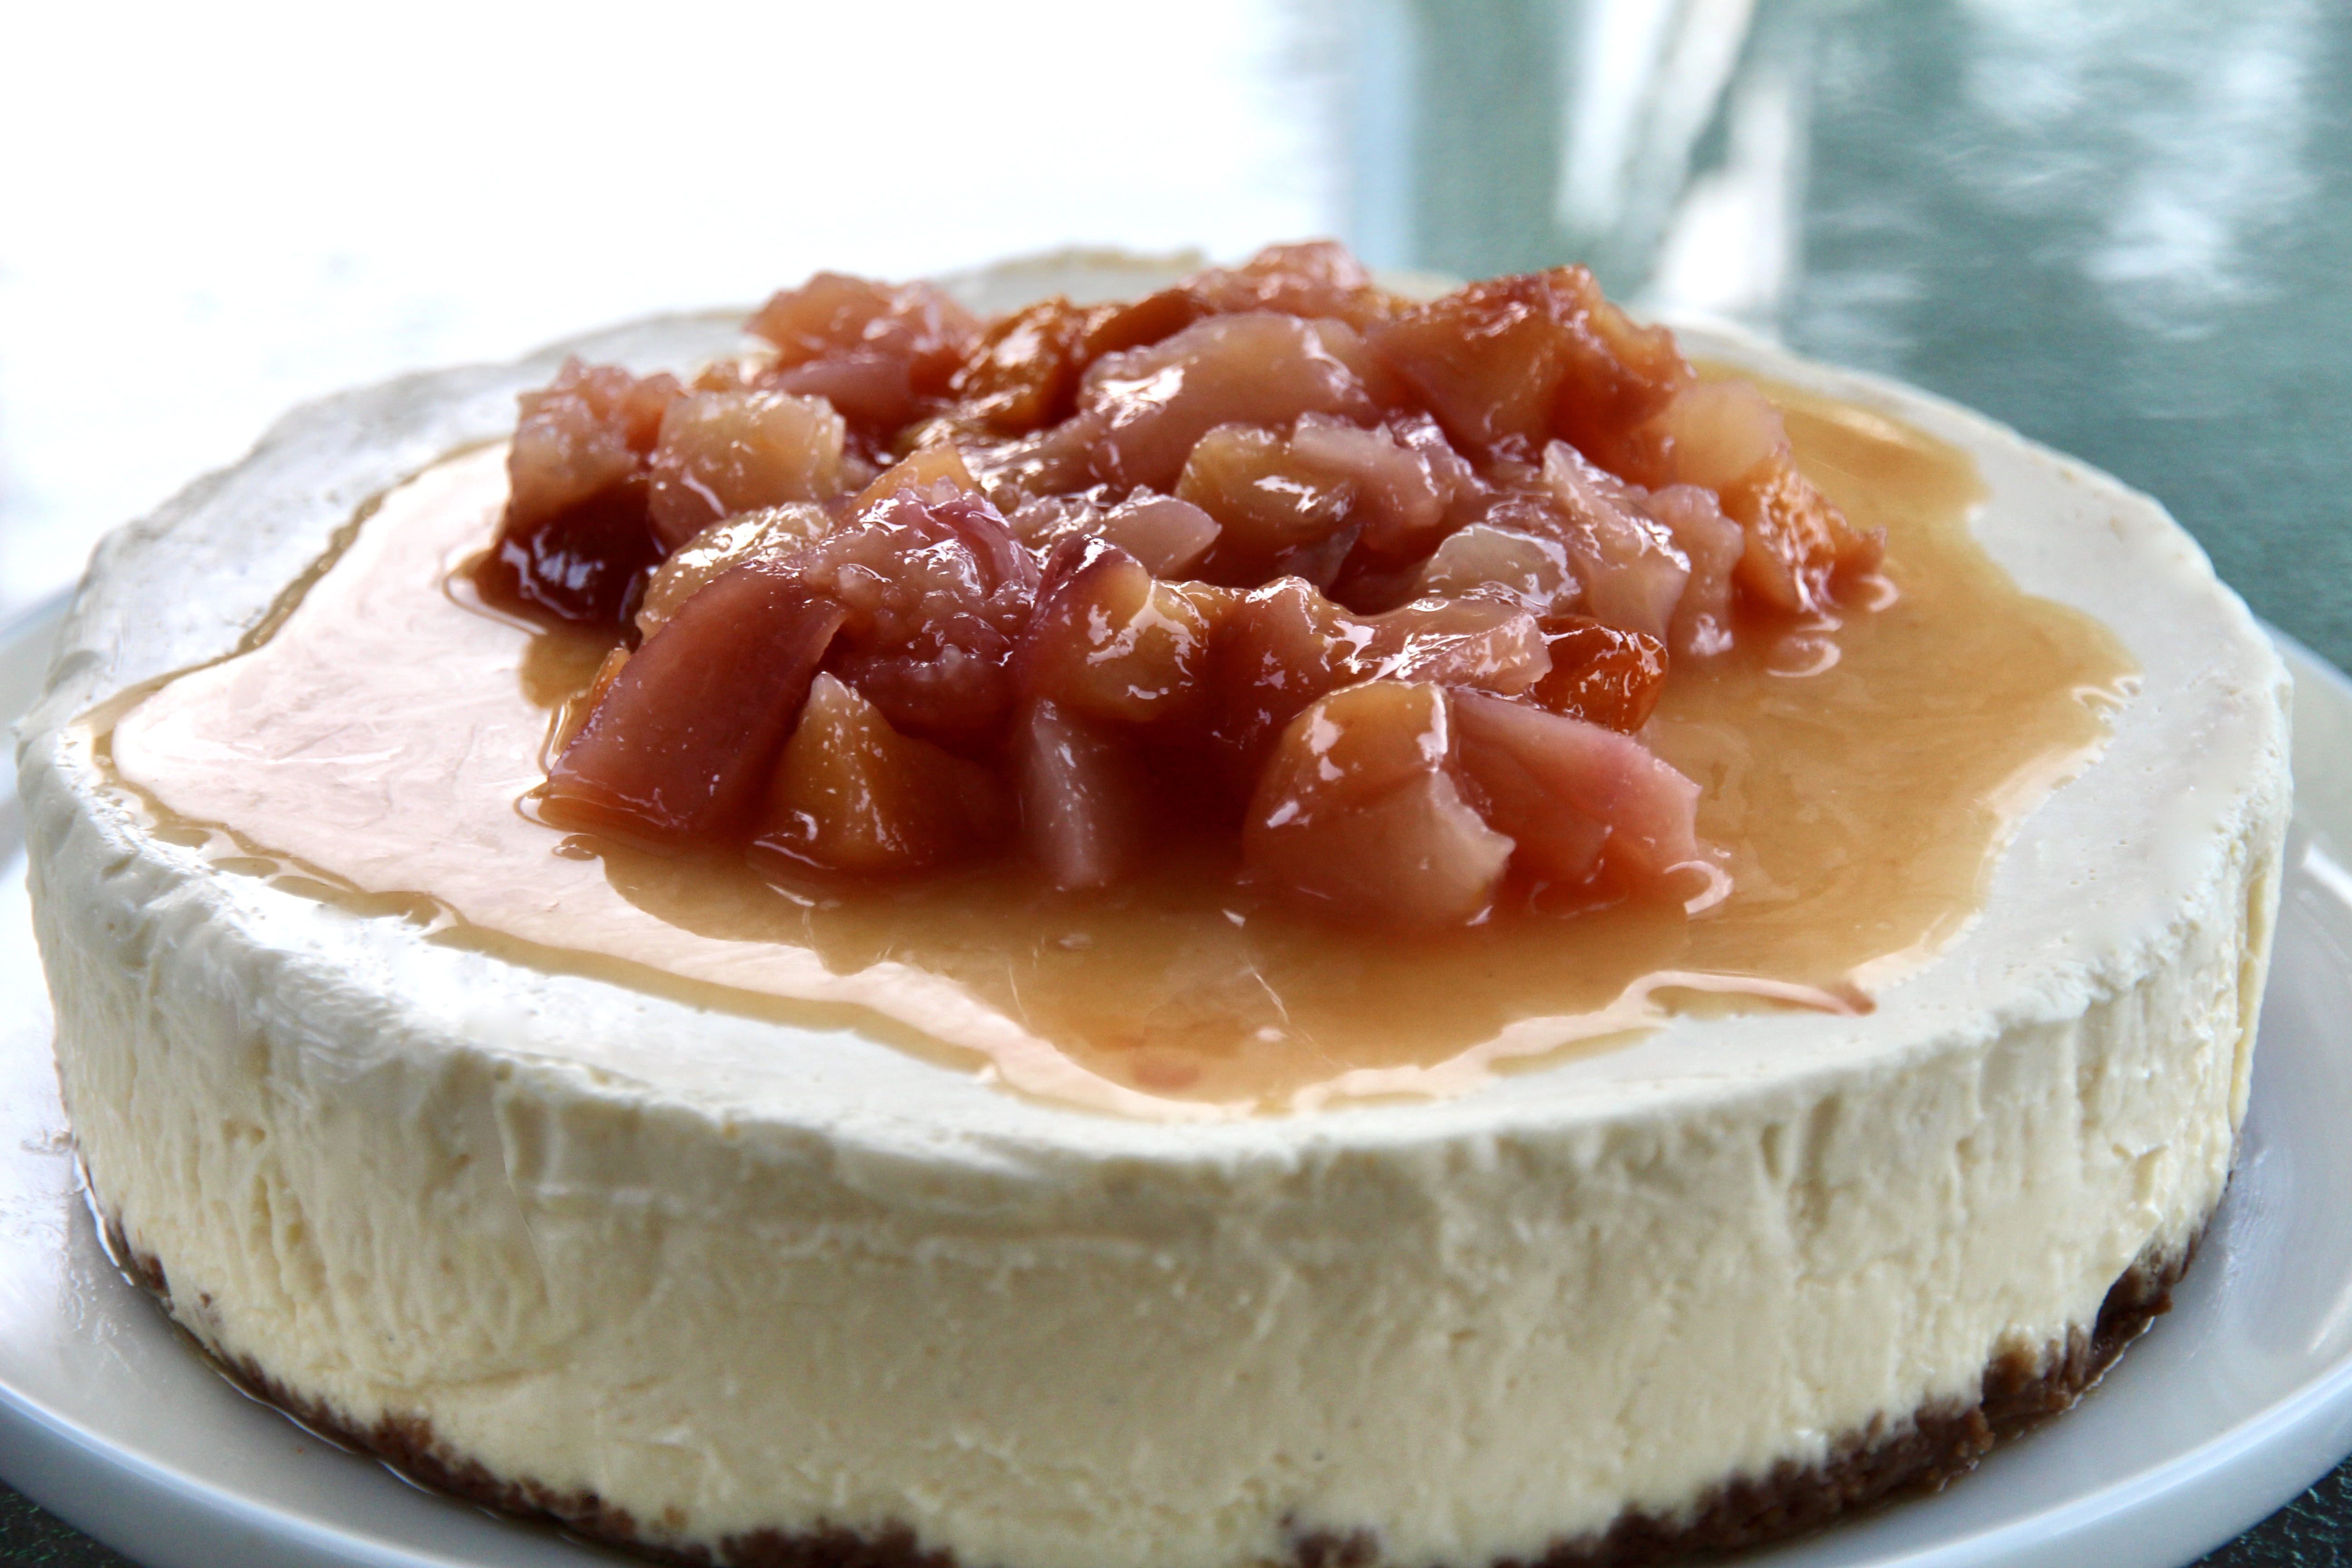
This cheescake is a labour of love but, in my opinion, is absolutely worth the effort as it yields a perfectly silky, tangy cheesecake with a delicious cinnamon crumb. Start the recipe the day ahead as it needs to set in the fridge overnight.
Ingredients (serves 12) 60g wholemeal plain flour 40g brown sugar pinch sea salt ½ teaspoon ground cinnamon 50g butter, melted
140g caster sugar Pinch sea salt 500g full-fat cream cheese, cubed 2 eggs 300ml full-fat sour cream 1 teaspoon vanilla extract Juice of 1 medium-large lemon
Decorate with berries, poached stone fruit or passionfruit pulp, if desired
Method Preheat the oven to 150°C (fan-forced). Line a large baking tray with baking paper.
To make the crumb base, combine the flour, brown sugar, salt, cinnamon and melted butter in a wide mixing bowl and mix together with your hands to a sticky crumble. Scatter the mix onto the prepared tray and bake for 25 minutes until evenly brown.
While the base is baking, spray a 20cm round cake tin with cooking oil spray and line the base and side with baking paper (I like the paper to extend well above the sides of the tin to make cake removal easier).
Put the sugar, salt and cream cheese into a large bowl and slowly cream the mix with an electric beater on low, scraping down the side of the bowl often with a flexible plastic spatula. Stay on low speed and add the eggs in two batches, scraping well between each addition, then add the sour cream and vanilla and mix until combined. Remove the bowl from the mixer and give the mix a final hand whisk to ensure there are no lumps. Add the lemon juice to taste and set aside.
Once the crumb is baked and cooled, blitz in a food processor to a fine crumb. Reduce the oven to 120°C.
Fill the base of the prepared cake tin with the crumb, packing it down lightly with the back of a dessert spoon to ensure an even spread. Pour the cheesecake mixture into the crumb-lined cake tin.
Make a water bath by placing a piece of paper towel in the base of a high-sided roasting tin. Sit the cheesecake in the roasting tin (the paper towel will stop it from sliding around) and pour in enough hot water to come one-third up the side of the cheesecake tin. Carefully lift the tin into the oven and bake for about 60 minutes, or until the edges are set but it still has a slight wobble in the centre.
To make the topping, mix together the sour cream, sugar and vanilla with a plastic spatula until runny and pourable. Starting from the outside, pour the topping over the cheesecake, smoothing it gently towards the centre with a spatula. Return to the oven and bake for a further 15 minutes. Remove from the oven and allow the cheesecake to cool in the water bath until it reaches room temperature. Gently cover the cheesecake with clingfilm and refrigerate overnight.
The next day, cover a flat plate or board with clingfilm. Gently remove the paper from the side of the tin (this should loosen the cheesecake) and place the prepared plate/board on top of the cheesecake. Flip the cheesecake over quickly and place the plate on the work surface. Tap the base of the tin and lift a side of the tin – with a wiggle the cheesecake should release. Peel off the baking paper and invert again onto a serving plate so it is top-side up.
Serve chilled either by itself or topped with fruit (I like berries, poached stone fruit or passionfruit pulp). Enjoy!
Recipe adapted from ‘The cheesecake (that you will love the most)‘ in Beatrix Bakes
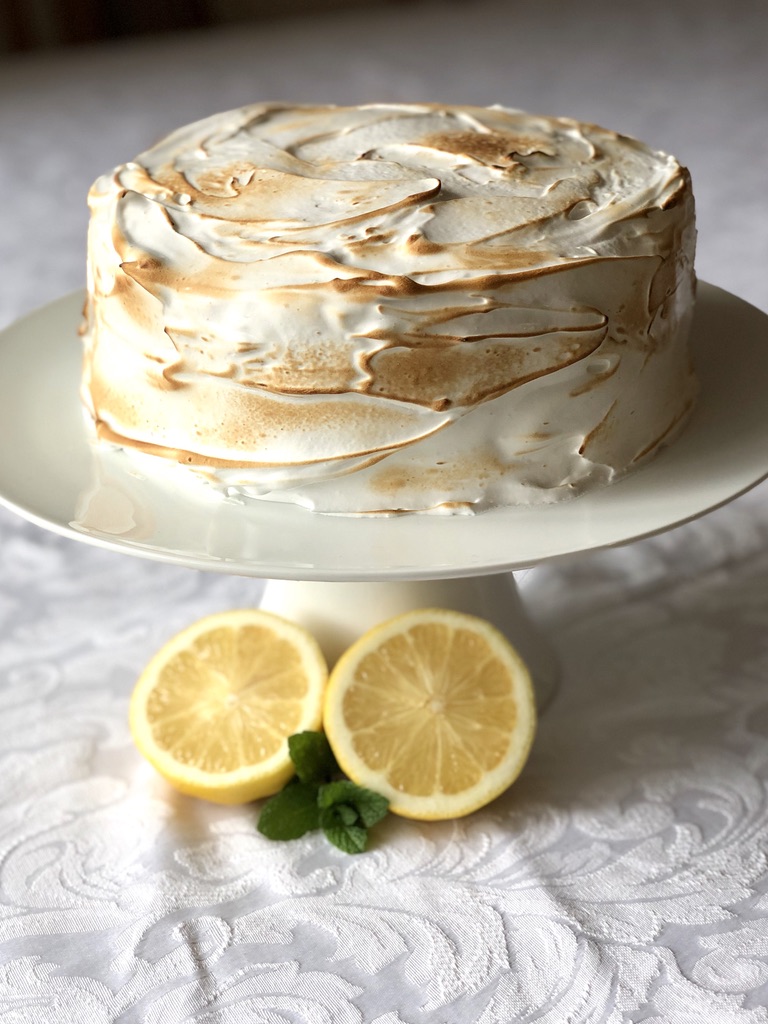
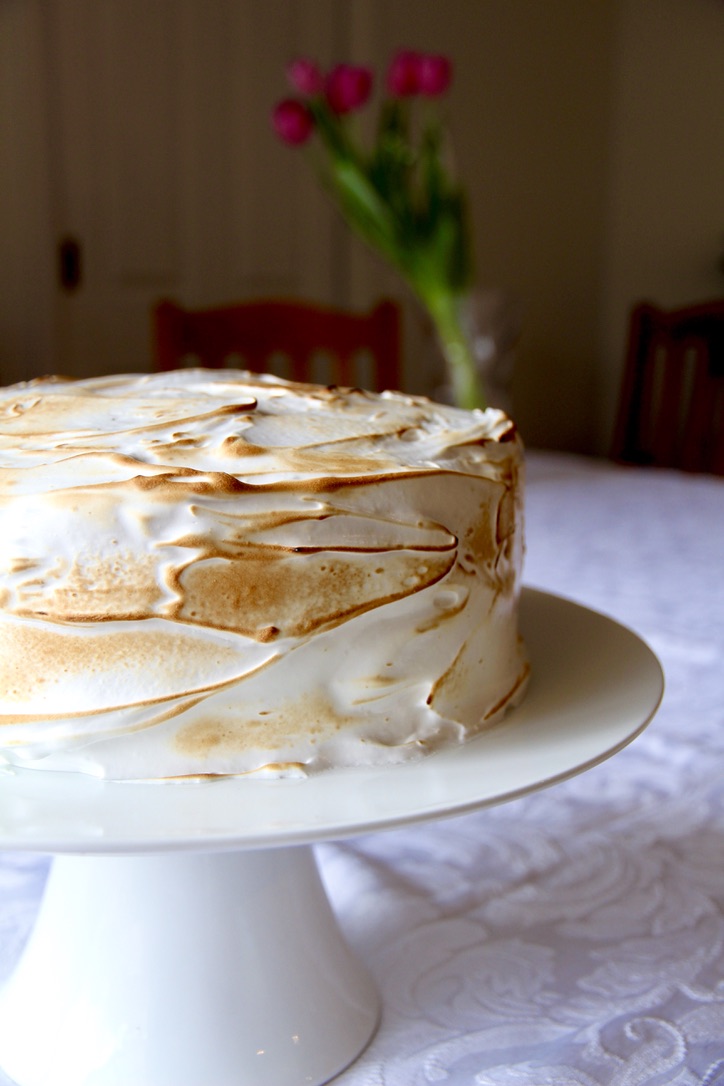
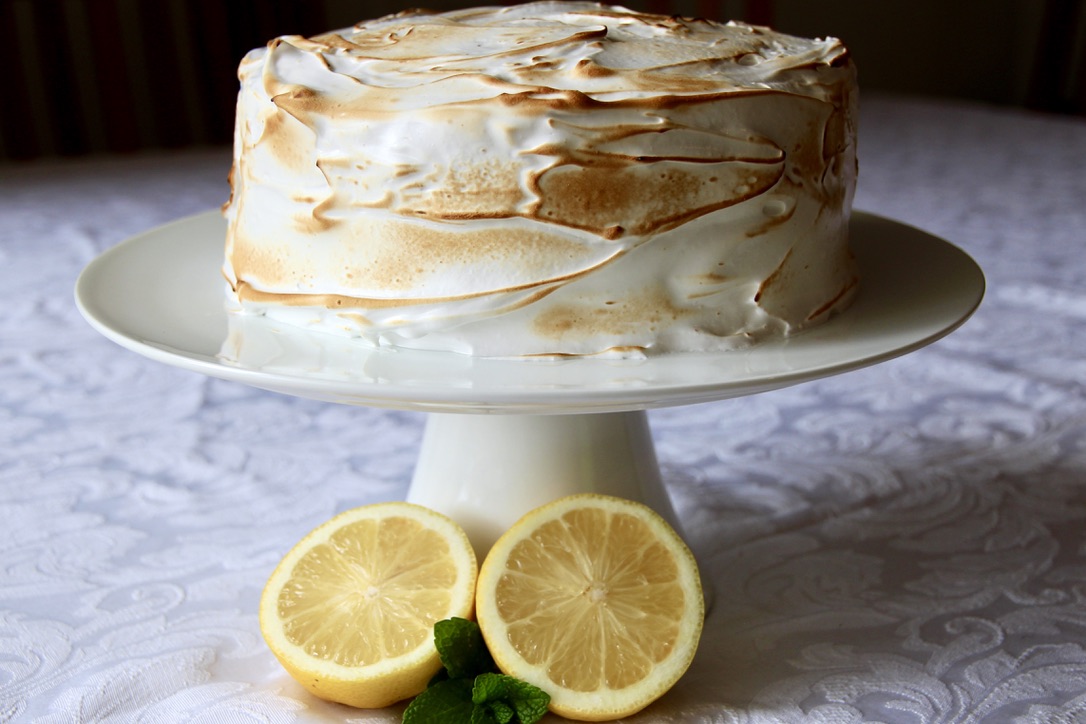
Light as a feather sponge cakes sandwiched with tangy lemon curd and enrobed in pillowy torched meringue – what’s not to love?! I made this cake for my 26th birthday and it has become a favourite. It is best to make the lemon curd the day ahead and the meringue just before serving.
Ingredients (serves 12) Lemon Curd (makes 2 cups) 1 cup white sugar
3 eggs
1 cup fresh lemon juice (approx. 4-5 lemons)
Zest of 2 lemons
115g butter, melted
Sponge Cake 4 eggs
3/4 cup caster sugar
1 cup self-raising flour
1 tablespoon cornflour
10g butter
1/3 cup boiling water
Meringue 3 egg whites
3/4 cup white sugar
1 teaspoon vanilla extract
Kitchen blowtorch (optional)
To make the lemon curd, whisk together the sugar and eggs in a large microwave safe bowl until thoroughly combined. Whisk in lemon juice, zest and melted butter. Cook in the microwave on full power for 50 second intervals, whisking after each interval. You will know your lemon curd is ready when it coats the back of a metal spoon (approximately 3-5 50 second intervals). Pour into a sterile jar or container and allow to cool to room temperature before covering it with a lid and storing it in the fridge.
To make the sponges, line and grease two deep 20cm round cake pans. Preheat oven to 180°C (160°C fan-forced).
In a large bowl, beat eggs with electric mixer until thick and foamy. Gradually add sugar, about a tablespoonful at a time, beating until sugar is dissolved between additions (total beating time approx. 10 minutes). Sift flour and cornflour together over the egg mixture. Gently fold to combine. Combine butter and water and gently fold through egg mixture.
Divide mixture evenly into prepared pans. Bake sponges about 25 minutes or until a skewer inserted comes out clean. As soon as the sponges are baked, turn out upside-down onto wire racks covered with baking paper to cool.
Once the cakes are completely cool, glue one sponge to a cake stand or serving plate using lemon curd. Spread a generous layer of lemon curd over the top of the cake and gently place the second sponge on top, taking care not to squeeze out too much of the curd from the middle (scrape away any excess from the sides).
To make the meringue, use electric beaters to whisk the egg whites and sugar in a large heat-proof bowl until frothy. Fill a medium saucepan with a few inches of water and place over a medium heat. Place the mixing bowl on top of the saucepan to create a double boiler. Whisking constantly with the beaters, heat the egg white mixture until the sugar dissolves completely and it is warm to the touch. Take the bowl off the saucepan, add the vanilla and mix on high until you have medium-stiff glossy peaks.
Working quickly, heap the meringue mixture onto the top of your sponge cake and gently spread down the edges with a metal spatula until the cake is completely covered. Create some texture with the meringue on the sides and top of the cake (this is one time where you don’t want it to be perfectly smooth). Use a blowtorch on low-medium to toast the meringue until it is your desired colour. Serve immediately.
Note: the cake is best eaten on the day it is made as the meringue changes texture, however it is still good the following day. Store covered at room temperature.
Lemon curd adapted from My Baking Addiction microwave lemon curd.
Sponge cake adapted from the Australian Women’s Weekly ‘Best Ever Sponge Cake’.
Meringue icing adapted from The Cake Blog lemon meringue cake.
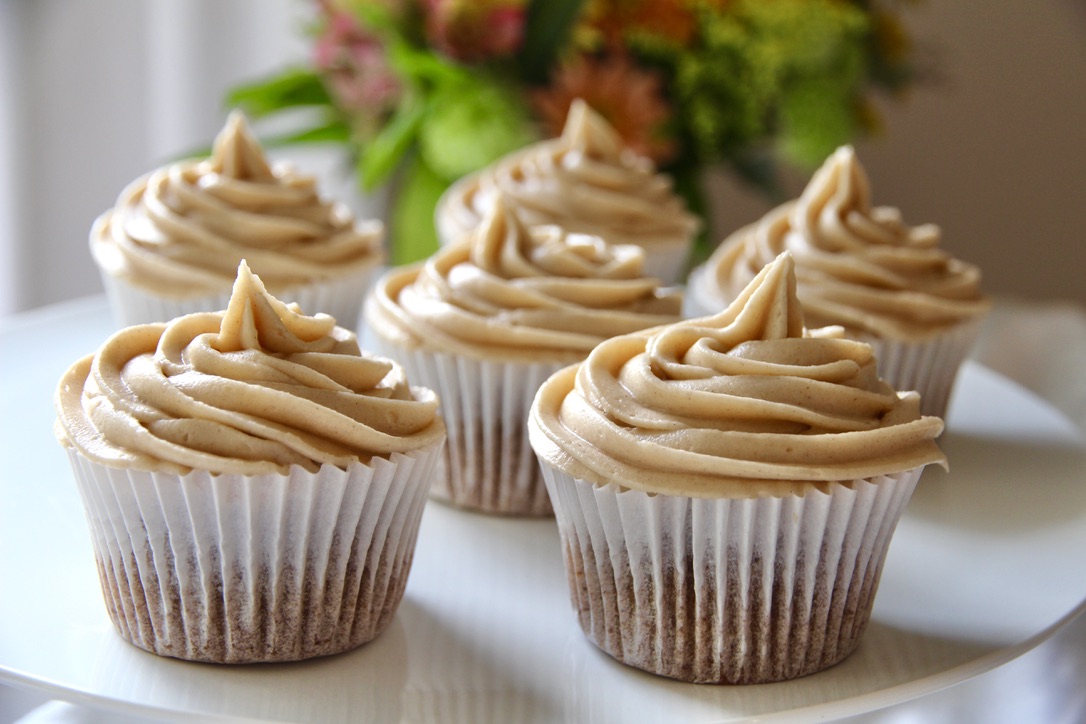
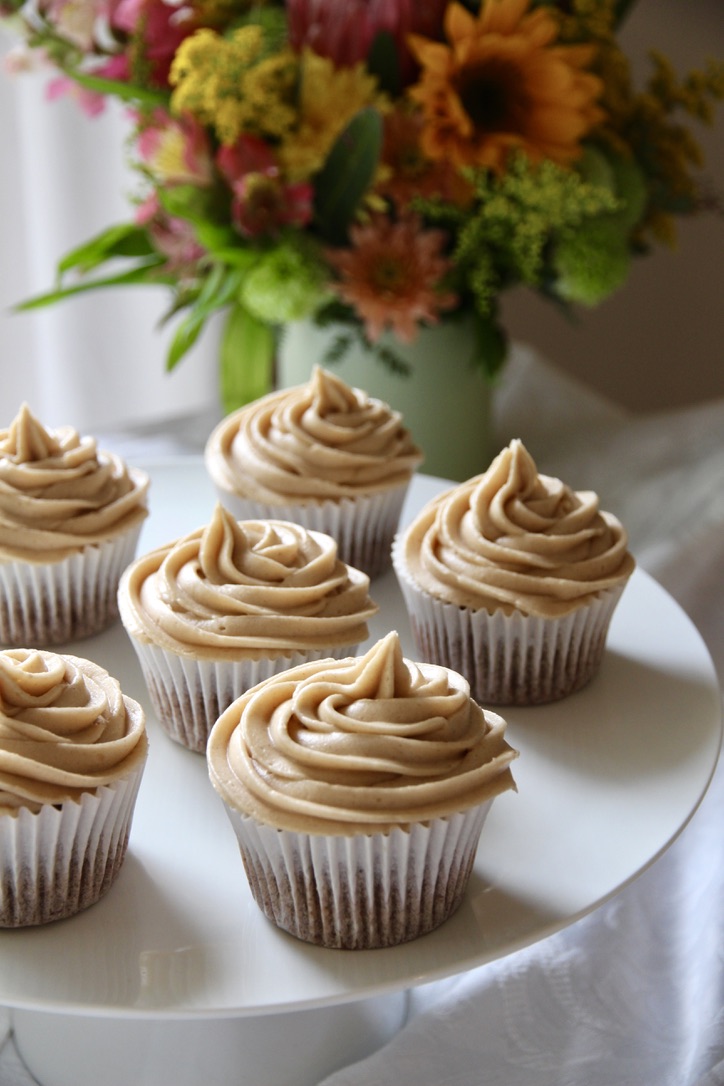
Hints of cinnamon, ginger, nutmeg, cloves and allspice combine beautifully with the natural sweetness of roasted pumpkin and, when topped with a light and airy cream cheese icing, make these the Autumnal cupcakes of my dreams. Try and stop at one!
Note: it is best to make the pumpkin puree the day before.
Ingredients (makes 12) ½ a butternut pumpkin (approx. 550g)
1 cup plain flour
1 teaspoon baking powder
½ teaspoon bicarb soda
1 teaspoon ground cinnamon
½ teaspoon ground ginger
½ teaspoon ground allspice
¼ teaspoon ground cloves
¼ teaspoon ground nutmeg
½ cup vegetable oil
2 eggs
¾ cup brown sugar
1 teaspoon vanilla extract
To make the pumpkin puree, preheat oven to 180°C fan-forced. Line a large baking tray with baking paper. Peel and de-seed the pumpkin and cut into 3cm pieces. Bake for approximately 40 minutes or until pumpkin is golden and tender. Once cooled, blitz in a blender until silky and smooth. Refrigerate until required.
Preheat the oven to 180°C fan-forced. Line a 12-hole muffin tin with patty pans.
Whisk the flour, baking powder, bicarb soda and spices together in a large bowl and make a well in the centre. In a separate bowl, whisk 1 cup pumpkin puree, oil, eggs, brown sugar and vanilla until combined. Pour the wet ingredients into the dry ingredients and gently stir with a silicone spatula until just combined.
Divide the batter evenly between the 12 patty pans. Bake for 18-25 minutes, or until the cupcakes bounce back when touched. Cool for 5 minutes in the tin before transferring to a cooling rack.
To make the icing, add the cream cheese and butter to a large bowl and beat with a handheld mixer on high speed until smooth and creamy. Add vanilla, cinnamon and icing sugar and beat on low speed until just combined. Switch to high speed and beat for 2 minutes until light and airy. If the icing is too runny, add extra icing sugar.
Once the cupcakes have cooled completely, spoon the icing into a piping bag fitted with a large star piping tip (I use Wilton 1M). Ice the cupcakes in a circular motion from the outside in for a softserve look. Enjoy!
Recipe adapted from ‘Pumpkin Cupcakes with Cream Cheese Frosting’ from Sally’s Baking Addiction.
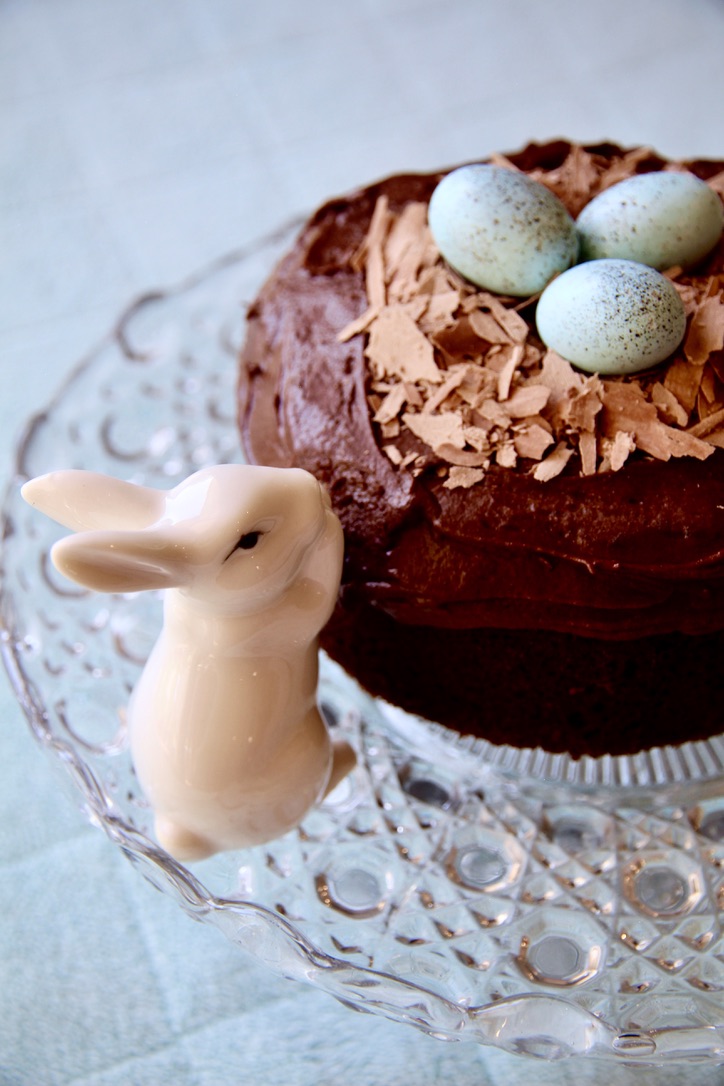
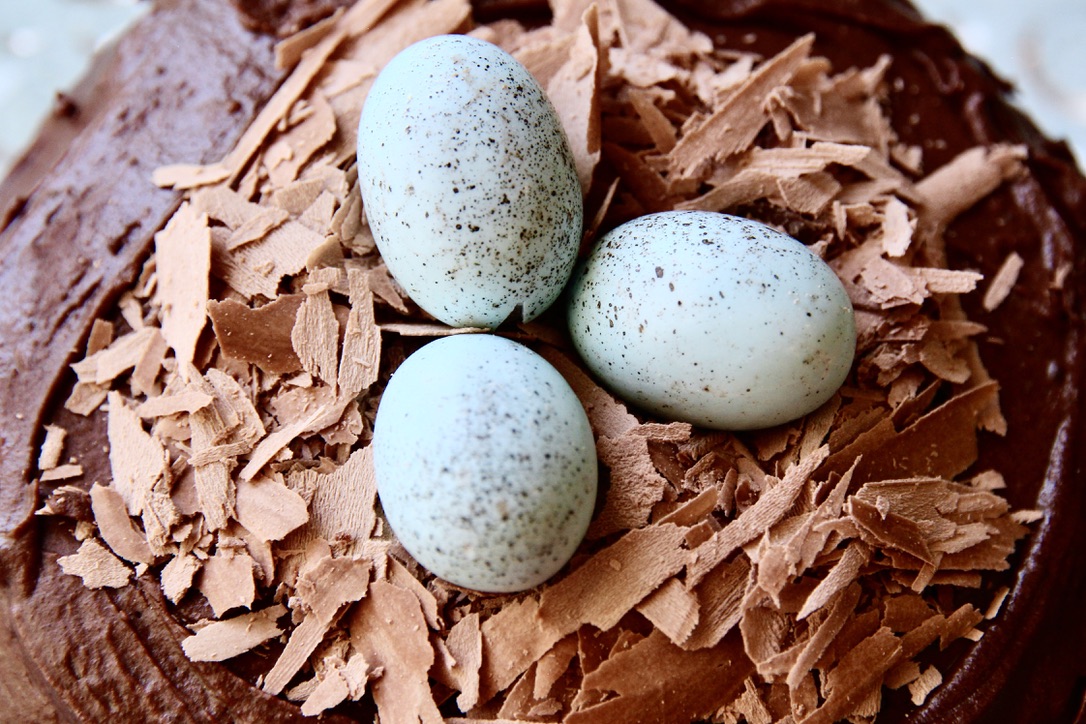
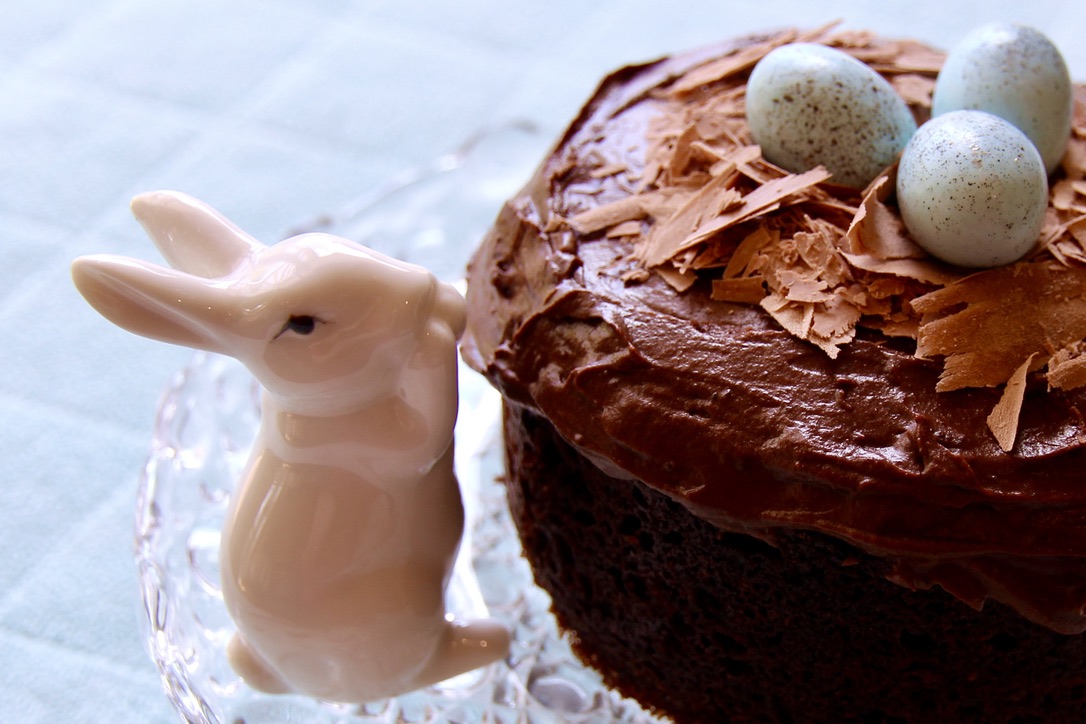
Happy (almost) Easter everyone! Today I’m sharing my super simple recipe for these adorable miniature chocolate cakes topped with a Flake nest and speckled eggs. To make it even easier, feel free to use a packet mix cake (I like Betty Crocker’s Devil’s Food Cake mix).
Ingredients (makes 2 10cm cakes, 1 10cm cake and 12 cupcakes, or 24 cupcakes)
125g butter, softened
1 teaspoon vanilla extract
1¼ cups caster sugar
2 eggs
1 1/3 cup self-raising flour
½ cup cocoa powder
2/3 cup (160ml) water
90g dark chocolate melts
30g butter
1 cup icing sugar
2 tablespoons hot water
1 packet Speckled Easter eggs (I used Darrell Lea)
3 Flake bars, lightly crushed
Method
Preheat the oven to 180°C (160 fan-forced). Spray a 10cm round cake pan with cooking oil and line the base with a baking paper. Fill a 12-hole muffin tin with patty pans*.
Place the butter, vanilla, sugar, eggs, sifted flour and cocoa, and water into a large bowl. Beat with an electric mixer on low speed until the ingredients are just combined. Beat the mixture for a further 3 minutes on medium speed until smooth and pale in colour.
Fill the round cake pan about 2/3 way full and divide the remaining mixture evenly among the patty pans. Bake the cupcakes for approximately 18-20 minutes and the mini cake for 25-30 minutes or until a skewer inserted comes out clean. Leave to cool on a wire rack.
Meanwhile, make the chocolate icing. Place the chocolate and butter in a small heatproof bowl. Half-fill a small saucepan with water; bring to the boil and then turn down the heat to a simmer. Put the bowl of chocolate mixture on top of the saucepan and stir until smooth. Add a little of the sifted icing sugar and some of the water; stir until mixture is smooth. Keep adding the sifted icing sugar and the water, a little bit at a time, stirring, until the icing is spreadable.
When the cakes are completely cold, spread with chocolate icing using a metal spatula. Shape the Flake pieces into a nest on top of the cakes and top with speckled eggs. Enjoy!
*Alternatively spray and line a second 10cm round cake pan, or prepare two 12-hole muffin tins with patty pans.
Cake and icing recipe adapted from Australian Women’s Weekly ‘Quick Mix Chocolate Cake’ and decoration inspiration from taste.com.au
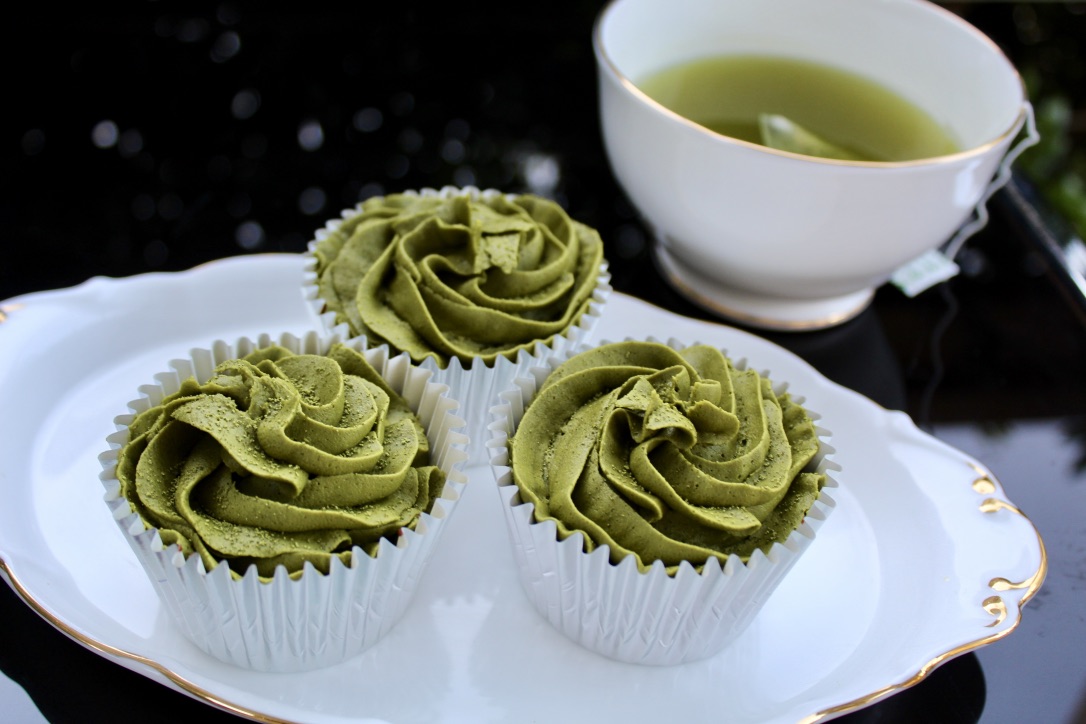
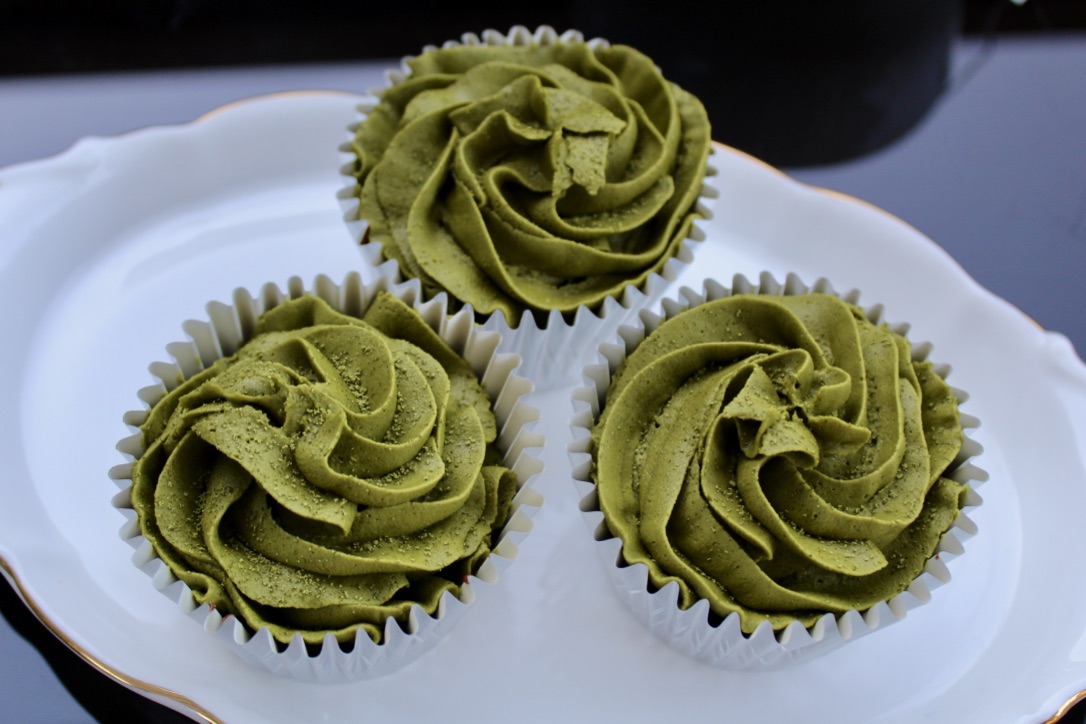
I can’t believe it’s already March! 2019 is flying by and that means that St. Patrick’s Day is just around the corner, and with it, my desire to tint food all shades of green.
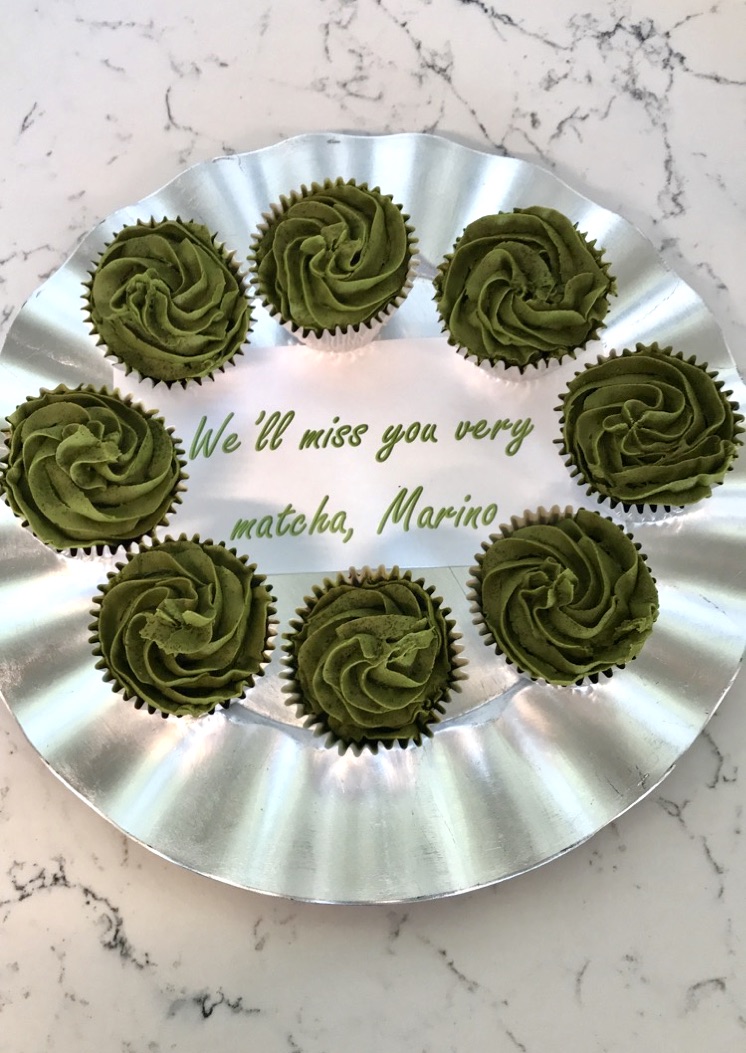
I have wanted to make these extraordinary looking cupcakes ever since I received the Hummingbird Cupcake Bakery Cookbook in 2011, and finally had the opportunity to when farewelling a matcha-loving colleague last month.
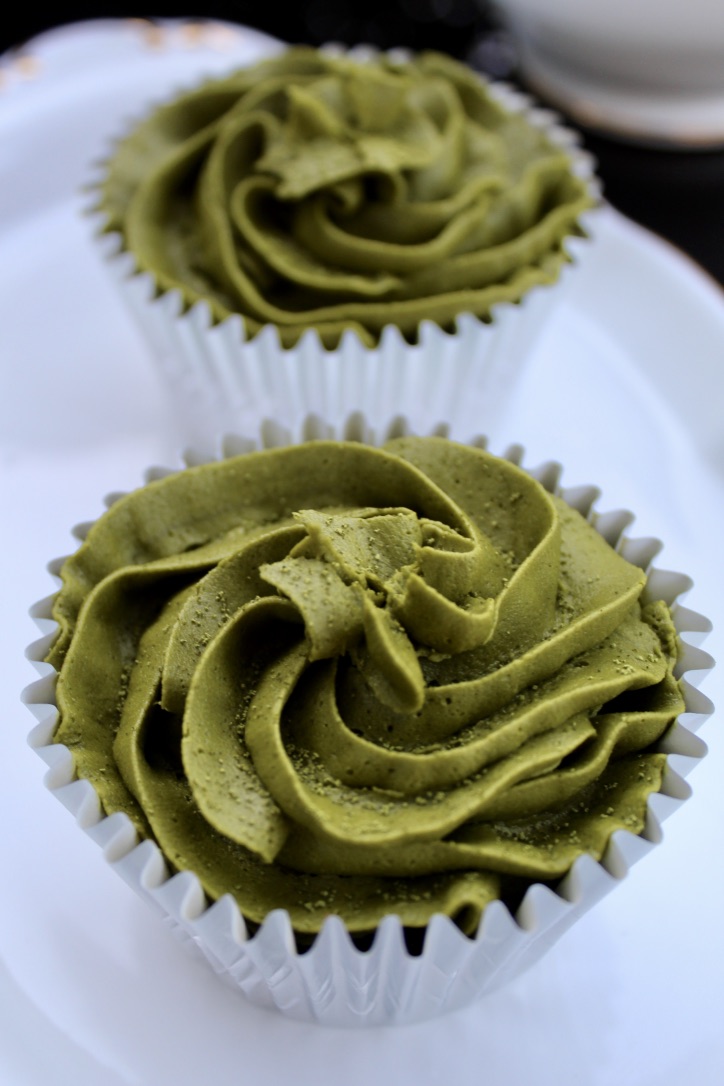
The cakes themselves only have a mild matcha flavour but the frosting really packs a punch. If you’re not a big matcha fan or want to appeal to a wider audience, I would recommend only adding in a fraction of the matcha powder into the frosting initially and adding more to taste. Or alternatively, frosting the cakes with vanilla buttercream instead.
Matcha frosting 250g icing sugar
80 butter
20g Matcha green tea powder (plus extra to decorate)
25ml milk
1 teaspoon vanilla extract
Method Put the milk and green tea bags in a jug, cover and refrigerate for a few hours, or overnight.
Preheat the oven to 170ºC. Line a 12-hole muffin tin with patty pans.
Put the flour, cocoa powder, sugar, baking powder and butter in a large bowl and beat with an electric mixer on low until it reaches a sandy consistency with everything combined.
Combine the tea-infused milk (with tea bags removed) with the egg and vanilla extract. Slowly pour half into the flour mixture, beating until all ingredients are well combined. Repeat with the remaining milk mixture. Mix for a further few minutes until the mixture is smooth.
Spoon the mixture into the patty pans until two-thirds full and bake for 20-25 minutes or until the cakes spring back when touched. Leave cakes in the tin for 5 minutes before turning onto a wire cooling rack to cool completely.
To make the frosting, beat together the icing sugar, butter and matcha powder on a medium-slow speed until it comes together. Turn the electric beater down to low and gradually add in the milk and vanilla. Continue beating for a further 5 minutes or until light and fluffy.
Using a Wilton 2B icing nozzle, pipe the frosting onto the cupcakes and sprinkle with extra matcha powder. Enjoy!
Recipe adapted from ‘Green Tea Cupcakes’ from The Hummingbird Bakery Cookbook


 Lemon curd adapted from My Baking Addiction microwave lemon curd.