These adorable trifles are an ideal finish to a big meal (such as Christmas dinner) as they are light and fresh with zesty lemon curd and pops of blackberry. I’ve made 9 individual trifles here, but it also works as one large trifle for a Christmas centrepiece, you may just need to add some chantilly cream on top of the lemon curd layer to get sufficient height.
You’ll want to make the meringues, sponge and curd the day ahead so all you need to do is assemble.
Ingredients (serves 9) Meringues 3 egg whites pinch of salt 3/4 cup caster sugar
1½-2 cups luscious lemon curd (or bought curd if you prefer) 1 vanilla sponge cake (or bought if you prefer) 2 x 300g jars blackberry jam (I use Beerenberg) 900g vanilla custard (I used Paul’s Double Thick Custard in French Vanilla) 2 punnets fresh blackberries Edible flowers (optional)
Method
To make the meringues, preheat oven to 100°C. Line 2 large trays with baking paper. Use a stand mixer with the whisk attachment to beat the egg whites with a pinch of salt until stiff peaks form. Add sugar, a table spoon at a time, beating until the sugar has dissolved between each addition. Keep beating until all of the sugar has been added and the mixture is thick, white and glossy. Transfer to a large piping bag with a large star nozzle (I used Wilton’s 2M). Pipe approximately 50 small rosettes of meringue onto the trays. Bake for 1 hour and 15 minutes, then turn off the oven, prop open the door and leave to cool completely.
Cut the sponge cake in half and spread each half with a layer of blackberry jam. Then carefully cut the sponge cake into small cubes.
To assemble the trifle, put a layer of sponge cake pieces in the bottom of each glass, trying to get a flat and even layer. Spoon approximately 1 teaspoon of extra blackberry jam per glass and spread over the top of the sponge pieces.
Spoon a thick layer of vanilla custard on top of the jam, followed by a generous dollop of lemon curd, then top with crushed meringue pieces and blackberries cut in half (approximately 6 halves per glass).
Repeat the layers – sponge cake, blackberry jam, custard and curd. Then top with a few whole meringues, a couple of blackberries and an edible flower. If not serving immediately, leave off the meringues from the top until just before serving so they stay crisp.
Enjoy!
Meringue recipe adapted from Merle’s Kitchen by Merle Parrish.
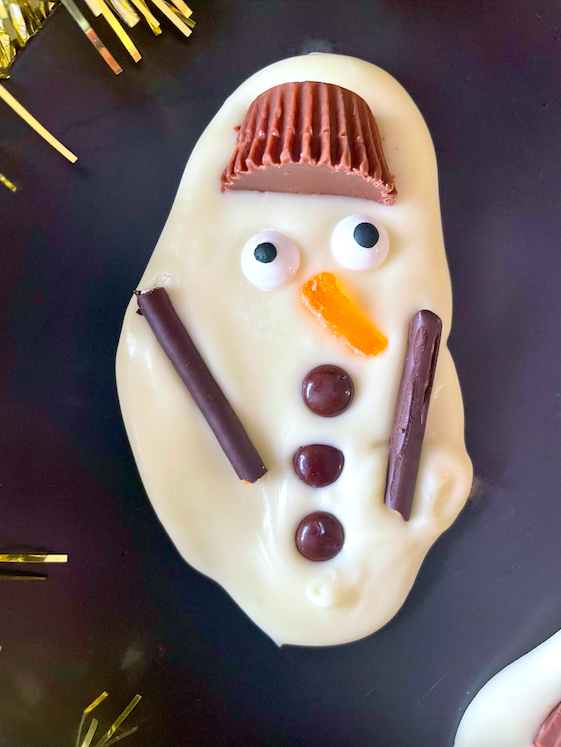
These adorable chocolate snowman puddles are such a fun and simple no-bake Christmas treat. Perfect for making with little ones – you really can’t go wrong!
Ingredients (makes 8) 290g packet white chocolate melts 1 packet mini Reese’s Peanut Butter cups 16 candy eyeballs 1 packet of jubes 1 packet mini M&Ms 1 packet chocolate Pocky sticks
Method
For the snowman’s hat, gently unwrap the mini Reese’s Peanut Butter cups and cut in half
For the snowman’s nose, thinly slice orange jube/s into 8 narrow triangles.
For the snowman’s arms, cut 16 4cm pieces of Pocky sticks, using only the chocolate section.
For the snowman’s buttons, separate out the red, green and brown mini M&Ms and ensure you have enough for 3 buttons per snowman.
Melt the white chocolate in a microwave-safe bowl on medium in 30 second bursts, stirring with a silicone spatula after each burst, until melted and smooth. Set aside to cool for 2 minutes.
Meanwhile, line 2 large baking trays with baking paper.
Divide your melted white chocolate into 8 roughly even puddles – 4 per tray.
Working quickly and using the picture as a guide, arrange the peanut butter cup ‘hat’, 2 eyeballs, jube nose, 3 M&M buttons and pocky stick arms on each puddle.
Leave to set at room temperature (or in the fridge if it’s warm). Serve and enjoy!
Recipe adapted from Woolworths fresh ideas magazine, December 2022.
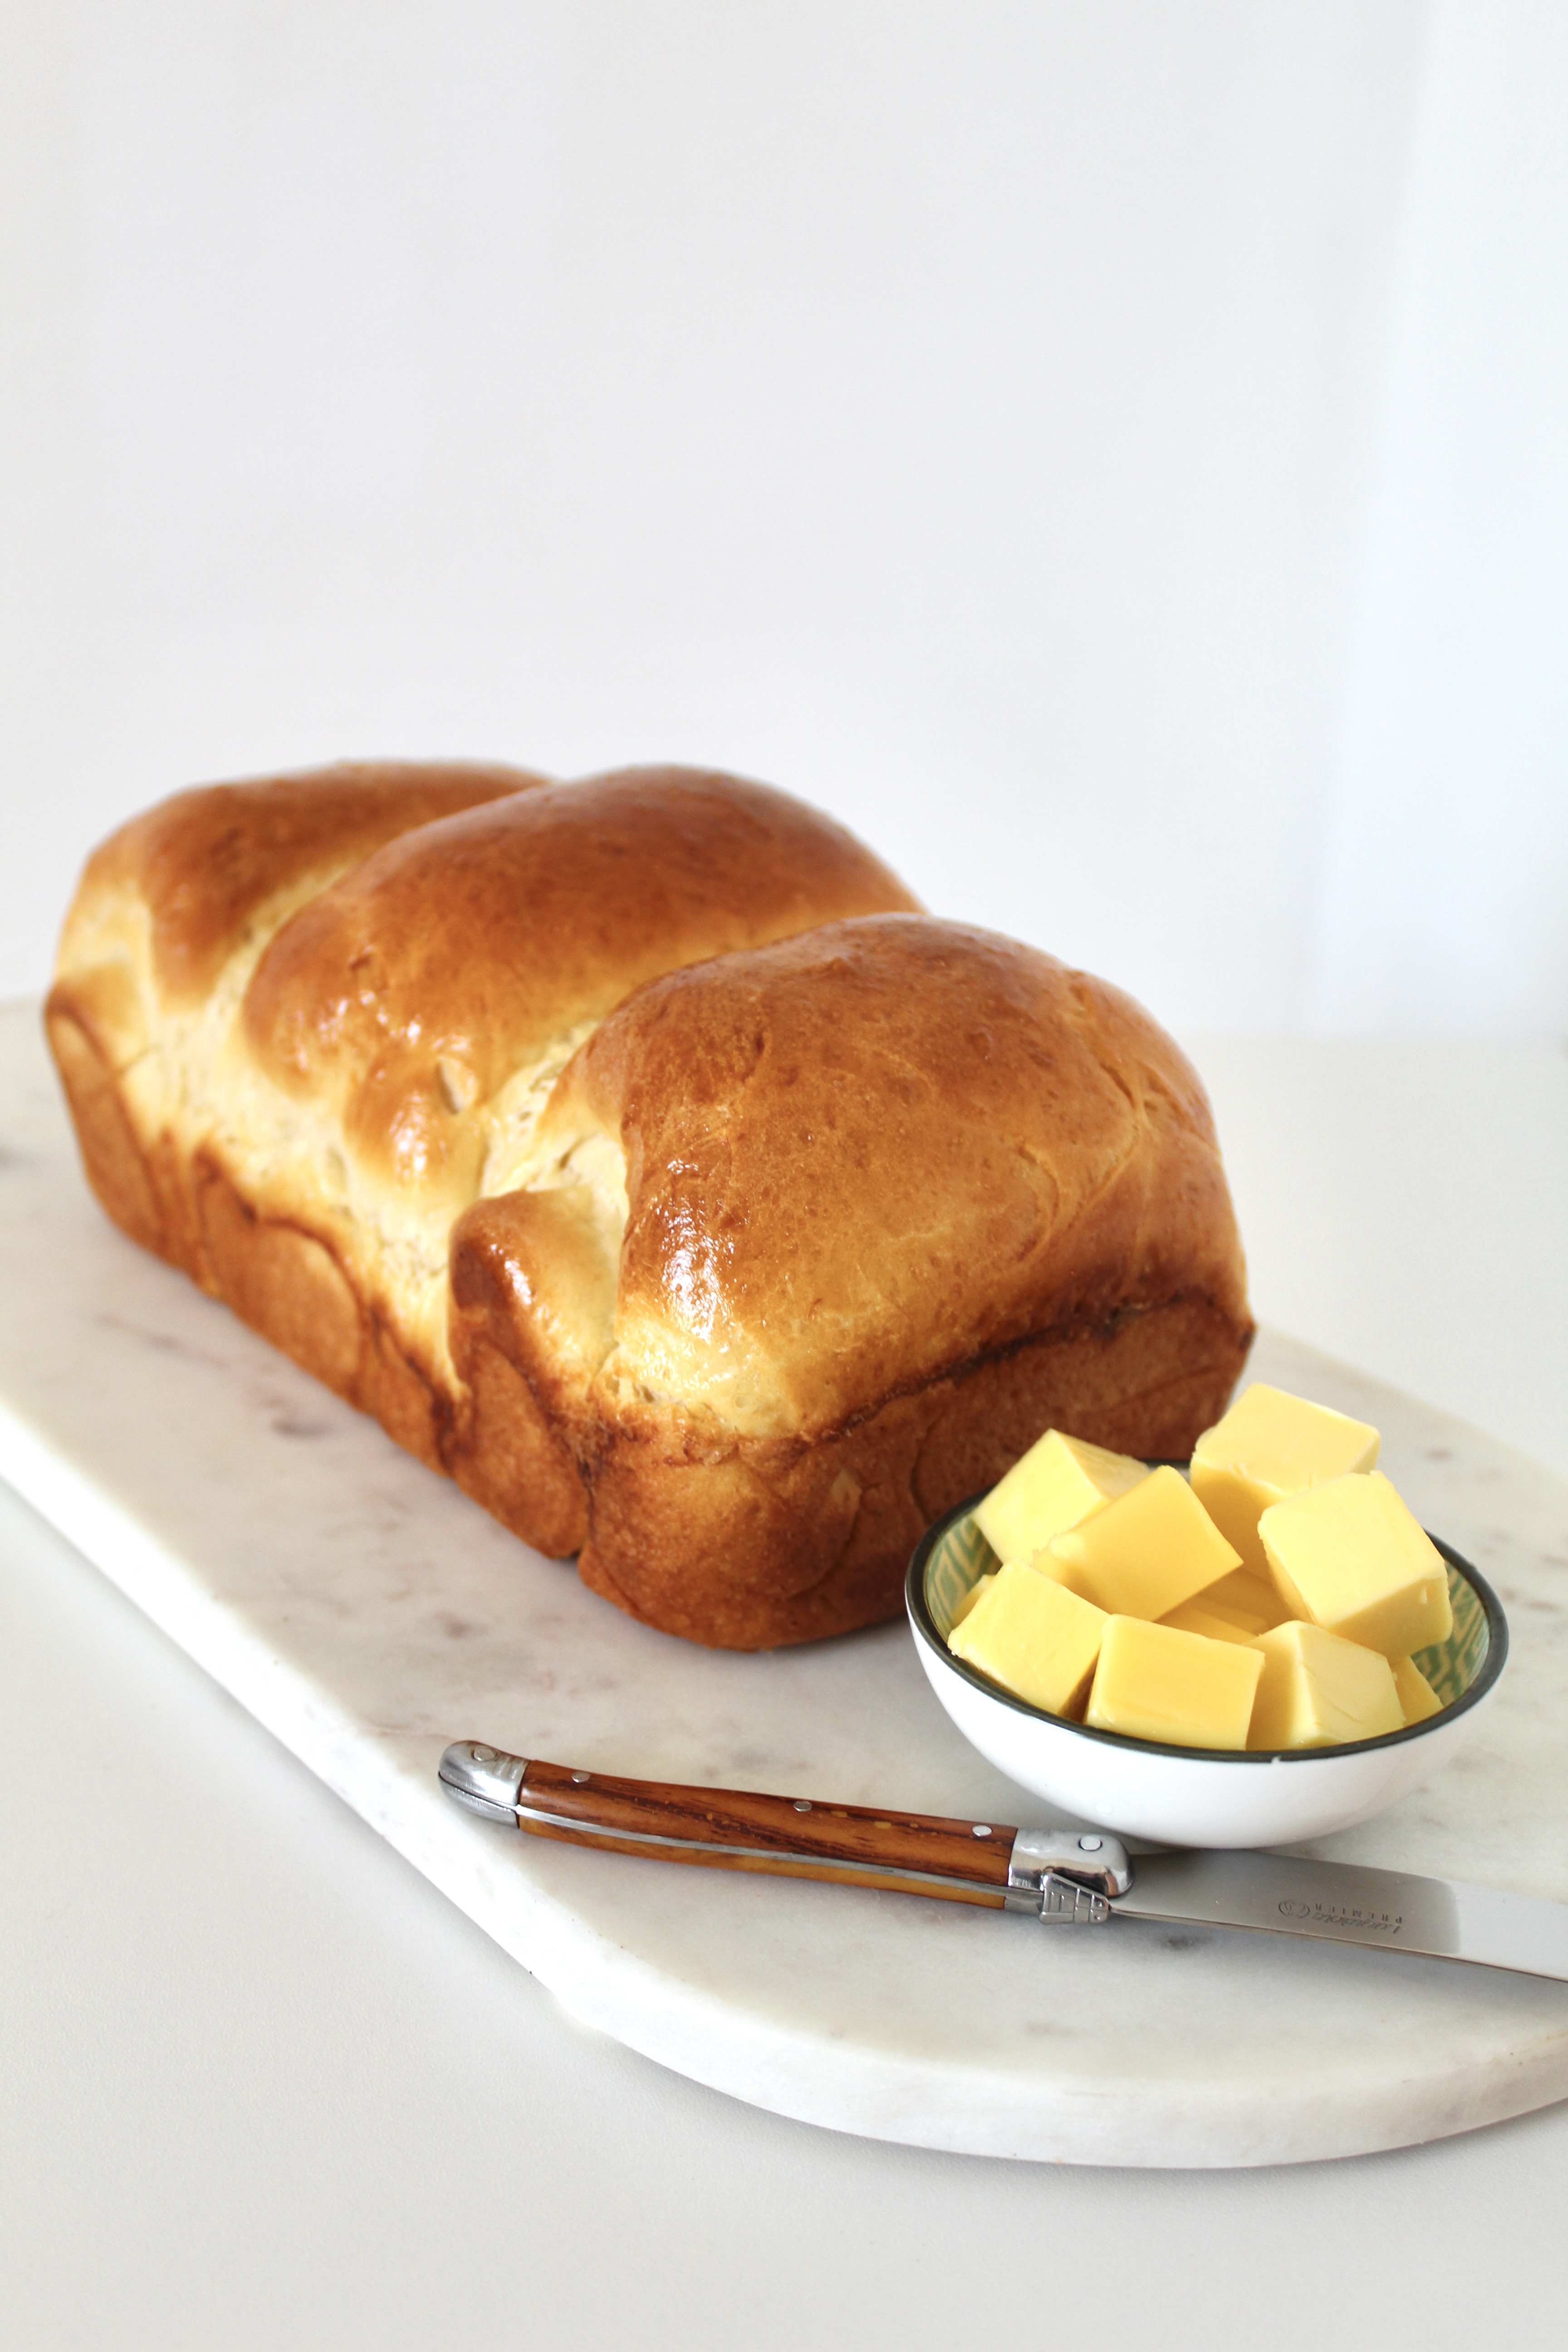
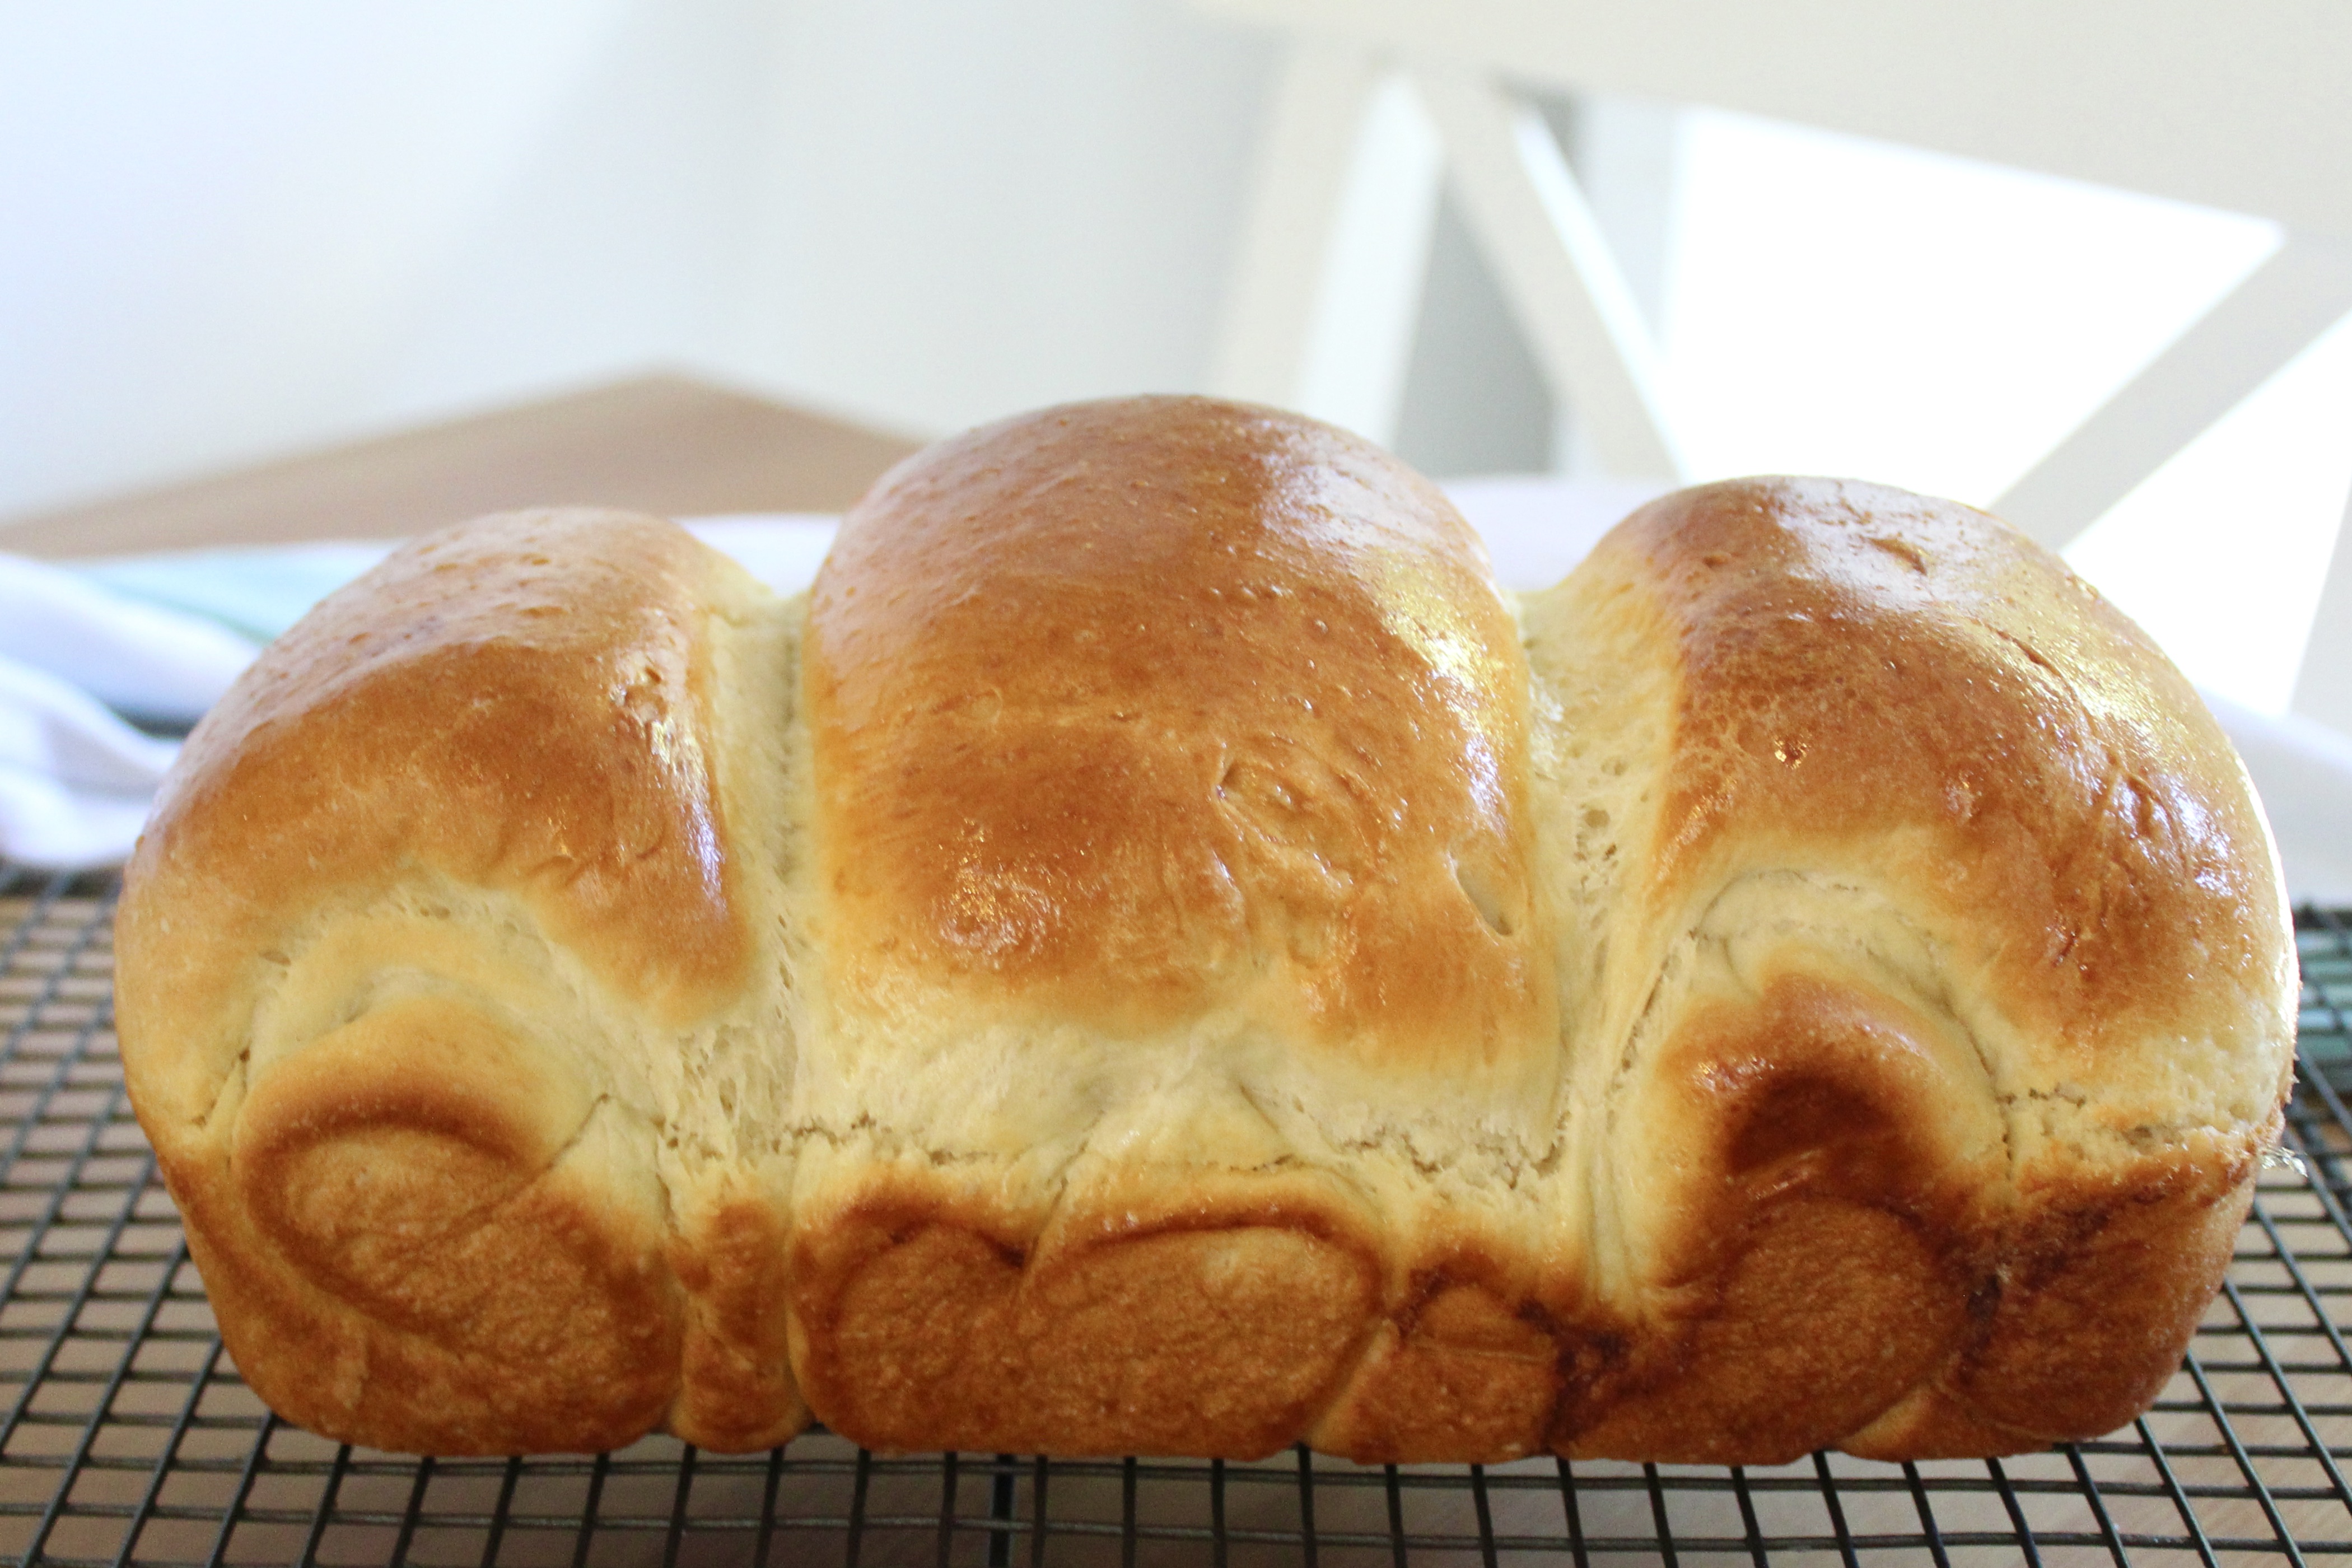
This bread is without a doubt the lightest, fluffiest loaf you’ll come across and with its shiny golden exterior and featherlight white centre, it’s as much a joy to look at as it is to eat. It’s also really simple to make so is perfect for bread making beginners.
This version uses a tangzhong method of making a roux out of flour and water to ensure soft, fluffy bread every time.
Ingredients (makes 1 large loaf) Tangzhong 25g bread flour 90ml water
Loaf 300g bread flour 7g sachet of fast acting yeast 120ml milk (lukewarm, not hot) 30g butter 40g caster sugar 1 egg
Glaze 1 egg
Method
Add water and flour to a small saucepan, whisk until free from lumps. Place over a low-medium heat and stir constantly until it thickens. Set aside to cool.
Once cooled, add the egg to the tangzhong and stir until combined. Add the bread flour, yeast, milk, butter, sugar and eggy tangzhong mixture to the large bowl of a standmixer. Use the dough hook of the standmixer on a medium spped to combine and knead the dough until it is no longer sticky (approximately 10-15 minutes). Add a small amount of extra flour if required.
Transfer dough to a lightly oiled bowl. Cover with a clean tea towel and leave to rise in a warm place until doubled in size (approximately an hour).
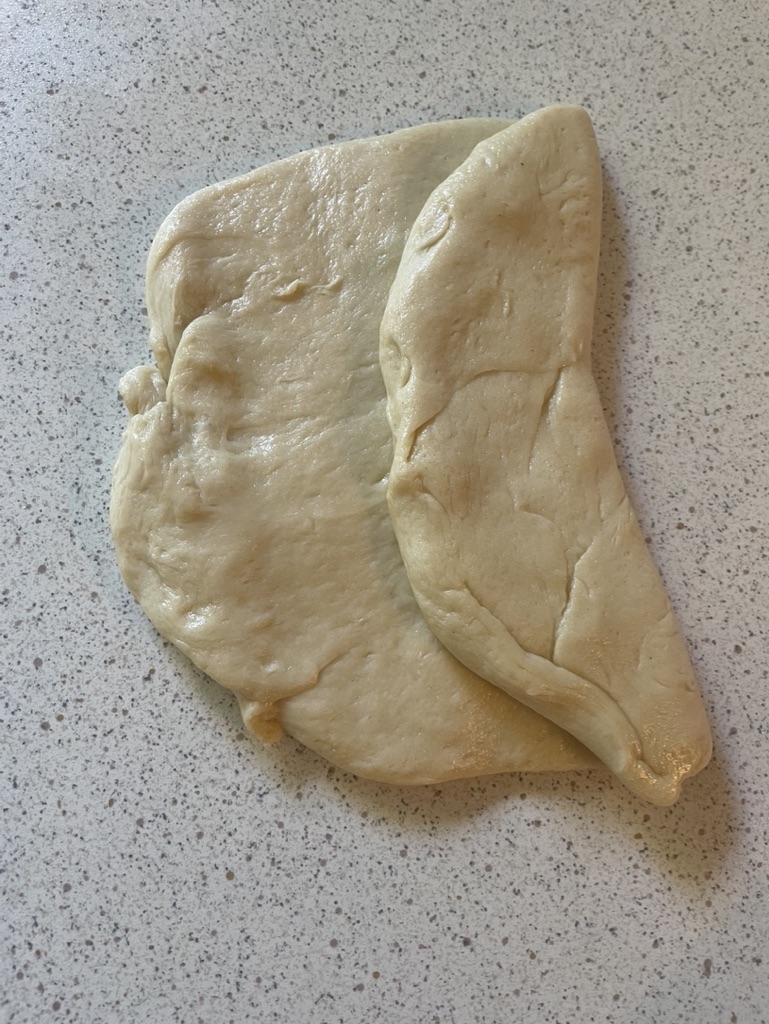
Once it has risen, punch down the dough and divide into three equal pieces. Set the other pieces to one side and use a rolling pin to shape a piece into an oval shape.
Fold one side of dough over to halfway across the remaining dough then fold the other side on top(see photos below). Roll up the piece of dough from the short side (bottom to the top of the middle picture below) as you would a cinnamon roll.
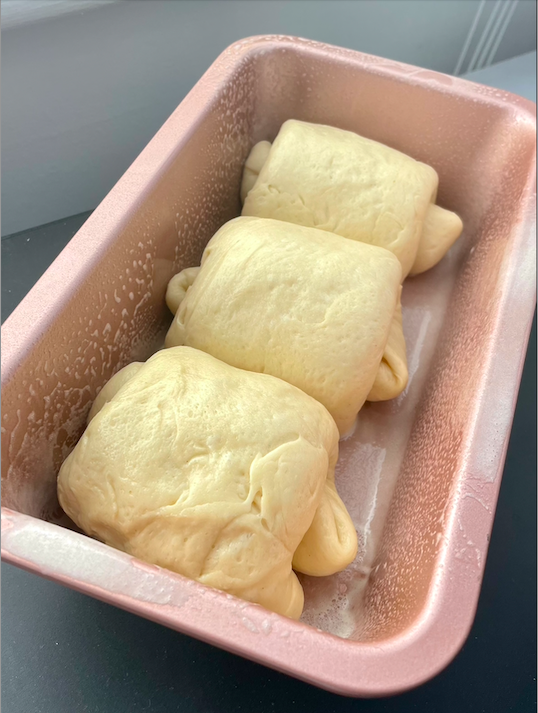
Repeat with the other pieces of dough then put all three rolls of dough in an oiled loaf pan.
Cover and leave to rise again until the loaf is just reaching the top of the pan.
Once nearly risen, preheat oven to 175°C (160°C fan-forced). Lightly beat the egg and brush the top of the loaf with egg wash.
Bake the loaf for approximately 30 minutes until golden brown. If it browns too fast, loosely cover with foil for the last part of cooking. Turn onto a cooling rack to cool before slicing.
Recipe adapted from Caroline’s Cooking ‘Japanese milk bread’.
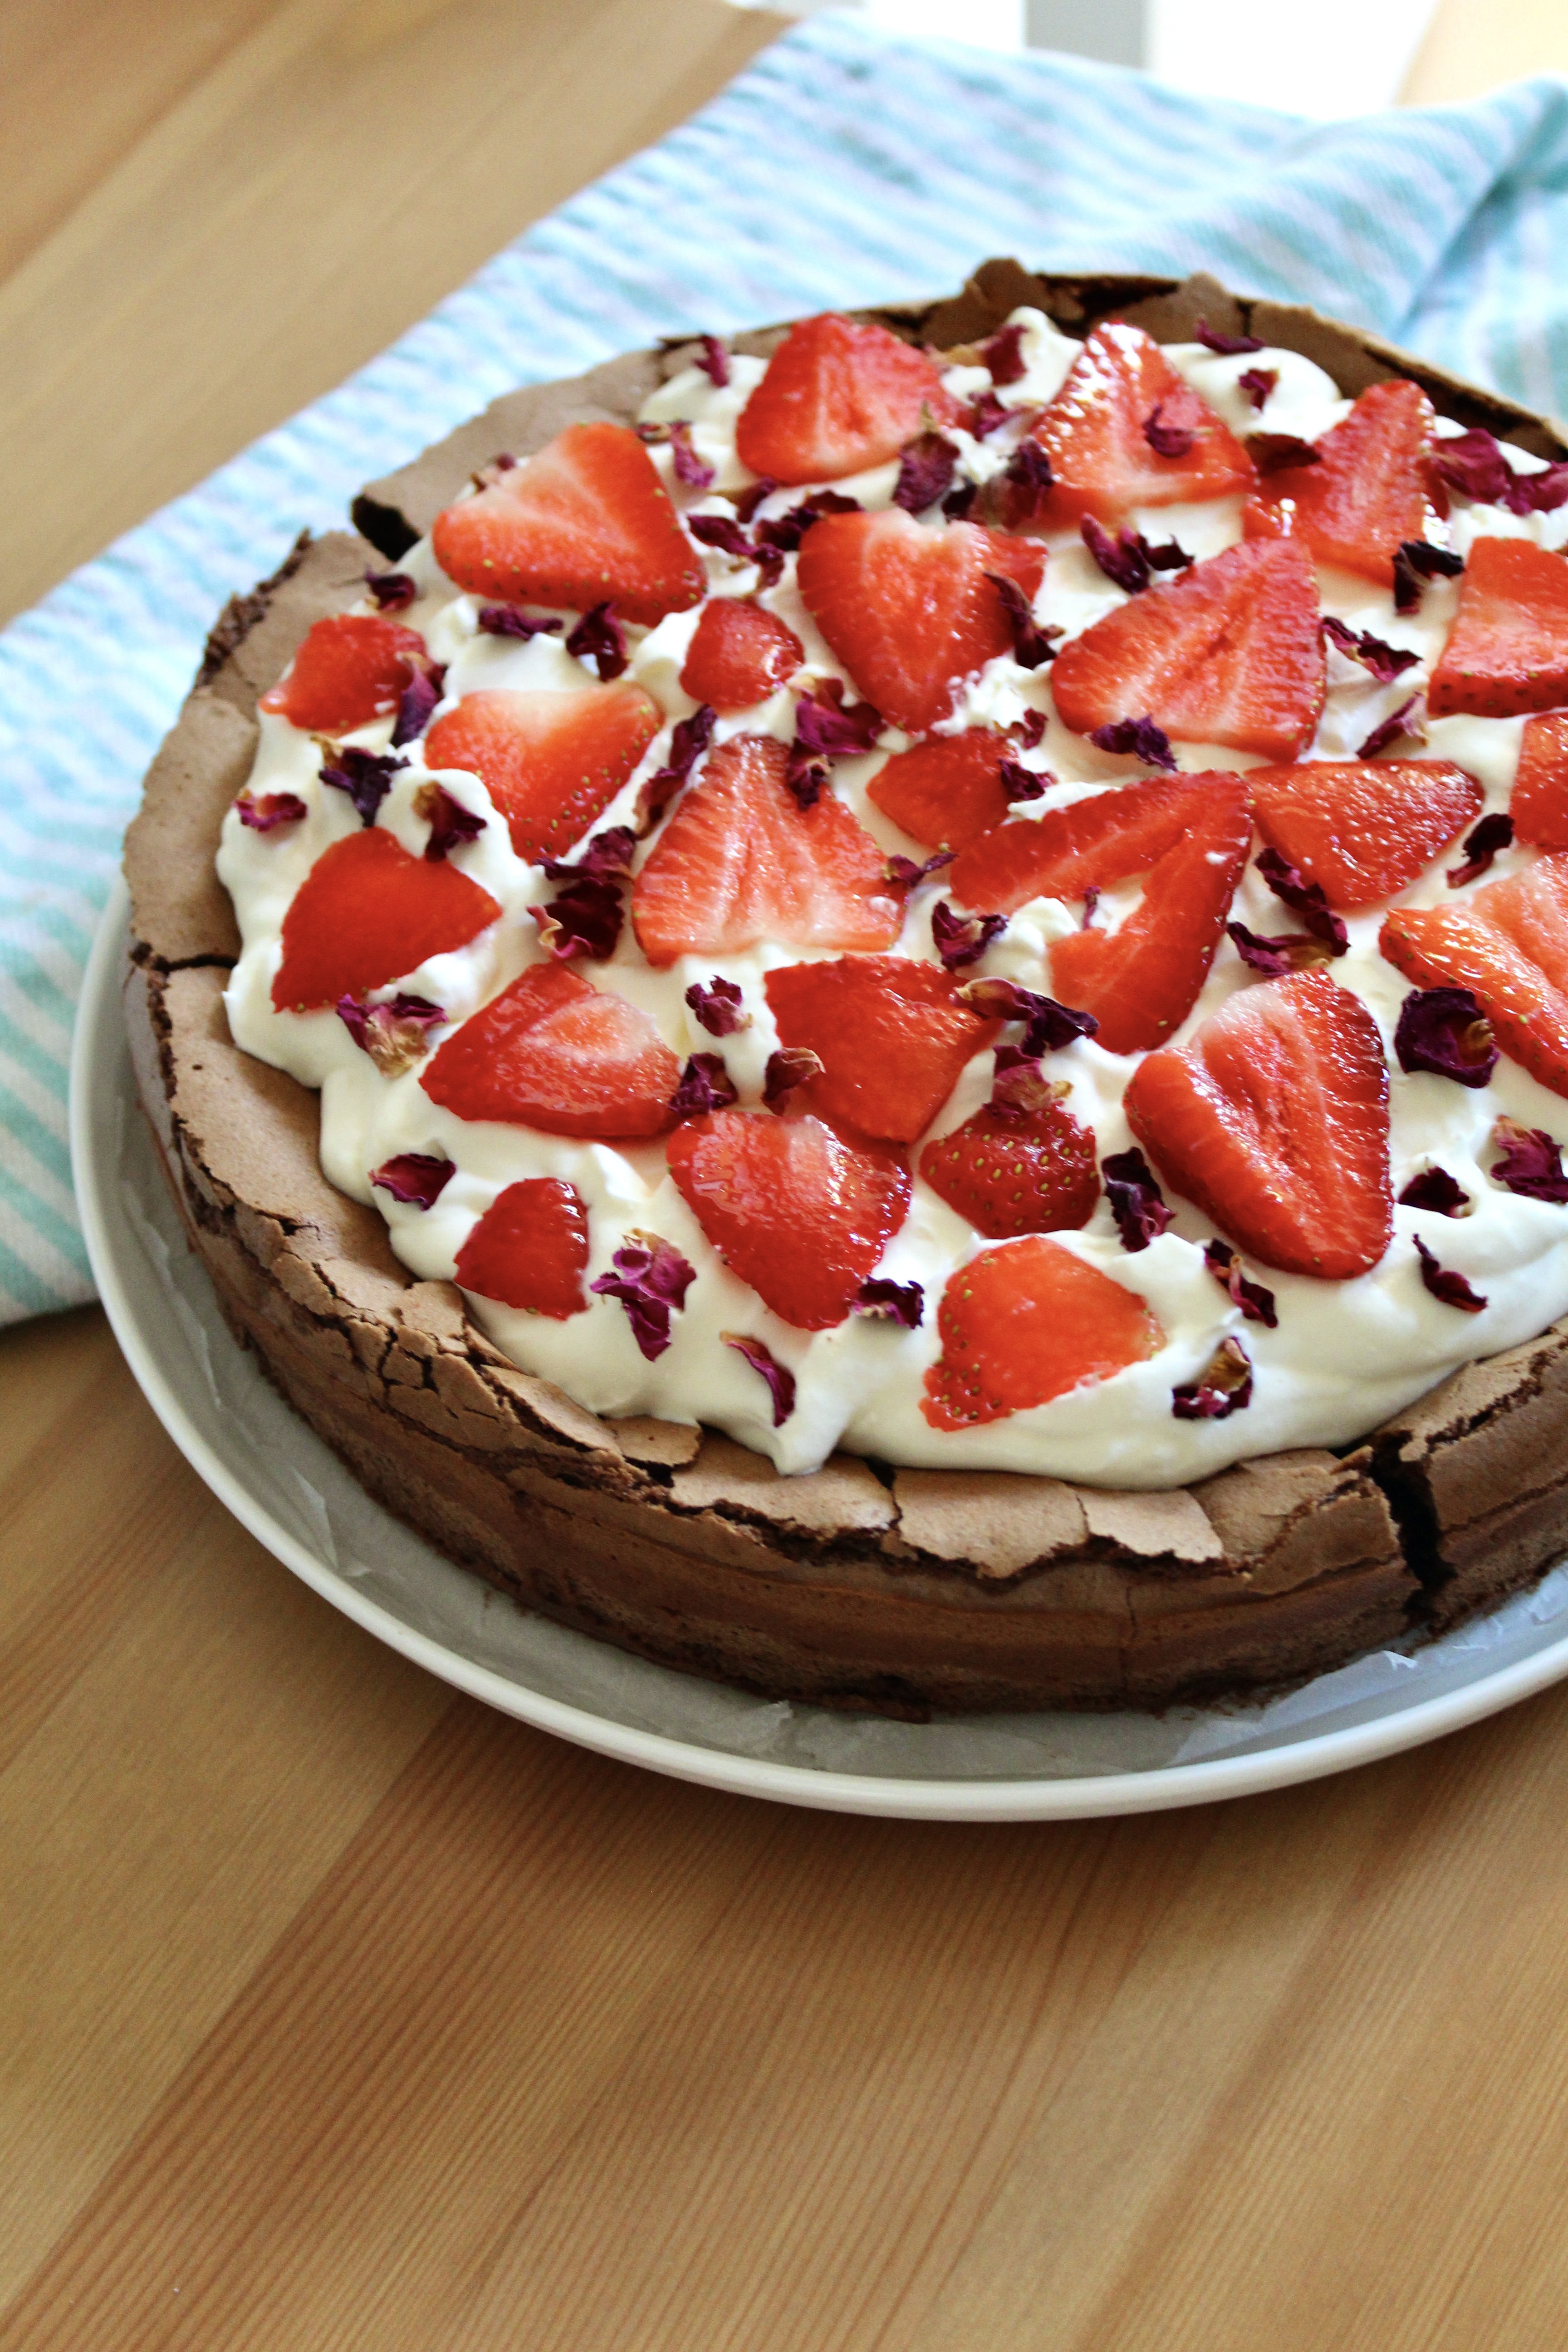
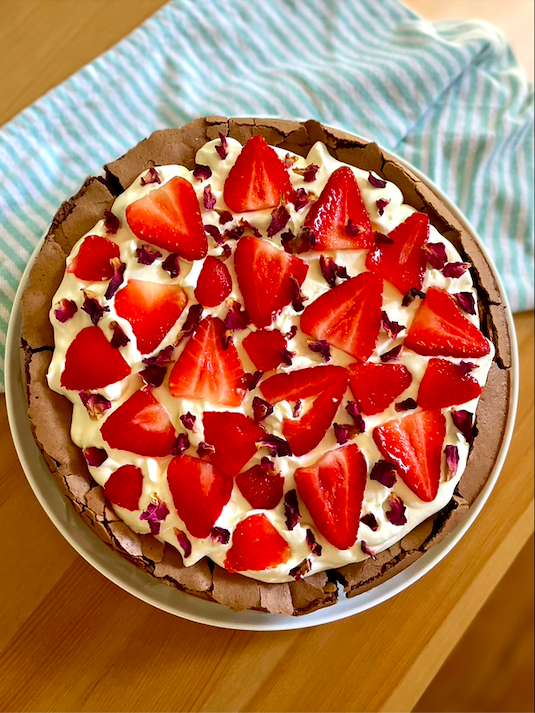
There’s something very freeing about a cake that’s supposed to crack, and that’s exactly what this one does – right before your eyes. But it’s the incredibly light, cloud-like texture of this cake that makes it so special (and gives it its name) due to its airy, flourless batter and whipped cream topping.
Ingredients (serves 8-10) 250g good quality dark chocolate, chopped 125g butter 6 eggs 175g caster sugar 300ml thickened cream 2 teaspoons icing sugar Fresh berries Edible rose petals (optional)
Method Preheat oven to 180°C (160 fan-forced). Grease and line the base of a 23cm springform tin.
Melt the butter in a small saucepan. Once melted, remove from the heat and stir in the chocolate until smooth and glossy.
Separate 4 of the eggs and set the whites aside. Using electric beaters or a stand-mixer, beat the yolks and remaining 2 whole eggs with 75g of the caster sugar on high speed for 3-4 minutes or until really creamy. Gently fold in the melted chocolate mixture.
In another bowl, whisk the eggwhites until they’re just frothy, then slowly add the remaining caster sugar while whisking until the mixture holds soft peaks.
Add a table spoon of the whisked eggwhites to the chocolate mixture to loosen it, then gently fold in the rest, maintaining as much of the air in the mixture as you can.
Pour into the prepared tin and bake for approximately 35 minutes or until it is no longer wobbly around the edges (but still soft in the centre).
Leave the cake in the tin to cool.
Once cooled, whip the cream and icing sugar until very thick and velvety.
Run a knife around the edge of the cake to loosen it from the tin and carefully transfer to a serving plate.
Top with the whipped cream, berries and rose petals. Enjoy!
Recipe adapted from the ‘Chocolate pomegranate cloud cake’ in Special Delivery by Annabel Crabb and Wendy Sharpe
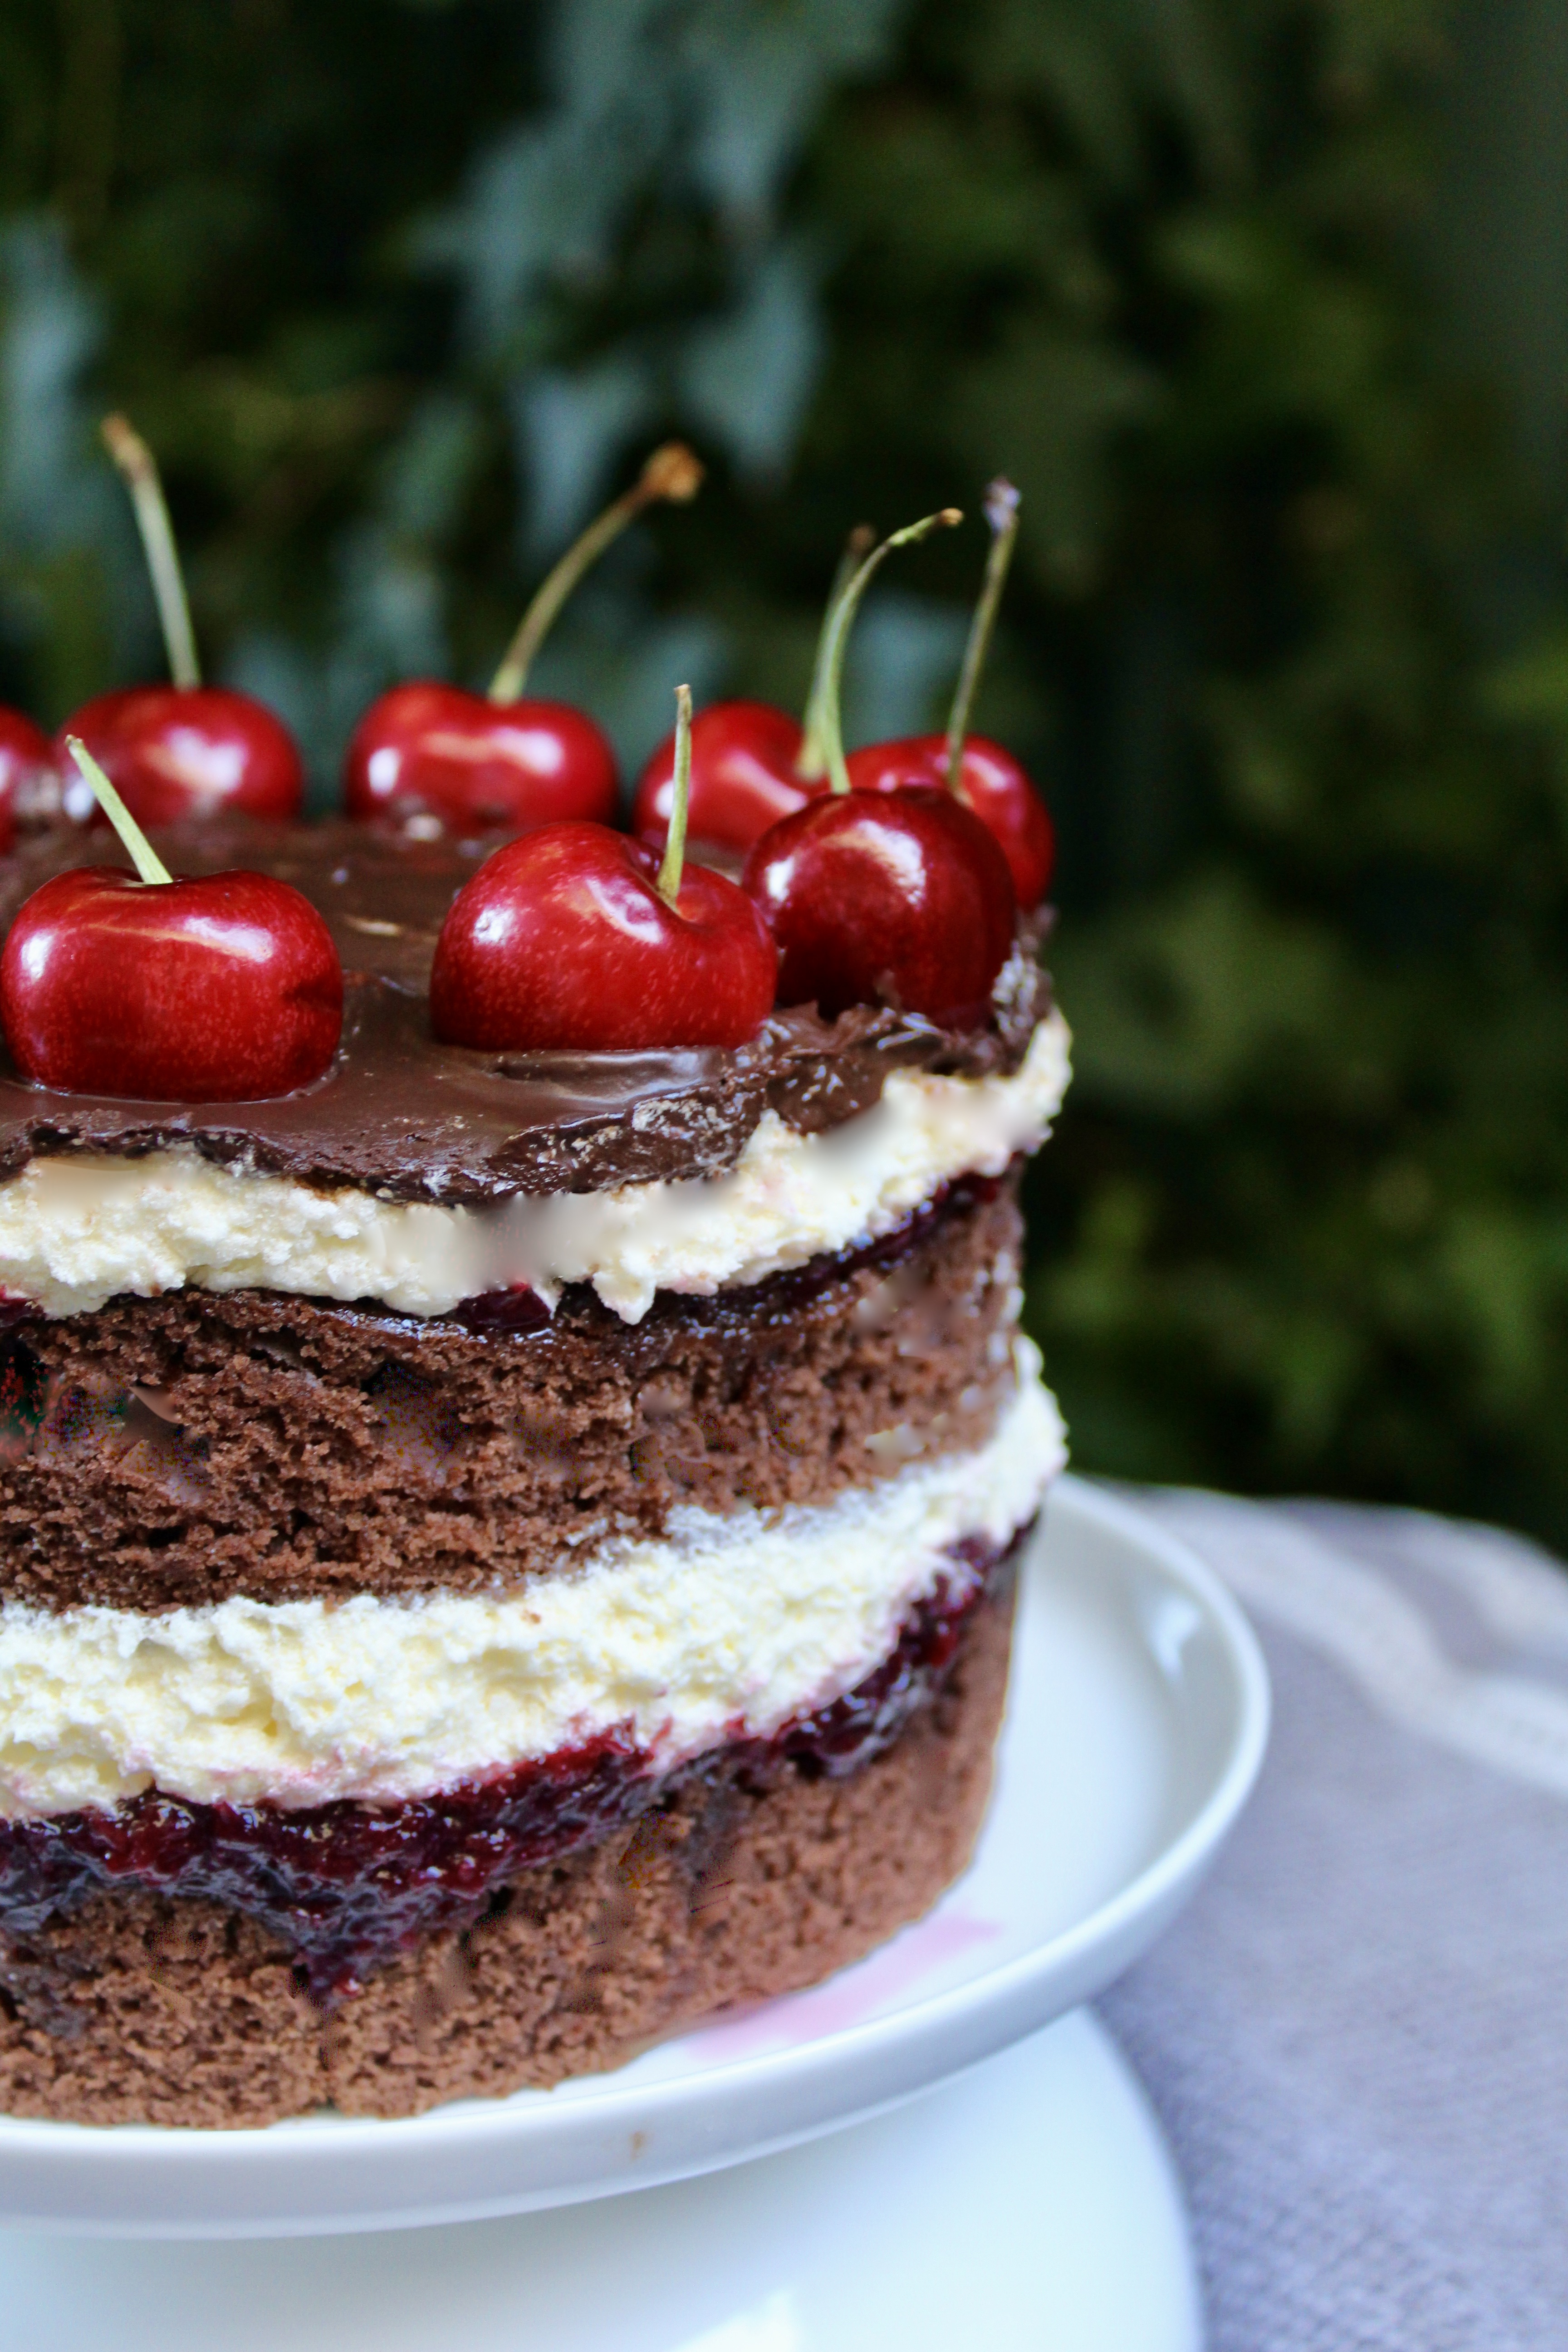
Black forest cakes are a tried and true favourite for a reason – especially when cherries are in season and at their most flavoursome. This is another cake using the Milk Bar method of cutting out rounds from a large rectangular sponge cake, ensuring you get perfectly even layers every time.
While I made this into a 2-layer cake this time as it was a gift for a couple in quarantine who didn’t need a giant cake, the recipe actually makes a 3-layer cake.
Ingredients (serves 12-14) Equipment 9 x 13 inch “quarter sheet pan”* A 6 inch cake ring* 6 inch wide acetate roll Sticky tape
Chocolate Ganache 120g dark chocolate melts 90ml cream
Cherry Jam 225g fresh or frozen cherries (pitted and chopped finely) 25g caster sugar 1 tablespoon cornflour
Buttercream 115g butter, roughly chopped, room temperature 2 teaspoons vanilla extract 2 cups icing sugar 1 tablespoons full-fat greek yoghurt, room temperature ½-1 tablespoon full-cream milk, room temperature
Cherry MilkSoak 40ml full-cream milk 25ml kirsch (cherry liqueur) or cherry juice
10-12 large fresh cherries, to decorate
Method
Chocolate Ganache Add the dark chocolate and cream to a small saucepan and stir over a low heat until the chocolate is nearly melted. Remove from the heat and continue stirring until the chocolate is fully melted and smooth. Set aside (at room temperature).
Cake Preheat oven to 180°C (160°C fan-forced). Spray the base and sides of a quarter sheet pan with cooking oil and line the base with baking paper.
Cream the butter and sugar together in a stand mixer, or a large bowl if using a hand mixer, on a medium speed until light and fluffy. Add the eggs and beat on high until combined.
Add the buttermilk, oil, 2 tablespoons of your pre-prepared chocolate ganache, vanilla and coffee into a small bowl and stir until the coffee has dissolved. Add this chocolate mixture into the the butter mix and beat on high for a few minutes, scraping down the bowl as required.
Sift the flour, cornflour, cocoa powder and baking powder into the batter. Beat on low until the mixture has just combined, and then pour the batter into the lined cake tin. Smooth out flat and tap the tray gently against the bench a few times to get out any air bubbles.
Bake for 25-35 minutes, or until a skewer inserted into the middle comes out clean. Leave to cool in the tin for about 15 minutes and then remove from the tin and place on a wire rack to cool completely.
Cherry Jam Place the cherries, caster sugar and cornflour into a saucepan over a medium heat. Stirring constantly, bring the mixture to the boil. Reduce the heat slightly and continue to stir until thickened.
Buttercream Beat butter in a large mixing bowl with an electric mixer on medium speed for 1-2 minutes until butter is pale and creamy.
Add vanilla and 1 cup of icing sugar. Beat on a low speed to combine, then turn up to medium and mix for 30 seconds. Add the remaining icing sugar along with the greek yoghurt. Beat on medium speed until light and fluffy. If too stiff, add milk. If too wet, add extra icing sugar. It should be fluffy and spreadable.
Cherry Milk Soak Add milk and kirsch to a small bowl and whisk to combine.
Assembling the Cake Place your cake on a large chopping/bread board. Using the picture below as a guide, use a 6 inch metal cake cutter to cut out 2 rounds of cake and then two half pieces.
Image courtesy of ‘What Charlotte Baked’
Place the 6 inch cake ring onto a plate or cake stand. Line the inside of the cake ring with a ‘collar’ of acetate, taping the edges together to join.
Place the two half pieces of cake at the bottom and press down firmly. If there are any gaps, use extra cake scraps to fill in the holes and press down very firmly to make one even layer. Carefully remove the cake ring (but leave the acetate).
Spoon 2 tablespoons of the milk soak over the cake layer. Allow to soak for about a minute. Spoon approximately one third of the chocolate ganache onto the cake layer, and spread evenly, ensuring the ganache gets right to the edges of the cake. Spoon half of the cherry filling on top of the ganache and spread out evenly to the edges of the cake. Add a few tablespoons of buttercream on top and smooth with a spatula to ensure the layer is (roughly) even.
Repeat this process for the second layer: cake, cherry milk soak, chocolate ganache, the remaining cherry jam and a thick layer of buttercream. If you need to, attach another round of acetate on top of your current cake collar (using tape to join the two collars) to ensure it is tall enough that all cake is supported.
Add the final layer of cake, spoon with the remaining milk soak and then top with the remaining chocolate ganache. Decorate with a ring of cherries and place in the fridge to set for a few hours. While the cake sets, add any remaining buttercream to the cake offcuts and enjoy as a snack!
Remove the cake from the fridge and gently peel away the acetate strip/s just before serving. Enjoy!
Recipe adapted from What Charlotte Baked ‘Black Forest Naked Cake’. Buttercream recipe adapted from The Sweetest Menu ‘Milk Bar Birthday Cake’.
*If you don’t have a quarter sheet pan and/or round cutter, you can use two 8 inch/three 6 inch round cake pans
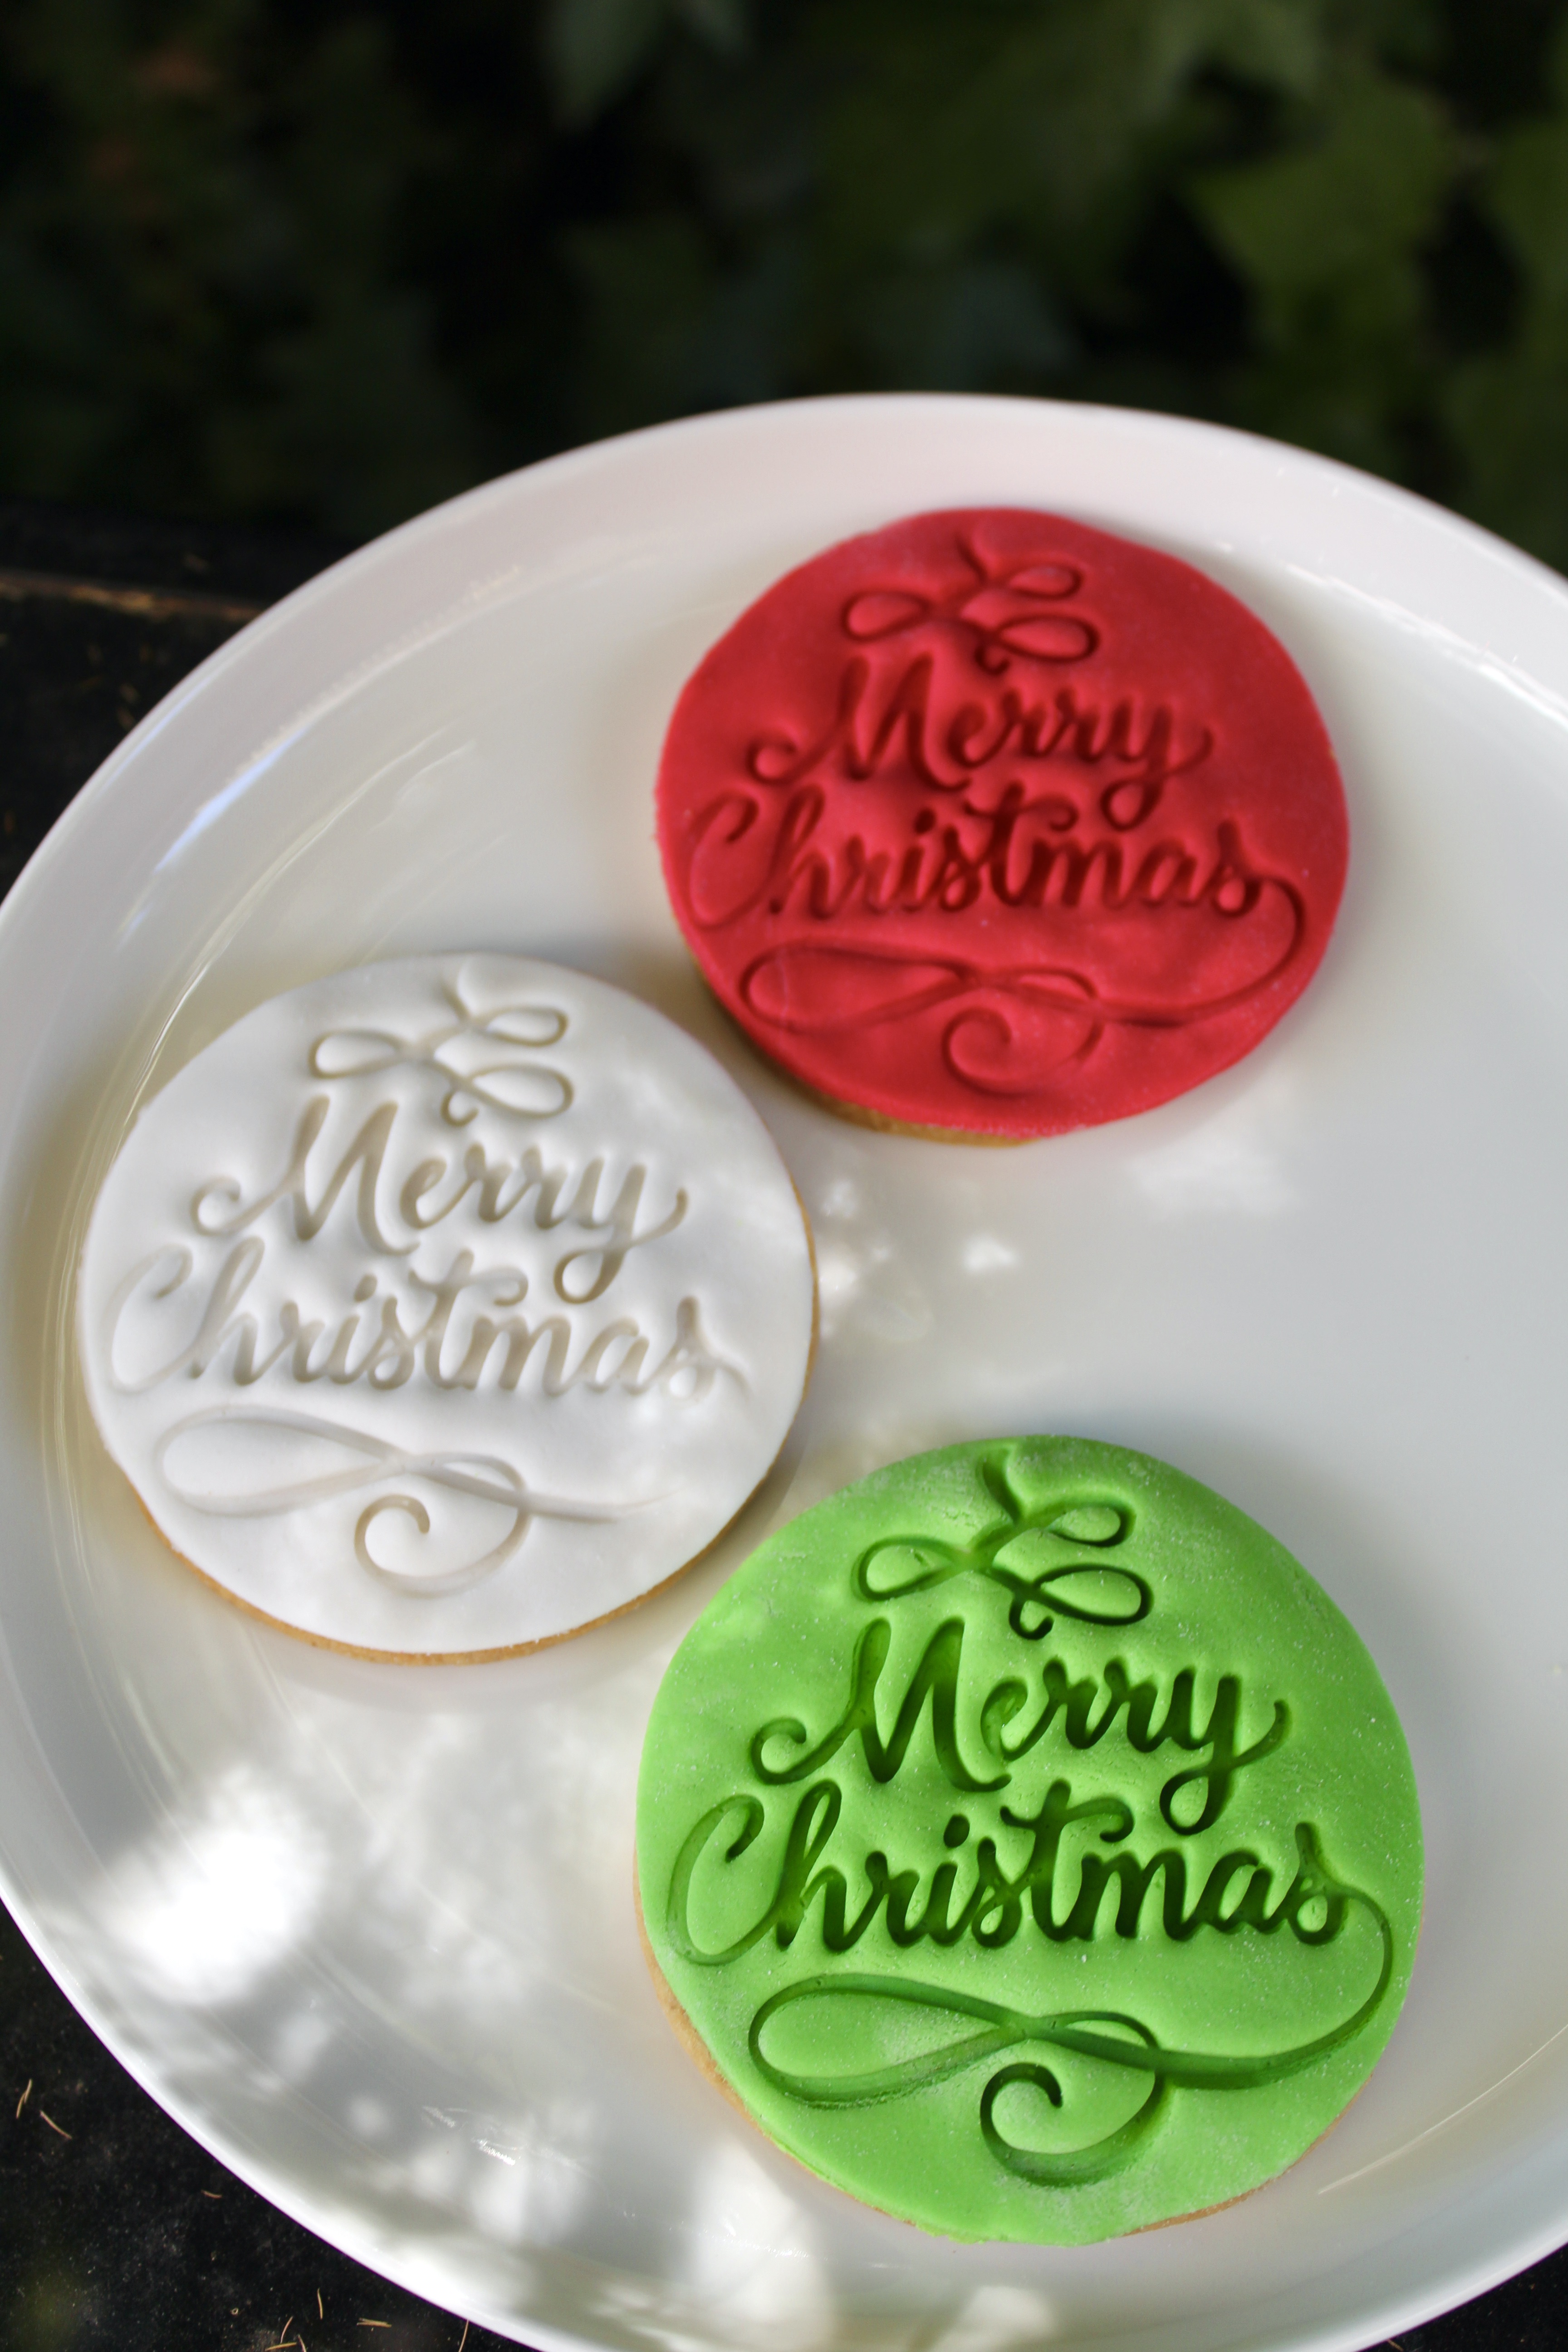
Ingredients (makes approx. 25 large round cookies) 125g butter ½ cup sugar 1 teaspoons vanilla extract 1 egg 1 ½ cups plain flour 2 teaspoons mixed spice 1 teaspoon baking powder
Approx 200g white fondant icing Icing sugar Vanilla essence Red and green food colouring
Method Cream butter, sugar & vanilla using electric beaters until well combined. Add the egg and beat until light and fluffy.
Using a wooden spoon or silicone spatula, mix sifted dry ingredients into wet ingredients until a dough forms. Knead gently for 1-2 minutes on a lightly floured bench and then divide into 2 roughly equal pieces, cover with clingfilm and refrigerate for at least 30 minutes.
Preheat oven to 180°C (160 fan-forced). Roll out dough onto a lightly floured surface using a rolling pin until you reach your desired thickness (I like mine around 5-6mm) and cut out circles using a large round cookie cutter. Repeat until you have used all the dough.
Place onto a baking tray (they don’t have to be spread out much as they don’t really expand) and bake for approximately 12-15 minutes, or until lightly golden.
While the cookies cool, make your vanilla glaze by combining vanilla essence and icing sugar until you have a thick syrup consistency.
Divide your fondant icing into 3 roughly equal parts. Colour one red, one green and leave the other white.
Roll out your fondant using a rolling pin on a surface lightly dusted with icing sugar until 3-4mm thick. Use the same round cutter as for the cookie to cut out circles of fondant.
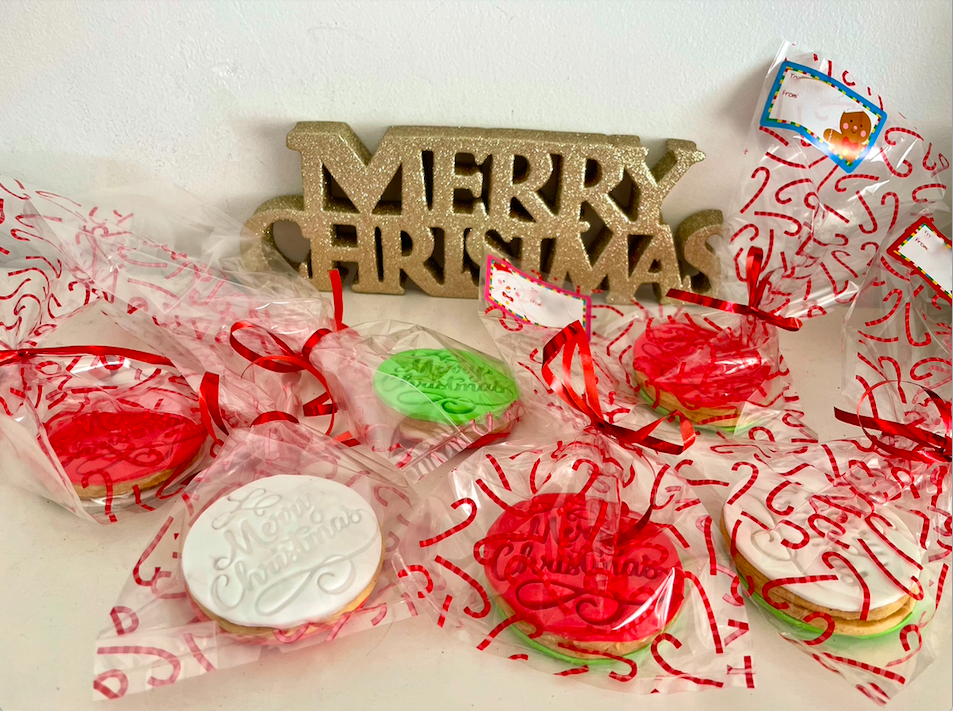
Brush each cookie with a small amount of the vanilla glaze and the top with fondant. Press down gently to ensure the fondant has adhered completely to the cookie. Stamp with a ‘Merry Christmas’ cookie stamp or decorate as desired. Repeat until all cookies have been decorated. Enjoy!
Recipe adapted from ‘The Best Valentine Sugar Cookies’ on Alice & Lois.com
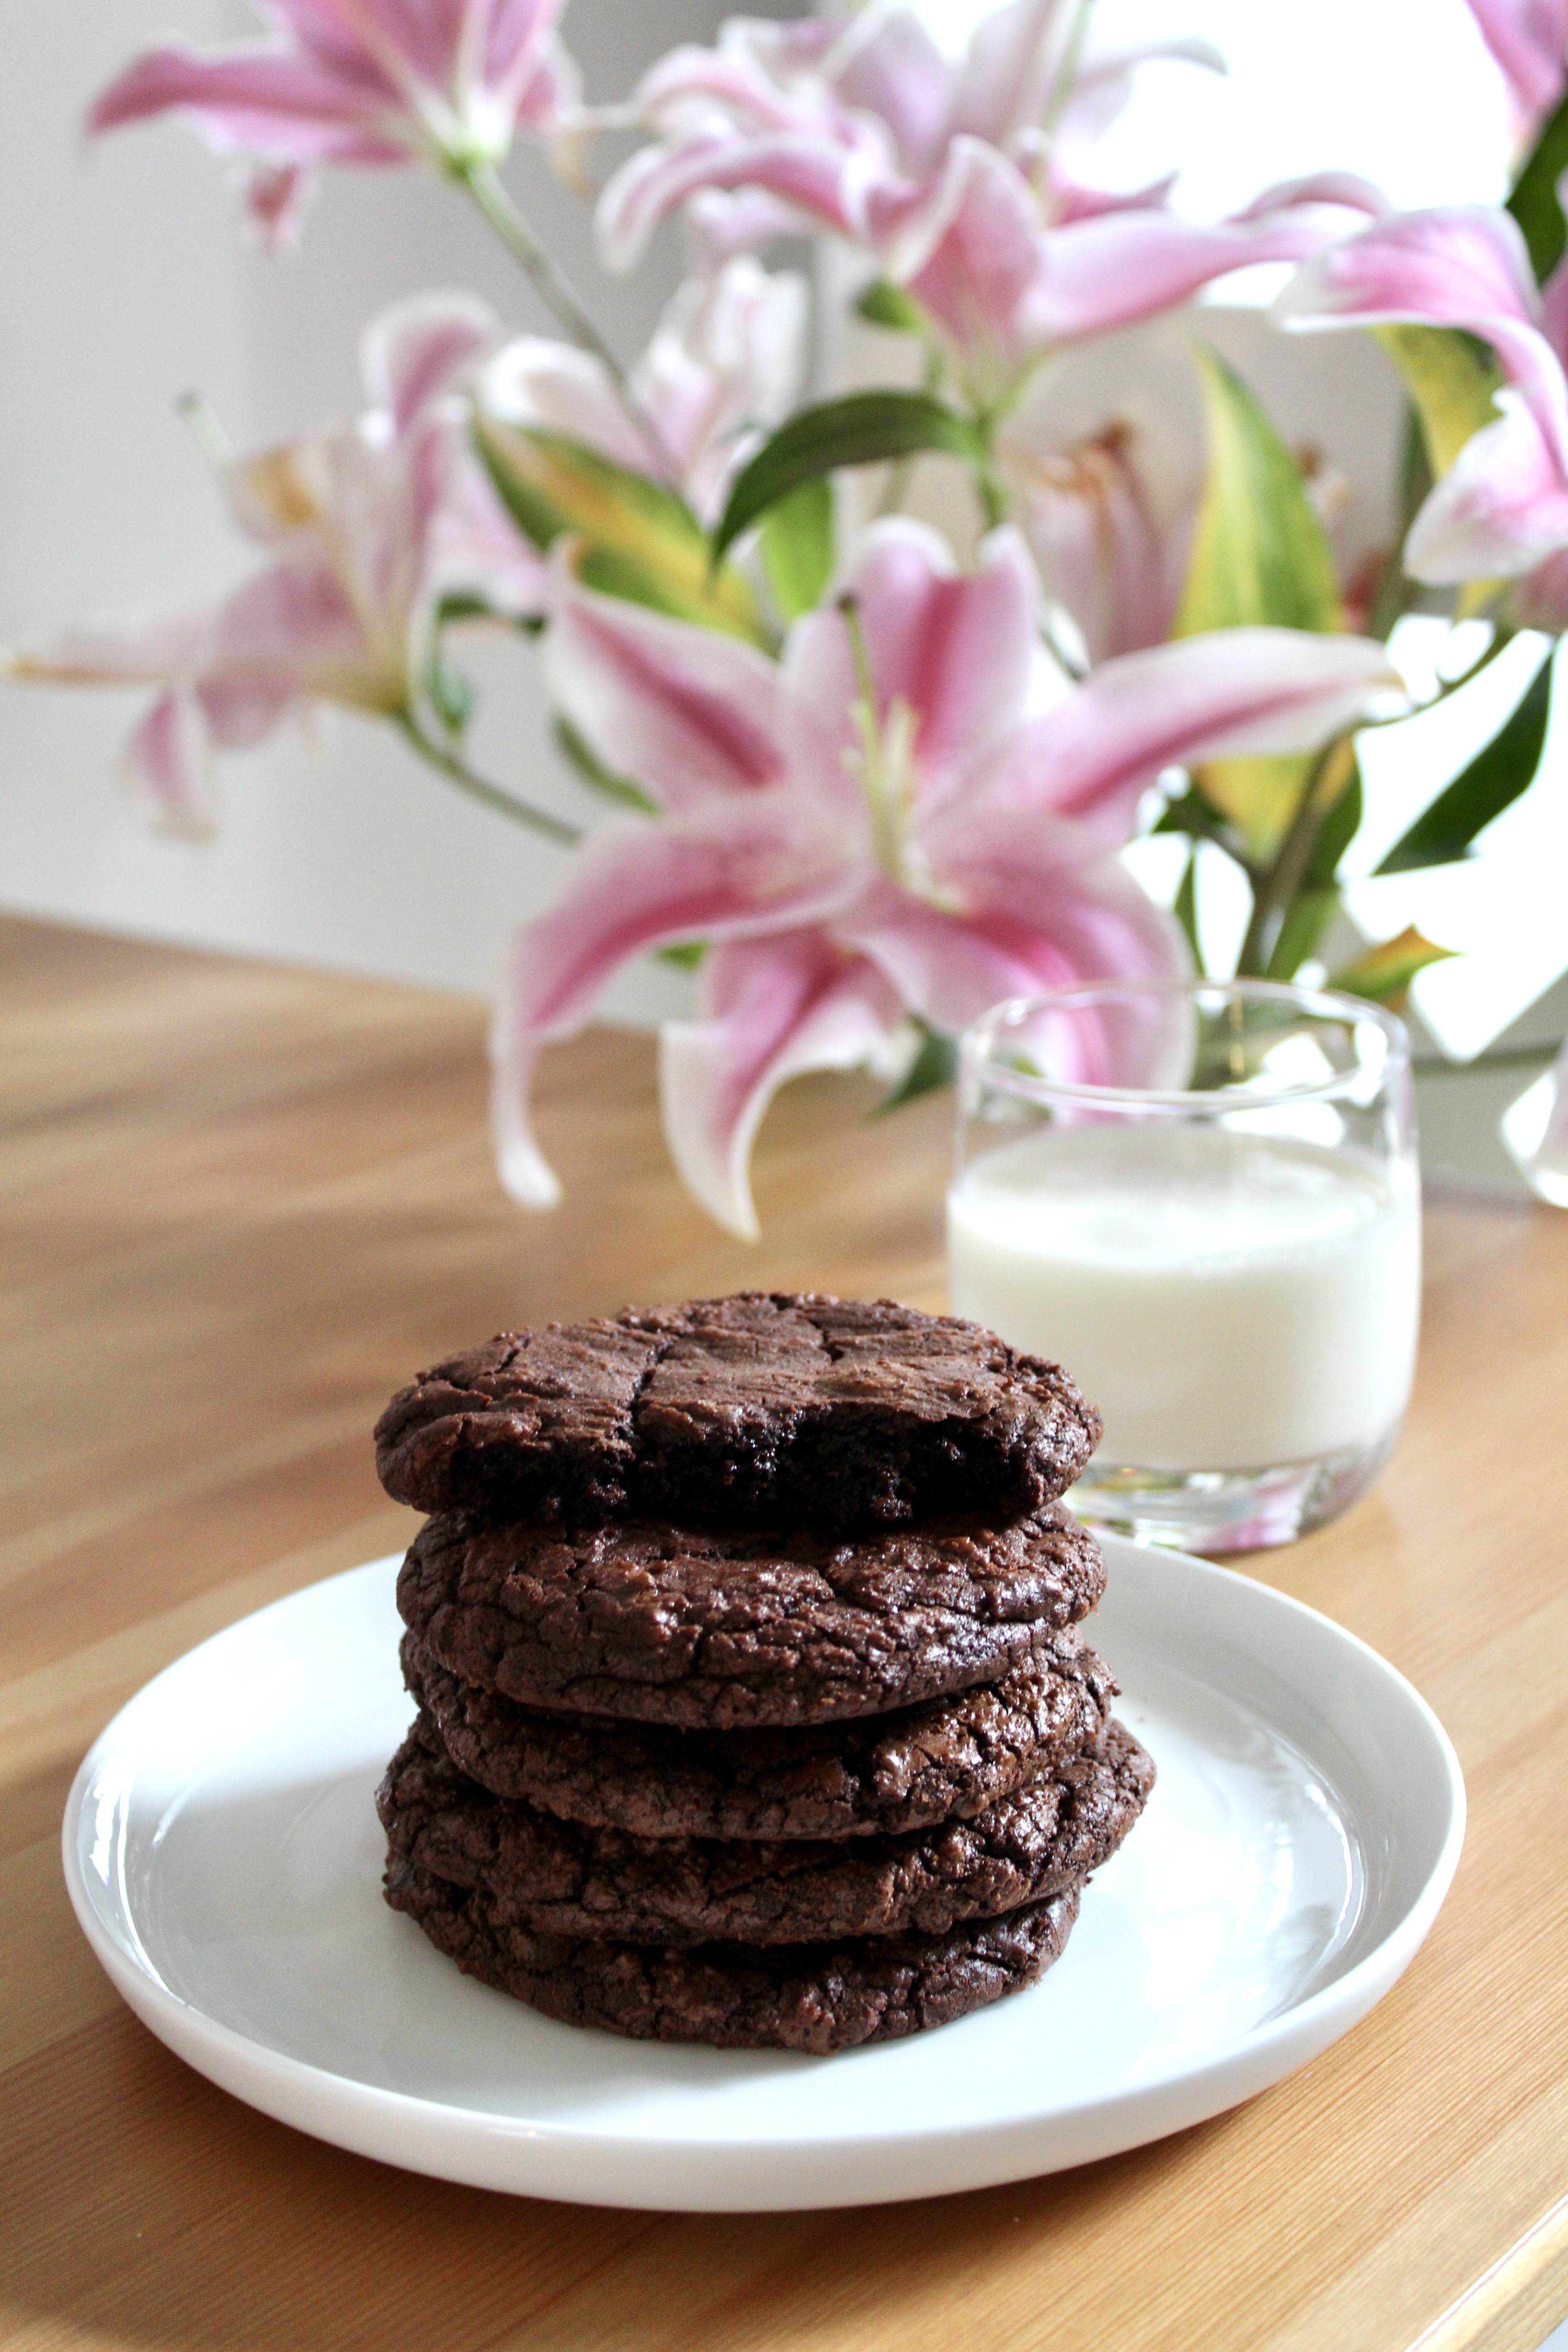
I’ll be the first to admit that I was skeptical. As a brownie purist and cookie lover, I couldn’t imagine how ‘brookies’ could improve on perfection. Well, I’m happy to say that I was proven wrong! Brookies combine the rich chocolate fudginess of a brownie with the convenience and shelf life of a cookie. They also have both the crunchy side parts AND the fudgy middle of a brownie in the one morsel, so there’s no more fighting over who gets which brownie. To sum up, I’m mad at myself for resisting this trend for so long when they are JUST. SO. GOOD.
I ate (and, regretfully, shared) this batch too quickly to experiment, but I’m going to try making brooking sandwiches next time, with a peanut butter or caramel filling.
Ingredients(makes 24) 225g dark chocolate melts 75g butter, at room temperature ¾ cup brown sugar ¼ cup white sugar 1 teaspoon vanilla extract 2 eggs, room temperature ¾ cup plain flour ¼ cup cocoa powder 1 teaspoon instant coffee 1 teaspoon baking powder
Method Melt the chocolate in the microwave in 20 second bursts, stirring between each burst, until smooth and entirely melted. Set aside to cool slightly.
In a large bowl, add the butter, brown sugar, and white sugar together with electric beaters on medium-high speed until smooth and creamy (about 2 minutes). Add the eggs and vanilla, and beat on high speed for a further 2 minutes. Scrape down the sides and bottom of the bowl, then pour in the melted chocolate and mix on medium-high speed for 2 full minutes.
Add in the flour, cocoa powder, coffee and baking powder and beat on low speed until just combined. Cover the bowl with clingfilm and refrigerate the dough for 20 minutes.
Meanwhile, preheat the oven to 180°C (160 fan-forced) and line 2 large baking trays with baking paper.
Once chilled, roll the dough into roughly golf ball sized balls and place on the tray, leaving room to spread (I fit about 6 per tray). Bake for approximately 12 minutes or until the edges appear set and the top has a cracked appearance (don’t worry that the centre is soft, it will set as it cools). Remove from the oven and leave to cool. Enjoy!
Cookies will keep in an airtight container at room temperature for up to a week (but I doubt they’ll last that long!)
Recipe adapted from ‘My Favorite Brownie Cookies’ on Sally’s Baking Blog.
To celebrate my five year anniversary of working in the Public Service and winning an exciting new employment policy role, I decided to treat myself and buy a kitchenaid (not sponsored, I’m just a long time admirer and now proud owner!) Of course, it couldn’t be just any kitchenaid, it had to be one of their beautiful new pastel shades. I tossed up between the rose pink and ice blue, but ultimately decided on the gorgeous blue.
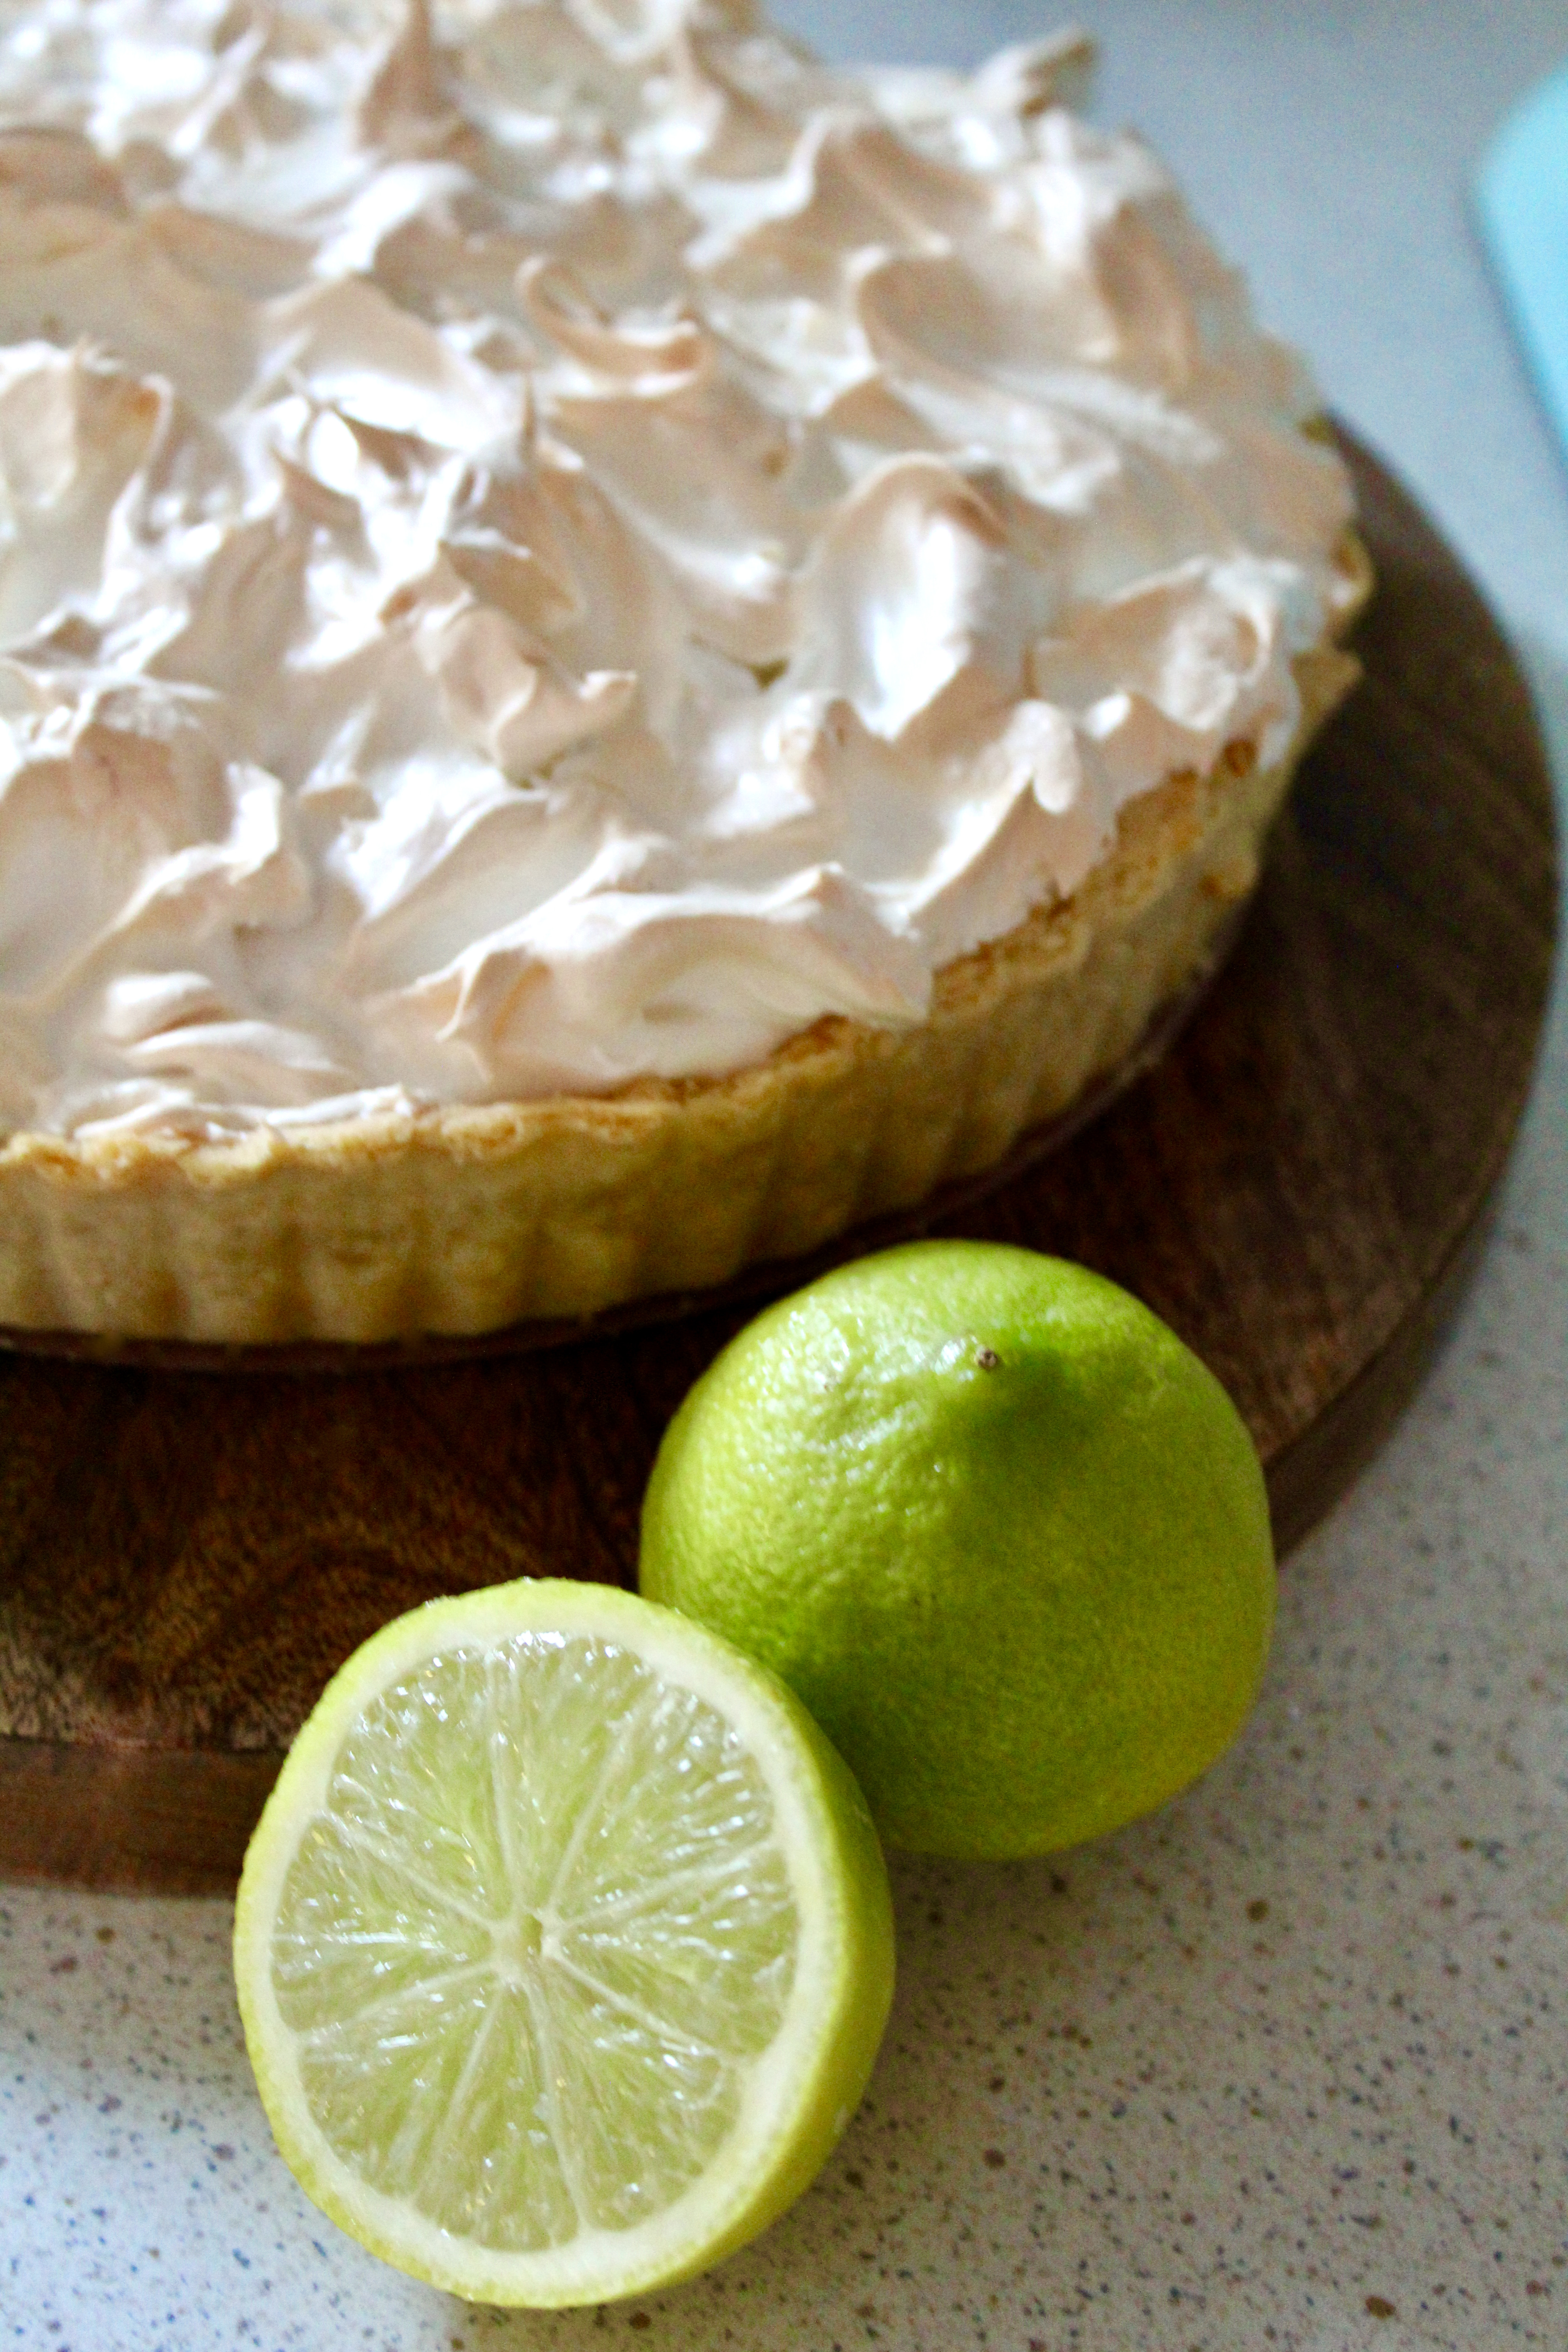
In order to christen it properly, I knew I had to make something with meringue to take advantage of not having to hold beaters while the eggwhites are whipping. Mum’s lime tree is absolutely chokkas at the moment, so a lime meringue pie was the obvious choice.
The pie is zesty, sweet and packed with lime flavour. Enjoy!
Lime filling ½ cup cornflour 1 cup caster sugar ½ cup lime juice 1¼ cups water 2 tspns finely grated lime rind 3 egg yolks 50g butter Green food colouring (if desired)
Meringue 3 egg whites ½ cup caster sugar
Method Put flour, icing sugar, butter, yolk and water into a food processor and process until just come together. Press dough into a ball, knead gently on a floured surface until smooth; cover, refrigerate 30 mins.
Preheat oven to 180°C fan-forced. Grease a 24cm flan tin. After resting, roll dough on floured surface until it is large enough to line the tin. Lift pastry into tin, ease into sides and trim the edge.
Place tin on an oven tray, line pastry with baking paper and fill with pie weights or uncooked rice. Bake for 10mins then remove baking paper and weights and bake, uncovered for a further 10 mins or until pastry case is browned lightly. Leave to cool. Reduce oven temperature to 160°C fan-forced.
To make filling: combine corn flour and sugar in a medium saucepan. Gradually stir in lime juice and water. Stir over heat until mixture boils and thickens (mixture should be very thick, jelly-like). Reduce heat, simmer, stirring for 30 secs. Remove from heat and quickly stir in egg yolks, butter and rind. Stir until smooth. If you wish to make the filling greener, add a few drops of food colouring. Leave until it cools to room temperature.
Once at room temperature, spread filling into pastry case.
To make meringue: beat egg whites in a medium bowl with electric mixer until soft peaks form. Gradually add sugar, beating until dissolved after each addition. Mixture should be smooth and glossy.
Top pie with meringue mixture (I like to make it look rustic with mounds of differing heights) and bake for 5 – 10 mins at 160°C fan-forced until browned lightly. Stand for 5 mins before serving.
Enjoy!
Adapted from ‘The Women’s Weekly’ Lemon Meringue Pie
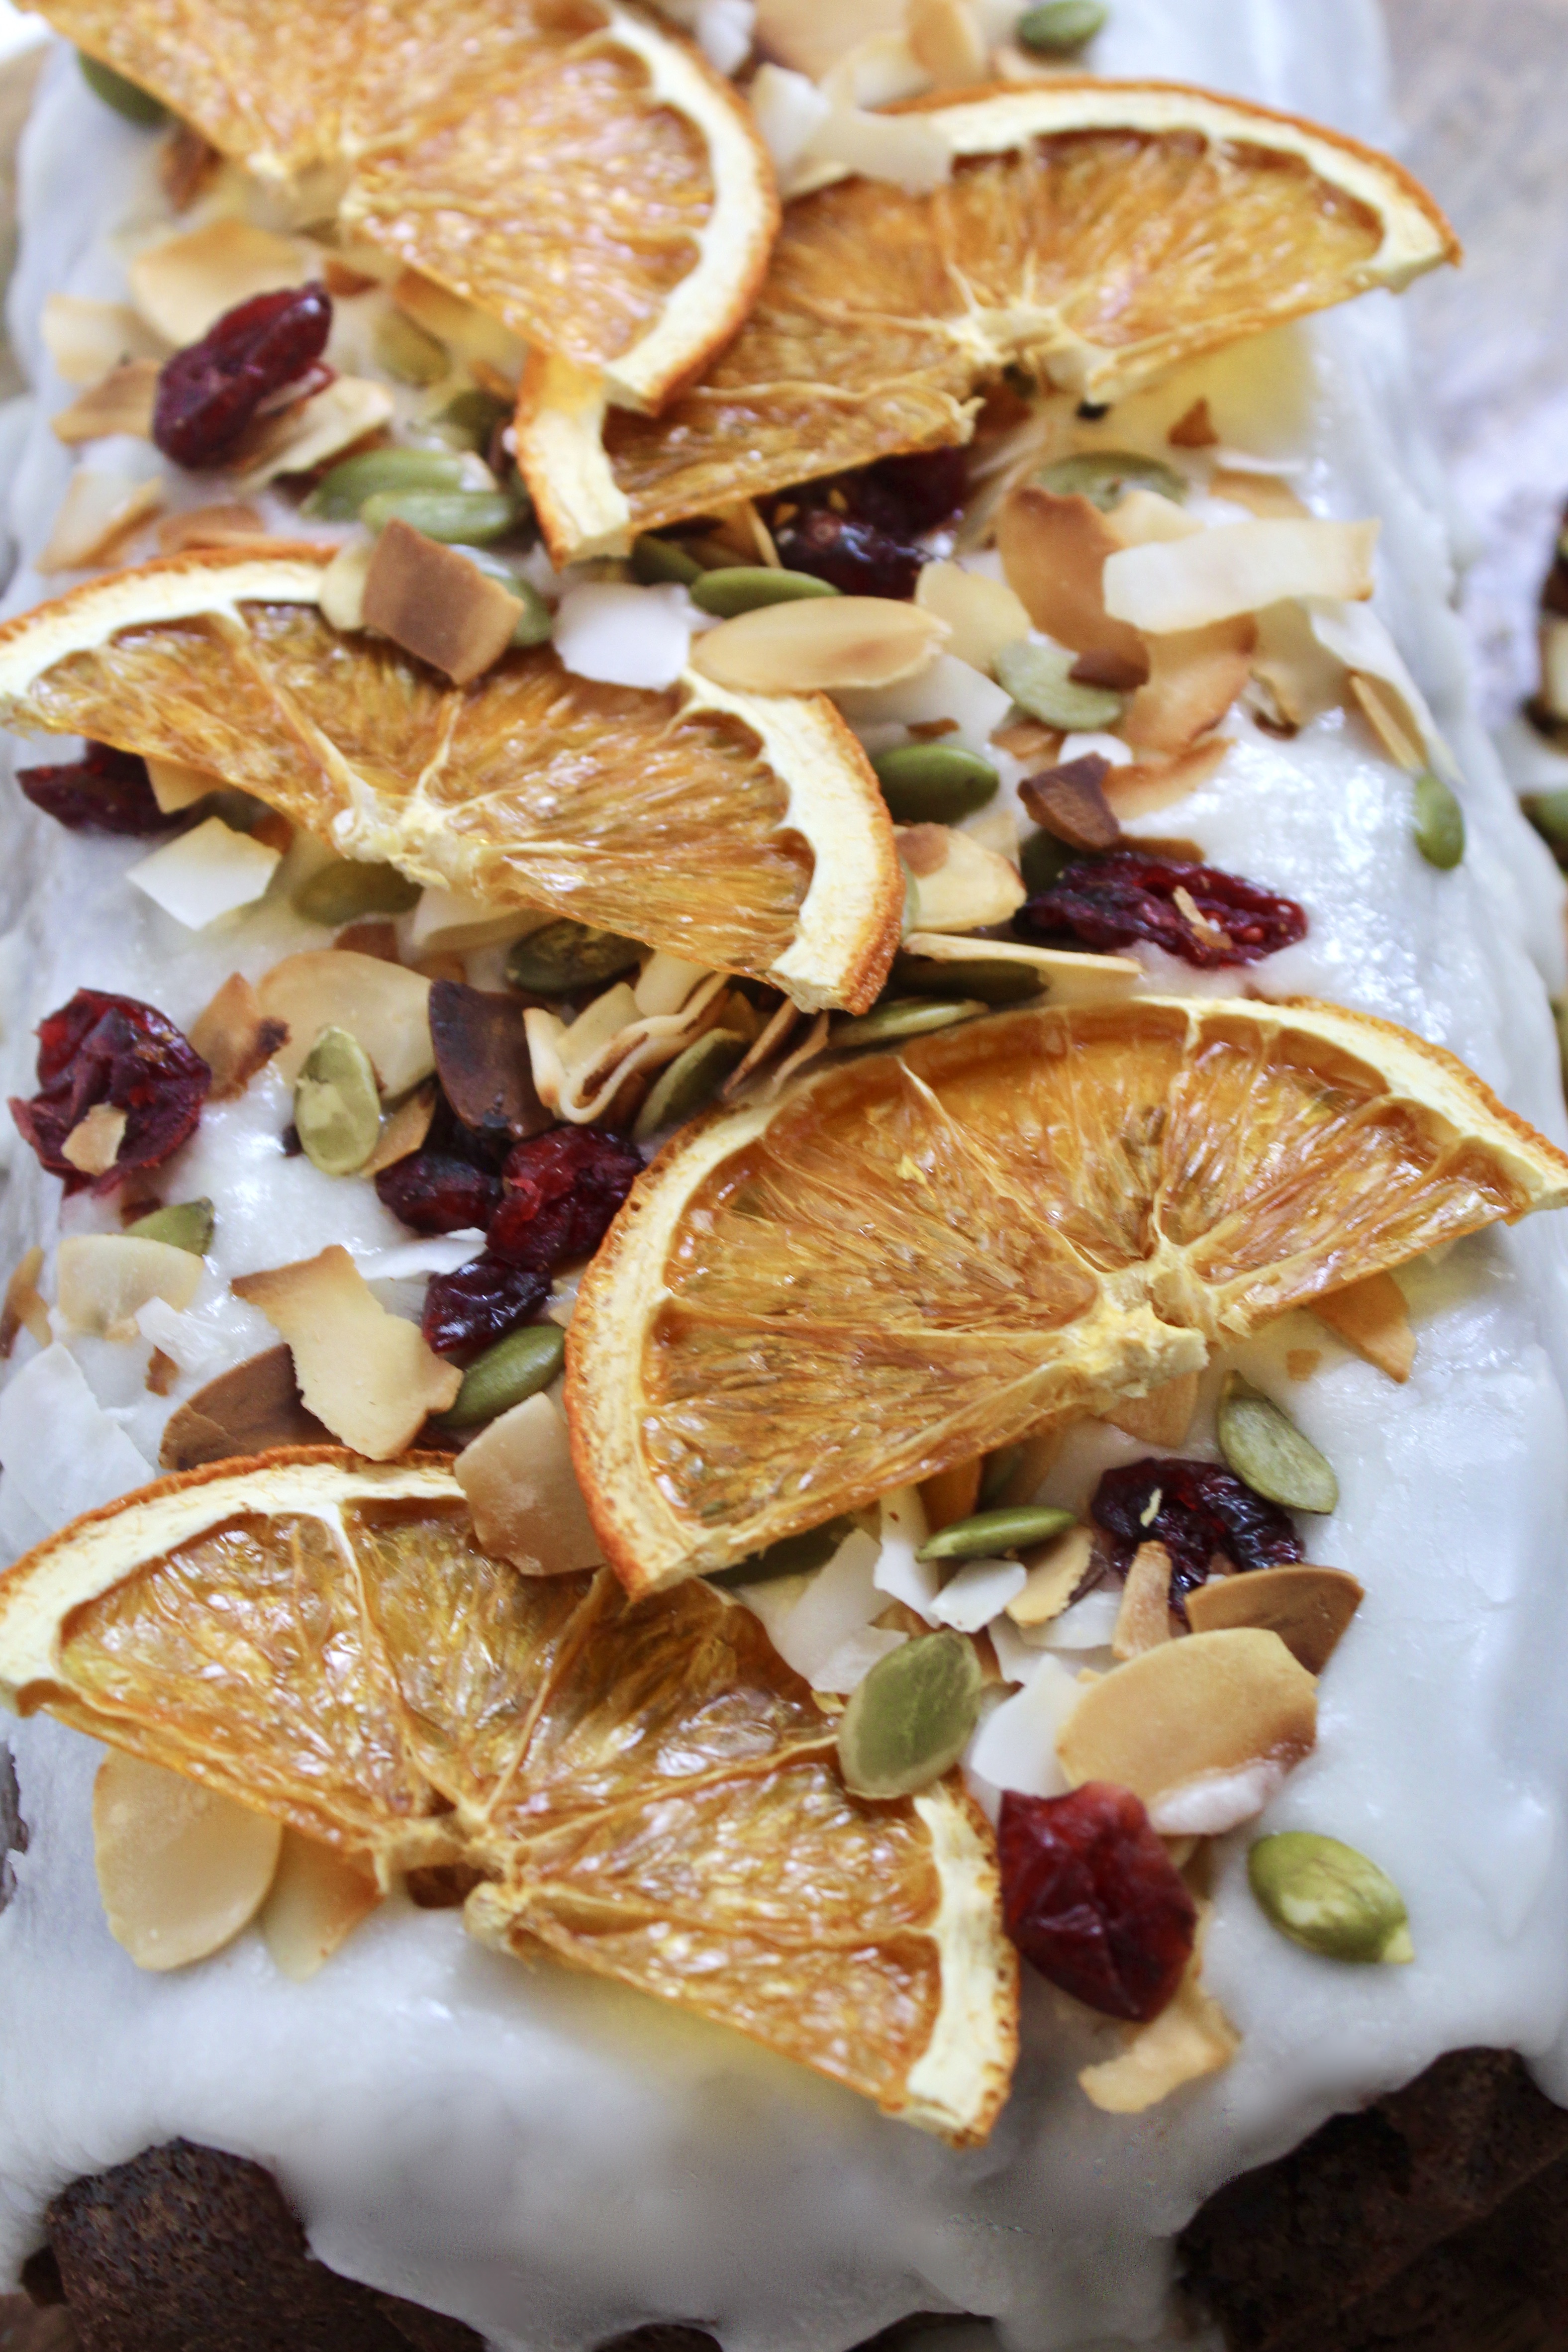
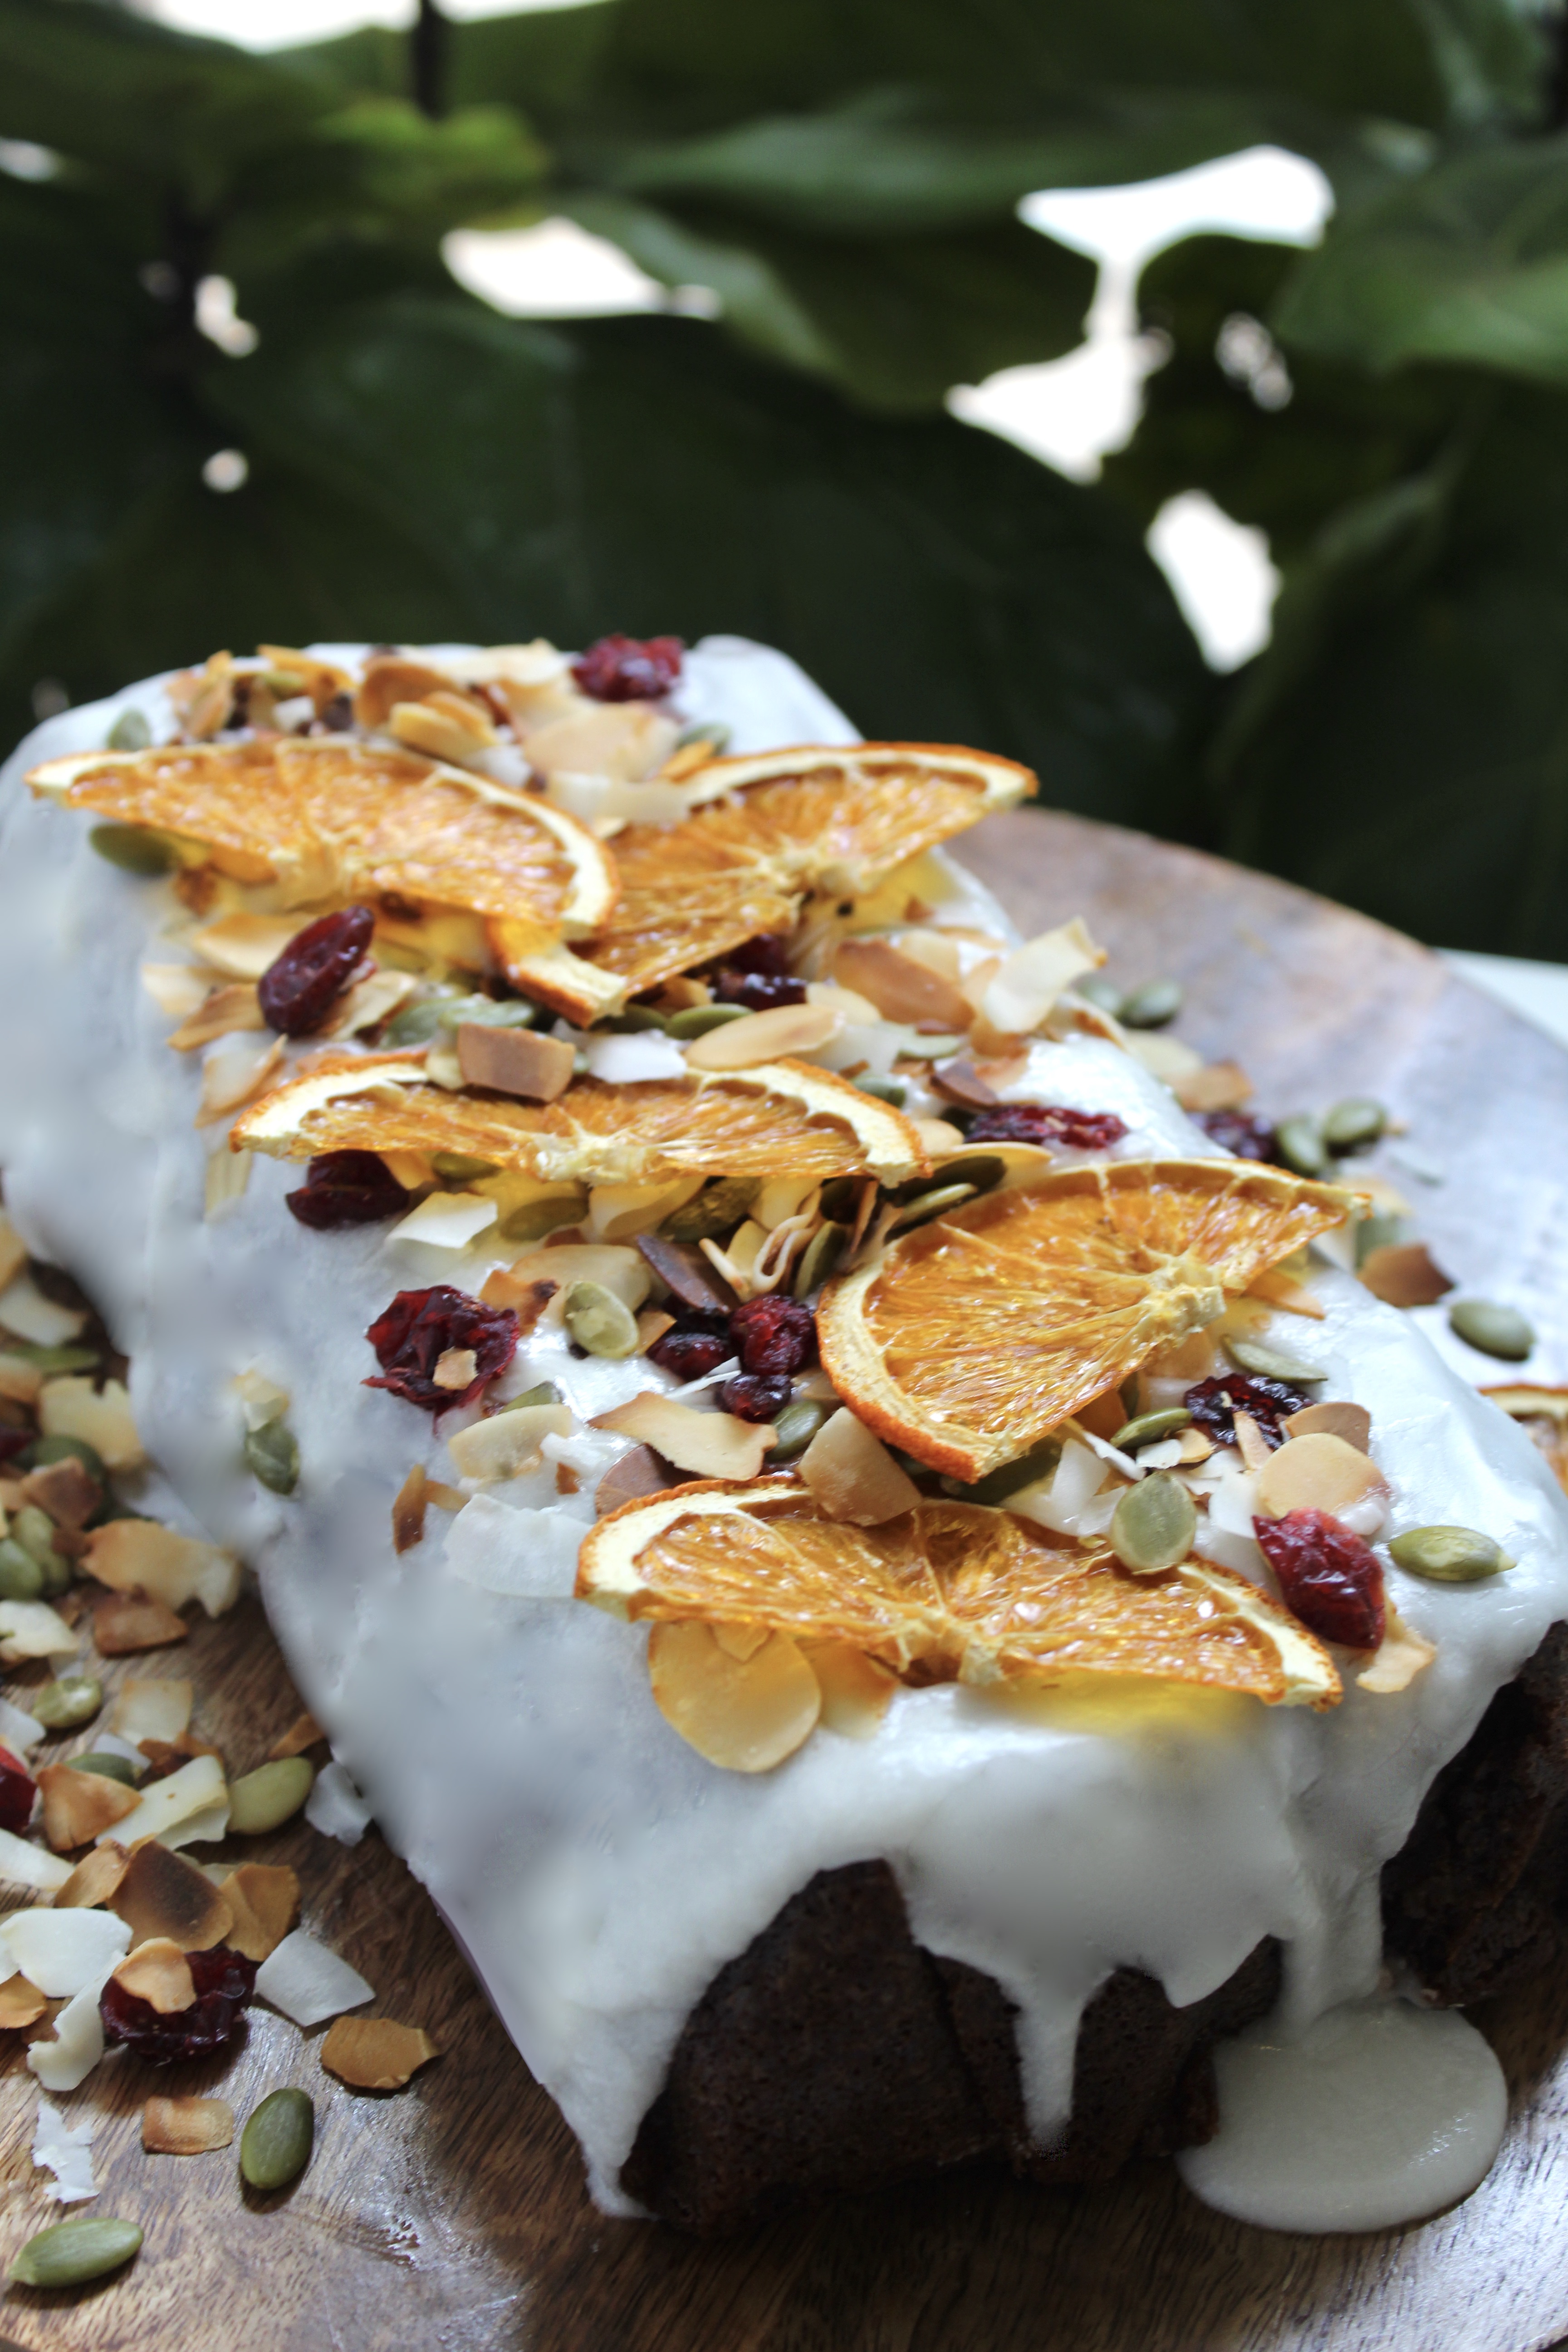
To me, this is Christmas in a cake – fragrantly spiced with the familiar flavours of cinnamon, nutmeg, ginger and cloves, and bejeweled with Christmas colours. This cake is perfect as a Christmas table centrepiece, shared with friends or colleagues with a cuppa, or left as a snack for grateful Santa.
Ingredients 3/4 cup plain flour 1 teaspoon baking powder ½ teaspoon bicarb soda 1½ teaspoon ground mixed spice 100g butter, softened 3/4 cup brown sugar 2 eggs 3 tablespoons sour cream 125ml hot water 75g dark chocolate 1 teaspoon instant coffee (I use decaf)
5 tablespoons icing sugar 1½ – 2 tablespoons hot water ½ teaspoon vanilla extract 3 dried oranges, halved A good handful each of dried cranberries, pepitas, shaved coconut and flaked almonds
Preheat the oven to 160ºC fan-forced. Line a 24cm loaf pan with baking paper.
In a large bowl, combine flour, baking powder, bicarb and mixed spice. In another bowl, cream the butter and sugar with an electric mixer. Add the eggs one at a time, mixing well after each, and then beat in a third of the flour mixture followed by a tablespoon of the sour cream, repeating until all used.
Put the water, chocolate and instant coffee in a pan and heat gently until the chocolate melts. Fold this into the cake batter, being careful not to over beat.
Pour the batter into the prepared pan and bake for 40 minutes or until a skewer inserted comes out clean.
Leave to cool for 5 minutes in the tray before transferring to a wire rack to cool completely.
While the cake is cooling, lightly toast the coconut and almonds in a non-stick saucepan.
To make the icing, combine vanilla icing sugar and 1½ – 2 tablespoons of hot water. Leave it to thicken slightly before pouring on the cake. Decorate with orange pieces, cranberries, pepitas, shaved coconut and flaked almonds. Enjoy!
Recipe adapted from ‘Christmas Cupcakes’ in Nigella’s How to Be a Domestic Goddess
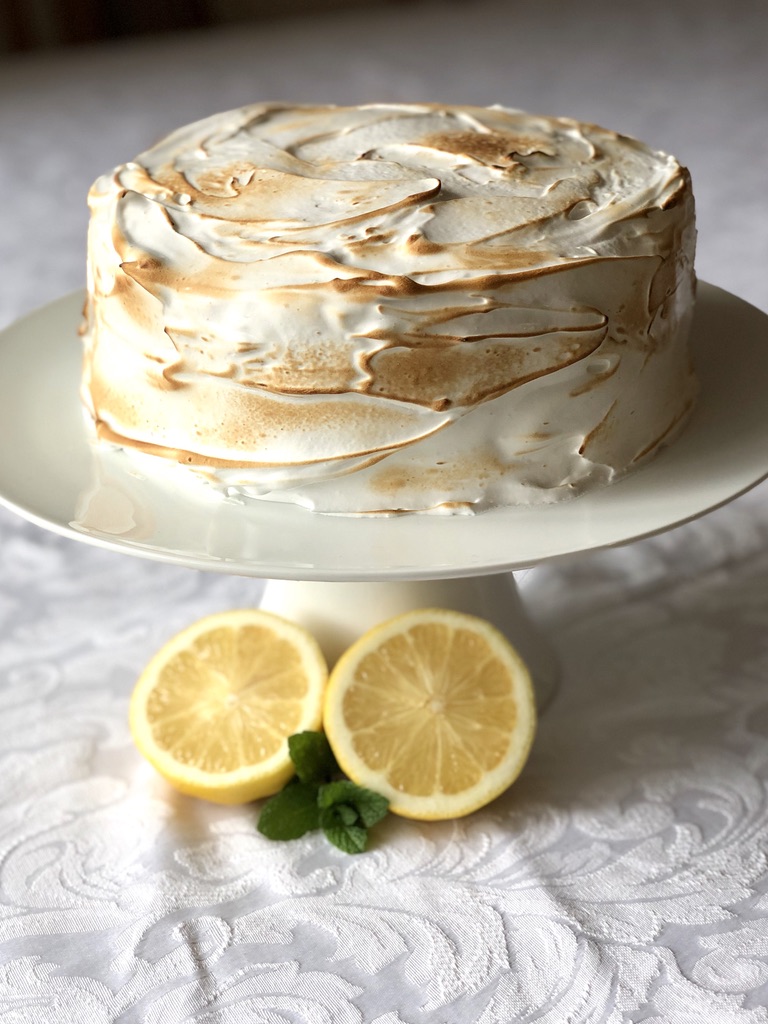
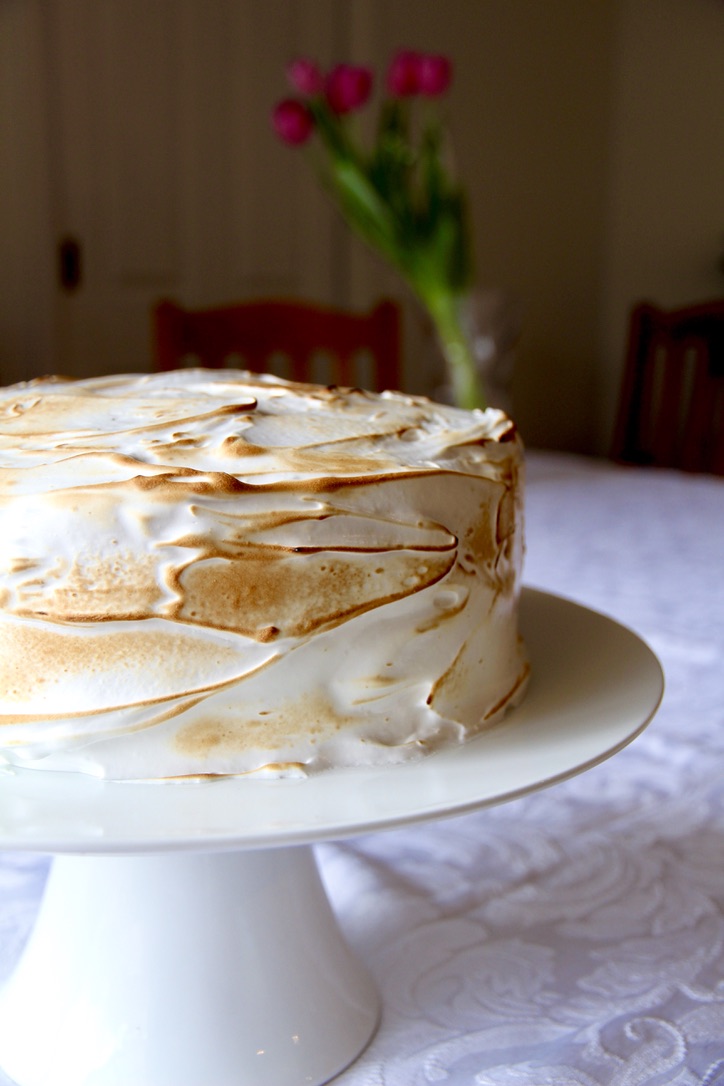
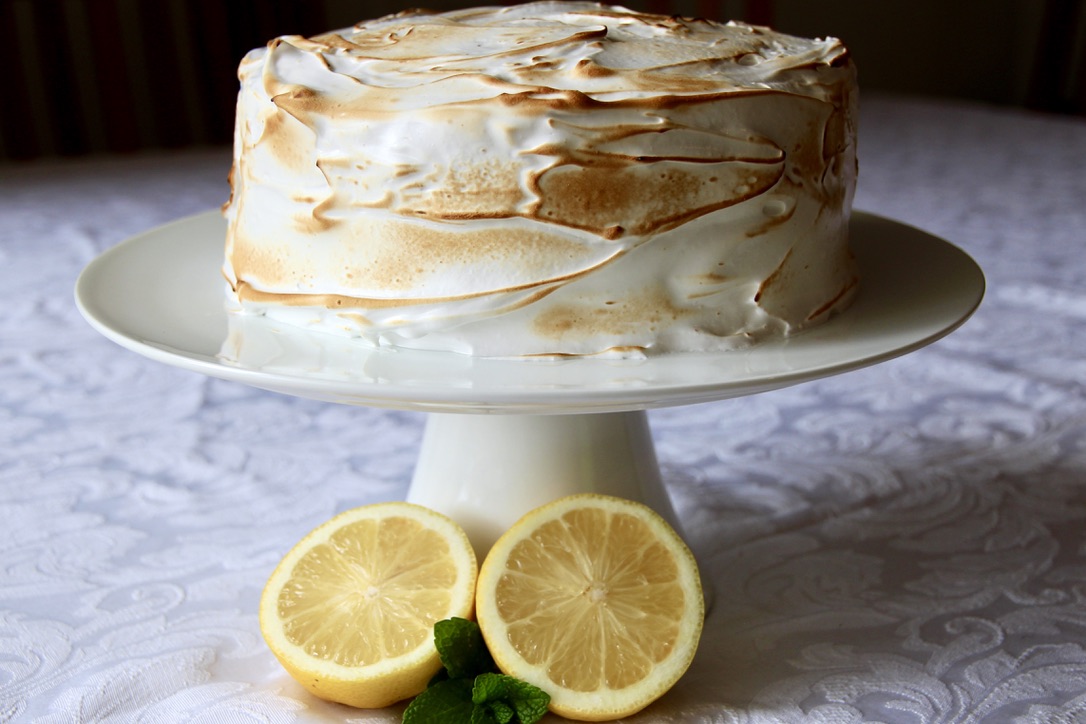
Light as a feather sponge cakes sandwiched with tangy lemon curd and enrobed in pillowy torched meringue – what’s not to love?! I made this cake for my 26th birthday and it has become a favourite. It is best to make the lemon curd the day ahead and the meringue just before serving.
Ingredients (serves 12) Lemon Curd (makes 2 cups) 1 cup white sugar
3 eggs
1 cup fresh lemon juice (approx. 4-5 lemons)
Zest of 2 lemons
115g butter, melted
Sponge Cake 4 eggs
3/4 cup caster sugar
1 cup self-raising flour
1 tablespoon cornflour
10g butter
1/3 cup boiling water
Meringue 3 egg whites
3/4 cup white sugar
1 teaspoon vanilla extract
Kitchen blowtorch (optional)
To make the lemon curd, whisk together the sugar and eggs in a large microwave safe bowl until thoroughly combined. Whisk in lemon juice, zest and melted butter. Cook in the microwave on full power for 50 second intervals, whisking after each interval. You will know your lemon curd is ready when it coats the back of a metal spoon (approximately 3-5 50 second intervals). Pour into a sterile jar or container and allow to cool to room temperature before covering it with a lid and storing it in the fridge.
To make the sponges, line and grease two deep 20cm round cake pans. Preheat oven to 180°C (160°C fan-forced).
In a large bowl, beat eggs with electric mixer until thick and foamy. Gradually add sugar, about a tablespoonful at a time, beating until sugar is dissolved between additions (total beating time approx. 10 minutes). Sift flour and cornflour together over the egg mixture. Gently fold to combine. Combine butter and water and gently fold through egg mixture.
Divide mixture evenly into prepared pans. Bake sponges about 25 minutes or until a skewer inserted comes out clean. As soon as the sponges are baked, turn out upside-down onto wire racks covered with baking paper to cool.
Once the cakes are completely cool, glue one sponge to a cake stand or serving plate using lemon curd. Spread a generous layer of lemon curd over the top of the cake and gently place the second sponge on top, taking care not to squeeze out too much of the curd from the middle (scrape away any excess from the sides).
To make the meringue, use electric beaters to whisk the egg whites and sugar in a large heat-proof bowl until frothy. Fill a medium saucepan with a few inches of water and place over a medium heat. Place the mixing bowl on top of the saucepan to create a double boiler. Whisking constantly with the beaters, heat the egg white mixture until the sugar dissolves completely and it is warm to the touch. Take the bowl off the saucepan, add the vanilla and mix on high until you have medium-stiff glossy peaks.
Working quickly, heap the meringue mixture onto the top of your sponge cake and gently spread down the edges with a metal spatula until the cake is completely covered. Create some texture with the meringue on the sides and top of the cake (this is one time where you don’t want it to be perfectly smooth). Use a blowtorch on low-medium to toast the meringue until it is your desired colour. Serve immediately.
Note: the cake is best eaten on the day it is made as the meringue changes texture, however it is still good the following day. Store covered at room temperature.
Lemon curd adapted from My Baking Addiction microwave lemon curd.
Sponge cake adapted from the Australian Women’s Weekly ‘Best Ever Sponge Cake’.
Meringue icing adapted from The Cake Blog lemon meringue cake.


 Lemon curd adapted from My Baking Addiction microwave lemon curd.