Spiced Chocolate Sugar Cookies

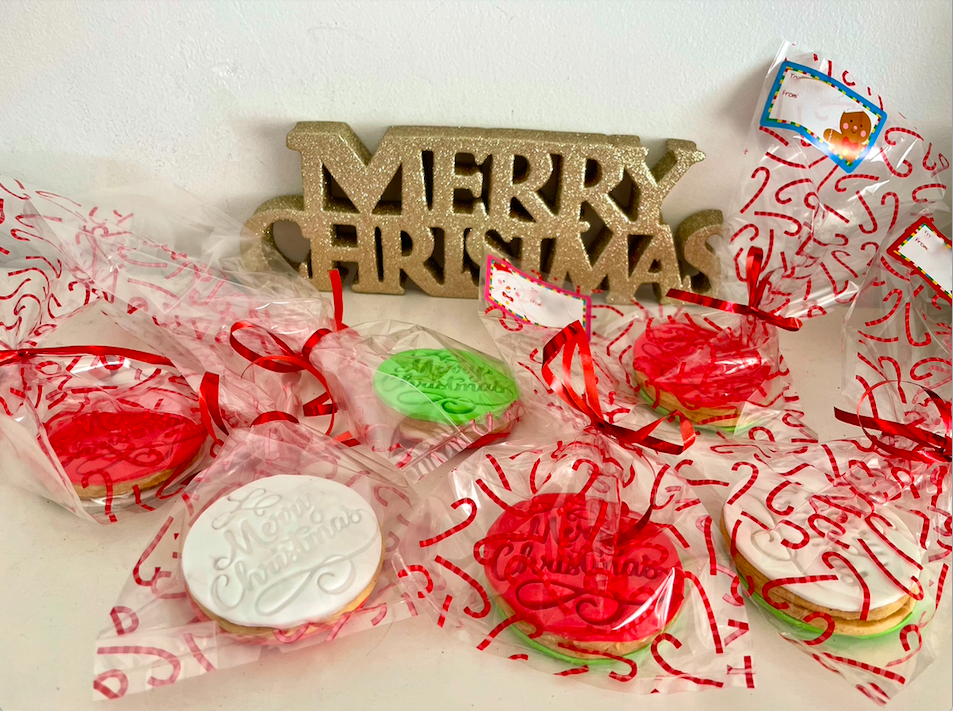
These spiced chocolate sugar cookies are super quick and easy to whip up, leaving plenty of time for more important things, like decorating and eating!

Ingredients (makes approximately 40 cookies)
170g butter, chopped (straight from the fridge)
3/4 cup + 1 tablespoon caster sugar
1 teaspoon vanilla extract
1 egg
2 cups plain flour
½ cup cocoa powder
1 teaspoon mixed spice
½ teaspoon ginger powder
½ teaspoon baking powder
Packet of royal icing (I use Queen brand)
Red food dye

Method

Preheat oven to 150ºC fan-forced. Line 2 large trays with baking paper.

Add butter, sugar and vanilla to the large bowl of a stand mixer. Beat butter and sugar on low speed, then turn up to medium until butter and sugar is completely combined. Add egg and beat briefly until egg has been dispersed. Add flour, cocoa, spices and baking powder and mix on low speed until it comes together.

Shape into a large disc and roll out with a rolling pin on a clean surface until it’s at your desired thickness (I like mine around 5-6mm). Use cookie cutters to cut out cookies and carefully transfer them to your prepared trays.

Bake for 12-15 minutes. Allow to cool briefly on the tray before transferring to a wire rack to cool completely.

Repeat with the rest of the dough.

For the icing, follow the packet instructions and colour half of the mix red, leaving the remainder white. Transfer into snaplock bags, cut the corner (keep the cut nice and small) and pipe the cookies as desired. Top with mini m&ms, sprinkles or leave plain.

Recipe adapted from The Sweetest Menu’s ‘Chocolate Sugar Cookies’.

Advertisement

Fondant Christmas Cookies

Ingredients (makes approx. 25 large round cookies)
125g butter
½ cup sugar
1 teaspoons vanilla extract
1 egg
1 ½ cups plain flour
2 teaspoons mixed spice
1 teaspoon baking powder

Approx 200g white fondant icing
Icing sugar
Vanilla essence
Red and green food colouring

Method
Cream butter, sugar & vanilla using electric beaters until well combined. Add the egg and beat until light and fluffy.

Using a wooden spoon or silicone spatula, mix sifted dry ingredients into wet ingredients until a dough forms. Knead gently for 1-2 minutes on a lightly floured bench and then divide into 2 roughly equal pieces, cover with clingfilm and refrigerate for at least 30 minutes.

Preheat oven to 180°C (160 fan-forced). Roll out dough onto a lightly floured surface using a rolling pin until you reach your desired thickness (I like mine around 5-6mm) and cut out circles using a large round cookie cutter. Repeat until you have used all the dough.

Place onto a baking tray (they don’t have to be spread out much as they don’t really expand) and bake for approximately 12-15 minutes, or until lightly golden.

While the cookies cool, make your vanilla glaze by combining vanilla essence and icing sugar until you have a thick syrup consistency.

Divide your fondant icing into 3 roughly equal parts. Colour one red, one green and leave the other white.

Roll out your fondant using a rolling pin on a surface lightly dusted with icing sugar until 3-4mm thick. Use the same round cutter as for the cookie to cut out circles of fondant.

Brush each cookie with a small amount of the vanilla glaze and the top with fondant. Press down gently to ensure the fondant has adhered completely to the cookie. Stamp with a ‘Merry Christmas’ cookie stamp or decorate as desired. Repeat until all cookies have been decorated. Enjoy!

Recipe adapted from ‘The Best Valentine Sugar Cookies’ on Alice & Lois.com

Pastel Iced Sugar Cookies

Inspired by Peggy Porschen and her stunning parlour that I visited while in London in 2017, these beautiful cookies are as much fun to make as they are to eat.

Ingredients (makes approx. 50 small cookies)
250g butter
1 cup sugar
2 teaspoons vanilla extract
1 egg
3 cups plain flour
3 teaspoons mixed spice
1 ½ teaspoons baking powder
Star, Christmas tree and/or snowflake cookie cutters

1 330g packet royal icing mixture (I use Queen’s brand)
Pastel food colouring (I used blue, green, pink and purple)
Silver cachous

Method
Cream butter, sugar & vanilla using electric beaters until well combined.

Add the egg and beat until light and fluffy.

Using a wooden spoon or silicone spatula, mix sifted dry ingredients into wet ingredients until a dough forms. Divide into 2 roughly equal pieces, cover with glad wrap (or plastic wrap) and refrigerate for an hour.

Preheat oven to 180°C (160 fan-forced). Roll out dough onto a lightly floured surface using a rolling pin until you reach your desired thickness (I like mine around 6-7mm) and cut out shapes using cookie cutters.

Place onto a baking tray (they don’t have to be spread out much as they don’t really expand) and bake for 5-8 minutes, or until golden.

Once the cookies have cooled, make the royal icing according to the packet instructions. Divide the icing evenly into 5 bowls (or however many colours you want) and add a small amount of food colouring to all but one.

Spread a thin layer of the coloured icing onto your cookies with a butter knife and leave to harden. Spoon the white royal icing into a piping bag (I didn’t use a nozzle and just cut a tiny hole in the bag) and pipe on decorations. Decorate with silver cachous or however you wish. Enjoy!

Recipe adapted from ‘The Best Valentine Sugar Cookies’ on Alice & Lois.com

Christmas Light Cookies

These cookies are so easy to make, but look amazing. They’re absolutely perfect as end of year gifts, served on Christmas day or left out for Santa.

Ingredients (makes approx. 50 large round cookies)
250g butter
1 cup sugar
2 teaspoons vanilla extract
1 egg
3 cups plain flour
3 teaspoons mixed spice
1 ½ teaspoons baking powder

3 cups icing sugar
Boiling water
Mini M&Ms (cut in half)
Black edible marker

Method

Cream butter, sugar & vanilla using electric beaters until well combined. Add the egg and beat until light and fluffy.

Using a wooden spoon or silicone spatula, mix sifted dry ingredients into wet ingredients until a dough forms. Knead gently for 1-2 minutes on a lightly floured bench and then divide into 2 roughly equal pieces, cover with clingfilm and refrigerate for at least 30 minutes.

Preheat oven to 180°C (160 fan-forced). Roll out dough onto a lightly floured surface using a rolling pin until you reach your desired thickness (I like mine around 5-6mm) and cut out circles using a large round cookie cutter. Repeat until you have used all the dough.

Place onto a baking tray (they don’t have to be spread out much as they don’t really expand) and bake for approximately 12-15 minutes, or until lightly golden.

When the cookies are cooled, make your icing by adding boiling water gradually to the icing sugar until you have the desired consistency (thin enough to spread easily, but not so thin that it runs off the cookies).

Once the icing has dried, gently draw the string of the Christmas lights with the black marker. Add the halved M&Ms as the ‘lights’ alternating whether they hang from above or below the marker line. Enjoy!

Recipe adapted from ‘The Best Valentine Sugar Cookies’ on Alice & Lois.com
Decorations inspired by various versions on Pinterest

Melting Snowman Cookies

These lightly spiced Christmas cookies are almost too cute to eat (almost…. sorry Frosty!)

Ingredients (makes approx. 30 large round cookies)
250g butter
1 cup sugar
2 teaspoons vanilla extract
1 egg
3 cups plain flour
3 teaspoons mixed spice
1 ½ teaspoons baking powder

3 cups icing sugar
Boiling water
30 white marshmallows
2 packets of mini M&Ms
Edible textas (black and orange)

Method

Cream butter, sugar & vanilla using electric beaters until well combined. Add the egg and beat until light and fluffy.

Using a wooden spoon or silicone spatula, mix sifted dry ingredients into wet ingredients until a dough forms. Knead gently for 1-2 minutes on a lightly floured bench and then divide into 2 roughly equal pieces, cover with clingfilm and refrigerate for at least 30 minutes.

Preheat oven to 180°C (160 fan-forced). Roll out dough onto a lightly floured surface using a rolling pin until you reach your desired thickness (I like mine around 5-6mm) and cut out circles using a large round cookie cutter. Repeat until you have used all the dough.

Place onto a baking tray (they don’t have to be spread out much as they don’t really expand) and bake for approximately 12-15 minutes, or until lightly golden.

When the cookies are cooled, make your icing by adding boiling water gradually to the icing sugar until you have the desired consistency (thin enough to spread easily, but not so thin that it runs off the cookies).

To decorate, spread icing onto the cookie so it looks like a puddle, attach the white marshmallow to the ‘back’ and 2 M&M buttons. When the icing has dried completely, gently draw on the arms and facial details (my snowmen are surprised, but you can add whatever expressions you like). Enjoy!

Recipe adapted from ‘The Best Valentine Sugar Cookies’ on Alice & Lois.com
Decorations inspired by various versions on Pinterest

Festive Chocolate Ginger Nut Cookies

These cheat’s festive cookies are cheap and easy, but look a million bucks! Choose your favourite decoration option, or make some of each.

Option 1: Mini Christmas Puddings
1 packet Arnott’s Ginger Nut Biscuits
100g dark chocolate, melted
20g white chocolate, melted
Original M&Ms (red & green)
Mini M&Ms (red)

Spread the melted dark chocolate onto your biscuits and let harden. Using a butter knife, spread the melted white chocolate onto the top of your cookies to look like custard. Top with M&Ms.

thumb_img_2745_1024

Option 2: Glitzy Gold
1 packet Arnott’s Ginger Nut Biscuits
100g dark chocolate, melted
Gold cachous
Gold sugar crystals

Spread the melted dark chocolate onto your biscuits and top with gold cachous and sugar crystals.thumb_img_2750_1024

Option 3: Strawberry, Pistachio & Almond
1 packet Arnott’s Ginger Nut Biscuits
100g dark chocolate, melted
Slivered almonds
1 tablespoon pistachios, finely chopped
Dried strawberries, finely chopped

Spread the melted dark chocolate onto your biscuits and top with dried strawberries, almonds and pistachios.
thumb_img_2751_1024

Recipe adapted from Better Homes & Gardens Magazine, Christmas 2015

Stained Glass Christmas Cookies

These gorgeous stained glass cookies are as fun to make as they are to eat! You can use any shaped cutters you like and could even join the cookies together to make a stained glass cookie wreath.

thumb_img_2709_1024

Ingredients (makes approximately 50 cookies)
½ cup butter
½ cup sugar
1 teaspoons vanilla
1 teaspoon mixed spice
1 small egg
½ teaspoon water
1 ½ cups flour
¾ teaspoons baking powder

Hard/boiled lollies (I used Melbourne Rock Candy Bo Peep collection)
White chocolate, melted

thumb_img_2714_1024

Method
Cream butter, sugar & vanilla using electric beaters until well combined. Add the egg and water and beat until light and fluffy.

Using a wooden spoon or silicone spatula, mix sifted dry ingredients into wet ingredients until a dough forms. Divide into 2 roughly equal pieces, cover with glad wrap (or plastic wrap) and refrigerate for an hour.

Line 3 large trays with baking paper.

Roll out dough using a rolling pin until it is approximately 1cm thick. Use assorted cutters to cut out shapes from the dough, and carefully place them on the lined trays (no need to leave room for spreading as they don’t). Then line up the smaller cutter of the shape in the centre of each, and cut out the centre dough.

Preheat oven to 190-200°C  (180°C fan-forced).

Divide the hard lollies into colours and blitz them, one colour at a time, in a blender until they are fine crystals. Using a teaspoon, carefully sprinkle the crystals into the empty centres of the cookies ensuring that the centre is fully covered. Brush away any crystals not in the centre as these will discolour the cookies.

Bake cookies for 8-12 minutes, until lightly golden. Leave to cool on the baking trays for 5 minutes, before gently transferring onto a wire rack to cool completely.

Once they are cool, decorate by piping melted white chocolate onto the cookies.

Enjoy!

thumb_img_2712_1024

Sugar cookie recipe adapted from ‘Alice & Lois.com’ – ‘The Best Valentine Sugar Cookies’
Design idea from Pinterest

Elsa’s Snowflake Cookies

These beautiful snowflake cookies look like something Elsa from Frozen would make, and are a fantastic way to get your kids involved in the kitchen. These are perfect for Christmas or for a Frozen themed Birthday party.

thumb_img_2705_1024

Ingredients (makes around 40 cookies)
Equipment:
1 large snowflake cookie cutter
1 small snowflake cookie cutter

For the cookies:

½ cup butter
½ cup sugar
1 teaspoons vanilla
1 teaspoon mixed spice
1 small egg
½ teaspoon water
1 ½ cups flour
¾ teaspoons baking powder

To decorate:
Blue hard lollies (we used Melbourne Rock Candy Bo Peep collection)
White chocolate, melted

thumb_img_2699_1024

Method
Cream butter, sugar & vanilla using electric beaters until well combined. Add the egg and water and beat until light and fluffy.

Using a wooden spoon or silicone spatula, mix sifted dry ingredients into wet ingredients until a dough forms. Divide into 2 roughly equal pieces, cover with glad wrap (or plastic wrap) and refrigerate for an hour.

Line 3 large trays with baking paper.

Roll out dough using a rolling pin until it is approximately 1cm thick. Use the large snowflake cutter to cut out snowflakes from the dough, and carefully place on the lined trays (no need to leave room for spreading as they don’t). Then line up the smaller cutter in the centre of the large snowflake to cut out the dough – you can either bake these little snowflakes as cookies or put them back into the dough to cut out more large snowflakes.

Preheat oven to 190-200°C  (180°C fan-forced).

Blitz blue hard candy in a blender until they are fine crystals. Using a teaspoon, carefully sprinkle the crystals into the empty centres of the cookies ensuring that the centre is fully covered. Brush away any crystals not in the centre as these will discolour the cookies.

Bake cookies for 8-12 minutes, until lightly golden. Leave to cool on the baking trays for 5 minutes, before gently transferring onto a wire rack to cool completely.

Once the cookies are cool, decorate by piping melted white chocolate onto the cookies.

Enjoy!

thumb_img_2703_1024

thumb_img_2689_1024

Sugar cookie recipe adapted from ‘Alice & Lois.com’ – ‘The Best Valentine Sugar Cookies’

Design idea from Pinterest.