Bûche de Noël (Chocolate Yule Log)

Happy Christmas Eve everyone! Today I’m sharing with you an incredibly easy yet delicious cheat’s version of the classic French Christmas dessert – Bûche de Noël.

For a traditional pudding-hater like myself, Christmas dessert has never brought much joy. Sure, you can smother your piece of pudding in custard (which I do) and that helps a bit, but somehow the fruity-boozy flavour that I hate so much still overpowers it. Anyway, fortunately I’m not the only pudding-hater in my family and so last year Mum made this Bûche de Noël (chocolate yule log) in addition to the pudding for dessert. This yule log is sweet (but not overly so) and very light – perfect for a hot summer’s day. It proved so popular last year that we’ll be making it again this year 🙂

December '13 - June '14 279

Ingredients (Serves up to 12)
1x 250g packet Arnott’s chocolate ripple biscuits (or equivalent)
600ml thickened cream
1 tspn caster sugar
1 tspn vanilla essence
20g cocoa powder
Grated chocolate, to decorate
Spearmint leave lollies, to decorate
Raspberries, to decorate

Method
Using an electric mix, mix cream, sugar and vanilla together until stiff.

Fold in the cocoa until combined.

Spread a small amount of the cream along a long, rectangular serving plate to make a base. Spread 1 biscuit with 1 ½ teaspoons of cream and then top with another biscuit. Top with another 1 ½ teaspoons of cream and then place biscuits on their side onto the cream base on the serving platter.

Repeat until all biscuits have been used, to form a log.

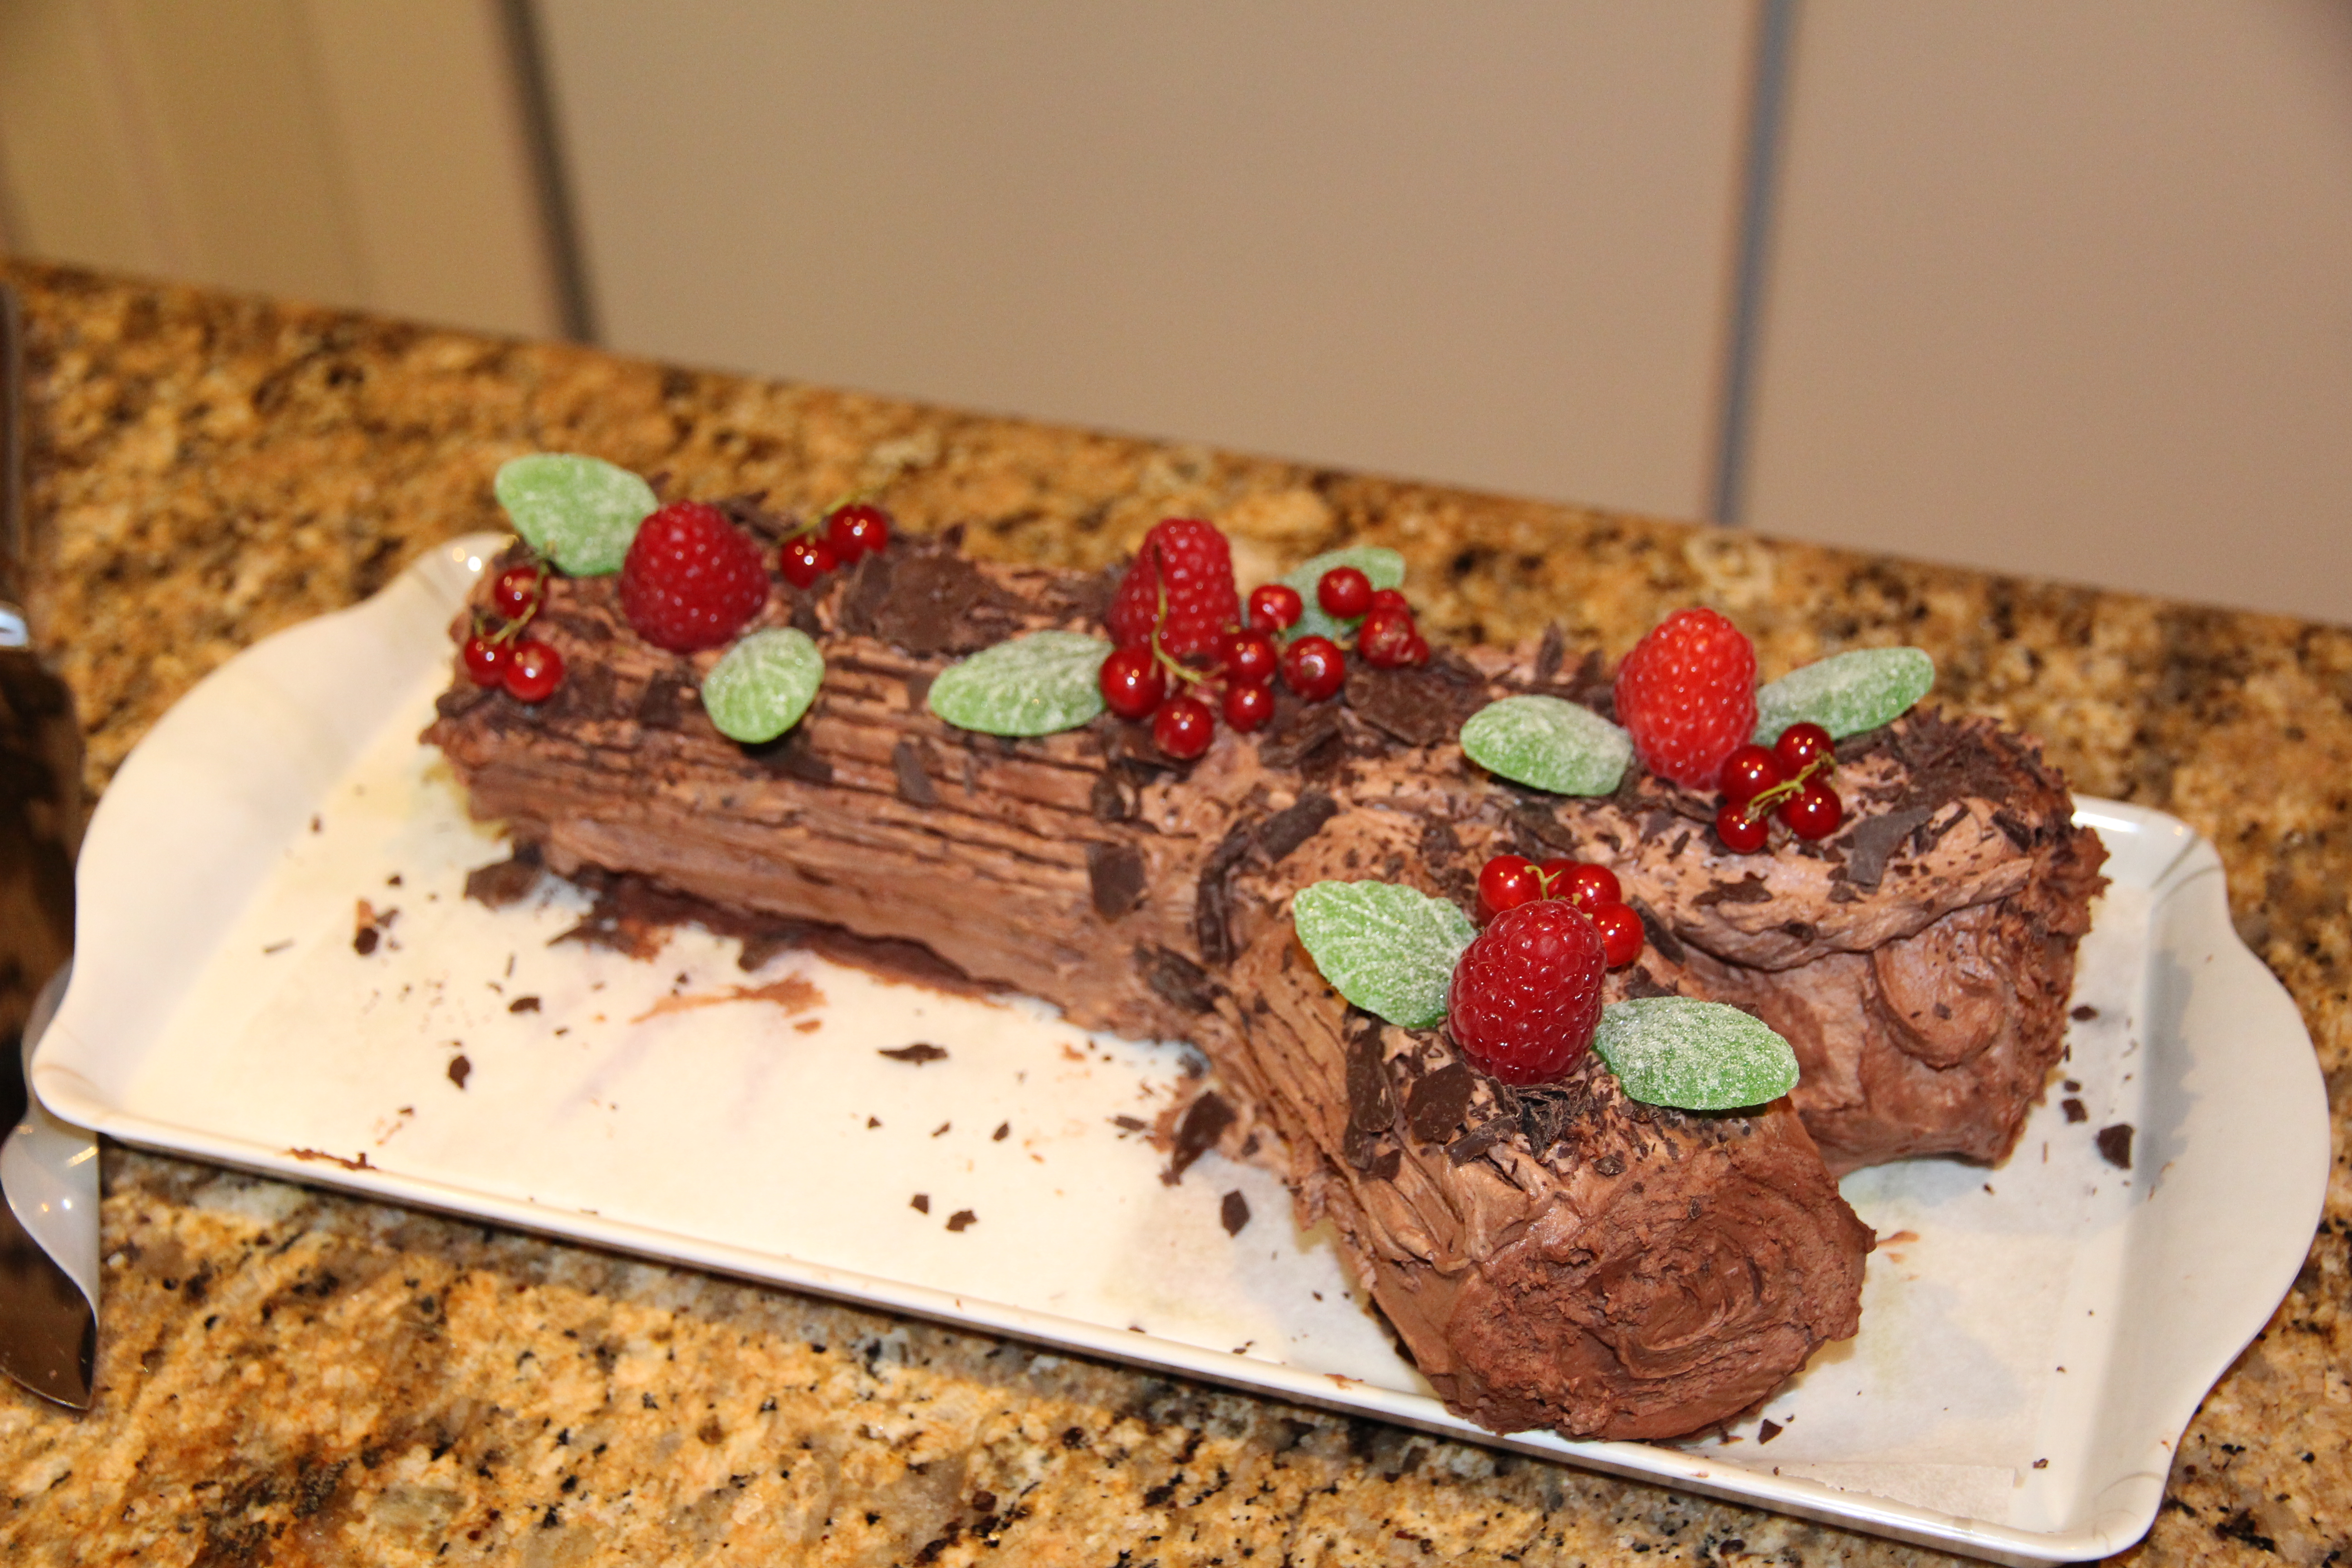
Spread remaining cream over entire log, reserving a small amount for the branch.

Cover loosely with foil and refrigerate for at least 6 hours to set.

Just before serving, cut cake diagonally about a quarter of the way in and use that piece as a branch off the main log.

Patch it up with the remaining cream so it looks attached.

Use a fork to make some lines along the branch to look natural and then sprinkle with grated chocolate.

Decorate with some raspberries and spearmint leaves and serve. Enjoy!

December '13 - June '14 279

Adapted from Arnott’s ‘Bake and Create’ Recipe booklet.

Red Velvet Christmas Cupcakes

image2-9

Wow! Only a week and a day until Christmas 🙂 It’s warming up around here which means that having the oven on and heating the house isn’t ideal and so I’ve had a couple of organised baking spells to try and minimise the amount of oven time.

I made these cupcakes yesterday for an afternoon tea with friends and they’re easy and delicious (and still soft & moist today).

For decorations, go as crazily festive as you like. There are plenty of cute Christmas sugar icing decorations that are cheap and readily available, you could make up a range of different coloured icings and pipe a wreath on them or something along those lines (if you can be bothered), or do as I did, and cut out some holly out of ready-made fondant icing.

Of course, these cupcakes aren’t reserved just for Christmas time, they would work equally well as birthday cupcakes with piped icing and candles!

image3-2

Ingredients (Makes 24)
Cupcakes
150g softened butter
⅔ cup caster sugar
2 tspns vanilla extract
2 eggs
1 ⅓ cups self raising flour, sifted
4 tblspns cocoa, sifted
½ cup buttermilk
1 ½ tblspns of good quality red food colouring (I use Wilton’s, you may need to adjust the amount depending on the brand you use)

Cream Cheese Icing
500g cream cheese, chopped
100g butter, softened
1 tspn vanilla extract
1 ½ cups icing sugar
2 tblspns milk

To Decorate
Ready made white fondant icing
Red food colouring
Green food colouring
Holly leaf cutter (or stencil)
Sharp Knife

image2-10

Method
Preheat oven to 160°C fan-forced. Place butter, caster sugar and vanilla into a large bowl and beat with electric mixer until pale and creamy. Add the eggs, beating until well combined. Add the flour, cocoa, buttermilk and food colouring and beat on a low speed until just combined.

Divide mixture into cupcake tins lined with (green) patty pans. Bake for 15-20 minutes (depending on your oven) or until a skewer inserted into the middle of the largest cupcake comes out clean. Allow to cool completely on a wire rack.

image2-7

While the cupcakes are cooking and cooling, divide half of the fondant icing into 2 and colour one lot vibrant red, and the other a deep (holly-ish) green. Roll out the green fondant with a rolling pin and cut out 48 holly leaves. Then, using a sharp non-serated knife, mark out a leaf pattern by running the knife through the centre so that it leaves an incision but does not cut through. Then cut diagonal incisions from the centre out so that it looks like the veins of a leaf (see picture below).

image2-11

Pull small pieces of the red fondant off and roll into 48 small balls to make the holly berries.

image1-8

Once the cupcakes are almost completely cool, start making the cream cheese icing. Place the cream cheese and butter into a large bowl and beat with an electric mixer for 8-10 minutes. Add the icing sugar and vanilla and beat for a further 5 minutes or until completely smooth. Add the milk and beat until just combined.

Ice each cupcake with a generous amount of icing and top with 2 leaves and 2 berries. Enjoy!

image3

Recipe adapted from Donna Hay’s recipe ‘red velvet cupcakes with sugared cranberries’.

Chocolate Reindeer Tartlets

Only 12 days until Christmas!! I LOVE Christmas time (and I mean LOVE) and have been madly baking and decorating along to Christmas tunes ready for the big day. I have also been joined by a little puppy, Bailey, who has made baking more of a challenge but has by no means curbed my enthusiasm for it.

image2-6image1-7

These adorable reindeer tartlets are delicious and so easy to make – a perfect recipe to involve the kids in and to take to the multitude of Christmas functions where you need to ‘bring a plate’. If you don’t want all the reindeer to be Rudolphs, feel free to swap the jaffas for brown m&ms 🙂

image1-6Ingredients (makes 20)
1 packet Butternut Snap Biscuits (or equivalent)
65g butter, chopped
⅓ cup cream
200g dark chocolate melts
Approximately 10 white marshmallows, halved
20 jaffas or equivalent red lollies
20 white mini marshmallows, halved
Chocolate writing icing (or black icing pen, or additional melted chocolate applied with a toothpick)
1 packet of pretzels

Method
Preheat oven to 160°C fan-forced. Place 1 biscuit per hole in a 12-hole, round-based tartlet tin. Bake for 2-3 minutes or until soft. Remove from oven. Carefully press softened biscuits into tin to mould into a cup shape (use a spoon to make it easier if you like). Allow to cool slightly before transferring to a plate and repeating with remaining biscuits.

image1

Heat butter, cream and chocolate in a saucepan over very low heat. Stir constantly for approximately 5 minutes or until melted and smooth. Pour into a clean, dry bowl and refrigerate for 20 minutes or until cool but not set.

Fill biscuit cases with 1 heaped teaspoon of chocolate mixture. Refrigerate until set.

image1-2

While the ganache is setting, carefully cut pretzels in half and trim so it looks like a lower case ‘f’ for the antlers (I seem to break as many as I successfully cut so that’s why I recommend allowing a full packet!!)

image2-2

Gently press 1 marshmallow half, sticky side up into each tartlet.

image1-3

Attach 1 jaffa to each marshmallow.

image2-3

Attach 2 mini marshmallow halves above nose, cut-side up, to form eyes. Use an icing pen/or a spot of chocolate ganache applied with a toothpick to create the pupils.

image1-5

Place 2 pretzel pieces above eyes. Press to secure. Serve & enjoy!

image2-4image1-6

Recipe adapted from Arnott’s ‘Chocolate Butternut Snap Tartlets’ recipe.