Spiced Pumpkin Whoopie Pies

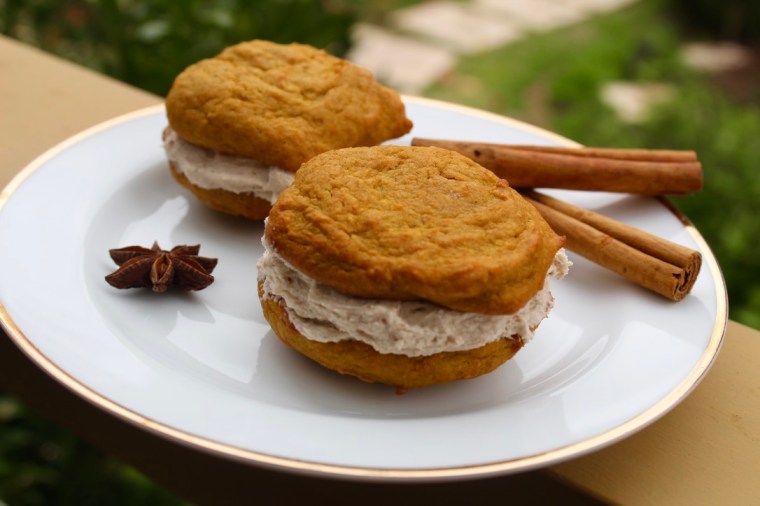
Autumn is here (at long last) and the trees are looking stunning! Even though I live in the Southern Hemisphere and pumpkin flavouring isn’t as prevalent as in the US, when I found myself free on a grey Autumn afternoon I felt the need to make something using pumpkin, cream cheese frosting and my favourite spices.

My Mum, sister and I visited the Hummingbird Bakery while we were in Notting Hill in London and tried one of their whoopie pies. While everything we tried from the bakery was delicious, the whoopie pie was our favourite and so I felt the need to replicate it at home. Luckily for me, the recipe was easily available online (and also in their cookbook Cake Days) and with a bit of tweaking to add in extra spices, it really hit the spot.

hbE6H2iHQq+38Y06nt+g7w_thumb_3

Ingredients (makes 15 whoopie pies)
120ml vegetable oil
180g brown sugar
1 teaspoon vanilla extract
1 egg
100ml pumpkin purée
250g plain flour
½ teaspoon baking powder
½ teaspoon bicarbonate of soda
2 teaspoons ground cinnamon
1 teaspoon mixed spice
½ teaspoon ground ginger

85g butter, softened
150g icing sugar
80g cream cheese
1 teaspoon vanilla extract
2 teaspoons cinnamon
1 teaspoon mixed spice
A splash of milk (as required)

h0tVzICfRome4PjCCxkv4Q_thumb_e

Method
Preheat the oven to 170ºC (approx. 150ºC fan-forced) and line two large trays with baking paper.

Using an electric mixer, combine the oil, sugar and vanilla until combined and light in colour. Add the egg and pumpkin purée and mix until all ingredients are incorporated. Sift together the remaining ingredients and add to the liquid mixture in two batches, beating until just combined.

Spoon 30 teaspoons full of the batter on to the prepared trays, leaving a 3cm gap between each. Bake for 10-15 minutes or until they are golden and bounce back when touched. Allow to cool completely before filling.

To make the cream cheese filling, use an electric beater to mix together the butter and the icing sugar on a low speed until smooth. Add the cream cheese, vanilla and spices and continue mixing on a low speed until just combined. Add milk or extra icing sugar as required.

To assemble the whoopie pies, take a sponge, spread approximately 1 tablespoon of filling onto its flat side and then sandwich with another sponge flat-side-down. Enjoy!

zqdAnK2vQTGowZ0wpxdipQ_thumb_4

Recipe adapted from Cake Days by the Hummingbird Bakery

Advertisement

Red Velvet Cupcakes with Cream Cheese Frosting

I’ve always been fascinated by red velvet cake, probably since seeing the memorable bleeding armadillo groom’s cake in Steel Magnolias! Red velvet isn’t a very common flavour in Australia (although this is changing), and so finding a strong enough red food dye can be challenging. I used Wilton red no-taste colouring paste, but have heard Dr. Oetker works well too. These cakes are light and fluffy, and due to the buttermilk are not overly sweet. I served mine with cream cheese frosting, but a vanilla buttercream would also work well.

oEVw09pAQW+t51%tbpl5kA_thumb_e08

Ingredients (Makes 24)
Cupcakes
150g softened butter
⅔ cup caster sugar
2 tspns vanilla extract
2 eggs
1 ⅓ cups self raising flour, sifted
4 tblspns cocoa, sifted
½ cup buttermilk
1 ½ tblspns of good quality red food colouring (I use Wilton’s, you may need to adjust the amount depending on the brand you use)

Cream Cheese Frosting
500g cream cheese, chopped
100g butter, softened
1 tspn vanilla extract
1 ½ cups icing sugar
2 tblspns milk

dgaf6Bt6QwyCBAfZ66gBCw_thumb_de6

Method
Preheat oven to 160°C. Place butter, caster sugar and vanilla into a large bowl and beat with electric mixer until pale and creamy. Add the eggs, beating until well combined. Add the flour, cocoa, buttermilk and food colouring and beat on a low speed until just combined.

Divide mixture into cupcake tins lined with patty pans. Bake for 15-20 minutes or until a skewer inserted into the middle of a cupcake comes out clean. Transfer to a wire rack to cool.

Once the cupcakes are almost completely cool, start making the cream cheese frosting. Place the cream cheese and butter into a large bowl and beat with an electric mixer for 8-10 minutes. Add the icing sugar and vanilla and beat for a further 5 minutes or until completely smooth. Add the milk and beat until just combined.

Top each cupcake with a thick layer of frosting and, if desired, break up one of the cupcakes and sprinkle its crumbs over the remaining cakes. Enjoy!

dbw2B4K+RySQh027I%XaBA_thumb_df2

Recipe adapted from Donna Hay’s recipe ‘red velvet cupcakes with sugared cranberries’.

igcIKYHeSe2XgzJgGwN%Og_thumb_e18

SaveSaveSaveSaveSaveSaveSaveSaveSaveSaveSaveSave

Powder Puffs with Strawberries & Cream

This is probably my most requested recipe and I feel terrible for having kept it in the Bills/Payne/James/Hockney family vault for so long! My Mum (and her mother and grandmother before her) makes powder puffs for special occasions and they are always incredibly popular. They’re dead easy to make and the “sponge biscuits” keep in an airtight container for ages**. The only trick is to fill them with cream far enough in advance so they soften up – then they’re like eating sweet, fluffy clouds. I love them filled with strawberries and cream, lightly dusted with icing sugar, but you could fill them with just about anything.

thumb_IMG_1895_1024

Ingredients (makes approximately 45 sandwiched powder puffs)
3 eggs
¾ cup sugar
½ cup plain flour
½ cup cornflour
1 teaspoon cream of tartar
½ teaspoon bicarb soda

To fill
Whipped, sweetened cream flavoured with a drop or two of vanilla extract
Strawberries, thinly sliced

thumb_IMG_1896_1024

Method
Preheat the oven to 200°C (or 180°C fan-forced). Line 3 large baking trays with baking paper (you will fill approximately 6 trays due to spreading, but I just rotate and re-use the trays).

Beat eggs and sugar in a large bowl with electric mixers until light and fluffy. Add in sifted flours, cream of tartar and bicarb soda and mix until just combined.

Drop ½ teaspoons’ worth of the mixture onto the prepared trays, leaving plenty of room to spread (I usually fit 12-15 on my large trays). Bake for 6 minutes* and then leave to cool slightly, before removing from the tray with a metal spatula and letting them cool completely on a wire cake rack. Repeat this process with the remaining mixture.

2-3 hours before serving, match each sponge biscuit with another of approximately equal size. Spread each ‘biscuit’ generously with thickened, sweetened cream and add sliced strawberries to one half before sandwiching them together.

Dust with a little icing sugar just before serving. Enjoy!

Notes:
*They will harden like a biscuit (they’re supposed to, don’t worry), but will soften when you add the cream later.
** Store in an airtight container with grease-proof paper between each layer so they don’t stickthumb_IMG_1897_1024.jpg

Adapted from a very old family recipe.

Red Velvet Christmas Cupcakes

image2-9

Wow! Only a week and a day until Christmas 🙂 It’s warming up around here which means that having the oven on and heating the house isn’t ideal and so I’ve had a couple of organised baking spells to try and minimise the amount of oven time.

I made these cupcakes yesterday for an afternoon tea with friends and they’re easy and delicious (and still soft & moist today).

For decorations, go as crazily festive as you like. There are plenty of cute Christmas sugar icing decorations that are cheap and readily available, you could make up a range of different coloured icings and pipe a wreath on them or something along those lines (if you can be bothered), or do as I did, and cut out some holly out of ready-made fondant icing.

Of course, these cupcakes aren’t reserved just for Christmas time, they would work equally well as birthday cupcakes with piped icing and candles!

image3-2

Ingredients (Makes 24)
Cupcakes
150g softened butter
⅔ cup caster sugar
2 tspns vanilla extract
2 eggs
1 ⅓ cups self raising flour, sifted
4 tblspns cocoa, sifted
½ cup buttermilk
1 ½ tblspns of good quality red food colouring (I use Wilton’s, you may need to adjust the amount depending on the brand you use)

Cream Cheese Icing
500g cream cheese, chopped
100g butter, softened
1 tspn vanilla extract
1 ½ cups icing sugar
2 tblspns milk

To Decorate
Ready made white fondant icing
Red food colouring
Green food colouring
Holly leaf cutter (or stencil)
Sharp Knife

image2-10

Method
Preheat oven to 160°C fan-forced. Place butter, caster sugar and vanilla into a large bowl and beat with electric mixer until pale and creamy. Add the eggs, beating until well combined. Add the flour, cocoa, buttermilk and food colouring and beat on a low speed until just combined.

Divide mixture into cupcake tins lined with (green) patty pans. Bake for 15-20 minutes (depending on your oven) or until a skewer inserted into the middle of the largest cupcake comes out clean. Allow to cool completely on a wire rack.

image2-7

While the cupcakes are cooking and cooling, divide half of the fondant icing into 2 and colour one lot vibrant red, and the other a deep (holly-ish) green. Roll out the green fondant with a rolling pin and cut out 48 holly leaves. Then, using a sharp non-serated knife, mark out a leaf pattern by running the knife through the centre so that it leaves an incision but does not cut through. Then cut diagonal incisions from the centre out so that it looks like the veins of a leaf (see picture below).

image2-11

Pull small pieces of the red fondant off and roll into 48 small balls to make the holly berries.

image1-8

Once the cupcakes are almost completely cool, start making the cream cheese icing. Place the cream cheese and butter into a large bowl and beat with an electric mixer for 8-10 minutes. Add the icing sugar and vanilla and beat for a further 5 minutes or until completely smooth. Add the milk and beat until just combined.

Ice each cupcake with a generous amount of icing and top with 2 leaves and 2 berries. Enjoy!

image3

Recipe adapted from Donna Hay’s recipe ‘red velvet cupcakes with sugared cranberries’.

Buttery Orange Cake

I have a thing for orange cakes. I’m not really sure why, I’m not a fan of most fruit cakes, but orange cakes fall into a category of their own. The original recipe for this pairs the cake with a simple glace icing flavoured with orange juice but I found that a cream cheese icing works better for a stronger, less sickly-looking cake. Here I have gone over the top with fresh roses and white chocolate shavings but you can decorate it as simply as you like.

403896_10150671923324463_10224932_n

Ingredients (serves 12)
250g softened butter
2 tblspns finely grated orange rind
1 ½ cups caster sugar
4 eggs
1 ½ cups self-raising flour
½ cup plain flour
¾ cup orange juice

Icing
30g softened butter
80g softened cream cheese
1 tsp finely grated orange rind (although I tend to add a bit more – up to you!)
1 ½ cups icing sugar mixture

Method
Preheat oven to 170°C. Grease a deep 22cm round cake-pan; line base and sides with baking paper, extending it 5cm above the top of the pan (this will make getting it out easier and will assist with the cooking process).

Beat butter, rind and sugar in a medium bowl with an electric mixer until light and fluffy. Add eggs one at a time, beating until just combined between additions. Mix in flour and juice in two batches.

Pour the mixture into the prepared tin and bake for approximately 1 hour and 10mins then carefully turn onto a wire rack to cool.

Place cake top-side up onto a serving plate or cake stand then spread cold cake with icing and decorate as desired.

To make the icing, beat butter, cream cheese and rind in small bowl with electric mixer until light and fluffy, gradually beat in icing sugar.

E cookbook 3 012Adapted from the Australian Women’s Weekly’s “Buttery Orange Cake” in the 2002 ‘Best Food’ cookbook.