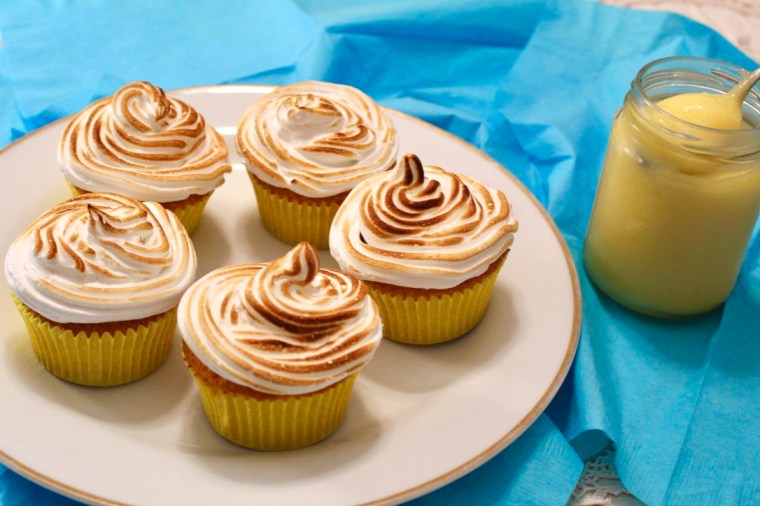
It should be no secret by now that I love lemon meringue. I already have recipes on the blog for a traditional lemon meringue pie and for mini lemon meringue pies, but until now I haven’t had lemon meringue cupcakes.
Luckily, today is the day I rectify that sad scenario. This recipe is a combination of my butterfly cake recipe with my lemon curd and a lightly toasted meringue topping and the result is delicious!
Lemon Curd
½ cup white sugar
1 egg + 1 egg yolk
½ cup fresh lemon juice (approx. 2-3 lemons)
Zest of 1 lemon
55g butter, melted
Meringue
3/4 cup caster sugar
3 egg whites
Method Preheat oven to 200ºC and line a 12-hole muffin tin with yellow patty pans.
Put all of the ingredients except for the milk into a food processor and blitz until smooth. Pulse while adding the milk until just combined.
Divide batter evenly among the patty pans (I know it doesn’t look like much batter, but they will rise a lot).
Bake for 15-20 minutes or until a skewer inserted comes out clean. Transfer immediately onto a wire rack to cool completely.
While the cakes are baking, start making the lemon curd. Whisk together the sugar, egg and yolk in a large microwave safe bowl until thoroughly combined. Whisk in lemon juice, zest and melted butter.
Cook the curd in the microwave on full power for 50 second intervals, whisking after each interval. You will know your lemon curd is ready when it coats the back of a metal spoon (approximately three 50 second intervals). Allow to cool completely.
Once the cakes and curd are completely cool, use a teaspoon to dig a hole in the centre of each cupcake. Fill the holes with the lemon curd and set aside.
To make the meringue, whisk the egg whites in a clean, dry bowl until soft peaks form. Continue whisking, gradually adding the sugar, 1 tablespoon at a time. Continue whisking until sugar dissolves.
Use a piping bag with a star or plain nozzle to pipe meringue over cupcakes. Use a cook’s blowtorch to lightly toast the meringue. Enjoy!
Notes:
– If you don’t have a blowtorch, simply bake the frosted cakes on an oven tray at 220ºC for 3-5 minutes or until the meringue is toasted.
– Any extra lemon curd can be stored in a sterilised container in the fridge for up to 2 weeks.
Cupcake recipe from Nigella Lawson’s How to be a Domestic Goddess Lemon curd recipe from My Baking Addiction Meringue recipe from Taste.com.au
This is my favourite cheesecake recipe which was kindly given to me by my high-school friend, Antonia. The filling has a silky texture with a delicious punch of lemon, and sets without needing gelatin. It’s a perfect no-stress summer dessert as you can make it the night before and leave it to set without a second thought.
Ingredients (serves 8-10) Juice and rind of 1 large lemon
400ml condensed milk
250g cream cheese, softened
300ml thickened cream
1 x 250g packet Arnott’s Granita biscuits (or equivalent)
75g butter, melted
Method
Grease and line a 25cm round springform tin.
Crush the biscuits in a food processor and add the melted butter. Use the crumb mixture to line the bottom and part way up the sides of the prepared tin, pressing it in firmly with the bottom of a glass to ensure it is even.
In a large bowl, beat the cream cheese and condensed milk until smooth.
In a separate bowl, beat the cream until it is very thick but not fully whipped.
Gently combine the cream into the cream cheese mixture and stir until just combined. Add in the lemon rind and gradually add the juice (to taste).
Pour into the crumb lined tin. Cover the top with foil and secure with a rubber band.
Refrigerate overnight or until set (at least 7 hours).
I love the look of these number cakes (also known as cream tarts or alphabet cakes) that are all over Instagram and was thrilled when my sister asked me to make her one for her 21st Birthday.
While they’re a bit fiddly to make and decorate, I was surprised by how quick they are to make; largely as they take so little time to bake in the oven. I also love how customisable they are – you can use any letters or numbers you choose, pick your decoration colour scheme, and change the flavour of the filling to taste. I went with a traditional almond biscuit with a vanilla custard filling and decorated with strawberries and pink and white flowers, meringues and macarons.
Ingredients (makes two A3-sized number cakes, serves approx. 20) Pâte Sablée (biscuit layers)
– 225g butter, room temperature
– ½ cup icing sugar
– 1 egg
– 2¼ cups flour
– 1 cup almond meal
– 1 teaspoon almond essence
– 1 teaspoon vanilla essence
Other
– Cut out A3 sized numbers (I used a 1 and a 2 stretched to fill an A3 page each in bolded Arial Black font)
– Extra large square silver cake board
– Fresh, pesticide-free flowers
– Macarons
– Meringues
– Sugar flowers
– Strawberries (halved)
To make the biscuit layers, place all pâte sablée ingredients into a food processor and blitz until combined.
Remove the dough from the processor and knead gently for 30 seconds until smooth. Halve the dough, press each into a disc shape, cover in clingfilm and refrigerate for at least 30 minutes.
Pre-heat oven to 180ºC.
Roll one of the pieces of dough between two pieces of baking paper until it’s big enough for your number template (approx. 5-6 mm thick). Carefully cut out the first number from the dough, keeping the excess pieces. Place onto a baking tray lined with baking paper.
Repeat with the same number and the excess dough (remember that you need two of each number).
Bake the two biscuits for 12-15 minutes or until golden brown. Allow to cool completely before VERY gently transferring one of the biscuits onto to the silver cake board and setting the other aside.
Take out the second half of the dough from the refrigerator and repeat steps 4-6 for the second number.
To make the vanilla filling, whip the cream in a large bowl with an electric mixer until peaks form. Alternately add the pudding mix and the icing sugar while beating, until the filling is combined and very thick.
Spoon the filling into a piping bag with a medium-sized round nozzle and pipe even dollops in rows on each number (as below)
Gently sandwich the biscuit pairs on top of the filling and repeat step 9.
Decorate with flowers, macarons and meringues.
Enjoy!
Notes:
The biscuits can be made the day ahead and kept in an airtight container, but don’t pipe the filling or assemble the cake until the day of serving.
If any of your biscuits break, don’t panic, simply ‘glue’ the biscuit back together with some of the vanilla filling prior to piping the filling on top and decorating – no-one will ever know!
Can be kept in the refrigerator for up to 3 days but the biscuit layers will go soft.
Biscuit recipe adapted from ‘Cream Tart’ recipe on Home Cooking Adventure.com
Vanilla filling recipe adapted from ‘The Best Whipped Cream Frosting’ on Two Sisters Crafting.com
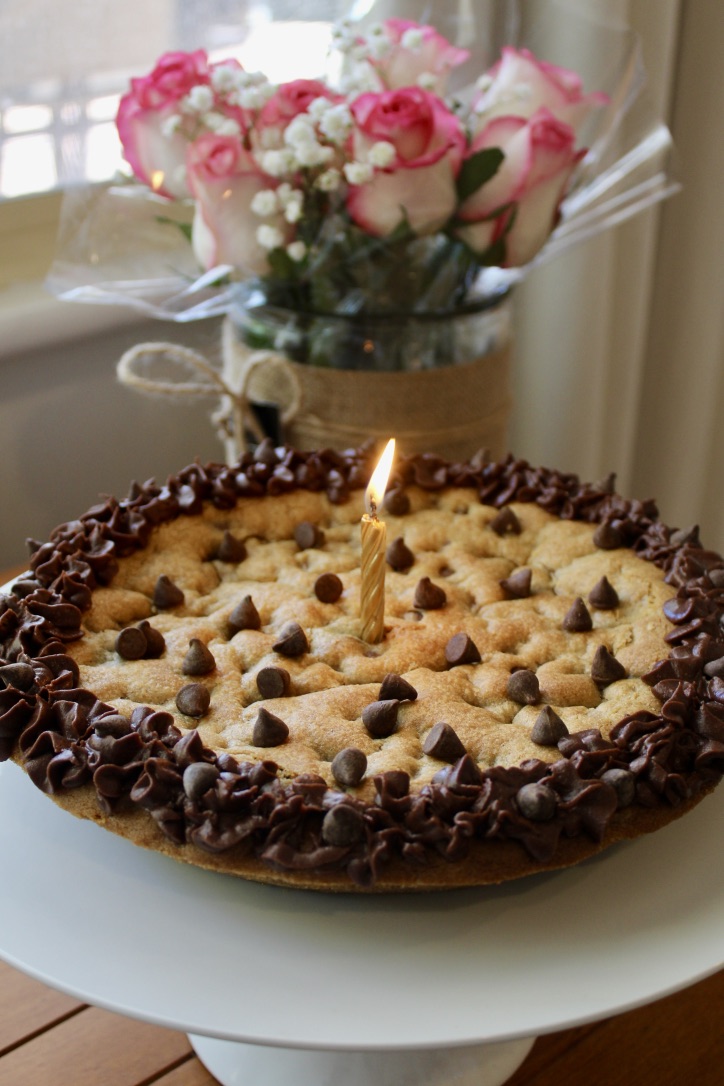
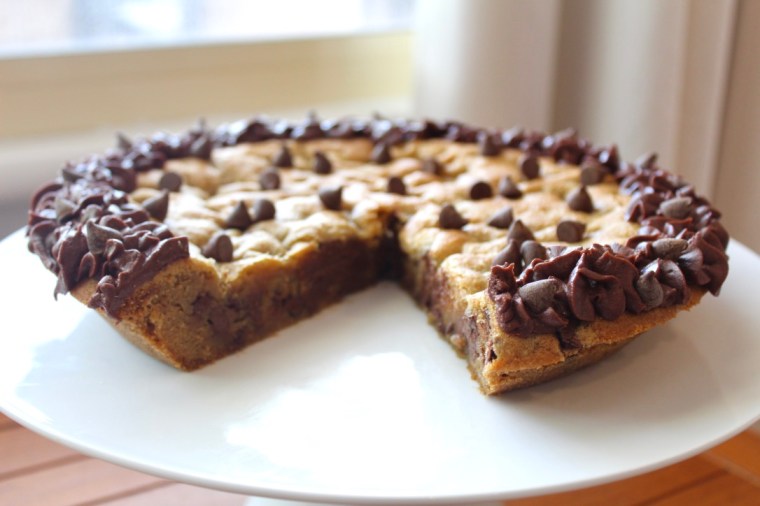
For my birthday this year, I decided to bake something a little different. As much as I have enjoyed making (and eating!) my layered drip cakes (here and here) over the last couple of years, this year I was after something simpler. Enter the cookie cake.
I have admired the brightly coloured array of delicious looking cookie cakes on Sally’s Baking Addiction (my baking porn website of choice) for years, and finally got around to making it. Boy, am I glad I did! As promised, this ‘cake’ is so quick and simple to make and produces a deliciously chewy and flavoursome giant cookie. The recipe is also very easy to adapt – you could use M&Ms, or mix up the choc chips depending on your taste.
Ingredients (serves 12-14) 170g softened butter
1 cup brown sugar
1 egg + an extra yolk
5 teaspoons vanilla extract
2 cups flour
2 teaspoons cornflour
1 teaspoon baking powder
1½ cups chocolate chips (I used dark chocolate)
Chocolate frosting for topping (optional)
Method Preheat your oven to 180°C. Spray a 23cm (9-inch) pie dish or cake pan thoroughly with nonstick spray.
In a large bowl, beat the butter for 1-2 minutes until light and creamy. Add the brown sugar and beat for about a minute or until combined. Mix in the egg, egg yolk and vanilla on until combined, scraping down the sides of the bowl as required.
In a separate bowl, combine the flours and baking powder. On a low speed, gradually mix into the wet ingredients until combined. Add in 1¼ cups chocolate chips and mix for until evenly dispersed.
Gently press the cookie dough evenly into the prepared pan. Bake for 20-25 minutes or until the cake is lightly golden brown (use a skewer in the centre to check it’s cooked). Remove from the oven and set the pan on a wire rack to cool completely.
Once cooled, use a sharp knife or metal spatula to loosen the sides of the cookie cake from the pan and transfer to a cake stand or serving plate.
Decorate as desired (I made a quick chocolate buttercream using butter, icing sugar and cocoa powder and piped it on using my Wilton 1M tip), top with the remaining chocolate chips and serve with vanilla ice-cream. Enjoy!
Recipe adapted from ‘Chocolate Chip Cookie Cake’ on Sally’s Baking Addiction.
I love Nigella recipes because they’re consistently quick, easy and delicious. These muffins are no exception, taking under 40 minutes from start to finish. The recipe is also incredibly flexible – you can use fresh or frozen raspberries (or any other fruit for that matter) or try switching the lemon for another citrus fruit of your choice. Happy baking!
Ingredients (makes 12)
60g butter
200g plain flour
2 teaspoon baking powder
½ teaspoon bicarb soda
150g caster sugar
Juice and zest of 1 lemon
Milk (approx. 120ml)
1 large egg
150g raspberries
Method
Preheat the oven to 200ºC. Line a muffin tin with 12 patty pans.
Melt the butter in a medium bowl and set aside to cool.
In a large bowl, combine the flour, baking powder, bicarb, sugar and lemon zest.
Pour the lemon juice into a large measuring jug and add milk until it comes to 200ml (don’t worry about it curdling). Add the milk mixture to the melted butter and then beat in the egg.
Combine the wet ingredients with the dry ingredients until just combined (don’t overmix it as your muffins will be tough). Gently stir through the raspberries.
Spoon the batter into the patty pans and bake for 25 minutes or until the muffins spring back when touched. Enjoy!
Recipe adapted from Nigella’s ‘Lemon-Raspberry Muffins’ in How to Be a Domestic Goddess.
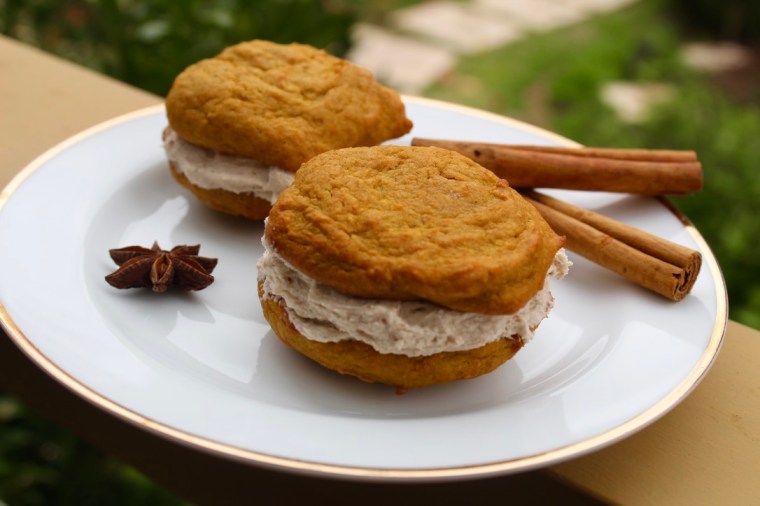
Autumn is here (at long last) and the trees are looking stunning! Even though I live in the Southern Hemisphere and pumpkin flavouring isn’t as prevalent as in the US, when I found myself free on a grey Autumn afternoon I felt the need to make something using pumpkin, cream cheese frosting and my favourite spices.
My Mum, sister and I visited the Hummingbird Bakery while we were in Notting Hill in London and tried one of their whoopie pies. While everything we tried from the bakery was delicious, the whoopie pie was our favourite and so I felt the need to replicate it at home. Luckily for me, the recipe was easily available online (and also in their cookbook Cake Days) and with a bit of tweaking to add in extra spices, it really hit the spot.
Ingredients (makes 15 whoopie pies)
120ml vegetable oil
180g brown sugar
1 teaspoon vanilla extract
1 egg
100ml pumpkin purée
250g plain flour
½ teaspoon baking powder
½ teaspoon bicarbonate of soda
2 teaspoons ground cinnamon
1 teaspoon mixed spice
½ teaspoon ground ginger
Method Preheat the oven to 170ºC (approx. 150ºC fan-forced) and line two large trays with baking paper.
Using an electric mixer, combine the oil, sugar and vanilla until combined and light in colour. Add the egg and pumpkin purée and mix until all ingredients are incorporated. Sift together the remaining ingredients and add to the liquid mixture in two batches, beating until just combined.
Spoon 30 teaspoons full of the batter on to the prepared trays, leaving a 3cm gap between each. Bake for 10-15 minutes or until they are golden and bounce back when touched. Allow to cool completely before filling.
To make the cream cheese filling, use an electric beater to mix together the butter and the icing sugar on a low speed until smooth. Add the cream cheese, vanilla and spices and continue mixing on a low speed until just combined. Add milk or extra icing sugar as required.
To assemble the whoopie pies, take a sponge, spread approximately 1 tablespoon of filling onto its flat side and then sandwich with another sponge flat-side-down. Enjoy!
Recipe adapted from Cake Days by the Hummingbird Bakery
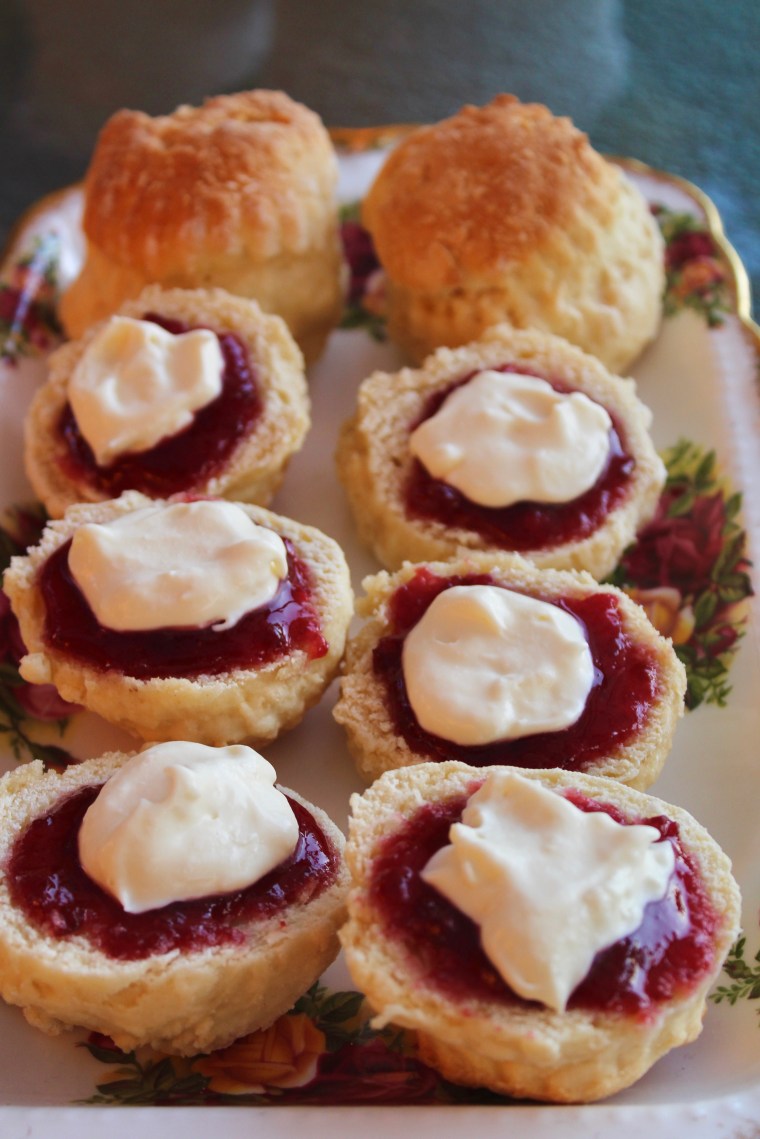
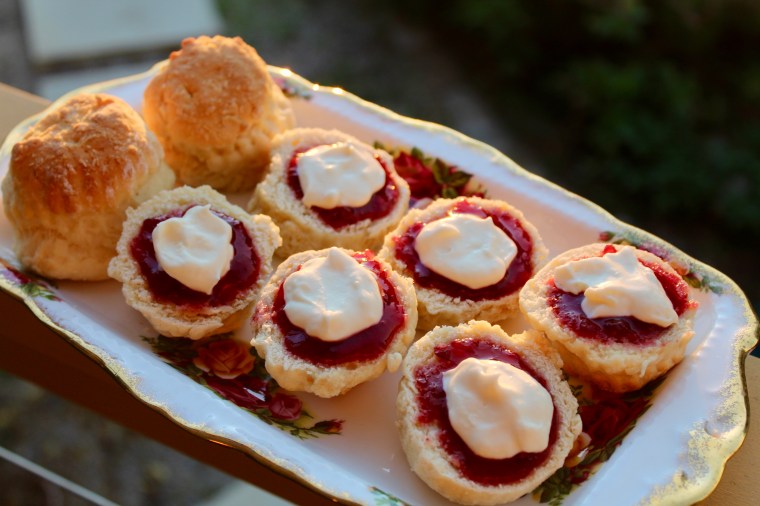
Does anything beat scones with jam and cream and tea in the sunshine? (Answer: no).
Scones are very simple to make but tend to be saved for ‘fancy’ occasions like high-tea in my house. Well, no more. I vow to make more of these versatile beauties because, regardless of occasion, there’s something supremely satisfying about a eating a fluffy scone smothered in jam (ideally homemade) and a dollop of whipped cream.
Oh and obviously it’s pronounced scone, rhyming with “John” not “Joan”.
Ingredients (makes approximately 20) 2 very full cups self-raising flour (+ extra for dusting)
60g butter, melted
1½ tablespoons caster sugar
1 cup milk
1½ tablespoons lemon juice
2 eggs
Method Preheat oven to 230-240°C (210-220°C fan-forced).
Beat eggs together in a small bowl. Add lemon juice to milk in order to sour it (don’t worry if it gets a bit lumpy).
Sift flour into a large bowl, add sugar and then gently mix in eggs, soured milk and butter with a metal spoon until just combined.
Turn dough out onto a lightly floured surface and knead lightly until it just comes together. Gently form into a disc 3-4cm thick. Use a 5cm-diameter round/crimped cutter dipped in flour to cut out scones (re-flouring between each scone). Arrange scones close together on a large oven tray lighted dusted with flour.
Bake scones for 10-12 minutes or until golden brown. Turn scones out onto a clean tea towel and cover with another tea towel.
Serve scones warm or at room temperature with jam and sweetened whipped cream.
NB: best eaten fresh on the day they’re made as they dry out quickly.
Recipe adapted from Grandma, Margaret Payne, via Mum ♥
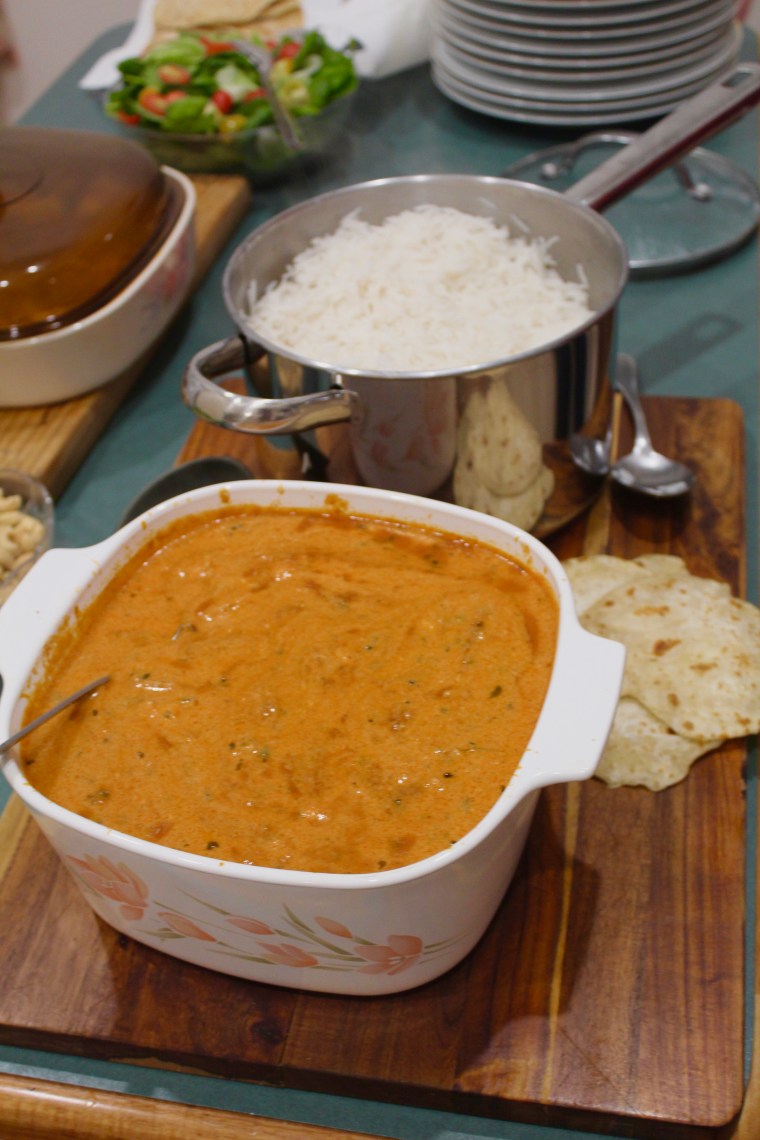
I LOVE butter chicken. It is always my go-to order at Indian restaurants and a good butter chicken is up there with my favourite foods. Sadly, butter chicken doesn’t always love me. I’m allergic to capsicum and while Canberran restaurant butter chicken was capsicum-free, the Adelaide restaurants I’ve tried all seem to add it in ¯\_(ツ)_/¯. That meant that for 2 miserable years I had no butter chicken that didn’t result in terrible stomach pains.
Fortunately, Pinterest came to the rescue (as it often does), and after a few false starts, I found a recipe that produced butter chicken equal to or better than my favourite restaurant versions. The key ingredient is fenugreek leaves. They may be a little hard to find (I order mine online from herbies spices) but PLEASE do not judge this recipe without it – they are what set it apart from pre-made butter chicken sauces and give it its authentic flavour.
Because it is a little fiddly to make, we often double the recipe and make a huge batch that will make enough for several dinners and lunches. I actually think it tastes even better the next day once the flavours have had more time to integrate. We serve it with fluffy basmati rice and homemade rotis.
Ingredients (serves 4-6) 60g butter + 1 tablespoon for cooking
6 green cardamom pods
1 brown onion, chopped
1 tablespoon chopped garlic
2 x 400g cans diced tomatoes
50g cashews, soaked
1 tablespoon minced ginger
2 teaspoons chilli flakes
1 tablespoon dried fenugreek leaves, crushed
1kg chicken thigh fillets, diced
½ teaspoon tandoori paste
2 teaspoons honey
2 teaspoons garam masala
1 cup cream
Method Sauté cardamom pods in 1 tablespoon of butter in a large pan for 1 minute. Add onion, garlic and tomatoes with a pinch of salt and cook over a medium-low heat for 10 minutes. Add cashews and ginger and continue to cook until tomatoes are pulpy.
Cool the mixture slightly, remove the cardamom pods, then blend with a stick blender until it resembles a loose, smooth puree.
Add 60g butter, chilli flakes, fenugreek leaves and salt and cook for around 15 minutes on medium heat.
Add chicken, tandoori paste, garam masala and honey. After 15 minutes, adjust seasoning as necessary and let simmer for a further 25-30 minutes for the flavours to develop.
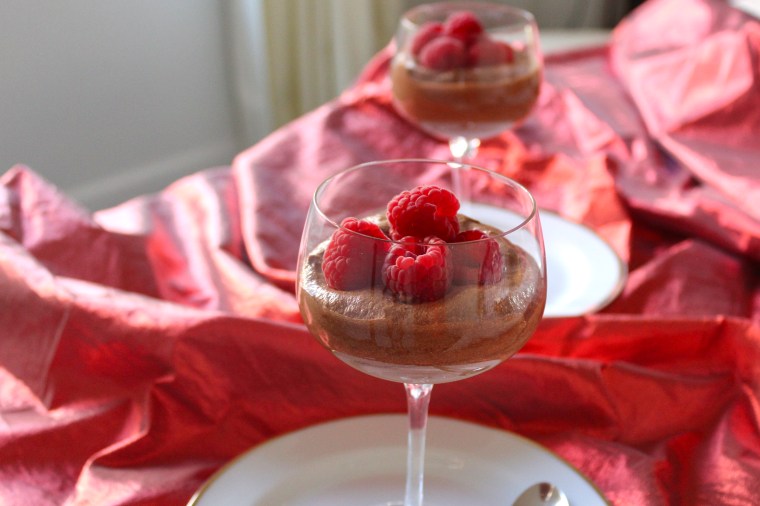
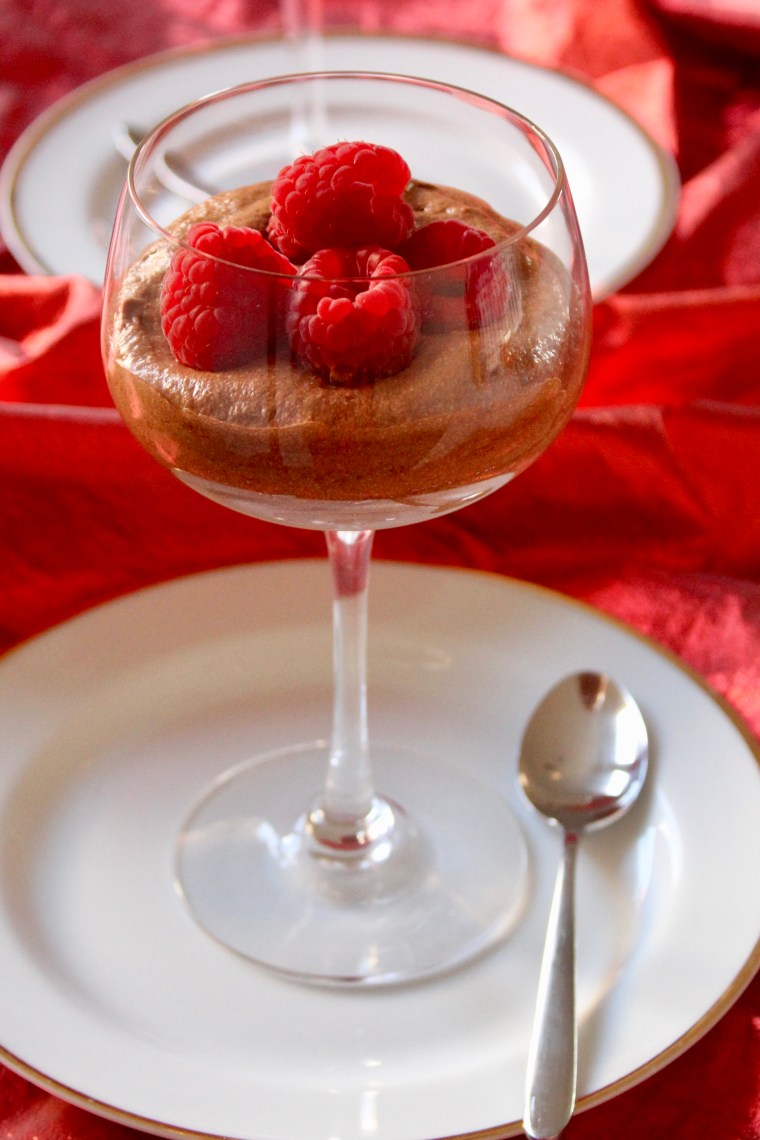
This is one of my favourite desserts because it takes so little effort and you can make it well ahead of time – the perfect set and forget dinner party dessert. I like a hint of Bailey’s Irish Cream in my mousse, but this can be omitted if you’re serving it to children or swapped for any other liqueur of your choice – creme de menthe for a choc-mint or Cointreau for a choc-orange mousse would both work well.
Ingredients (serves 8) 300g good quality dark chocolate
50g butter
3 eggs, separated
1-2 tblspns Bailey’s Irish Cream (optional)
¼ cup caster sugar
300ml thickened cream
Method Melt butter and chocolate in a small saucepan over a low heat until smooth. Remove from heat.
Stir in egg yolks, one a a time, and Bailey’s liqueur. Transfer to a large bowl and leave to cool.
Beat egg whites in a medium bowl until soft peaks form. Add sugar, one tablespoon at a time, beating until it dissolves between additions.
Beat cream until thoroughly whipped and thick. Gently combine with the chocolate mixture and then fold in the egg white mixture in two batches, taking care not to over-mix the mousse.
Divide mousse among eight ½-cup serving dishes (I use glasses). Cover with clingfilm and refrigerate until set (at least 2 hours).
Serve with fresh raspberries. Enjoy!
Recipe adapted from The Australian Women’s Weekly Best Food Desserts.
Population: approx. 555,000 in the Sarajevo metropolitan area
Famous for: the assassination of Archduke Franz Ferdinand triggering WW1, the 1984 Winter Olympics, the Siege of Sarajevo
Fun fact: Sarajevo was the first European city to have a full-time electric tram network through the city
The Latin Bridge, Sarajevo, at sunset
Day 6 We had another very early start and boarded the Topdeck bus from Belgrade at 7.20am. Drove for a few hours on a mixture of highways and narrow 2-way roads (sometimes getting stuck behind tractors filled with watermelons!) and had a quick morning tea break. It was already very warm so Laura and I got an icy pole each which turned out to be 18+ alcoholic mojito calippos.
We drove for another couple of hours through increasingly windy and hilly terrain and were lucky to have another efficient border crossing from Serbia to Bosnia & Herzegovina. Had our lunch on the bus and arrived just out of Srebrenica at the site of Srebrenica Genocide Memorial.
Srebrenica Genocide Memorial with gravestones as far as the eye can see
We had some time to wander around the memorial to over 8,300 victims (and counting – remains are still being found) of the July 1995 massacre and I was horrified to see how many youths were among the murdered; including infants and toddlers. As we were there only a few weeks after the anniversary, there were several fresh graves visible of victims whose remains were found in the year since the last anniversary, and many flowers and tributes on the graves. We also visited a small gallery at the site of the memorial which featured haunting images of victims and the aftermath of the genocide and did a masterful job of putting faces to the atrocity and making it feel real.
From there, we walked across the road to a former battery factory where thousands of Bosnian refugees were held during the Yugoslav War under the ‘protection’ of the United Nations. We had time to explore the exhibits in the factory including more graphic and haunting photographs and several damning photos of anti-Bosnian graffiti by the Dutch United Nations peacekeepers. Laura and I had always been very pro-UN, but this museum gave a very different account of the role of peacekeepers and their utter failure to protect the innocent during the Yugoslav war.
Graffiti in the Battery Factory
We then went next door to the newly opened Srebrenica Documentation Centre to hear the heart-wrenching story of a Srebrenica survivor who had lost several family members in the conflict and watch a documentary featuring very confronting real footage of the massacre. We had another half an hour to explore the rest of the museum before boarding the bus to Sarajevo.
Needless to say, visiting Srebrenica was a very confronting, draining and emotional experience, but something I would recommend doing at some point in your life. For me, I found it incomprehensible that this is something that was allowed to occur during my lifetime. Even more incomprehensible to me, is the fact that ‘the Butcher of Bosnia’, Ratko Mladić; the man recently convicted of genocide, war crimes and crimes against humanity and sentenced to life imprisonment for his role orchestrating massacres, torture and rape during the Yugoslav war, is considered a hero by many and whose “portrait adorns bars and office walls in Bosnia and Serbia…[and] name is sung at football matches” (Vulliamy, The Guardian).
Visiting made me feel very ashamed of how little I know of the conflicts that are occurring around me now and determined to educate myself better on them having seen first-hand the horrific consequences of apathy.
For more information about the Srebrenica Massacre (which I highly recommend you educate yourself on), see here or take a virtual tour of Srebrenica here).
8372 victims and counting…
After checking in to our hotel, we were dropped in downtown Sarajevo for our walking tour. We saw the river, main fountain, the location of Franz Ferdinand’s assassination, the Cathedral and walked through the bazaar until we reached the restaurant we were going to for dinner.
Sacred Heart Cathedral, Sarajevo
Dinner was delicious – chicken and vegetable soup, grilled chicken with rice and potatoes and baked apples filled with spiced walnut and whipped cream. After such an exhausting and draining day, no-one had the energy to stay out late so we all opted to take the bus straight back to the hotel after dinner.
Pretty lanterns in the Grand Bazaar
Day 7 Had a sleep-in (6.20am!) and headed down to breakfast which featured delicious local specialties such as dates and turkish delight.
Travelled about 30mins on the bus to the Sarajevo Tunnel Museum. We watched a 15 minute documentary about the Siege of Sarajevo and the building of the ‘tunnels of hope’ which acted as the city’s lifeline to the outside world when it was surrounded by hostile Serbian forces in the 1992-95 siege. We then heard from a lovely local who had spent her childhood hiding in an underground cellar through the siege.
We had a chance to look through the siege museum on the site which was fascinating, especially seeing what rudimentary tools were used to build the tunnels that saved the city – including spoons! We also got to walk through 25m of the original tunnel which terrified me, but showed just how small and basic the lifesaving tunnels were.
The remnants of the ‘tunnels of hope’
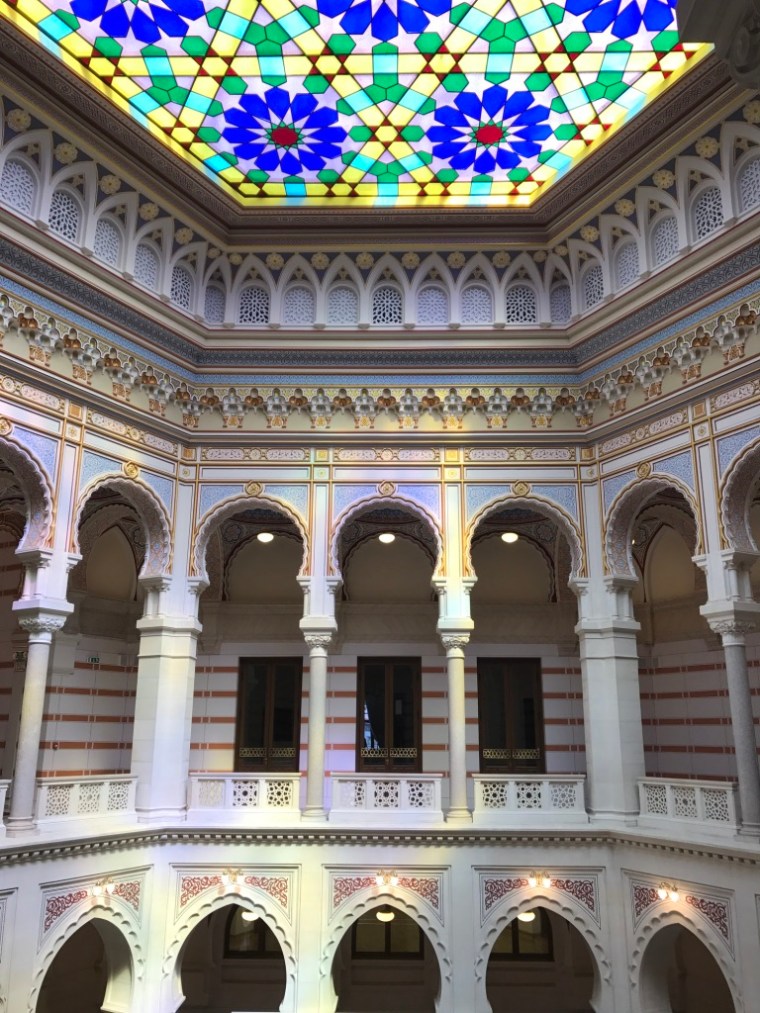
After being dropped back in downtown Sarajevo, a small group of us went to Sarajevo City Hall to admire the stunning Ottoman inspired architecture:
and stunning stained-glass ceiling of the newly rebuilt Hall (the original was bombed and burnt in 1992 during the Siege, destroying over two million books and manuscripts).
We spent time in the City Hall Museum which showed the best and worst of Sarajevo’s history between 1914 and 2014 and then walked back through the bustling bazaar, shopping for souvenirs and enjoying a delicious and very cheap lunch.
Some of the beautiful items on offer in the bazaar
We walked through the city to the Avaz tower for amazing views over Sarajevo before heading back to the hotel for a rest.
Views over Sarajevo from the Avaz tower
To end our time in Sarajevo the tour group went to a gorgeous authentic Bosnian restaurant in the bazaar for dinner where there was enough food to feed more than double the number of people!
Overall, I thought Sarajevo was a really cool city with a lot to offer – I can see why Lonely Planet ranked it as one of the top cities of the region. The food was outstanding both in terms of deliciousness and value for money, the locals were friendly and helpful and despite the sad recent history of the country, there was a perceptible sense of optimism and hope for the future. As corny as it sounds, I feel like I left Bosnia and Herzegovina a better and more informed person than I was when I arrived and I know that my experience at Srebrenica will stay with me for the rest of my life.
Bobsled Track (Image credit: Trover)
Top 5 Things to Do in Sarajevo
Explore the Old Bazaar and pick up some beautiful souvenirs while you’re there
Visit the stunning City Hall to admire the architecture as well as visit the museum
Indulge in local specialties such as ćevapi, burek, baklava, turkish delight and turkish coffee (as well as crowd pleasers like fresh ice cream)
Visit the funky graffitied Sarajevo bobsled track from the 1984 Winter Olympics (note: best to go in a large group as there are gangs in the vicinity who have been known to target tourists, but a group from our tour went and had no trouble)
Take a day-trip to Srebrenica or the Tunnel Museum to better understand Bosnian history


 Method