Nutella “Freakshake”

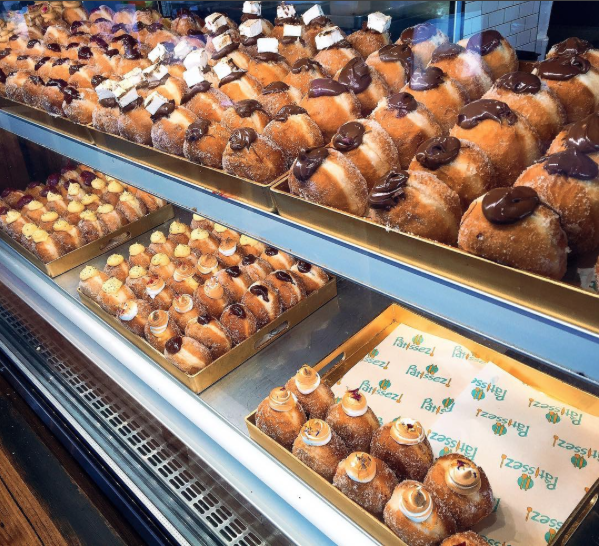
Ever since the cafe Pâtissez opened in June 2015 in my home town of Canberra, I have been desperate to try one of their famous FreakShakes. Clearly I’m not alone, because their FreakShakes garnered media attention from Toowoomba to Tokyo to Timbuktu, and copycat versions have cropped up all over the world.

I feel a particularly strong urge to go there, not only because their food and drinks look almost illegally delicious, but also because we have known one of the owners, Gina, for years as she previously owned a school uniform shop and worked with my Mum to develop a uniform for Jerrabomberra Public School in 2001. It has been amazing to see her success!

f-nutz-cookie-gay-fruit-ban_6953a5d1-5cf6-420d-bd85-3e0fada94416
A selection of Pâtissez’s world-famous FreakShakes. Image: pattisez.com.au
Screen Shot 2017-03-05 at 5.35.08 PM.png
How flipping amazing do these doughnuts look?!?! Image: @pattisez Instagram

While I’m still hopeful I’ll get to visit Pâtissez in the not too distant future, for the time being I’ll make do with some homemade versions, starting with this easy Nutella and pretzel shake.

thumb_img_3216_1024

Ingredients (serves 1 very hungry person)
2½ tablespoons Nutella
400ml milk
1 tablespoon chocolate syrup
1 scoop good-quality vanilla ice-cream

To decorate: 
8-12 pretzels
Whipped cream
Nutella (extra)

Method
To make the milkshake, combine chocolate syrup, Nutella, ice-cream and milk in milkshake shaker and shake until bubbly and combined.

Using a metal spatula or butter knife, spread Nutella generously on the inside of a mason jar and around the outside of the rim. Stick pretzels on using extra Nutella so they line the rim. Pour the milkshake into the prepared mason jar. Top with a generous amount of whipped cream, a drizzle of Nutella and 4 extra pretzels. Enjoy!

thumb_img_3221_1024

Inspired by Pâtissez’s ‘Pretzella’ FreakShake

Tropical Ice Cream

This delicious, easy dessert has all the tastes of summer and is perfect served with fresh fruit on a balmy evening. thumb_img_3009_1024Ingredients (serves 6-8)
1 litre good quality vanilla ice cream
100g unsalted pistachio nuts
¾ cup desiccated coconut
Pulp of 2 passionfruit
2 tablespoons honey
Fresh fruit, to serve

Method
Allow ice cream to soften at room temperature until just soft.

Remove pistachio nuts from shells. Cover nuts with boiling water and remove their dark skins. Dry thoroughly.

Place coconut in a dry pan and cook over a gentle heat until golden, stirring constantly. Remove from pan.

Combine ice-cream, nuts, ½ cup of the coconut, passionfruit pulp and honey. Place in a glad-wrap lined container (I use a log tin), cover and freeze for at least 2 hours

Serve topped with the remaining toasted coconut and fresh fruit. Enjoy!

thumb_img_3011_1024

Recipe adapted from Sydney Market Authority

Pavlova

The pavlova is a quintessential Aussie dessert that is said to have been inspired by the Russian ballet dancer Anna Pavlova after a chef saw her perform on her world tour in 1926. A good pavlova has a beautiful high, crisp crust and a soft, pillowy marshmallow inside. It is one of my favourite summer desserts, especially when topped with seasonal fruit.

fullsizeoutput_5df

Ingredients (Serves 6-8)
1 large cup of sugar
1 teaspoon vanilla
1 teaspoon white vinegar
1 teaspoon cornflour
2 egg whites (at room temperature)
4 tablespoons boiling water
300ml cream, thickened
Fresh fruit (this time I used a mango, strawberries and blueberries)

fullsizeoutput_5c9.jpeg

Method
Preheat the oven to 180°C. Line a large tray with baking paper and trace a circle around the bottom of an 18cm cake tin (or other round object of the desired size). Turn the baking paper over (so it is pencil side down).

Add eggs whites to a large bowl. Put cornflour and caster sugar to one side of the bowl.  Add boiling water to egg whites, pour in vanilla and white vinegar, and beat on high for 10-20 minutes until thick, glossy and the sugar has dissolved (you can test this by putting a small amount of mixture on your index finger and rubbing it with your thumb, if you can feel the sugar, keep beating). **It is hugely important that you have the sugar dissolved, otherwise the pavlova may crack and weep during cooking**

Using the circle on the baking paper as your guide, spoon the pavlova mixture onto the tray and shape.

Cook at 180°C for about 8 minutes and then reduce heat to 90°C and cook for another 45 minutes. Turn the oven off and leave the pavlova to cool in the oven for at least an hour, to prevent collapsing.

When fully cool and you’re ready to serve it (keep the meringue free of toppings until right before serving), gently spread the thickened cream over the top and decorate with fruit.

jIdOiH2sTH2BujFeWf6rNA.jpg

Recipe from my lovely Grandmother, Margaret Payne.

Pumpkin Pies with a Brûlée Topping

Thanksgiving is almost upon us and while my family doesn’t celebrate it, we have developed a fondness for pumpkin pie since the first pumpkin pie I made for “Chrisgiving” in 2014. To change things up this year, I decided to make individual pies for everyone and for crunch, added a brûlée topping. Yum!

thumb_img_2562_1024
It was my first time using a blowtorch so some bits got a little darker than anticipated – lots of fun though! 

Ingredients (makes 8)
Pastry
1 ⅔ cups plain flour, sifted
110g butter, chilled
110g pure icing sugar
1 egg yolk

Filling
2 cups pumpkin puree (made by roasting 1 whole butternut pumpkin (skinless), blitzing it into a smooth paste in a blender and then putting it in a sieve for an hour to remove the excess juice)
3 large eggs
½ cup sugar
⅓ cup brown sugar
¾ cup cream
1 ½ teaspoons vanilla extract
1 ½ teaspoons ground cinnamon
1 teaspoon ground nutmeg
½ teaspoon ground ginger
¼ teaspoon ground cloves
A pinch of salt
1 quick grind of pepper

Brûlée Topping
Caster sugar

thumb_img_2569_1024

Method
For the pastry, place flour, butter and icing sugar in a food processor and process until the mixture resembles fine breadcrumbs. Add egg yolk and 2 tblspns cold water and process until the mixture comes together in a smooth ball. Enclose in a plastic wrap and chill for 30mins.

Preheat the oven to 190°C. Grease 8 10cm loose-bottomed tart pans well with margarine and canola oil spray.

Roll out pastry on a lightly floured surface and lift pastry into a tin, easing into the sides & trimming the excess. Repeat with the remaining tins. Chill the pastry in the tins for 15mins. Line the pastry with baking paper and fill with pastry weights. Blind-bake for 10mins, then remove paper and weights and return to the oven for 5mins or until crisp and lightly golden. Allow to cool slightly.

Meanwhile, whisk eggs and sugar until smooth. Add the pumpkin puree, cream, vanilla and spices and stir until all incorporated.

Remove the baking paper and pie weights and pour mixture into pastry cases. Bake pies in the oven for 10 minutes before reducing the heat to 160°C fan-forced and baking for a further 20-25 minutes, or until the filling has set.

Allow to cool completely before gently removing pies from the tins. These can be served without the brûlée topping as mini pumpkin pies.

thumb_img_2554_1024

To create the brûlée topping, sprinkle the tops of the pies liberally with caster sugar and then heat with a blowtorch until the sugar has melted and formed a crisp coating. Serve with ice cream or whipped cream. Enjoy!

thumb_img_2561_1024

Pastry recipe adapted from the delicious. ‘Sweet’ cookbook and pumpkin pie filling recipe from Inspired Taste.net


Honeycomb

This is an old family recipe for delicious honeycomb – perfect enjoyed by itself, dipped in chocolate to make home-made ‘crunchies’, or as decorations on cakes.

Note: best consumed on the day it is made and stored immediately in an airtight container so it doesn’t go sticky.

thumb_IMG_2210_1024

Ingredients
6 tablespoons white sugar
2 tablespoons honey
½ tablespoon water
1 teaspoon bicarb soda

Method

Place a sheet of non-stick baking paper on a tray.

Place sugar, honey and water in a medium saucepan over high heat.

Bring to the boil. Boil for 3 minutes or until deep golden in colour.

Take off the heat and lightly sprinkle over bicarb soda, stirring any lumps if required (but otherwise leaving it to froth and bubble).

Pour mixture onto prepared tray (don’t spread it too much or you will lose aeration), and allow it to set at room temperature.

thumb_IMG_2193_1024

Once set, break it into desired size pieces. Enjoy!

Recipe adapted from my Great Grandmother, Doreen James.

Carrot Cake with Lemon Cream Cheese Frosting

I love this cake, it’s so quick and effortless to put together and is absolutely delicious (also, because it contains carrot it’s basically a salad, right?!). It’s great at any time of year but is particularly good as a treat around Easter for someone who doesn’t like chocolate or for people who are chocolated out!

thumb_IMG_1330_1024

Ingredients (serves 8-10)
1 ½ cups grated carrot (lightly packed)
½ cup chopped walnuts
1 cup plain flour
2 eggs
1 teaspoon bicarb soda
1 cup caster sugar
1 teaspoon mixed spice
¾ cup vegetable oil
½ teaspoon salt
½ teaspoon vanilla

Lemon Cream Cheese Frosting:
40g (1 tablespoon) softened butter
60g cream cheese (e.g. Philadelphia)
1 teaspoon lemon rind
1 ½ cups icing sugar, sifted

To decorate (if desired):
Extra chopped walnuts
The thin end of a small carrot cut into 2 halves
4 sprigs of coriander

thumb_IMG_1336_1024

Method
Preheat oven to 180°C (160°C fan-forced).

Grease an 8″ round cake pan with margarine and line the base with baking paper.

Combine eggs, sugar, oil, vanilla & sifted dry ingredients  in a large bowl & beat on low speed.

Stir in carrots & walnuts. Mix well.

Pour mixture into the prepared cake tin and bake in the oven for approx. 40 – 45mins or until a skewer inserted in the middle of the cake comes out clean.

Let the cake cool in the tin for 5-10 minutes, before placing it on a wire rack to cool completely.

thumb_IMG_1231_1024

To make the cream cheese frosting, beat butter & cream cheese until smooth and creamy. Add in the lemon rind and icing sugar and beat until smooth. Spread evenly over the top and sides of the cake.

If desired, decorate by placing the finely chopped walnuts around the edge of the cake and the carrot pieces in the centre of the cake with two coriander sprigs above each carrot. Enjoy!

thumb_IMG_1337_1024

Recipe from Aunty Cynth

Chocolate Berry Meringue Nests

These meringue nests are the perfect conclusion to a summer dinner party or BBQ. They are light, flavoursome and not too sweet when paired with fresh berries and whipped cream. I especially love that they look like you’ve gone to a lot of effort (when they’re really very simple to make) and they don’t heat up the house too much while baking!

thumb_IMG_1228_1024

Ingredients (makes 4)
3 egg whites
¾ cup (165g) caster sugar
1 ½ teaspoons vanilla essence
1 tablespoon dark dutch cocoa powder
300ml thickened cream, whipped
Fresh berries, to decorate (I used strawberries, raspberries and blueberries)

Method
Preheat oven to 120 degrees C (~100 degrees C fan-forced). Line a large oven tray with baking paper.

Beat egg whites in a medium bowl with an electric mixer or mixmaster until soft peaks form. Add caster sugar, a tablespoon at a time, beating until the sugar dissolves between each addition. Add in vanilla essence and cocoa powder.

Divide the meringue mixture into 4 roughly equal sized dollops on the baking tray, and spread into circles approximately 11cm in diameter.

Bake in the oven for approximately 45 minutes or until meringues are firm. Turn off the oven and let meringues cool for 5 minutes, before letting them cool completely with the door ajar.

Top meringues with whipped cream and berries. Enjoy!

thumb_IMG_1212_1024

thumb_IMG_1223_1024

Adapted from ‘Chocolate Berry Meringues’ in The Australian Women’s Weekly cookbook ‘Best Food’, 2005 reprint.

Xmas Reblog: Easy Chocolate Yule Log

Today I’m sharing with you an incredibly easy yet delicious cheat’s version of the classic French Christmas dessert – Bûche de Noël.

For a traditional pudding-hater like myself, Christmas dessert has never brought much joy. Sure, you can smother your piece of pudding in custard (which I do) and that helps a bit, but somehow the fruity-boozy flavour that I hate so much still overpowers it. Anyway, fortunately I’m not the only pudding-hater in my family and so last year Mum made this Bûche de Noël (chocolate yule log) in addition to the pudding for dessert. This yule log is sweet (but not overly so) and very light – perfect for a hot summer’s day. It proved so popular last year that we’ll be making it again this year 🙂

December '13 - June '14 279

Ingredients (Serves up to 12)
1x 250g packet Arnott’s chocolate ripple biscuits (or equivalent)
600ml thickened cream
1 tspn caster sugar
1 tspn vanilla essence
20g cocoa powder
Grated chocolate, to decorate
Spearmint leave lollies, to decorate
Raspberries, to decorate

Method
Using an electric mix, mix cream, sugar and vanilla together until stiff.

Fold in the cocoa until combined.

Spread a small amount of the cream along a long, rectangular serving plate to make a base. Spread 1 biscuit with 1 ½ teaspoons of cream and then top with another biscuit. Top with another 1 ½ teaspoons of cream and then place biscuits on their side onto the cream base on the serving platter.

Repeat until all biscuits have been used, to form a log.

Spread remaining cream over entire log, reserving a small amount for the branch.

Cover loosely with foil and refrigerate for at least 6 hours to set.

Just before serving, cut cake diagonally about a quarter of the way in and use that piece as a branch off the main log.

Patch it up with the remaining cream so it looks attached.

Use a fork to make some lines along the branch to look natural and then sprinkle with grated chocolate.

Decorate with some raspberries and spearmint leaves and serve. Enjoy!

December '13 - June '14 279

Adapted from Arnott’s ‘Bake and Create’ Recipe booklet.

Thanksgiving Pumpkin Pie

Pic from Inspired Taste.net (mine got eaten too quickly!)
Pic from Inspired Taste (mine got eaten too quickly!)

Even though Thanksgiving isn’t really a holiday celebrated here in Australia, this year my family decided to get in on the action anyway as a number of us will be away over Christmas (and we like to party with or without good reason). So, in keeping with tradition, I made a pumpkin pie for dessert. I had no idea what to expect having never tried one before, but gave a highly rated recipe I found online a go and was really pleased with the result. If I didn’t know there was pumpkin in there (and it wasn’t orange) I wouldn’t pick it because it’s really the vanilla and spices that come to the fore, with the pumpkin providing a creamy, sweet back note. Pumpkin-y or not it was delicious and I’ll probably make it again when pumpkins are in season.

Ingredients (serves 8-10)
Pastry
1 ½ cups plain flour
3 tspns icing sugar
140g cold butter, chopped
1 egg yolk
2 tblspoons water

Filling
2 cups pumpkin puree (made by roasting pumpkins, scooping out the flesh, blitzing it into a smooth paste in a blender and then putting it in a sieve for an hour or so to remove the excess juice)
3 large eggs
½ cup sugar
⅓ cup brown sugar
¾ cup cream
1 ½ teaspoons vanilla extract
1 ½ teaspoons ground cinnamon
1 teaspoon ground nutmeg
½ teaspoon ground ginger
¼ teaspoon ground cloves
A pinch of salt
1 quick grind of pepper (i.e. a really small amount, sounds odd but it works!)

Method
To make the pastry, put the flour, icing sugar, butter, yolk & water into a food processor and process until it just comes together. Press into a ball, knead gently on a floured surface until smooth & then refrigerate, covered in clingfilm, for 30 mins.

Preheat the oven to 200°C fan-forced. Lightly grease a 23cm flan tin or pie dish.

When the pastry has chilled, roll dough on a floured surface until large enough to line the tin (I often have a bit left over). Lift pastry into tin, ease into the sides & then trim the excess.

10822204_10152813949004463_1427830649_n

Cover the pastry with a sheet of baking paper and fill with pie weights or uncooked rice. Bake in the oven for 10 minutes.

Meanwhile, whisk eggs and sugar until smooth. Add the pumpkin puree, cream, vanilla and spices and stir until all incorporated.

10819066_10152813949034463_1140907709_n

Pour mixture into pastry case (obviously remove the baking paper and pie weights first!!) and smooth over the top. I ended up having a bit of pumpkin filling left over that I might use in muffins or something (if I don’t eat it all first :P)

10754950_10152813948824463_297181058_n

Bake pie in the oven for 10 minutes before reducing the heat to 160°C fan-forced for around 30-40 minutes, or until a skewer inserted comes out clean.

10834135_10152813948784463_763620382_n

Let cool completely before transferring to a serving platter and then serve at room temperature with whipped cream or ice cream. Enjoy!

Pumpkin-Pie-Recipe-13
Pic from Inspired Taste (mine got eaten too quickly!)

Pastry recipe from the Australian Women’s Weekly Lemon Meringue Pie Recipe & Filling Recipe from Inspired Taste.net

Tangy Lemon Tart

Since moving to Adelaide, I’ve been lucky enough to have access to an abundance of homegrown lemons. In our rental house in 2013, our lemon tree provided perfect fruit almost all year round, and my Aunt & Uncle also grow outstanding citrus and always seem to have plenty to give away. This has meant lots of experimentation with lemon desserts and this one has to be one of my most popular! This tart has a strong, slightly tart lemon flavour and  gorgeously short, melt-in-your-mouth pastry. Serve dusted with icing sugar and with thickened cream or ice cream for a perfect dinner party dessert.

e3HDCt%LQaqor6f1h3H8dw_thumb_28f5

Ingredients (Serves 12)
Pastry
2 cups plain flour
½ cup icing sugar, sifted
180g cold unsalted butter, chopped
1 egg, lightly beaten

Filling
5 eggs
3 egg yolks
150g caster sugar
200ml freshly squeezed lemon juice, strained
100ml freshly squeezed orange juice, strained
250ml pouring cream

Icing sugar, to dust
Double cream or vanilla ice cream, to serve

image1-19

Method
To make the pastry, process the flour, icing sugar & butter in a food processor until the mixture resembles breadcrumbs. Add the egg and process until the mix just comes together. Form the pastry into a disc, wrap in glad wrap and refrigerate for at least 2 hours.

Preheat oven to 180°C (160°C fan-forced). Spray a 27cm tart pan with a removable base with cooking oil. Roll out pastry on a lightly floured surface until 4mm thick and use to line the prepared pan. Trim the edge, then line with baking paper and fill with pastry weights (or dried rice). Bake for 15mins then remove weights and paper and cook for a further 5mins until golden. Set aside.

Reduce oven to 150°C.

To make lemon filling, place eggs, yolks & sugar into a bowl and stir until just combined (try to avoid creating bubbles). Gently stir in lemon and orange juices. Pour cream into a small saucepan and bring almost to the boil, then stir it into egg mixture. Using a fine sieve, strain lemon filling into a jug. Place tart shell onto an oven tray and pour in the filling.

Bake for 15mins, then carefully rotate to ensure even cooking. Bake for a further 10mins or until just set. To check, gently shake the tart; it should be slightly wobbly in the centre.

Cool the tart to room temperature, then dust with icing sugar and serve with double cream or ice cream.

jMSeO5usSQOH+Bysd3Z9qA_thumb_28f7.jpg

Adapted from Matt Moran’s Lemon Tart featured in MasterChef Magazine – Issue 3, July 2010.