Coconut & Raspberry Bread

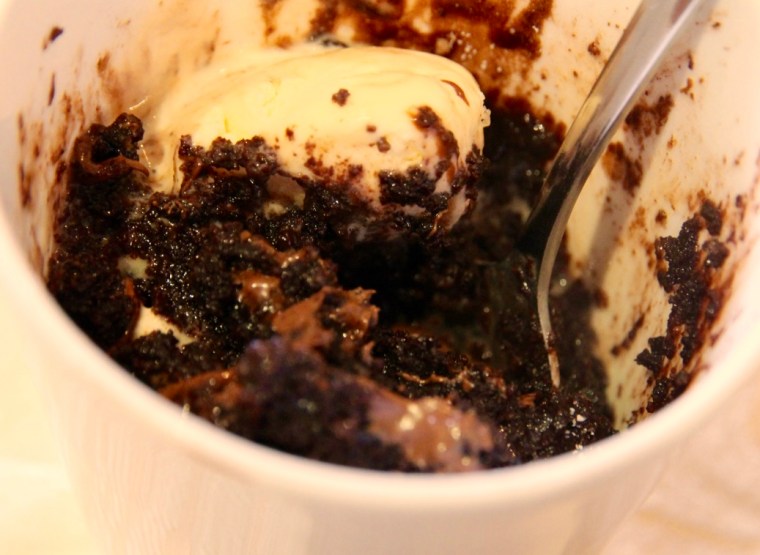
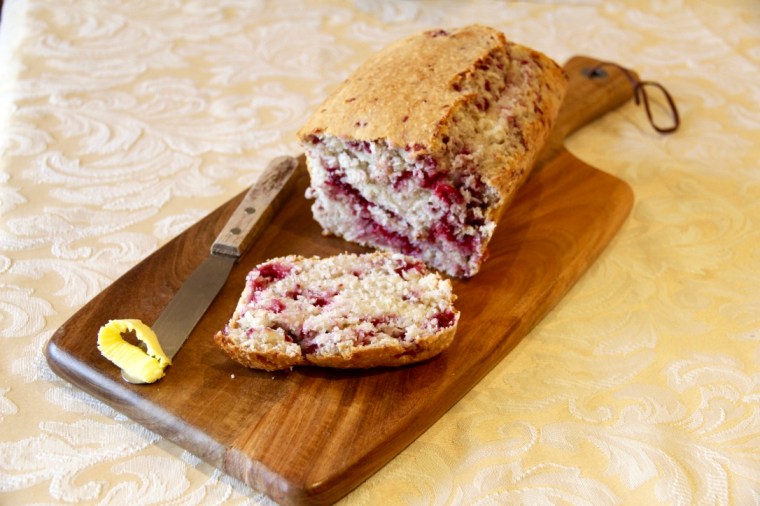
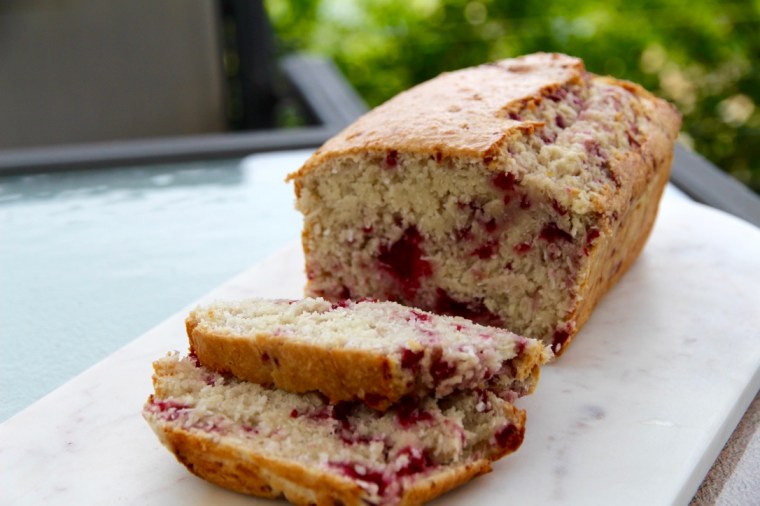
This is a ‘bread’ like banana bread, in that it’s really more like a bread-shaped cake. Name aside, it’s super simple to make and perfect for brunch, afternoon tea or dessert. I like it because it’s deliciously moist and not too sweet, but feel free to dust it with icing sugar to make it extra decadent. thumb_img_2444_1024

Ingredients (serves 8-10)
1 ¾ cups desiccated coconut
1 ½ cups coconut milk (I use Vitasoy unsweetened coconut milk found in the longlife milk section at most supermarkets)
¾ cup caster sugar
1 egg
1 teaspoon vanilla essence
1 ⅔ cups self-raising flour
1 cup frozen raspberries

thumb_img_2420_1024

Method
Add the coconut and coconut milk to a large bowl and stir to combine. Cover with Gladwrap and let it stand for 30 minutes.

Preheat the oven to 170°C. Spray a loaf pan with cooking oil and line with baking paper, ensuring you have overhang at both sides to help get it out.

Stir sugar, egg and vanilla essence in to the coconut mixture. Gently stir in the flour and then fold through the frozen raspberries.

Spoon into prepared pan and bake for 1 hour and 10 minutes, or until a skewer inserted come out clean. Cool in pan for 5 minutes, then lift onto a wire rack to cool completely.

Dust with icing sugar to serve if desired. Enjoy!

thumb_img_2449_1024It’s also delicious toasted with margarine or butter!

Recipe adapted from a 2006 issue of Super Food Ideas.

Advertisement

2 Minute Nutella Mug Cake

You know when it’s 9pm in the middle of winter and you have a hankering for something sweet? You don’t feel like going to much effort but something comforting and warm and chocolate-y would really hit the spot? Well, have I got a recipe for you!

This mug cake is deliciously warm and chocolate-y with a heavenly layer of oozy Nutella goodness in the middle and, as a bonus, is gluten free. It also doesn’t have that springy, rubbery texture you often get in mug cakes because of the almond meal. The real clincher for me though, is that it only takes about a minute to throw together and then a further minute to cook in the microwave. Washing up is also minimal – hallelujah! Need more convincing? See below:

thumb_IMG_1996_1024

Ingredients (serves 1)
¼ cup almond meal (hazelnut would also work well)
2 tablespoons Dutch cocoa powder
2 tablespoons caster sugar
1 ½ tablespoons coconut oil, at room temperature
1 egg
1 tablespoon milk
2 tablespoons Nutella
Icing sugar, to dust
Vanilla ice cream, to serve

thumb_IMG_2014_1024

Method
Combine almond meal, cocoa powder and caster sugar in a medium bowl. Add coconut oil, egg, milk and one tablespoon of the Nutella, and stir until smooth.

Spoon ¾ of the mixture into a 310ml capacity microwave safe mug. Spoon remaining tablespoon of Nutella into the centre, then cover with the remaining mixture.

Microwave on high for 1 minute (this is for a 1000 watt microwave, adjust as necessary).

Serve dusted with icing sugar and topped with a scoop of vanilla ice cream. Enjoy!

thumb_IMG_2005_1024

Adapted from a Sunbeam recipe on taste.com.au

Chocolate Fudge Brownies

These chewy, fudgy chocolate brownies, created by the domestic goddess Nigella herself, are my reliable go-to goodies when asked to bring a plate for morning or afternoon teas. They are best eaten on the day made (which often means I get up early on the day to make them) and are ridiculously good warmed with a scoop of vanilla ice-cream.

thumb_IMG_1939_1024

Ingredients (makes 16 large brownies)
200g good-quality dark chocolate
250g salted butter
1¾ cups brown sugar
4 eggs
⅓ cup cocoa
1¼ cups plain flour
¼ teaspoon baking powder

thumb_IMG_1952_1024

Method
Preheat oven to 160°C fan-forced. Line a 20cm x 30cm rectangular tin with baking paper.

Melt chocolate and butter in the microwave (or on the stovetop) and stir until smooth. Allow to cool slightly.

Place sugar, eggs, cocoa, flour and baking powder in a large bowl. Pour in chocolate mixture and mix until combined.

Pour into prepared tin and bake for 35-45 minutes or until set on top (but should still be gooey in the middle). Leave to cool slightly in tin.

Cut into 16 evenly sizes pieces. Enjoy!

thumb_IMG_1947_1024

Recipe adapted from Nigella Lawson.

NB: Can be kept in an airtight container at room temperature for up to 3 days, but in my opinion, the fresher the better.


Mini Quiches

These delicious quiches are perfect for picnics, high-teas or parties. Here I’ve provided the recipe for cheese & bacon mini quiches, which are probably the biggest crowd pleaser, but you can add anything you’d like to your quiches – I love spinach and semi-dried tomato as a vegetarian option.

thumb_IMG_1901_1024

Ingredients (makes 36)
2 sheets puff pastry
5 rashers shortcut bacon, with fat removed
185g shredded cheese
3 eggs
½ cup thickened cream

thumb_IMG_1910_1024

Method
Defrost pastry sheets at room temperature for approximately 15 minutes.

Preheat oven to 190°C fan-forced. Spray three 12-hole round-bottomed patty-pan/yorkshire pudding pans (see picture below) with cooking oil. Otherwise, muffin pans will work fine but you may need to adjust the size of your pastry rounds.

31QMKn0-O0L._SX300_
Image Credit: Amazon.com

Dice bacon into 1cm squares. Cook until crispy (I tend to be lazy and use the microwave, but by all means cook in a frypan).

Once pastry has defrosted, cut out rounds with a 6cm cutter and press into prepared pans.

Divide bacon pieces evenly among quiche bases. Top with approximately 1 teaspoon of cheese per quiche.

Whisk together eggs and cream in a small bowl. Transfer into a small jug for easy pouring. Pour approximately half a tablespoon of egg mixture into each quiche base.

Bake for 12-15 minutes or until puffed and golden.

Let the quiches cool for 2 minutes in pans, then transfer to wire cooling racks.

Quiches can be served warm or at room temperature. Enjoy!

thumb_IMG_1903_1024

NB: Quiches keep for 1-2 days in an airtight container in the fridge, but are best eaten on the day they’re made so the pastry is crisp.

Recipe from my Mum, Anne Bills.

Tangy Lemon Tart

Since moving to Adelaide, I’ve been lucky enough to have access to an abundance of homegrown lemons. In our rental house in 2013, our lemon tree provided perfect fruit almost all year round, and my Aunt & Uncle also grow outstanding citrus and always seem to have plenty to give away. This has meant lots of experimentation with lemon desserts and this one has to be one of my most popular! This tart has a strong, slightly tart lemon flavour and  gorgeously short, melt-in-your-mouth pastry. Serve dusted with icing sugar and with thickened cream or ice cream for a perfect dinner party dessert.

e3HDCt%LQaqor6f1h3H8dw_thumb_28f5

Ingredients (Serves 12)
Pastry
2 cups plain flour
½ cup icing sugar, sifted
180g cold unsalted butter, chopped
1 egg, lightly beaten

Filling
5 eggs
3 egg yolks
150g caster sugar
200ml freshly squeezed lemon juice, strained
100ml freshly squeezed orange juice, strained
250ml pouring cream

Icing sugar, to dust
Double cream or vanilla ice cream, to serve

image1-19

Method
To make the pastry, process the flour, icing sugar & butter in a food processor until the mixture resembles breadcrumbs. Add the egg and process until the mix just comes together. Form the pastry into a disc, wrap in glad wrap and refrigerate for at least 2 hours.

Preheat oven to 180°C (160°C fan-forced). Spray a 27cm tart pan with a removable base with cooking oil. Roll out pastry on a lightly floured surface until 4mm thick and use to line the prepared pan. Trim the edge, then line with baking paper and fill with pastry weights (or dried rice). Bake for 15mins then remove weights and paper and cook for a further 5mins until golden. Set aside.

Reduce oven to 150°C.

To make lemon filling, place eggs, yolks & sugar into a bowl and stir until just combined (try to avoid creating bubbles). Gently stir in lemon and orange juices. Pour cream into a small saucepan and bring almost to the boil, then stir it into egg mixture. Using a fine sieve, strain lemon filling into a jug. Place tart shell onto an oven tray and pour in the filling.

Bake for 15mins, then carefully rotate to ensure even cooking. Bake for a further 10mins or until just set. To check, gently shake the tart; it should be slightly wobbly in the centre.

Cool the tart to room temperature, then dust with icing sugar and serve with double cream or ice cream.

jMSeO5usSQOH+Bysd3Z9qA_thumb_28f7.jpg

Adapted from Matt Moran’s Lemon Tart featured in MasterChef Magazine – Issue 3, July 2010.

Caramel Slice

I love caramel slice but am constantly disappointed by the thick-bottomed, chalky and bland mass-produced stuff you buy at many cafes around the place. Instead, when I can be bothered, I make my own… and it’s amazing (if I do say so myself). The recipe originally came from my Mum’s high school cookbook and I am eternally grateful to the Annesley College Mothers’ Club for sharing it. It is very simple to make, using very few ingredients, and is perfect for occasions when you’re asked to ‘bring a plate’. The hardest part is not eating it all in one sitting (which is why I often make a double batch).

NP53UiU1TMeOxO8TwgJ6wQ_thumb_1bba

Ingredients
Base:
185g plain flour
125g butter, softened
60g sugar

Caramel layer:
125g butter, chopped
125g sugar
2 tablespoons golden syrup
½ tin condensed milk

Topping:
150g dark cooking chocolate

PZ00IqsIQYumKjleUTOAJw_thumb_1bb3

Method
To make the base, grease and line a swiss roll tin (or lamington tin – whatever you have, it will just alter the thickness of each layer) and preheat the oven to 180°C (or 160°C fan-forced). Rub butter into flour, add sugar and press evenly into the prepared tin. Bake for 20mins or until golden brown.

To make the caramel, put the butter, sugar, golden syrup and condensed milk into a heavy-based saucepan and boil for 5 minutes, stirring all the time (pay particular attention and scrape the bottom of the pan, otherwise it will burn).

Pour over the base. Leave to cool for about an hour.

Finally, to make the topping, melt the chocolate in the microwave or on the stovetop. Pour over the caramel.

Once set, cut into even squares using a knife dipped in hot water between each slice (so it cuts easily and leaves the layers intact).

Enjoy!

Vr1S1ybCQoGa7tYGZOjc6A_thumb_1bb7

Adapted from ‘Caramel Slice’ in the Annesley College Mothers’ Club Cookbook

Almond Croissants

thumb_IMG_1380_1024

These cheat’s almond croissants are perfect for breakfast, brunch or afternoon tea. Crunchy on the outside and soft and luscious in the middle – just one bite and you’ll be hooked!

Ingredients
8 mini or 6 medium croissants
½ cup flaked almonds

For the almond butter
80g butter, softened
½ cup caster sugar
1 tsp vanilla essence
2 drops almond essence
1 egg
1 cup almond meal
1 ½ tblspns plain flour

thumb_IMG_1402_1024

Method
Make almond cream by beating butter, sugar, vanilla & almond essence with an electric mixer until pale and creamy. Add egg. Mix until well combined. Stir in almond meal & flour and mix well.

Preheat oven to 180°C. Line a baking tray with baking paper, slice croissants in half lengthways & place bases on tray. Spread 1 tblspn of almond cream on each and cover with croissant tops. Thickly spread one tablespoon of remaining almond cream over the top of each and sprinkle with flaked almonds, pressing with fingertips to secure.

Bake croissants for 15mins or until golden. Serve warm. Enjoy!

thumb_IMG_1390_1024

Recipe from Mum