Raspberry & Vanilla Trifle

We’ve never really been a trifle family, and the few trifles I’d tried before this one were often disappointing – mushy and bland. We decided we wanted to serve a trifle as a dessert option on Christmas day and so, after a bit of experimenting, I developed this vanilla and raspberry trifle with torched meringue topping. I hope you enjoy as much as I do! For the time poor, I have put in some cheats to make it an easier job.

Start this recipe at least the day ahead.

Ingredients (serves 12-14)
2 packets raspberry jelly
1 cup frozen raspberries

Sponge cake
3 eggs, separated
1 cup caster sugar
½ cup cold water
1 teaspoon vanilla extract
2 teaspoons baking powder
1 cup plain flour
1 tbsp cornflour

OR use 2 round unfilled sponge cakes (Woolworths brand do the job perfectly)

Vanilla custard
1 tablespoon vanilla bean paste
1.2L full cream milk
8 egg yolks
4 tablespoons caster sugar
2 tablespoons cornflour

OR approximately 1 litre of pre-bought custard (I like Paul’s Double Thick French Vanilla 900g)

Meringue Topping
2 egg whites
⅔ cup caster sugar
1 teaspoon vanilla extract

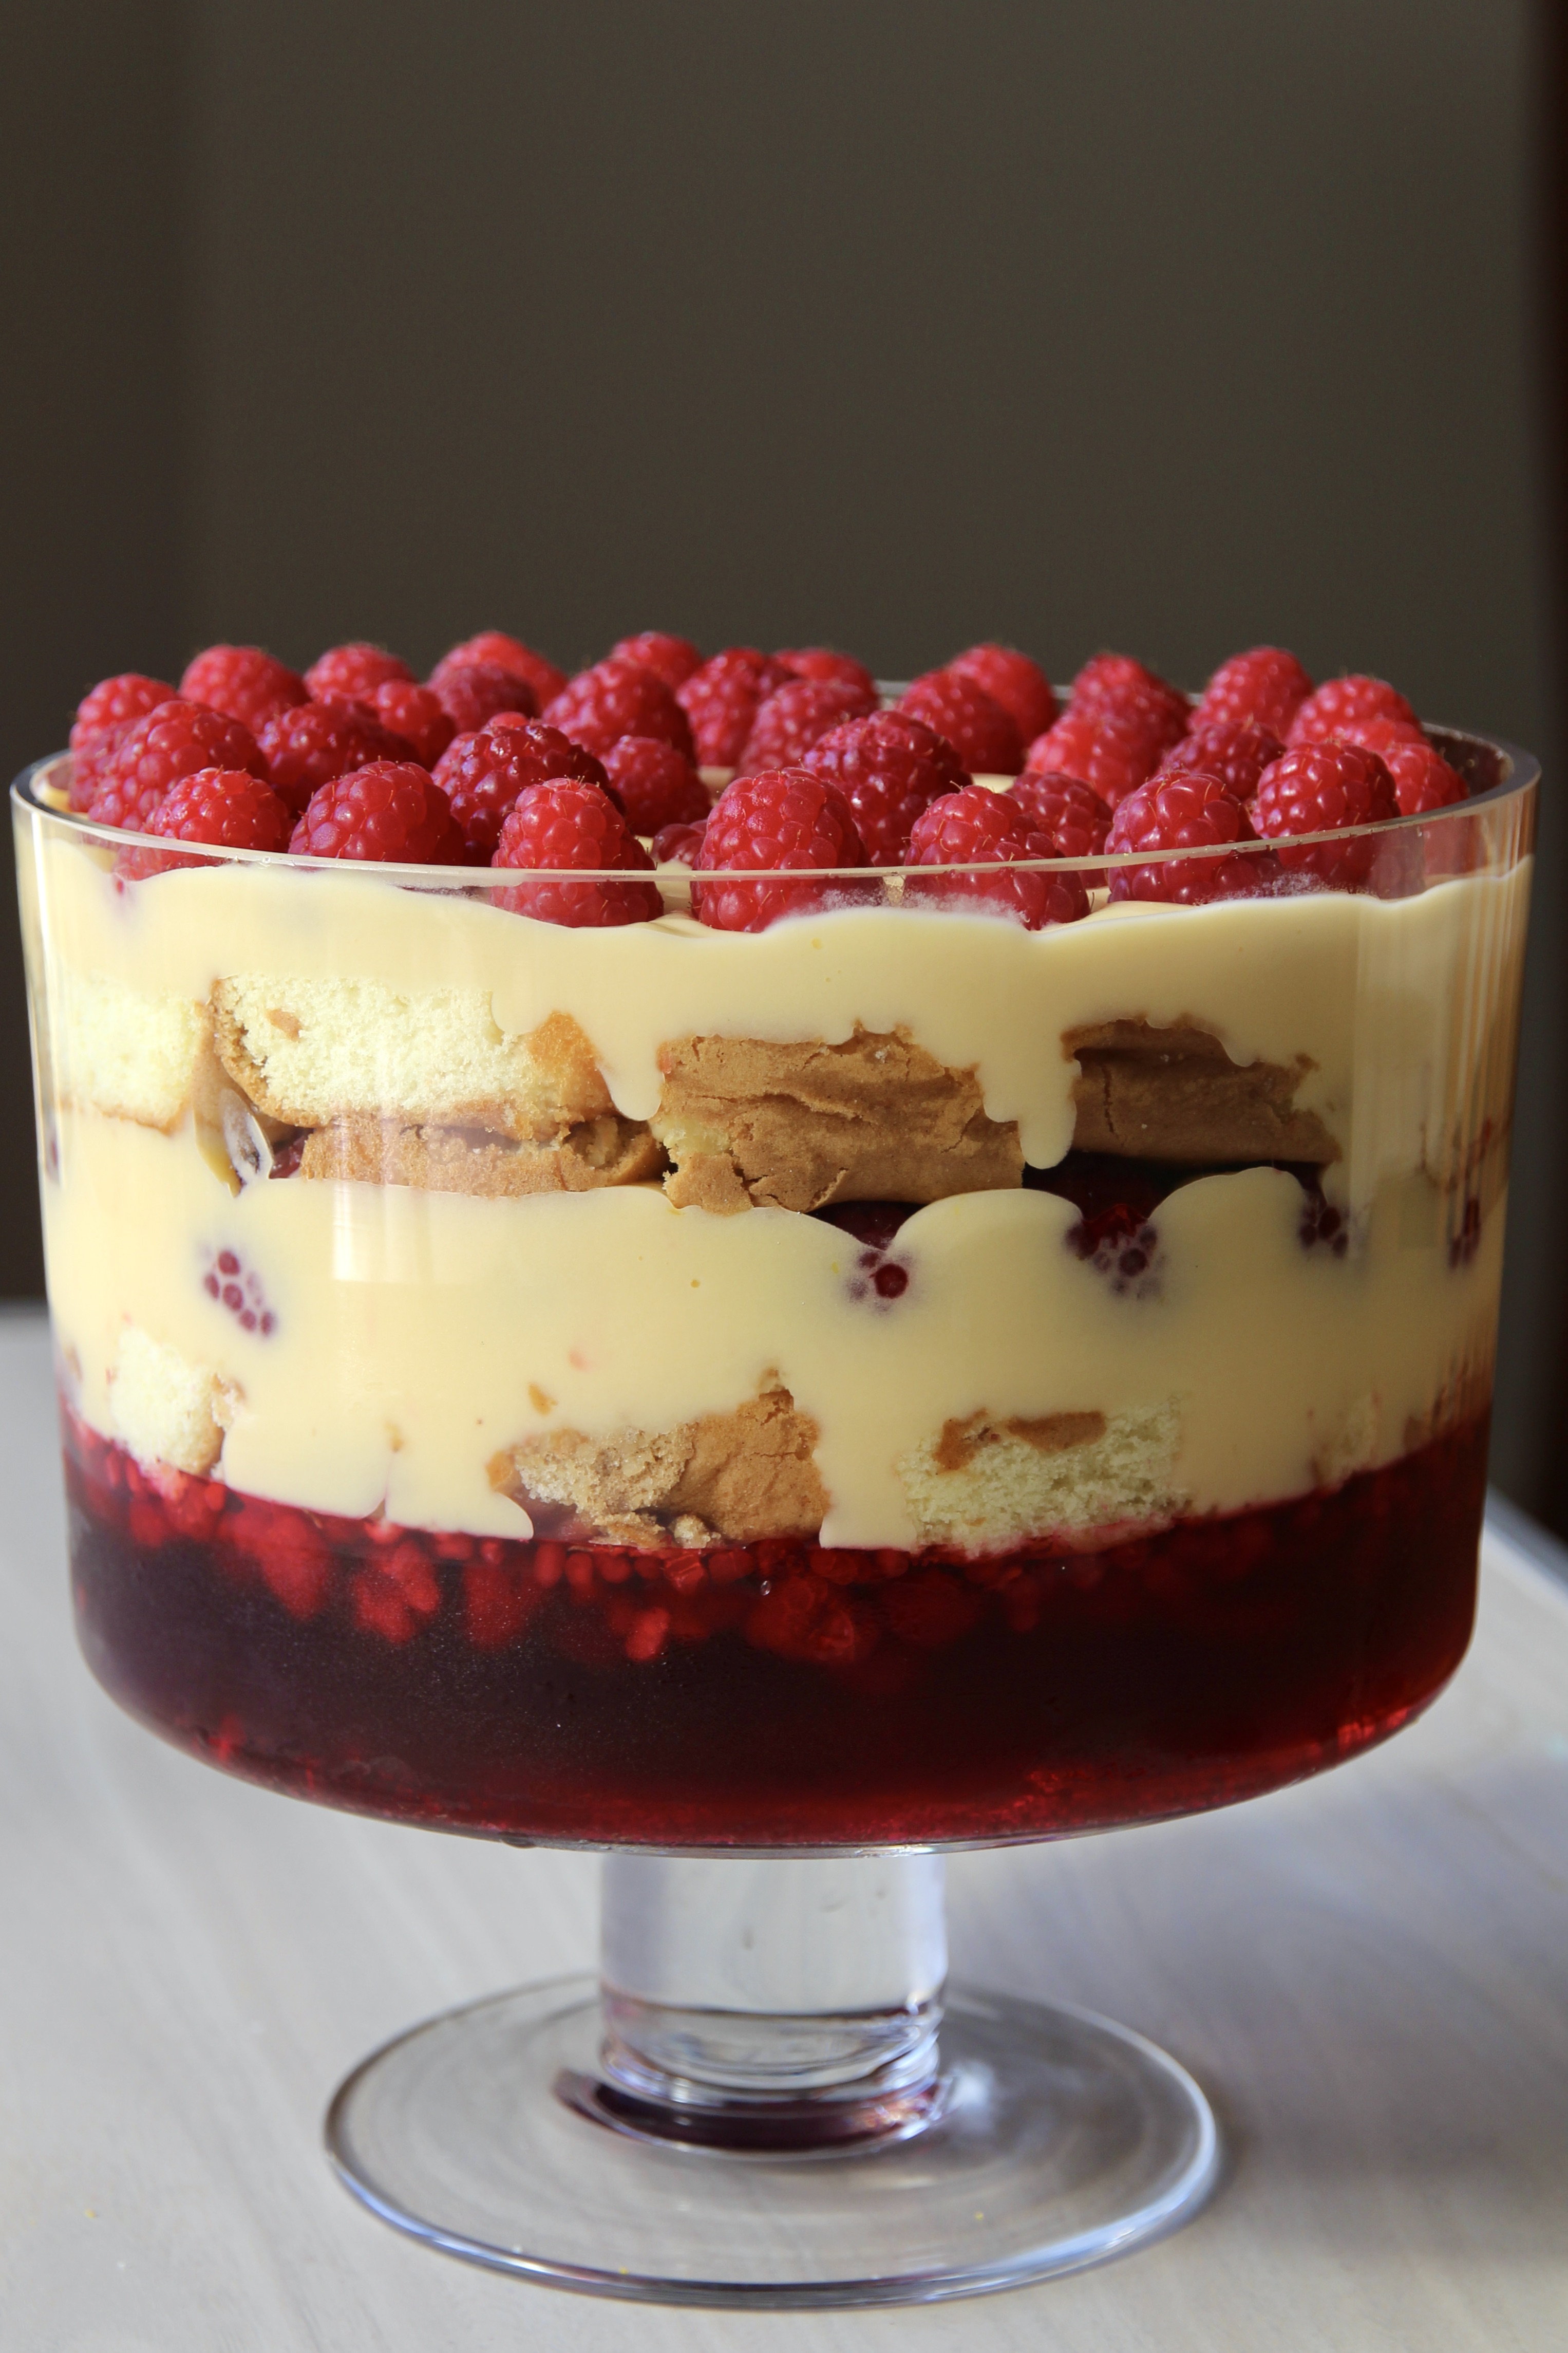
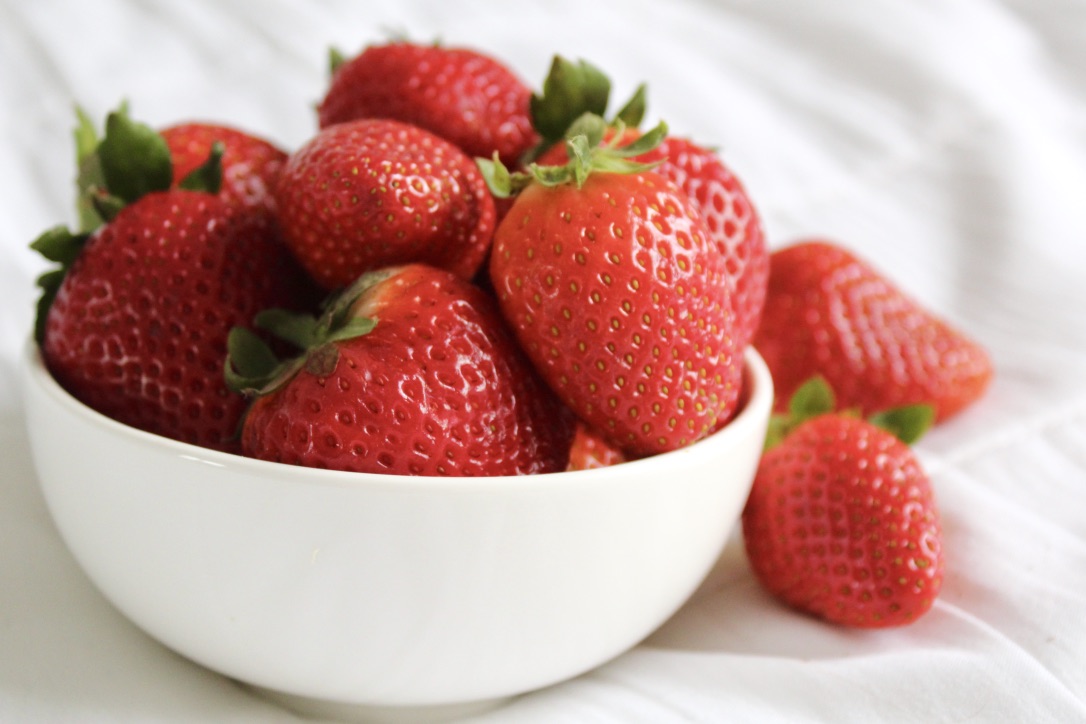
3 punnets of fresh raspberries, to serve

Method

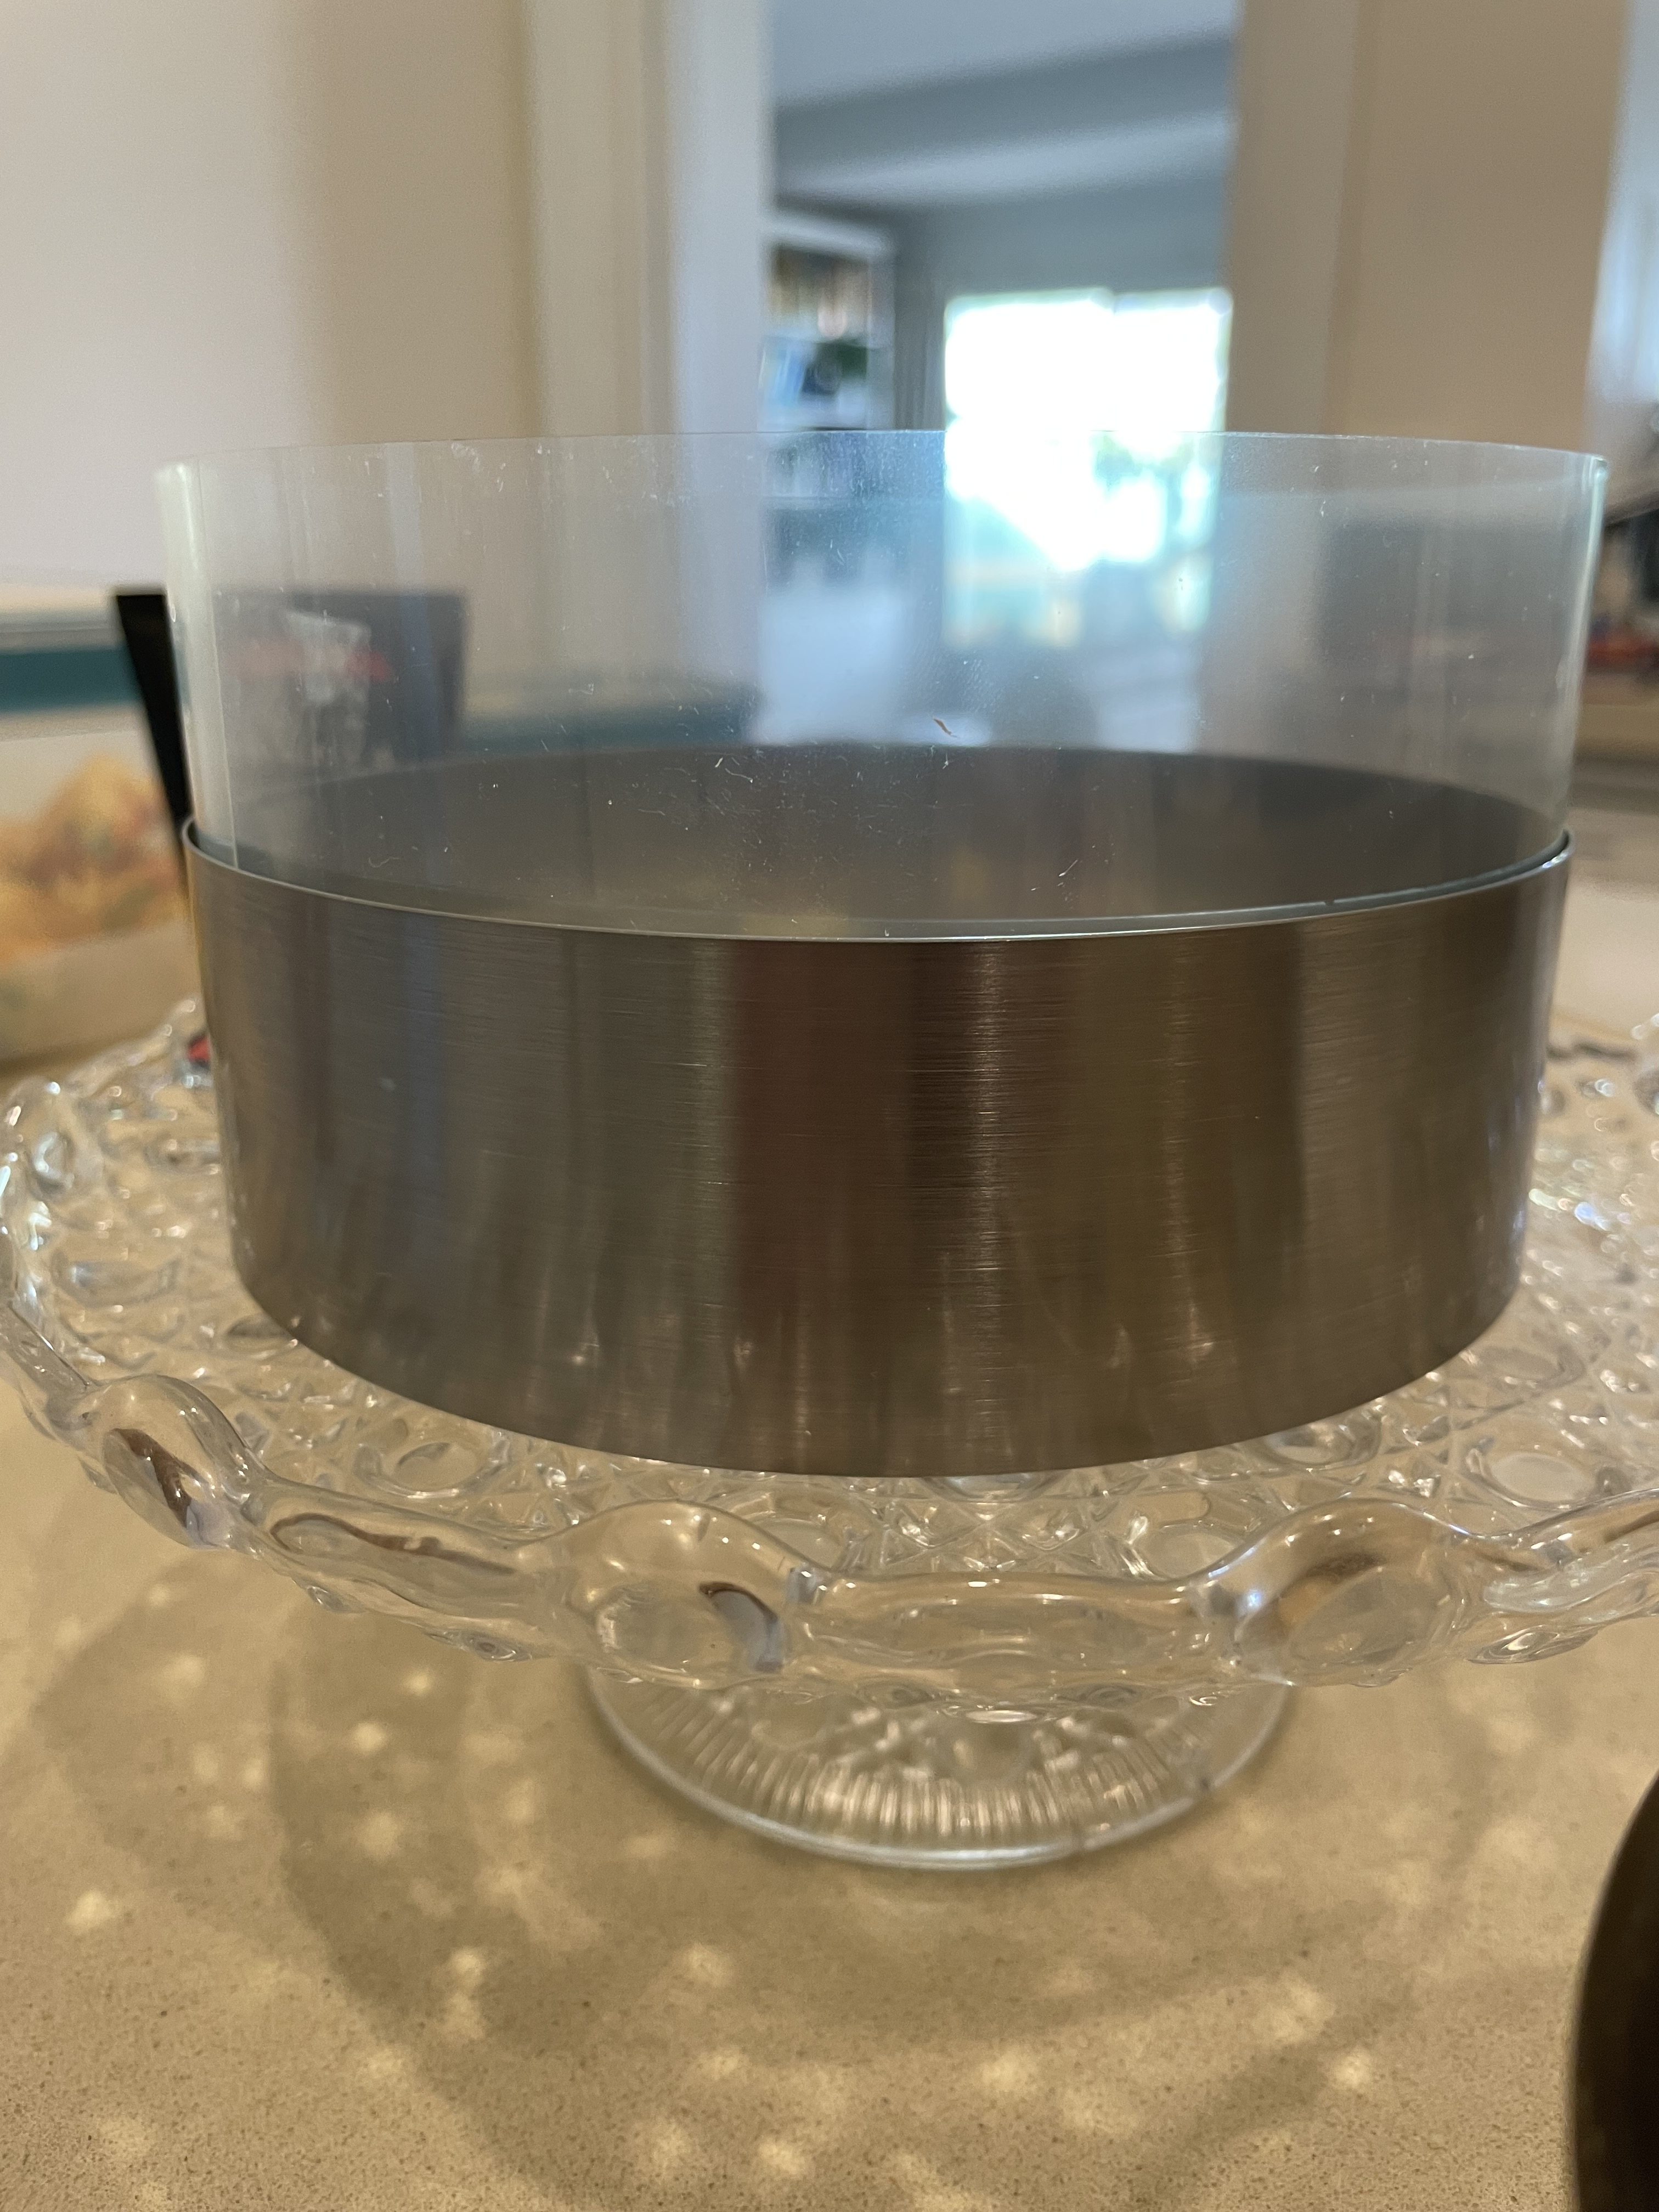
Make the jelly according to packet instructions and pour into a 3L capacity trifle dish. Add frozen raspberries. Put in the fridge to set for at least 6 hours.

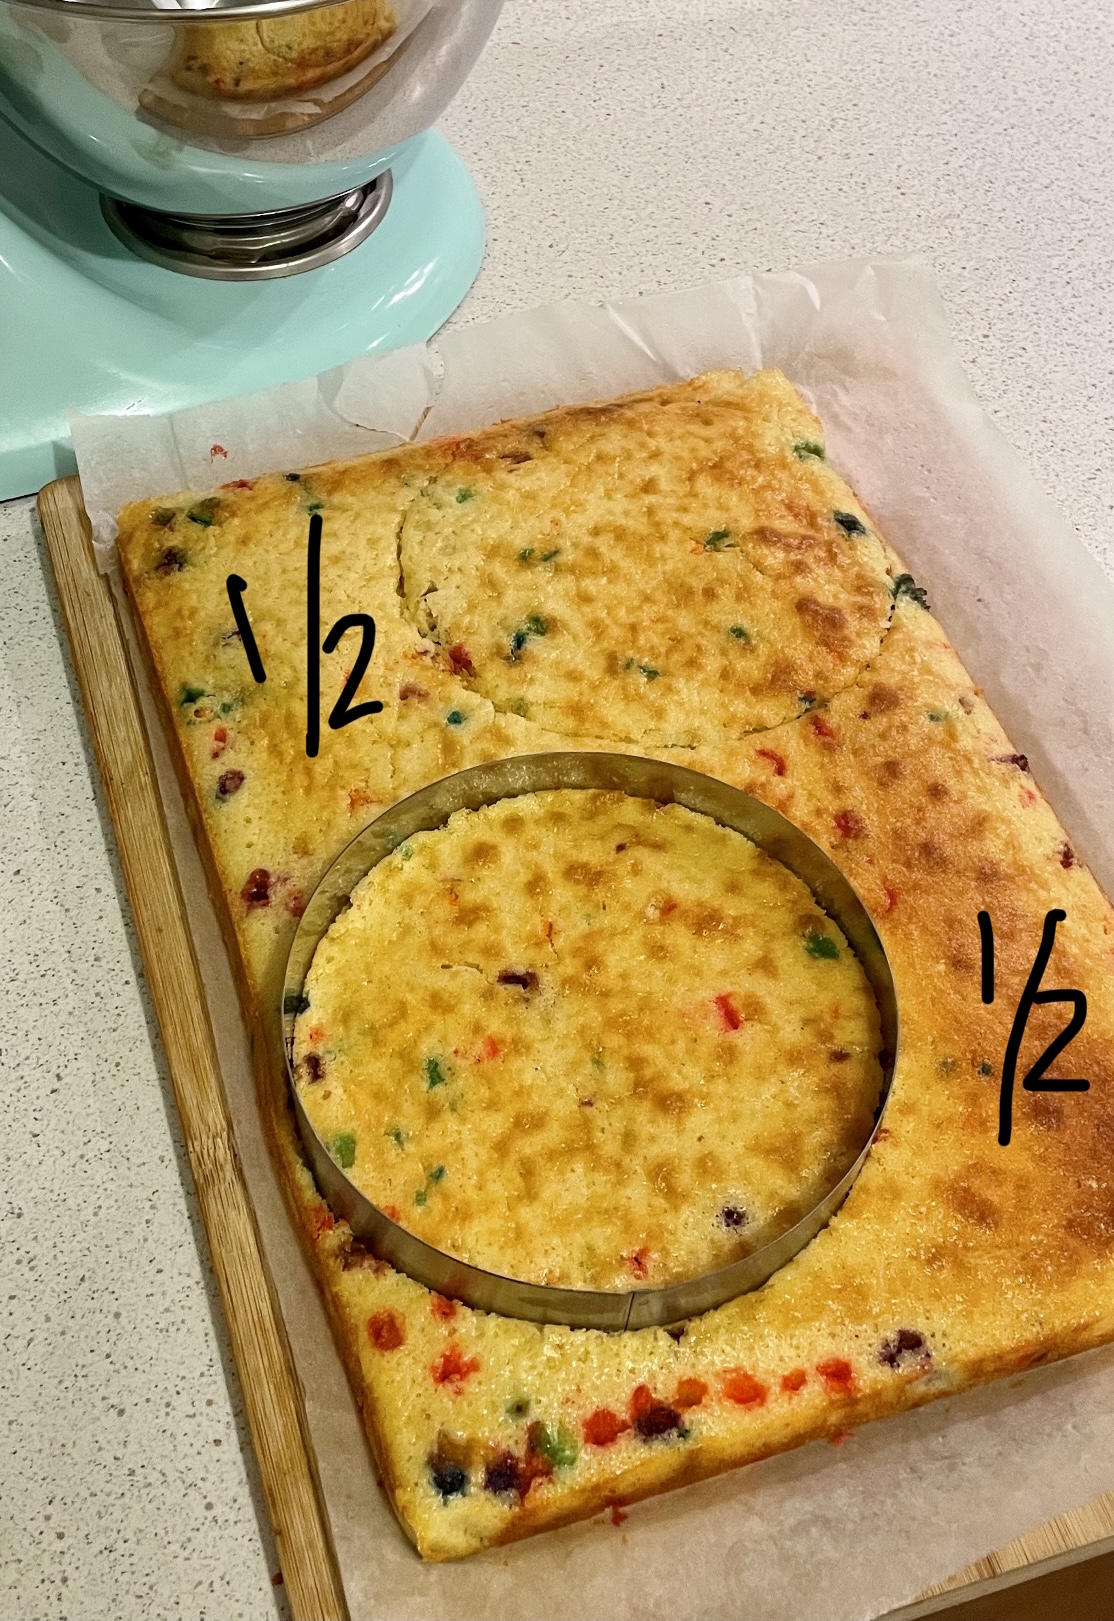
To make the sponge cakes, preheat oven to 160°C fan-forced. Grease two 20cm round, shallow tins and line the bases with baking paper.

Use electric beaters to beat the egg yolks, sugar, water, and vanilla for approximately 10 minutes, until very pale and thick. Wash the beaters and then, in a separate bowl, beat the egg whites and baking powder until stiff peaks form. Fold the sifted flours into the yolk mixture and then gently mix in the egg whites.

Divide evenly between the tins and bake for 20 minutes or until springy in the centre and the cake has come away from the sides of the tins. Gently turn cakes onto wire cooling racks and leave to cool entirely. Store in an airtight container until required.

To make the custard, add vanilla bean paste and milk to a large saucepan on a medium-low heat and bring to the boil. Immediately remove it from the heat and leave to cool slightly.

Meanwhile, in a very large mixing bowl, whisk the egg yolks with the sugar and cornflour until pale.

Gradually add the warm milk, a tablespoon full at a time, whisking well between each addition. Pour the mixture back into the pan and cook gently on a low heat, whisking continuously, for about 20 minutes or until very thick. Leave to cool at room temperature then refrigerate until required.

To assemble the trifle, cut the sponge cake into squares approximately 6cm x 6cm. Add a layer of sponge cake pieces over the set jelly like so:


Top with half of the custard mixture. Place half of the raspberries, evenly spaced, on top of the custard.

Repeat – add a further layer of sponge cake, the remaining custard and top with raspberries. Refrigerate until required.

Just before serving (or up to 3 hours ahead), make the meringue. Whip the eggwhites with electric beaters until they’re light and fluffy. Add the vanilla and a tablespoon of the sugar and beat until combined. Add the remaining sugar, a spoonful at a time, beating between each addition until the sugar has dissolved. Once all of the sugar has been added you should have glossy white, stiff peaks.

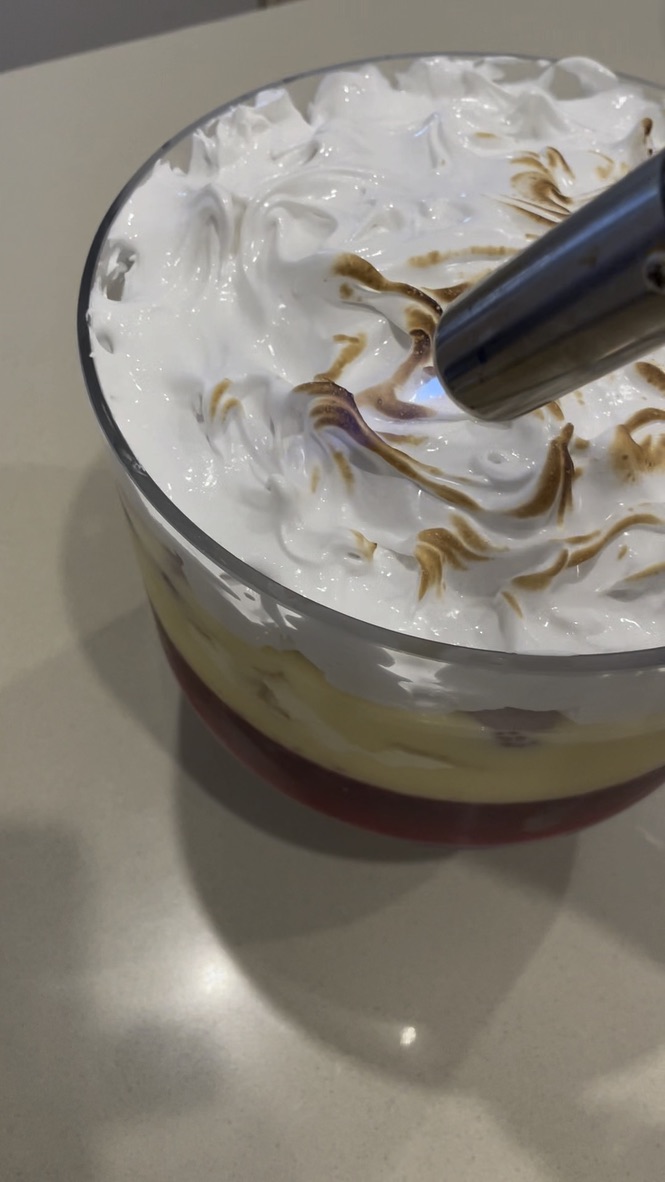
Spoon the meringue mixture onto the top. Use a kitchen blowtorch to lightly toast the meringue. Serve and enjoy!

Advertisement

Milk Bar Style Funfetti Layer Cake

I’ve been a huge fan of Christina Tosi for years, ever since I tried her famous Crack and Candy Bar Pies at Ma Peche on my first trip to New York in 2012.

So, naturally, I had to visit one of her Milk Bar stores on my most recent trip to the US in 2019 and it did not disappoint! I tried a slice of her vanilla birthday cake and it was like no cake I’d tried before – somehow both nostalgic and completely innovative. Ever since then, I’ve wanted to bring a taste of Milk Bar to Adelaide, especially as travel is not on the cards for a while. With this recipe, I think I’ve succeeded.

I’ll be honest, this cake is not for the faint-hearted. It’s a labour of love and requires some unusual equipment: a 9 by 13 inch “quarter sheet pan”, a 6 inch cake ring, 6 inch wide acetate to make cake collars and thick high-quality sprinkles/”jimmies”. I managed to source all of these from eBay relatively cheaply, but it is an investment – I guess I’ll just have to make lots more of these cakes to justify the purchases!

Start this cake at least the day ahead of serving. I actually spread it out over 3 days to make it far less intimidating, I made my crumbs on the Thursday evening, the cake on the Friday evening and then the buttercream, milk soak and assembly on Saturday.

Ingredients (serves 14-16)

Crumbs
¼ cup white sugar
1½ tablespoons brown sugar
¾ cup plain flour
½ teaspoon baking powder
½ teaspoon salt
2 tablespoons rainbow sprinkles
¼ cup grapeseed oil
½ tablespoon vanilla extract

Cake
230g butter, softened
200g caster sugar
1 tablespoon vanilla extract
3 eggs, room temperature
2¼ cups plain flour, sifted
3 teaspoons baking powder
1 cup full-cream milk, room temperature
¼ cup full-fat greek yoghurt, room temperature
¼ cup rainbow sprinkles

Buttercream
230g butter, roughly chopped, room temperature
3 teaspoons vanilla extract
4 cups icing sugar
2 tablespoons full-fat greek yoghurt, room temperature
1-2 tablespoons full-cream milk, room temperature
⅛ teaspoon baking powder

Milk Soak
60ml full-cream milk
1 teaspoon vanilla extract

Method

Crumbs
Preheat the oven to 150°C.

Combine sugars, flour, baking powder, salt, and sprinkles in a medium bowl and beat with electric beaters on low speed until well combined. Add the oil and vanilla and beat again to distribute. The wet ingredients will help the dry ingredients form small clusters; continue beating until that happens. Ideally, you want a mixture of large-medium and small crumb clusters.

Bake for 15 minutes. Cool completely and store in an airtight container (they will keep fresh for a week at room temperature or a month in the freezer).

Cake
Preheat the oven to 160°C fan-forced. Spray the base and sides of a quarter sheet pan with cooking oil and line the base with baking paper.

In a large bowl, add butter, sugar and vanilla and beat with an electric mixer on medium speed until pale and creamy. Add eggs, one at a time, and beat after each addition.

In a separate bowl, combine flour and baking powder. Add half of the flour mix and all the milk to the butter/sugar mix and beat on a low speed until combined.

Add remaining flour mix and greek yoghurt and continue to mix on a low speed until just combined. Gently stir in sprinkles with a silicone spatula.

Pour cake into prepared pan and smooth the top. Bake for 25-30 minutes or until golden and a skewer inserted in the middle comes out clean. Set on a wire rack to cool completely.

Buttercream
Beat butter in a large mixing bowl with an electric mixer on medium speed for 1-2 minutes until butter is pale and creamy.

Add vanilla and 1 cup of icing sugar. Beat on a low speed to combine, then turn up to medium and mix for 30 seconds. Add an extra 2 cups of icing sugar, along with the greek yoghurt. Beat on medium speed until combined. Add the final cup of icing sugar, milk and baking powder. Beat on medium speed until the buttercream is light and fluffy.

Milk Soak
Add milk and vanilla to a small bowl and whisk to combine.

Assembling the Cake
Ensure all of your components are in easy reach. Set aside 12-14 large, roughly even-sized crumbs to use to decorate the top of the cake.

Place your cake on a large chopping/bread board. Using the picture below as a guide, use a 6 inch metal cake cutter to cut out two rounds of cake and then two half pieces.

Place the 6 inch cake ring onto a plate or cake stand. Line the inside of the cake ring with a ‘collar’ of acetate.

Place the two half pieces of cake at the bottom and press down firmly. If there are any gaps, use extra cake scraps to fill in the holes and press down very firmly to make one even layer. Carefully remove the cake ring (but leave the acetate). Enjoy snacking on any residual cake offcuts while you work, or make into cake pops later.

Spoon 2 tablespoons of the milk soak over the cake layer. Add a few tablespoons of buttercream and spread into an even layer. Scatter over a handful of crumbs. Add a couple of extra tablespoons of buttercream on top (you don’t need to completely cover the crumbs) and smoothe with a spatula to ensure the layer is (roughly) even.

Repeat this process for the second layer: cake, milk soak, buttercream, crumbs, buttercream. If you need to, attach another layer of acetate on top of your current cake collar to ensure it is tall enough so that all cake will be supported.

Add the final layer of cake, spoon with 2 tablespoons of the milk soak and add the remaining buttercream to the top. Top the cake with the large crumbs you set aside earlier.

Place cake in the fridge for at least 1 hour to set. Gently peel away the acetate strip/s. Refrigerate until approximately half an hour before serving. Because the cake is so rich, cut into very small pieces (I use this method) to serve. Enjoy!

Cake inspired by Christina Tosi’s ‘Vanilla Birthday Cake’. Crumb recipe from Milk Bar Store. Cake, buttercream and soak recipe adapted from The Sweetest Menu ‘Milk Bar Birthday Cake’.

Butterfly Cakes with Strawberries & Cream

4r4f+HrwRyiAVM+exY9USg_thumb_d49

Considering it’s winter, we have been incredibly lucky to have an abundance of delicious, flavoursome strawberries and these cakes take full advantage of them.

zUuD1C6uQ+O34%Yrysxlkw_thumb_d45

These cupcakes are probably the quickest and easiest to make in the history of the world;  you simply blitz the ingredients in a food processor, divide into patty pans and bake!

The cakes are very light with a soft, sponge-like texture, which makes them perfect for butterfly cakes. If butterfly cakes aren’t for you, they’re also delicious with a frosting of your choice (try my vanilla buttercream or marshmallow frosting).

reHoi07+TbijnoL2o8%4NQ_thumb_d17

Ingredients (makes 12)
1 cup (125g) self-raising flour
⅔ cup (125g) caster sugar
125g butter, softened
2 large eggs
1 teaspoon vanilla extract
2 tablespoons milk
Sweetened thickened cream (or whipped cream)
Good quality strawberry jam
Fresh strawberries, halved (optional)
Icing sugar

BKVg8WuiQsWvmNzfzVXnNQ_thumb_d19

Method
Preheat oven to 200ºC and line a 12-hole muffin tin with patty pans.

Put all of the ingredients except for the milk into a food processor and blitz until smooth. Pulse while adding the milk until just combined.

Divide batter evenly among the patty pans (I know it doesn’t look like much batter, but they will rise a lot).

Bake for 15-20 minutes or until a skewer inserted comes out clean. Transfer immediately onto a wire rack to cool completely.

If you will be serving the cakes immediately, make your thickened cream and cut up your strawberries while the cakes cool.

Using a sharp knife at a 45 degree angle, cut out a circle from the top of each cake and cut it in half to make the butterfly wings. Fill the holes with a teaspoon or so of strawberry jam and then top with cream, butterfly wings and another line of jam. If you like, you can serve them like this in the traditional butterfly cake style (below).

cK1kGHjXTt+7BZ+IryKDzg_thumb_d0b

For me though, I love fresh strawberries so I top each cake with a strawberry half and then sprinkle with icing sugar. Enjoy!

NRowYsLGTmuyv9A1XZrSEg_thumb_d16

NB: filled cakes are best eaten with 6 hours
Recipe adapted from Nigella Lawson’s ‘Cupcakes’ in How to Be a Domestic Goddess. 

SaveSaveSaveSaveSaveSave

Homemade Vanilla Marshmallows

As the weather cools down, I am craving hot chocolates and crisp nights around the campfire, both of which are infinitely improved by the addition of marshmallows. Homemade marshmallows are on an entirely different level to store bought. Their texture is  impossibly soft, light and dreamy with none of the powderyness that even the best quality store bought varieties have. These are perfect for eating as is, roasting over a fire, popping into a steaming mug of hot chocolate, or combining with chocolate and graham crackers (or equivalent) to make s’mores. Do yourself a favour and make some, stat! These marshmallows are so good, I am already thinking of how I can use the base recipe to make different flavours and variations (how good would Baileys marshies be?!)

thumb_IMG_0120_1024

Ingredients (makes ~30)
½ cup warm water
2 tablespoons flavourless, powdered gelatine
1 tablespoon vanilla essence
1 ½ cups caster sugar
⅔ cups liquid glucose
½ cup water, extra
1 cup icing sugar, sifted

thumb_IMG_0107_1024

Spray a 20cm x 30cm slice tin with cooking oil and line the bottom with baking paper.  Place the warm water in the bowl of an electric mixer, add gelatine and vanilla and stir to combine. Set aside.

Place the caster sugar, glucose and extra water in a medium saucepan over a medium heat and cook, stirring, until the sugar is dissolved. Increase heat to high and bring to the boil. Allow to boil, without stirring, for 6–7 minutes until the temperature reaches 115°C on a sugar thermometer. With the electric mixer on high, add the hot syrup to the vanilla gelatine mixture in a thin steady stream, and beat for 5-10 minutes or until white, thick and glossy.

Pour the mixture into the prepared tin. Using a spatula sprayed with cooking oil, smooth the top of the marshmallow.

Refrigerate for 1–2 hours or until set. Gently tip the marshmallow, top-side-down onto a clean, flat surface dusted with icing sugar. Peel off the baking paper and sift icing sugar over the top. Dust a large knife with icing sugar and cut marshmallows into squares. Enjoy!

thumb_IMG_0099_1024

Can be stored in the fridge for ~1 week

Adapted from Donna Hay’s ‘Caramel Swirl Marshmallows’

thumb_IMG_0122_1024

Profiteroles with Vanilla Crème Pâtissière & Chocolate Sauce

Happy Mother’s Day to all mothers out there! Today I celebrated with one side of my family for a delicious brunch and then had dinner with the other side of the family, and I served these profiteroles for dessert.

Choux pastry has a nasty reputation as being very difficult to make, but Mum has been making this recipe for over 20 years and it has never failed for her. I was surprised by how easy it was to make and using this simple base recipe you can make profiteroles, eclairs or Paris-Brest. If you’re pressed for time you could easily swap the crème pâtissière for sweetened whipped cream, or for a different flavour, you could add a liquor such as Bailey’s Irish cream or Grand Marnier to the filling (although to me, nothing beats a homemade vanilla crème pat). The chocolate sauce could also be changed to berry, lemon, or caramel, or you could dip the profiteroles in toffee à la croquembouche. Basically, the options are endless!

thumb_IMG_3879_1024

Choux Pastry (makes ~35 profiteroles or 20 eclairs)
1 cup water
60g butter
120g plain flour, sifted
4 eggs
1 extra egg yolk mixed with 1 tablespoon cold water

Crème Pâtissière
2 eggs
2 egg yolks
140g white sugar
Seeds from 1 vanilla bean
2 heaped dessertspoons flour
2 heaped dessertspoons cornflour
500ml milk
70g butter

Chocolate Sauce
300g dark chocolate melts
400ml pouring cream

thumb_IMG_3869_1024

Line 2 large baking trays with baking paper and add a 1cm nozzle to a piping bag. Preheat oven to 205°C.

In a medium saucepan, bring water and butter to the boil. Lower the heat and add the flour all at once, stirring vigorously with a wooden spoon until the mixture forms a smooth, sticky mass. Remove from the heat and allow to cool for 3 minutes.

FullSizeRender-1 2

Stirring with a wooden spoon, add eggs one at a time, ensuring your mixture is smooth and fully combined.

Fill a piping bag with the mixture and pipe mounds of pastry about 2cm in diameter, 2cm apart. Sprinkle lightly with water (the humidity helps the pastry rise) and then bake in the preheated oven for 20 minutes. Turn down the temperature to 150°C and cook for a further 20 minutes. Turn off the oven and leave to dry in the oven for approximately an hour.

IMG_6708
The odd misshapen profiterole is inevitable!

To make the crème pâtissière, mix together the eggs, yolks, sugar and flours. Bring the milk to the boil. Carefully pour it into the egg mixture, whisking well together. Add in the vanilla bean.

Return the mixture to the saucepan and cook over a low heat, stirring constantly with a wooden spoon. After a time, the mixture will thicken quickly – make sure you keep stirring so the mixture on the bottom of the pan doesn’t burn. Beat in the butter a little at a time.

IMG_6706

Pour into a bowl, top with cling film and allow to cool.

Once profiteroles and crème pâtissière are fully cool, cut almost in half and fill with crème pâtissière.

Just before serving, make the chocolate sauce by combining the chocolate and cream in a medium saucepan and stirring on a low heat until melted and smooth. Add more cream or chocolate as required until desired consistency is reached.

Serve profiteroles drizzled with chocolate sauce and berries. Enjoy!

IMG_6710.JPG
Phew, 10 servings with 4 profiteroles each is quite exhausting!

thumb_IMG_3891_1024

thumb_IMG_3874_1024

Choux pastry recipe adapted from Gabriel Gaté’s ‘Sweet Treats’ (1995).
Crème pâtissière recipe adapted from Vogue’s ‘Grand Finales’ (1988).

Funfetti Cupcakes

These delicious vanilla cupcakes are made even better by the addition of sprinkles! Perfect for birthdays, baby showers or any time you feel like celebrating.

thumb_img_2909_1024

Ingredients (makes 24+ cupcakes)
2 ¾ cups plain flour
2 tspns baking powder
200g unsalted butter, softened
1 ¾ cups caster sugar
4 eggs
1 tblspn vanilla extract
1 cup milk
1 cup rainbow sprinkles

Vanilla Buttercream Frosting 
200g butter, softened
½ cup milk
1 tblspn vanilla extract
8 cups icing sugar
A few drops of food colouring as desired
Sprinkles, to decorate

thumb_img_2913_1024

Method
Preheat the oven to 170°C (approximately 150°C fan-forced). Line two 12 hole muffin trays with patty pans.

Sift together the flour and baking powder. In a different bowl, cream the butter for 1-2 mins. Add the caster sugar about a third at a time, beating for 2mins after each addition. After the last of the sugar has been beaten, beat until the mixture is light and fluffy and the sugar dissolved. Add the eggs one at a time, beating for 1 min after each addition or until the mixture is light and fluffy. Add the vanilla and beat until just combined.

Add approximately a third of the flour mixture to the creamed mixture and beat on a low speed until combined. Add half of the milk and beat until combined. Repeat this process until all of the flour and milk is thoroughly combined but be careful not to overbeat (this will toughen the mixture). Add in the sprinkles and gently stir through until evenly dispersed.

Spoon mixture into the patty pans (filling each about 3/4 full) and bake for about 18-20mins or until the top springs back when touched. Remove the cupcakes from the trays immediately and cool on a wire rack for at least half an hour before icing.

To make the frosting, cream the butter for 1-2 mins in a large bowl using an electric mixer. Add the milk, vanilla and half of the icing sugar and beat for at least 3 mins (until the mixture is light and fluffy). Add the remaining icing sugar and beat for a further 3 mins or until of a spreadable consistency. Add extra milk if too dry or extra icing sugar if too wet. Add colouring and beat in until combined and the desired colour has been achieved.

Using a piping bag with a Wilton 2D tip, pipe buttercream in a swirl on the cupcakes and decorate with extra sprinkles.

Enjoy!

thumb_img_2902_1024

thumb_img_2908_1024

Recipes adapted from The Crabapple Cupcake Bakery Cookbook.

Easter Cupcakes 3 Ways

Wow, I can’t believe it’s only 1 week until Easter Sunday!

Here are 3 simple ways to decorate cupcakes for Easter. I used my favourite dark chocolate mud cupcake recipe for the cakes, but they would be equally delicious vanilla or any other flavour of your choice! When I made mine, I just made one batch of the cakes and divided each of the frosting recipes by a third, but feel free to triple the cake recipe if you want 3 full batches, or pick and choose which decorations you’d like 🙂

thumb_IMG_1454_1024

Dark Chocolate Mud Cupcakes Ingredients (makes 12)
90g softened butter
1 cup brown sugar, firmly packed
2 eggs
⅔ cup self-raising flour
2 tablespoons cocoa powder
⅓ cup almond meal
⅔ cup water
60g dark chocolate melts, melted

Method
Preheat the oven to 170°C (150°C fan-forced). Line a 12-hole muffin tin with patty pans.

Beat butter, sugar & eggs in a large bowl with electric mixer until light and fluffy. Add in sifted flour and cocoa, almond meal, water and melted chocolate.

Fill each patty pan approximately ⅔ of the way full. Bake for around 25 minutes or until a skewer inserted comes out clean. Stand cakes in tin for 5 minutes before transferring them to a wire rack to cool.

thumb_IMG_1442_1024.jpg

Dark Chocolate Easter Nest Cupcake Ingredients (makes 12)
Dark chocolate frosting: 
125g butter, softened
1 ½ cups icing sugar
2 tablespoons dutch cocoa powder
2 tablespoons milk

Chocolate Easter Nests
1x 100g packet Chang’s Original Fried Noodles (or equivalent)
2 tbspns crunchy peanut butter
200g dark chocolate melts
1 bag of Cadbury “Mini Eggs” (or equivalent)

Method
To make the nests, microwave peanut butter and chocolate until melted. Mix until it is a smooth paste. Add the noodles and coat them well.

Spoon the mixture onto grease-proof paper and shape into nests small enough to fit on top of your cupcakes. Top with three mini eggs and then place in the refrigerator until set.

While the nests are setting, make the frosting. Beat butter in a medium bowl with electric mixer until light and fluffy. Beat in icing sugar, cocoa and milk in two batches. If the frosting is too stiff, add more milk. If it’s too runny, add more icing sugar or cocoa.

To decorate, spread each cupcake generously with frosting and top with a nest.

IMG_3536

Bright Springtime Easter Cupcake Ingredients (makes 12)
Vanilla frosting:
125g butter, softened
1 ½ cups icing sugar
2 tablespoons milk
2 teaspoons vanilla essence (or flavouring of your choice)
Green food colouring

To decorate:
Wilton grass icing nozzle tip
1 bag of Cadbury “Mini Eggs” or equivalent

Method
To make the frosting, beat butter in a medium bowl with electric mixer until light and fluffy. Beat in icing sugar, vanilla and milk in two batches. Add green food colouring until desired colour is reached (start slowly, the colouring is often very strong!) If the frosting is too stiff, add more milk. If it’s too runny, add more icing sugar.

Spoon frosting into a piping bag with a grass tip attachment. Pipe frosting vertically onto the cupcake until each cupcake is fully covered. Top with 3 mini eggs.

thumb_IMG_1433_1024

Bunny Behind Cupcake Ingredients (makes 12)
Vanilla frosting:
125g butter, softened
1 ½ cups icing sugar
2 tablespoons milk
2 teaspoons vanilla essence (or flavouring of your choice)
Green food colouring

Decorations
12 Ferrero Raffaello white chocolate truffles (or equivalent)
36 white mini marshmallows
Pink icing pen (or alternatively use pink icing, fondant or melted pink candy melts)
Milo (Australian malt powder) or crushed chocolate biscuits, for the soil

Method
To make the frosting, beat butter in a medium bowl with electric mixer until light and fluffy. Beat in icing sugar, vanilla and milk in two batches. Add green food colouring until desired colour is reached (start slowly, the colouring is often very strong!) If the frosting is too stiff, add more milk. If it’s too runny, add more icing sugar.

Top each cupcake with a generous layer of frosting, but be sure to leave aside a small amount of frosting to use as ‘glue’. Smoothe the top of each cupcake so you have a flat surface to work with. Sprinkle milo or crushed chocolate biscuits onto the frosting (but leave a border of green around the edge); this makes the ‘soil’. Firmly place a Raffaelo truffle into roughly the centre of your soil on each cake.

To make the tails, shape mini marshmallows into spheres and press firmly down. Attach each tail, using a small amount of frosting (so the green doesn’t show), to the Raffaelos (I chose to do mine to one side but I have seen them work top and centre).

To make the bunny’s feet, flatten 2 white marshmallows per bunny and squeeze in the centre to give a foot-like shape. Using your icing pen, draw on foot and toe-pads. Attach, toes down to the Raffaelos using a tiny amount of icing on the top back-side of each foot.

thumb_IMG_1454_1024

Frosting recipes adapted from the Australian Women’s Weekly ‘Cupcakes by Colour’ cookbook.


Vanilla Raspberry Layer Cake

Well.. I lied. I completely intended to blog more in the last few weeks (as evidenced by my last post!) but I’ve just been too busy. I had my 21st Birthday to plan, uni assessments galore, the Psychology ball to organise, and now Laura’s 18th is coming up in a couple of weeks. Yikes, I get exhausted just thinking about it all! However, while I haven’t been blogging, I have been baking.

Here is the cake I made for my 21st Birthday afternoon tea – triple layer vanilla cake with a tangy raspberry filling & super glossy meringue frosting, topped with vanilla bean macarons. The raspberry filling was perfect as, otherwise, this cake was going to be too sweet, so I would certainly recommend leaving it (or perhaps substituting it for a tangy lemon curd if you’re not a raspberry fan) to cut the sweetness from the frosting.

Elise's 21st Birthday 039
Don’t worry, the empty plates in the background didn’t stay empty!

For my 21st birthday cake, I used 2 packets of Betty Crocker’s SuperMoist Vanilla cake mix, with some extra vanilla added so they tasted more ‘home-made’ divided into 3 20cm lined pans. I did this for 2 main reasons; it saved a lot of time (and time was precious as I had so much other cooking to do!), and because it reliably produces an even, stable, fine-crumbed cake that is easy to work with. If you don’t want to use cake mixes, just make a double batch of your favourite vanilla/butter cake and that will work as well 🙂

The raspberry filling needs to be made at least a day ahead but keeps well in the fridge so can be made up to a week ahead.

I also made the macaron shells a couple of days ahead to save me some stress on the actual party day.

The frosting should be made the day of serving as it does not keep particularly well.

Ingredients

For the raspberry filling (make at least a day ahead)
340g frozen raspberries
⅔ cups water
½ cup white, granulated sugar
1 tblspn lemon juice
2 ½ tblspns cornstarch dissolved in ¼ cup of water

For the cake
2 boxes Betty Crocker’s SuperMoist Vanilla cake mix (made following instructions, so add the eggs, milk, butter etc. as specified by the box)
½ tablespoon vanilla extract

For the meringue frosting
6 egg whites
1 ¾ cups caster sugar
2 tblspns liquid glucose (or light corn syrup)
¼ teaspoon cream of tartar
2 teaspoons vanilla extract

For the macarons
https://bakerholicsanonymous.wordpress.com/recipes-2/cookies-biscuits-macarons/vanilla-bean-macarons/

Elise's 21st Birthday 048

Method
To make the raspberry filling:
In a saucepan combine the raspberries, water, sugar, and lemon juice. Bring to boil and simmer for 15-20mins  or until the raspberries have broken down.
Remove the mixture from the heat and strain with a fine mesh sieve. Return the stained mixture to the heat. Dissolve the cornstarch in water. Whisk the cornstarch mix into the raspberry mixture.
Bring the mixture back to a boil and simmer for 5 more minutes, stirring occasionally. Remove from heat and cool completely.
Refrigerate overnight to set.

To make the cakes: Line & grease 3 20cm cake pans. Set oven to temperature specified by the cake mix boxes. Make cakes according to box instructions, add ½ teaspoon of vanilla extract to each cake mix & divide mixture among the three pans. Bake for specified time, or until a skewer inserted comes out clean.

To assemble the cake: Carefully place a cake layer on your serving platter. Top with a generous amount of raspberry filling and spread gently using a spatula to make an even layer. Top with another cake layer and repeat. Finally, top with the final cake, ready to be frosted.

Elise August 2015 111

To make the meringue frosting: Add egg whites, sugar, liquid glucose and cream of tartar, and simmer over a pot of water (not boiling), whisking constantly but gently, until temperature reaches 54°C on a thermometer (be patient, it does get there eventually!).
Beat heated mixture with electric beaters on a low speed for 2 minutes, then increase the speed to medium and beat for 2 more minutes. Increase the speed to high and beat until it is very thick and glossy, about 5 minutes.
Add vanilla and beat to combine.
Frost cake immediately by piling the frosting on top of the cake and, using a metal spatula, gently spreading from the top down. Smoothe as much as possible with your spatula.

Top with 6 macarons, 3 of each colour and a candle (if desired).

Serve each piece with a macaron & enjoy!

Elise's 21st Birthday 048

Elise August 2015 131

Elise August 2015 132

Raspberry filling recipe adapted from: Pinterest (various sources with the same basic recipe)

Meringue frosting recipe adapted from Sweetapolita’s ‘Perfectly Pink Angel Food Cake’ http://sweetapolita.com/2015/05/perfectly-pink-angel-food-cake/

Vanilla Bean Macarons

Elise August 2015 113

I made these particular macarons to sit on top of my 21st birthday cake (and because I think no afternoon tea is complete without them!) Feel free to adapt the colours or flavours as you wish.

Ingredients (makes around 40 macarons, 20 paired)
Macaron shells
225g pure icing sugar
130g almond meal
115g egg whites
60g caster sugar
1g bicarb soda
A few drops of rose pink & violet food colouring

Vanilla bean filling
100g butter, softened
¼ cup milk
½  tblspn organic vanilla bean paste
4 cups icing sugar
Rose pink & violet food colouring

Method
Preheat oven to 150°C fan forced. Grease and line two large baking trays with baking paper.

Separately sift icing sugar and almond meal into medium bowls or over sheets of baking paper. Repeat process 3 times and re-weigh ingredients (I know this seems excessive but trust me, it’s worth it). You will need to top up the ingredients as you may have lost some in the sifting process. Sift icing sugar and almond meal into a bowl and repeat, ensure there are no lumps.

Whisk egg whites until doubled in size using electric beaters or an electric stand mixer. While still whisking, gradually add caster sugar and bicarb, whisking until mixture forms very stiff peaks.

Gently fold almond meal mixture into meringue using a spatula until incorporated.

Divide mixture into 2 bowls. Add food colouring (pink to one, purple to the other) one drop at time, stirring very gently with a spatula, until desired colour reached.

Spoon into a piping bag fitted with a 9mm round nozzle (approximately). Hold nozzle close to the baking tray and pipe 3cm diameter circles onto prepared trays – don’t make a circular motion àla soft serve. Tap the underside of the tray to allow macarons to settle and air bubbles to escape. If there is still a little peak on top, dip a teaspoon in water and use the back to smooth the surface. Repeat with other colour. 217929_10151403883896183_1104201680_n

Leave to rest for at least 20-30 minutes or until the macarons form a skin and the top is no longer shiny or sticky to the touch (this is VERY important as it will give your macaron its lovely ‘foot’).

Bake for 12 minutes. Remove trays from the oven and allow macarons to cool on the tray. They will still be soft at this stage but will firm up on cooling.

Elise August 2015 087

To make the buttercream, cream the butter for 1-2 mins. Add the milk, vanilla and half of the icing sugar and beat for at least 3 mins (until the mixture is light and fluffy).

Add the remaining icing sugar and beat for a further 3 mins or until of a spreadable consistency. Add extra milk if too dry or extra icing sugar if too wet.

Halve the mixture and add a drop of rose food colouring to one half and a drop of violet colouring to the other.

Pipe a generous amount of buttercream onto half the macarons and sandwich with a second macaron.

Elise's 21st Birthday 003

Elise's 21st Birthday 004

Elise's 21st Birthday 039

Recipe adapted from Callum Hann’s ginger macarons

Giant Vanilla Cupcake

I haven’t made a giant cupcake for about 18 months but I’m so glad I found my giant cupcake cases again because they’re so much fun to make (and eat!) They’re also really easily adaptable as you can make them any flavour you like and decorate them in a million different ways. This time I’ve used buttercream roses but you could ice it as simply (or complexly) as you like – there’s a link to my fondant ‘soft serve’ icing instructions at the bottom of the page.image1-16

Ingredients (serves 10-12):
Cake
375g butter, softened
375g caster sugar
6 eggs
1 tablespoon vanilla extract
375g self-raising flour
3 tablespoons milk

Cupcake Case
375g white chocolate melts or Wilton candy melts

Buttercream icing
250g butter, softened
800g icing sugar
1 ½ tablespoons vanilla extract
4 tablespoons of milk
Food colouring

image1-17

Method
Spray silicone giant cupcake pan liberally with canola oil and preheat oven to 160°C fan-forced.

Cream together butter and sugar with an electric mixer until light and fluffy. Add in vanilla and then eggs, one at a time, ensuring that each egg is fully incorporated before adding the next. Add in half of the flour followed by two tablespoons of the milk, and then add remaining flour and milk. Mix until just combined.

Fill the giant cupcake pans, starting with the cupcake top. Fill until approximately 2cm shy of the top of the pan. Then fill the bottom pan with the remaining batter.

Bake in the oven for between 40-70 minutes, checking regularly. Note: the cupcake top will bake faster than the bottom so take it out before the bottom is done. The cake is ready when a skewer inserted into the middle of the cake comes out clean.

Leave cakes in their pans for at least 20 minutes before gently peeling the silicone off and allowing the cakes to cool completely on a cooling rack.

jan-proj3-041-Copy
Image credit: The Pink Whisk

While the cakes are cooling, wash and dry the bottom cupcake pan ready to make the cupcake case. Melt half the chocolate/candy melts and pour into the bottom cupcake pan. Spread evenly up the sides using a pastry brush. Refrigerate for 20 minutes and then repeat with the remaining melts. Refrigerate for 30 minutes and then gently peel off the silicone mould.

tumblr_inline_mmyiwlTG1X1qz4rgp
Image credit: She Who Bakes

tumblr_inline_mmyixnTdp41qz4rgp
Image credit: She Who Bakes

tumblr_inline_mmyj0njISG1qz4rgp
Image credit: She Who Bakes

Using a serrated bread knife, trim around bottom cake so all crunchy edges are removed. Level top (of base) and then cut base in half. Cut off bottom layer off top piece. Level base (of top).

Make buttercream by beating all ingredients but the food colouring until light and fluffy. Set half aside for the crumb coat, and then add the food colouring to the remaining buttercream.

Put a 1cm thick coating of the uncoloured buttercream between 2 bottom layers of cake and then between the base and top (ensure level – cut if necessary). Then put a thin layer of buttercream on the inside of the chocolate case and gently ease cake into it. Cover top of cake liberally with buttercream to form a protective barrier against crumbs.

image1.PNG-2

Put the coloured buttercream into a piping bag fitted with a Wilton 2D nozzle (to make roses) or equivalent, and pipe icing in a rose swirl pattern, starting from the bottom of the cake and working your way up.

Decorate with icing flowers, sprinkles, silver cachous, glitter… basically whatever you like!

image2-15

Alternatively, if you’d prefer a soft-serve, fondant look. Halve the buttercream recipe to only make the crumb coat & then follow these directions: https://bakerholicsanonymous.wordpress.com/recipes-2/cakes/giant-cupcake/

Recipe adapted from ‘Vanilla Giant Cupcake Recipe’ by The Pink Whisk