Pavlova

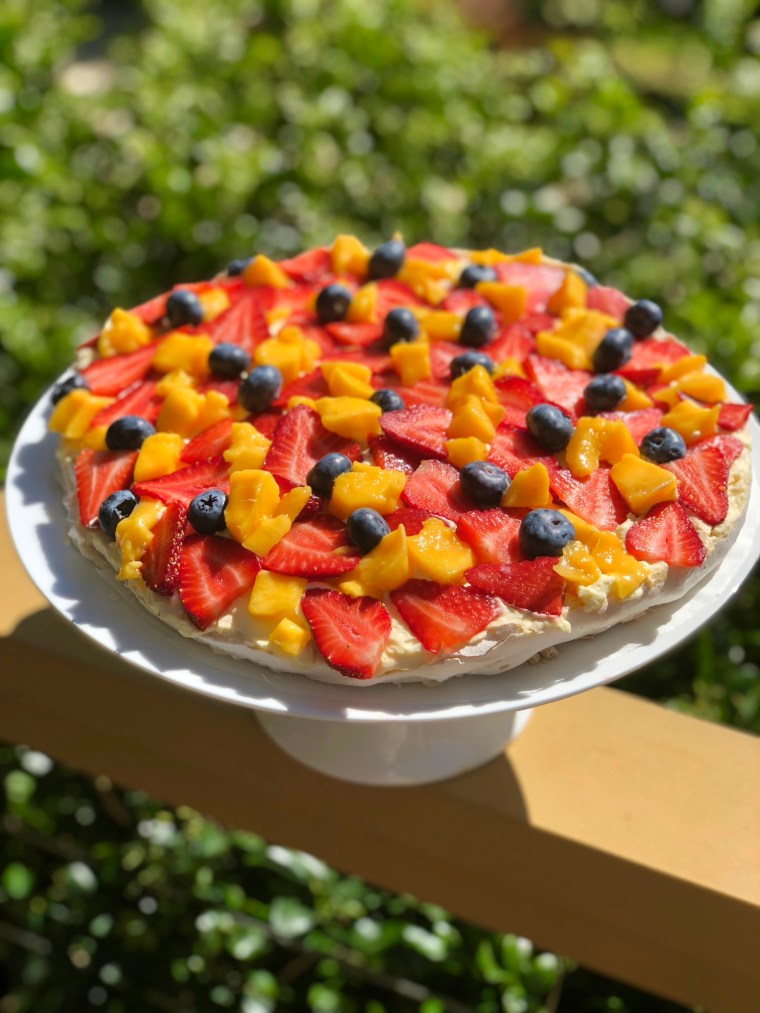
The pavlova is a quintessential Aussie dessert that is said to have been inspired by the Russian ballet dancer Anna Pavlova after a chef saw her perform on her world tour in 1926. A good pavlova has a beautiful high, crisp crust and a soft, pillowy marshmallow inside. It is one of my favourite summer desserts, especially when topped with seasonal fruit.

fullsizeoutput_5df

Ingredients (Serves 6-8)
1 large cup of sugar
1 teaspoon vanilla
1 teaspoon white vinegar
1 teaspoon cornflour
2 egg whites (at room temperature)
4 tablespoons boiling water
300ml cream, thickened
Fresh fruit (this time I used a mango, strawberries and blueberries)

fullsizeoutput_5c9.jpeg

Method
Preheat the oven to 180°C. Line a large tray with baking paper and trace a circle around the bottom of an 18cm cake tin (or other round object of the desired size). Turn the baking paper over (so it is pencil side down).

Add eggs whites to a large bowl. Put cornflour and caster sugar to one side of the bowl.  Add boiling water to egg whites, pour in vanilla and white vinegar, and beat on high for 10-20 minutes until thick, glossy and the sugar has dissolved (you can test this by putting a small amount of mixture on your index finger and rubbing it with your thumb, if you can feel the sugar, keep beating). **It is hugely important that you have the sugar dissolved, otherwise the pavlova may crack and weep during cooking**

Using the circle on the baking paper as your guide, spoon the pavlova mixture onto the tray and shape.

Cook at 180°C for about 8 minutes and then reduce heat to 90°C and cook for another 45 minutes. Turn the oven off and leave the pavlova to cool in the oven for at least an hour, to prevent collapsing.

When fully cool and you’re ready to serve it (keep the meringue free of toppings until right before serving), gently spread the thickened cream over the top and decorate with fruit.

jIdOiH2sTH2BujFeWf6rNA.jpg

Recipe from my lovely Grandmother, Margaret Payne.

Banana Bread with Chocolate Chips

This banana bread is super simple to make and is a perfect way to use up ‘dead’ bananas. It travels well so is great in kids’ lunch boxes, and will last for ~2 months in the freezer.

thumb_img_2899_1024

Ingredients (serves 8-10)
125g butter, softened
¾  cup caster sugar
2 eggs
2 teaspoons vanilla essence
3 overripe bananas
1 ¾ cups plain flour
1 teaspoon bicarb soda
½ cup milk chocolate chips (optional)

thumb_img_2893_1024

Method
Preheat your oven to 180°C (160°C fan-forced). Grease and line a 1-litre loaf pan.

Cream the butter and sugar with a handheld mixer until pale and thick. Beat in the eggs, vanilla and banana, followed by the flour and bicarb soda, beating until just combined. If desired, stir through the chocolate chips until evenly dispersed.

Pour the mixture into your prepared pan, smooth over the top and then bake for 55-60 minutes or until a skewer inserted in the thickest part of the bread comes out clean.

Allow to cool in the tin for 5 minutes before transferring to a wire rack to cool completely.

Enjoy! I love mine fresh for the first few days and then toasted with a bit of margarine.

thumb_img_2897_1024

Adapted from Matt Preston’s “Rock Star Banana Bread” from his Cook Book.

Mum’s Apricot Jam

One of our traditions when we go down to the family beach house at Victor Harbor is to eat homemade apricot jam on toast for breakfast while enjoying the sea view and, when we’re lucky, watching dolphins frolic in the waves.

fullsizerender-1
The view from the house

Because I have such fond memories associated with it, apricot is my favourite jam flavour, especially when homemade with local (or even better homegrown) apricots. This is Mum’s recipe and makes approximately 4 cups of sweet and tangy apricot goodness.

thumb_img_2885_1024

Ingredients (makes 4 cups)
1kg fresh apricots, halved with the kernels removed
1 vanilla bean, halved lengthways
1 cup water
1kg white sugar

thumb_img_2887_1024

Method
Sterilise jars by putting them and their lids through the hottest cycle of your dishwasher without detergent, or by standing the jars in the oven on the lowest temperature for 30 minutes.

Combine apricots, vanilla and water in a large saucepan. Bring to the boil. Reduce heat, and simmer, covered, for about 15 minutes or until pulpy.

Add sugar and stir over a high heat, without boiling, until the sugar dissolves. Bring to the boil and boil, uncovered and without stirring, for around 35 minutes or until the jam jells when tested.

Discard the vanilla bean and pour the hot jam into sterilised jars; sealing immediately. Label the jars with the date once cool.

Enjoy! Delicious on toast or scones with cream.

thumb_img_2886_1024

Adapted from the Australian Women’s Weekly ‘Apricot & Vanilla Bean Jam’


Christmas Ice Cream Pudding

As an Aussie, Christmas day is often stinking hot and the last thing you feel like is eating a hot, rich traditional pudding at the conclusion of your meal. Enter my cheat’s ice-cream pudding!

This is more of a suggestion than a recipe (as you can adapt it entirely to suit you), but this combination is always a hit with my family, with the bonus of looking like a traditional pudding once complete.

thumb_img_2796_1024

 Ingredients (serves 10)
2 litres good quality chocolate ice-cream
⅔ packet mini marshmallows
½  packet Maltesers
½ a packet lolly raspberries, chopped
2 large Mars Bars, chopped
50g white chocolate, melted (to decorate)
1 lolly raspberry (to decorate)
2 spearmint leaves (to decorate)

thumb_img_2797_1024

Method
Soften ice-cream at room temperature until it is a workable consistency. Meanwhile, line a  large, deep glass bowl with clingfilm. Spray the clingfilm with cooking oil.

Once ice-cream is softened, transfer half to a large bowl. Add in half of your lollies and mix until evenly distributed. Repeat with the remaining ice-cream in its container. Transfer all ice-cream into your prepared bowl. Smooth the “top” with a spatula. Freeze until set.

To turn the pudding out, sit the bottom of the bowl in a sink filled with a few centimetres of warm water, and run a knife around the edge of the bowl as required. Once it is loosened (you may need to repeat a few times), it should slide out easily onto your desired serving plate. Peel off the clingfilm.

To decorate, spoon melted white chocolate on top to look like custard and top with the raspberry lolly and spearmint leaves.  Enjoy!

thumb_img_2794_1024


Festive Chocolate Ginger Nut Cookies

These cheat’s festive cookies are cheap and easy, but look a million bucks! Choose your favourite decoration option, or make some of each.

Option 1: Mini Christmas Puddings
1 packet Arnott’s Ginger Nut Biscuits
100g dark chocolate, melted
20g white chocolate, melted
Original M&Ms (red & green)
Mini M&Ms (red)

Spread the melted dark chocolate onto your biscuits and let harden. Using a butter knife, spread the melted white chocolate onto the top of your cookies to look like custard. Top with M&Ms.

thumb_img_2745_1024

Option 2: Glitzy Gold
1 packet Arnott’s Ginger Nut Biscuits
100g dark chocolate, melted
Gold cachous
Gold sugar crystals

Spread the melted dark chocolate onto your biscuits and top with gold cachous and sugar crystals.thumb_img_2750_1024

Option 3: Strawberry, Pistachio & Almond
1 packet Arnott’s Ginger Nut Biscuits
100g dark chocolate, melted
Slivered almonds
1 tablespoon pistachios, finely chopped
Dried strawberries, finely chopped

Spread the melted dark chocolate onto your biscuits and top with dried strawberries, almonds and pistachios.
thumb_img_2751_1024

Recipe adapted from Better Homes & Gardens Magazine, Christmas 2015

Stained Glass Christmas Cookies

These gorgeous stained glass cookies are as fun to make as they are to eat! You can use any shaped cutters you like and could even join the cookies together to make a stained glass cookie wreath.

thumb_img_2709_1024

Ingredients (makes approximately 50 cookies)
½ cup butter
½ cup sugar
1 teaspoons vanilla
1 teaspoon mixed spice
1 small egg
½ teaspoon water
1 ½ cups flour
¾ teaspoons baking powder

Hard/boiled lollies (I used Melbourne Rock Candy Bo Peep collection)
White chocolate, melted

thumb_img_2714_1024

Method
Cream butter, sugar & vanilla using electric beaters until well combined. Add the egg and water and beat until light and fluffy.

Using a wooden spoon or silicone spatula, mix sifted dry ingredients into wet ingredients until a dough forms. Divide into 2 roughly equal pieces, cover with glad wrap (or plastic wrap) and refrigerate for an hour.

Line 3 large trays with baking paper.

Roll out dough using a rolling pin until it is approximately 1cm thick. Use assorted cutters to cut out shapes from the dough, and carefully place them on the lined trays (no need to leave room for spreading as they don’t). Then line up the smaller cutter of the shape in the centre of each, and cut out the centre dough.

Preheat oven to 190-200°C  (180°C fan-forced).

Divide the hard lollies into colours and blitz them, one colour at a time, in a blender until they are fine crystals. Using a teaspoon, carefully sprinkle the crystals into the empty centres of the cookies ensuring that the centre is fully covered. Brush away any crystals not in the centre as these will discolour the cookies.

Bake cookies for 8-12 minutes, until lightly golden. Leave to cool on the baking trays for 5 minutes, before gently transferring onto a wire rack to cool completely.

Once they are cool, decorate by piping melted white chocolate onto the cookies.

Enjoy!

thumb_img_2712_1024

Sugar cookie recipe adapted from ‘Alice & Lois.com’ – ‘The Best Valentine Sugar Cookies’
Design idea from Pinterest

Christmas Wreath Cupcakes

thumb_img_2654_1024

Ingredients (makes 24)
24 cupcakes of your desired flavour (red velvetflourless chocolate or Christmas spice work well)
250g butter, softened
3 cups icing sugar
4 tablespoons milk
Optional: Peppermint essence
Green food colouring
Red mini M&Ms

thumb_img_2651_1024

Method
Beat butter in a medium bowl with electric mixer until light and fluffy. Beat in icing sugar, milk, and, if desired, 1-2 drops of peppermint essence.

Spread thin layer of the frosting over each cupcake.

Colour remaining icing with 1-2 drops of green food colouring. Spoon into a piping bag with a star attachment and pipe icing in a ring around the edge of the cupcakes to make a wreath. Top with red M&Ms. Enjoy!

thumb_img_2658_1024

Elsa’s Snowflake Cookies

These beautiful snowflake cookies look like something Elsa from Frozen would make, and are a fantastic way to get your kids involved in the kitchen. These are perfect for Christmas or for a Frozen themed Birthday party.

thumb_img_2705_1024

Ingredients (makes around 40 cookies)
Equipment:
1 large snowflake cookie cutter
1 small snowflake cookie cutter

For the cookies:

½ cup butter
½ cup sugar
1 teaspoons vanilla
1 teaspoon mixed spice
1 small egg
½ teaspoon water
1 ½ cups flour
¾ teaspoons baking powder

To decorate:
Blue hard lollies (we used Melbourne Rock Candy Bo Peep collection)
White chocolate, melted

thumb_img_2699_1024

Method
Cream butter, sugar & vanilla using electric beaters until well combined. Add the egg and water and beat until light and fluffy.

Using a wooden spoon or silicone spatula, mix sifted dry ingredients into wet ingredients until a dough forms. Divide into 2 roughly equal pieces, cover with glad wrap (or plastic wrap) and refrigerate for an hour.

Line 3 large trays with baking paper.

Roll out dough using a rolling pin until it is approximately 1cm thick. Use the large snowflake cutter to cut out snowflakes from the dough, and carefully place on the lined trays (no need to leave room for spreading as they don’t). Then line up the smaller cutter in the centre of the large snowflake to cut out the dough – you can either bake these little snowflakes as cookies or put them back into the dough to cut out more large snowflakes.

Preheat oven to 190-200°C  (180°C fan-forced).

Blitz blue hard candy in a blender until they are fine crystals. Using a teaspoon, carefully sprinkle the crystals into the empty centres of the cookies ensuring that the centre is fully covered. Brush away any crystals not in the centre as these will discolour the cookies.

Bake cookies for 8-12 minutes, until lightly golden. Leave to cool on the baking trays for 5 minutes, before gently transferring onto a wire rack to cool completely.

Once the cookies are cool, decorate by piping melted white chocolate onto the cookies.

Enjoy!

thumb_img_2703_1024

thumb_img_2689_1024

Sugar cookie recipe adapted from ‘Alice & Lois.com’ – ‘The Best Valentine Sugar Cookies’

Design idea from Pinterest.

Christmas Light Cupcakes

These adorable cupcakes are very easy to decorate but look great! Just pipe white buttercream in a swirl on your favourite flavoured cupcakes, pipe a dark chocolate swirl as the wire and attach mini M&Ms.

thumb_img_2679_1024

Ingredients
24 cupcakes of your desired flavour (red velvet, flourless chocolate or Christmas spice would work well)
250g butter, softened
3 cups icing sugar
4 tablespoons milk
Optional: 1-2 drops peppermint essence
Dark chocolate melts
1 pack mini M&Ms

thumb_img_2669_1024

Method
Beat butter in a medium bowl with electric mixer until light and fluffy. Beat in icing sugar and milk and, if desired, 1-2 drops of peppermint essence.

Using a piping bag with a wide circular nozzle, pipe frosting in a circular motion on each cupcake, starting from the outside and working your way into the middle, gradually building it up to a peak in the centre. Repeat with remaining cakes.

Melt the dark chocolate and spoon into a zip-lock bag. Cut just the very corner of the bag and pipe a thin line of the chocolate on each cupcake in a swirl to make the ‘lighting wire’. Place M&Ms vertically along the dark chocolate lines ‘to make the lights’. Enjoy!

thumb_img_2664_1024

Design adapted from Pinterest.

Santa Cupcakes

It’s beginning to look a lot like Christmas…

thumb_img_2594_1024

…so what better way to celebrate the start of the festive season than with these gorgeous Santa cupcakes? The cakes taste like a cross between chocolate and gingerbread and look like they take a lot of time and skill, but are really very easy – perfect to take to a Christmas function or to share with your family and friends.

thumb_img_2647_1024

Ingredients (makes 12)
Christmas Spice Cupcakes
150g plain flour
1 teaspoon baking powder
½ teaspoon bicarb soda
1 teaspoon ground mixed spice
100g butter, softened
160g brown sugar
2 large eggs
3 tablespoons sour cream
125ml boiling water
75g dark chocolate
1 teaspoon instant coffee

Decorations
Raspberry jam
Red fondant icing
Black fondant icing
Yellow fondant icing

thumb_img_2633_1024

Method

Preheat the oven to 180ºC fan-forced. Line a 12-hole muffin pan with patty pans.

In a large bowl, combine flour, baking powder, bicarb and mixed spice. In another bowl, cream the butter and sugar with an electric mixer. Add the eggs one at a time, mixing well after each, and then beat in a third of the flour mixture followed by a tablespoon of the sour cream, repeating until all used.

Put the water, chocolate and instant coffee in a pan and heat gently until the chocolate melts. Fold this into the cake batter, being careful not to over beat.

Pour the batter into the patty pans and put in the oven for about 20-25 minutes, until each cake is cooked through but still dense and damp.

While the cakes are cooking, cut 12 circles out of red fondant approximately the size of the cupcakes (I used the rim of a glass as my cutter). To make Santa’s belt, cut rectangles out of the black fondant with a sharp knife, ensuring each is long enough to span the width of the middle of the circles. To make the belt buckle, cut a small rectangle out of yellow fondant, then cut a smaller rectangle out from within it leaving the belt frame. If desired, cut a small piece of fondant to make the belt “prong”.

Let cakes cool in the tin for 5 minutes, then place on a wire rack until completely cold.

Heat the jam in the microwave (mix with water if still thick) and use it as glue to stick the fondant circles to the tops of the cakes. Again using the jam as glue (sparingly), stick down the belts and buckles to the centre of the circles. Enjoy!

thumb_img_2641_1024

Cake recipe from Nigella’s ‘How to Be a Domestic Goddess’ cookbook. Design idea from Pinterest.