Giant Cookie Cake

UNADJUSTEDNONRAW_thumb_61

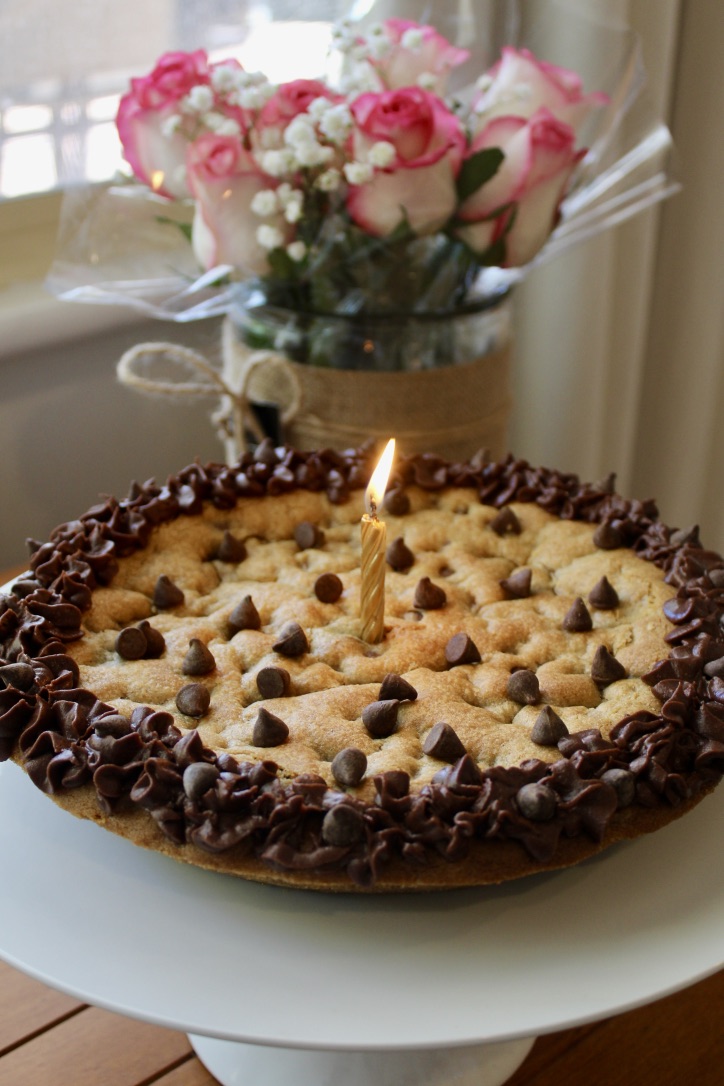
For my birthday this year, I decided to bake something a little different. As much as I have enjoyed making (and eating!) my layered drip cakes (here and here) over the last couple of years, this year I was after something simpler. Enter the cookie cake.

I have admired the brightly coloured array of delicious looking cookie cakes on Sally’s Baking Addiction (my baking porn website of choice) for years, and finally got around to making it. Boy, am I glad I did! As promised, this ‘cake’ is so quick and simple to make and produces a deliciously chewy and flavoursome giant cookie. The recipe is also very easy to adapt – you could use M&Ms, or mix up the choc chips depending on your taste.

VrWBmyKVSmSUCikS6jWSCA_thumb_58

Ingredients (serves 12-14)
170g softened butter
1 cup brown sugar
1 egg + an extra yolk
5 teaspoons vanilla extract
2 cups flour
2 teaspoons cornflour
1 teaspoon baking powder
1½ cups chocolate chips (I used dark chocolate)
Chocolate frosting for topping (optional)

xDp+PpGzQWSllld1vEVb%A_thumb_4b

Method
Preheat your oven to 180°C. Spray a 23cm (9-inch) pie dish or cake pan thoroughly with nonstick spray.

In a large bowl, beat the butter for 1-2 minutes until light and creamy. Add the brown sugar and beat for about a minute or until combined. Mix in the egg, egg yolk and vanilla on until combined, scraping down the sides of the bowl as required.

In a separate bowl, combine the flours and baking powder. On a low speed, gradually mix into the wet ingredients until combined. Add in 1¼ cups chocolate chips and mix for until evenly dispersed.

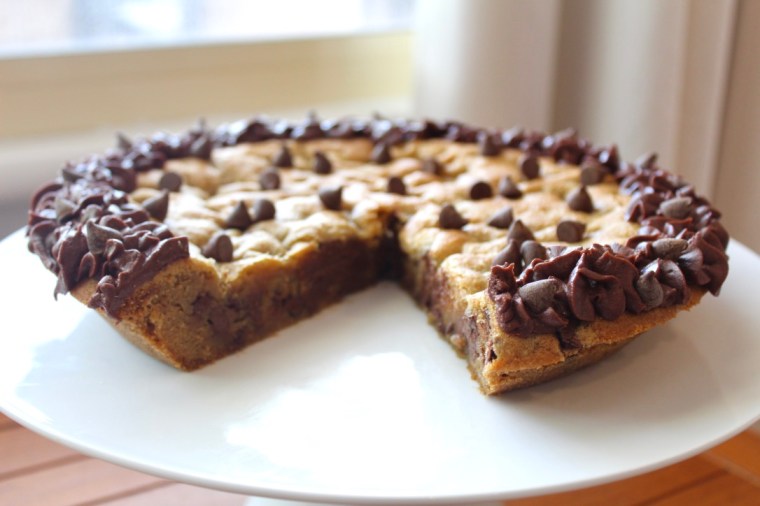
Gently press the cookie dough evenly into the prepared pan. Bake for 20-25 minutes or until the cake is lightly golden brown (use a skewer in the centre to check it’s cooked). Remove from the oven and set the pan on a wire rack to cool completely.

Once cooled, use a sharp knife or metal spatula to loosen the sides of the cookie cake from the pan and transfer to a cake stand or serving plate.

Decorate as desired (I made a quick chocolate buttercream using butter, icing sugar and cocoa powder and piped it on using my Wilton 1M tip), top with the remaining chocolate chips and serve with vanilla ice-cream. Enjoy!

zdB0RHF5TnWwFbnTlc6i8g_thumb_62

Recipe adapted from ‘Chocolate Chip Cookie Cake’ on Sally’s Baking Addiction.

kYGL4+ihStuSNZuhr1g5ug_thumb_4f

Lemon & Raspberry Muffins

I love Nigella recipes because they’re consistently quick, easy and delicious. These muffins are no exception, taking under 40 minutes from start to finish. The recipe is also incredibly flexible – you can use fresh or frozen raspberries (or any other fruit for that matter) or try switching the lemon for another citrus fruit of your choice. Happy baking!

foH3RgnFTnyCm4Cdk2cbTw_thumb_13

Ingredients (makes 12)
60g butter
200g plain flour
2 teaspoon baking powder
½ teaspoon bicarb soda
150g caster sugar
Juice and zest of 1 lemon
Milk (approx. 120ml)
1 large egg
150g raspberries

%etvstgDQp6kJpBNRrG4xQ_thumb_1e

Method

Preheat the oven to 200ºC. Line a muffin tin with 12 patty pans.

Melt the butter in a medium bowl and set aside to cool.

In a large bowl, combine the flour, baking powder, bicarb, sugar and lemon zest.

Pour the lemon juice into a large measuring jug and add milk until it comes to 200ml (don’t worry about it curdling). Add the milk mixture to the melted butter and then beat in the egg.

Combine the wet ingredients with the dry ingredients until just combined (don’t overmix it as your muffins will be tough). Gently stir through the raspberries.

Spoon the batter into the patty pans and bake for 25 minutes or until the muffins spring back when touched. Enjoy!

DlKUx8pYSWioOJWcjgI8ag_thumb_10

Recipe adapted from Nigella’s ‘Lemon-Raspberry Muffins’ in How to Be a Domestic Goddess.

Spiced Pumpkin Whoopie Pies

Autumn is here (at long last) and the trees are looking stunning! Even though I live in the Southern Hemisphere and pumpkin flavouring isn’t as prevalent as in the US, when I found myself free on a grey Autumn afternoon I felt the need to make something using pumpkin, cream cheese frosting and my favourite spices.

My Mum, sister and I visited the Hummingbird Bakery while we were in Notting Hill in London and tried one of their whoopie pies. While everything we tried from the bakery was delicious, the whoopie pie was our favourite and so I felt the need to replicate it at home. Luckily for me, the recipe was easily available online (and also in their cookbook Cake Days) and with a bit of tweaking to add in extra spices, it really hit the spot.

hbE6H2iHQq+38Y06nt+g7w_thumb_3

Ingredients (makes 15 whoopie pies)
120ml vegetable oil
180g brown sugar
1 teaspoon vanilla extract
1 egg
100ml pumpkin purée
250g plain flour
½ teaspoon baking powder
½ teaspoon bicarbonate of soda
2 teaspoons ground cinnamon
1 teaspoon mixed spice
½ teaspoon ground ginger

85g butter, softened
150g icing sugar
80g cream cheese
1 teaspoon vanilla extract
2 teaspoons cinnamon
1 teaspoon mixed spice
A splash of milk (as required)

h0tVzICfRome4PjCCxkv4Q_thumb_e

Method
Preheat the oven to 170ºC (approx. 150ºC fan-forced) and line two large trays with baking paper.

Using an electric mixer, combine the oil, sugar and vanilla until combined and light in colour. Add the egg and pumpkin purée and mix until all ingredients are incorporated. Sift together the remaining ingredients and add to the liquid mixture in two batches, beating until just combined.

Spoon 30 teaspoons full of the batter on to the prepared trays, leaving a 3cm gap between each. Bake for 10-15 minutes or until they are golden and bounce back when touched. Allow to cool completely before filling.

To make the cream cheese filling, use an electric beater to mix together the butter and the icing sugar on a low speed until smooth. Add the cream cheese, vanilla and spices and continue mixing on a low speed until just combined. Add milk or extra icing sugar as required.

To assemble the whoopie pies, take a sponge, spread approximately 1 tablespoon of filling onto its flat side and then sandwich with another sponge flat-side-down. Enjoy!

zqdAnK2vQTGowZ0wpxdipQ_thumb_4

Recipe adapted from Cake Days by the Hummingbird Bakery

Grandma’s Scones

Does anything beat scones with jam and cream and tea in the sunshine? (Answer: no).

Scones are very simple to make but tend to be saved for ‘fancy’ occasions like high-tea in my house. Well, no more. I vow to make more of these versatile beauties because, regardless of occasion, there’s something supremely satisfying about a eating a fluffy scone smothered in jam (ideally homemade) and a dollop of whipped cream.

Oh and obviously it’s pronounced scone, rhyming with “John” not “Joan”.

fullsizeoutput_17b3.jpeg

Ingredients (makes 18)
2 cups self-raising flour (+ extra for dusting)
2 tablespoons butter, melted
1½ tablespoons caster sugar
1 cup milk
1 tablespoon lemon juice
2 eggs

Method
Preheat oven to 230-240°C (210-220°C fan-forced).

Beat eggs together in a small bowl.  Add lemon juice to milk in order to sour it (don’t worry if it gets a bit lumpy).

Sift flour into a large bowl, add sugar and then gently mix in eggs, soured milk and butter until just combined.

Turn dough out onto a lightly floured surface and knead gently until it just comes together. Gently form into a disc 3-4cm thick. Use a 5cm-diameter round cutter dipped in flour to cut out scones (re-flouring between each scone). Arrange scones on a large oven tray lighted dusted with flour.

Bake scones for 10-12 minutes or until golden brown. Turn scones out onto a clean tea towel and cover with another tea towel.

Serve scones warm or at room temperature with jam and sweetened whipped cream.

NB: best eaten fresh on the day they’re made as they dry out quickly.

fullsizeoutput_17b6.jpeg

Recipe adapted from Grandma, Margaret Payne, via Mum ♥

Luscious Lemon Curd 2.0

This lemon curd could not be easier to make. Honestly. It takes 5 minutes and uses a microwave (the horror!!)

I have tried many recipes for lemon curd in my time, and can honestly say that this is far and away the tastiest, easiest and most luscious. You will want to slather this stuff on EVERYTHING – pikelets, bread or between sponge cake layers, tartlets (like these mini lemon meringue pies), ice cream or on a spoon right out of the jar (not that I would ever do anything as undignified as that). It is liquid gold.

IMG_4418

Ingredients (makes approx. 2½ cups)
1 cup white sugar
3 eggs
1 cup fresh lemon juice (approx. 4-5 lemons)
Zest of 2 lemons
½ cup (115g) butter, melted

Method
Whisk together the sugar and eggs in a large microwave safe bowl until thoroughly combined. Whisk in lemon juice, zest and melted butter.

Cook in the microwave on full power for 50 second intervals, whisking after each interval. You will know your lemon curd is ready when it coats the back of a metal spoon (approximately 3-5 50 second intervals).

Pour into a sterile jar or container and allow to cool to room temperature before covering it with a lid and storing it in the refrigerator.

Keeps for ~2 weeks.

0A9F68F9-83F6-4EB8-833A-0E432081B237_1_105_c

Adapted from My Baking Addiction microwave lemon curd.

Mini Lemon Meringue Pies

These adorable mini lemon meringue pies make entertaining simple. I use bought miniature pastry cases, filled them with the simplest ever homemade lemon curd and topped them with a dollop of meringue – delicious! The best part is, the recipe makes more lemon curd than is required for the pies so you will have plenty to use in cakes, on scones, to give as a gift, or to eat with a spoon (no shame!)

Note: for best results, make the lemon curd the day ahead

fullsizeoutput_178f.jpeg

Ingredients (makes 32 mini pies)
For the lemon curd
1 cup white sugar
3 eggs
1 cup fresh lemon juice (approx. 4-5 lemons)
zest of 2 lemons
½ cup butter, melted

30 x 5cm tart shells (I use the Baylies Epicurean Delights brand)
2 egg whites
½ cup caster sugar

fullsizeoutput_1791.jpeg

To make the curd,whisk together the sugar and eggs in a large microwave safe bowl until thoroughly combined. Whisk in lemon juice, zest and melted butter.

Cook in the microwave on full power for 50 second intervals, whisking after each interval. You will know your lemon curd is ready when it coats the back of a metal spoon (approximately 3-5 50 second intervals).

Pour into a sterile jar or container and allow to cool to room temperature before covering it with a lid and storing it in the refrigerator.

To assemble the pies, preheat oven 200°C (180°C fan-forced).

Place egg whites in a large bowl and beat with an electric mixer until soft peaks form. Gradually add the sugar, beating until it dissolved between additions. Spoon meringue into a piping bag with a large star tip nozzle.

Place pastry cases onto a baking tray and carefully fill each with lemon curd. Pipe stars of meringue onto each pie.

Bake in the oven for 8-10 minutes or until the meringue is lightly browned.

fullsizeoutput_1786

Lemon curd recipe adapted from My Baking Addiction and meringue recipe from 9 Honey Kitchen.


Melting Moments

Happy Birthday to me! Bakerholics Anonymous is 5 years old today 🙂 In celebration of the anniversary I am posting one of my favourite biscuit recipes: melting moments. This version has a tangy passionfruit buttercream which helps cut through the deliciously buttery biscuit – yum!

FAoqfeQtRU+VbIGjjJqzRQ_thumb_288f

Ingredients (makes 25)
250g butter, softened
1 teaspoon vanilla extract
½ cup icing sugar
1½ cups plain flour
½ cup cornflour
Passionfruit Buttercream
90g butter, softened
¾ cup icing sugar
½ teaspoon vanilla extract
Pulp of 3 passionfruit

2tqVk0jtRRS0c0tJG5R5Gw_thumb_2894

Method
Line oven trays with baking paper.

Beat butter, extract and sifted icing sugar in a large bowl with an electric mixer until light and fluffy. Gently stir in sifted flour in two batches.

Preheat the oven to 160ºC.

Roll teaspoons of mixture into balls and place ~2.5cm apart on the trays. Flatten slightly with a fork.

Bake biscuits for 15 minutes or until lightly golden on the bottom. Stand 5 minutes before transferring to a wire rack to cool.

Make butter cream by beating butter, icing sugar and vanilla with an electric mixer until pale and fluffy. Stir through passionfruit pulp. If the icing is too runny, add more icing sugar.

Sandwich biscuits with butter cream. Dust with extra icing sugar and enjoy.

Note: if you do not have passionfruit, add more vanilla extract to make a vanilla buttercream or add 1 teaspoon each of lemon juice and finely grated lemon rind to make lemon buttercream.

2RSvqNl6Q86HPmh3srKpGA_thumb_2891

Recipe from Grandma, adapted from the Australian Women’s Weekly

Spinach, Leek & Feta Tart

This savoury tart is a delicious and easy way to eat your greens. I always associate it with spring picnics (which it is perfect for!) but it is also a great midweek meal or work/school lunch.

hPXpS5rUTVS%Ya0NrNq0IA_thumb_1ba6

Ingredients (Serves 4-6)
200g Greek feta, crumbled
1 leek
20g butter
160g baby spinach leaves
½ cup sour cream
½ cup thickened cream
3 eggs, lightly beaten
2 tablespoons shredded basil leaves
2 sheets frozen puff pastry, thawed

eFkSKhIjQrWiHxRw2gSSjg_thumb_1ba9

Method
Preheat oven to 200ºC. Cut the leek in half and thinly slice the white and pale green part to achieve 1 cup full.

Melt the butter in a saucepan and lightly sauté the leek over a medium heat for 4 minutes. Transfer to a bowl and set aside.

Add spinach to the saucepan, cover and cook until wilted. Take off the heat and then press leaves into a strainer to remove excess moisture.

In a bowl, combine sour cream, cream and eggs. Add the feta, leek, spinach and basil. Stir will and season to taste.

Line a non-stick rectangular quiche pan (35cm x 13cm) with the two pieces of pastry, overlapping slightly, and gently push the pieces together in the middle to seal the pastry case. Trim excess pastry. Lightly prick the pastry base with a fork and place the quiche pan onto an oven tray.

Bake the pastry case for 5-10mins until it has started to colour and puff.

Pour in prepared filling and bake for 30-35mins until firm and golden in the centre.

Remove from baking tray and allow to cool slightly before serving. Enjoy!

0fs7PRL6RoiuX5S%TaJ9Bw_thumb_1bad

Adapted from Baker’s Secret

Chocolate & Mint Drip Cake

I made this cake for a combined Birthday/Bon Voyage dinner last weekend. I love the combination of chocolate and mint and am always keen to try out large layer cakes when cooking for a crowd.

Keep pieces small to ensure it’s not overly rich – maybe try out this technique from the genius Katherine Sabbath!

uyXWQVeBSyGoNWAE7osPcQ_thumb_e36

Ingredients (serves 16-18)
Chocolate Layer Cake
2 boxes Betty Crocker moist devil’s food cake

Mint Buttercream Frosting
200g butter, softened
½ cup milk
½ teaspoon vanilla extract
8 cups icing sugar
2-3 drops peppermint oil (or to taste)
a few drops of green food colouring

Dark Chocolate Ganache
170g dark chocolate melts
¾ cup cream
1 ½ teaspoons corn syrup

Toppings
2 x Flake bars
3 x Peppermint Crisp bars
3 x double Aero bars
1 x packet Darrell Lea BB’s chocolate mint balls
1 x packet dark Maltesers

y0FihIuCSCaDgQastXb44w_thumb_e33

Method
Make 4 cakes, according to packet instructions, by halving the batter from each cake mix and baking in 20cm cake tins. Carefully trim cooked cakes where necessary to ensure they are perfectly flat, and use the best 3 (freeze the 4th for another time).

To make the frosting, cream the butter for 1-2 minutes. Add the milk, vanilla extract and half of the icing sugar and beat for at least 3 minutes or until the mixture is light and fluffy. Add the remaining icing sugar along with the peppermint oil and food colouring and beat for a further 3 minutes or until light and fluffy.

Attach your base cake to a cake board or serving tray by using a small amount of frosting as glue. Spread a layer of frosting onto the top of the cake and then top with the next cake layer. Repeat.

IMG_7703

Spread frosting onto the top and sides of the cake – don’t worry if you get crumbs in it, this is called the crumb coat. Using a spatula or protractor (as I did!), scrape off excess frosting so you have a thin smooth layer. Refrigerate cake for 30 minutes or until frosting is firm.

Add a second layer of frosting onto the top and sides of cake, again scraping off the excess and creating a smooth finish.

Place chocolate melts into medium bowl and set aside. Heat cream in a saucepan over medium-high heat just until it almost starts to simmer. Remove from heat and pour over chocolate. Let sit for about 5 minutes and then stir with a wooden spoon until chocolate is completely melted and smooth. Stir in corn syrup. Allow to cool until slightly thickened.

Use a spoon to add a few purposeful drips over the top edge of the cake. Then spoon more ganache on top of the cake, allowing it to drip at varying points around the cake.

Top cake with Flake pieces, peppermint crisp shards, Aero pieces, Maltesers and bb’s. Alternate Maltesers and bb’s and make a ring around the base of the cake.

Serve by cutting into small pieces. Enjoy!

lWCv5RJDQfOWT5oQnp51Fw_thumb_e4c

Yg8SqPqtQg6TkS%yAuiGHw_thumb_e37

SaveSaveSaveSaveSaveSaveSaveSave

Pavlova Wreath

WxtVq30NTRKQBIe97L7k%Q_thumb_d52

I made this pavlova wreath for a friend’s Christmas in July themed Birthday lunch. It’s a great, light way to finish a meal (perfect after a rich Christmas feast!) and looks festive without being kitsch. It’s great for Christmas Day as you can make and decorate it well ahead of time, giving you more time to focus on the main course and mingle with guests.

Uut8X+CPQ4qhE1T2VL9HsQ_thumb_d63

Ingredients (serves 10-12)
6 large free-range egg whites
350g caster sugar
1 teaspoon white vinegar
1 teaspoon cornflour

For the topping
600ml cream
2 teaspoons vanilla essence
½ – 1 tablespoon icing sugar (to taste)
2 punnets of strawberries
⅔ punnet of raspberries
½ punnet of blueberries
½ punnet blackberries
Mint leaves (optional)

upDTuTgac+qipn%VAyQ_thumb_d50

Method
Preheat oven to 160°C (140°C fan-forced). Line a large baking tray (or round pizza tray as I used) with baking paper and draw a 30cm circle in the centre.

Whisk egg whites with an electric mixer in a large, clean bowl until soft peaks form. Gradually add the sugar a little at a time, whisking on maximum speed until stiff and glossy. Once all of the sugar has been added, continue mixing for 10 minutes or until all of the sugar has been dissolved (test this by rubbing the meringue mixture between your fingertips and ensuring it is smooth). Mix the vinegar and cornflour in a cup and stir it into the egg whites.

Spoon dollops of meringue mixture onto the prepared circle on the baking paper as below:5xNnVspLSUuZc9DoPgiObg_thumb_d68

Transfer to the oven and immediately reduce the temperature to 140°C (120°C fan-forced). Bake the pavlova for 1 hour–1 ¼ hours, until the outside is hard but still white. Turn the oven off, prop the oven door open with a matchbox and leave the pavlova inside for an hour to cool and dry.

To assemble, whip the cream, vanilla and icing sugar until thickened. Gently spread over the top of the wreath and top with fruit and mint leaves. Enjoy!

ltCc+nBNQa+jJHl+g6tvIg_thumb_d4b

Recipe adapted from Mary Berry’s Christmas Pavlova recipe on BBC Food.

SaveSaveSaveSave