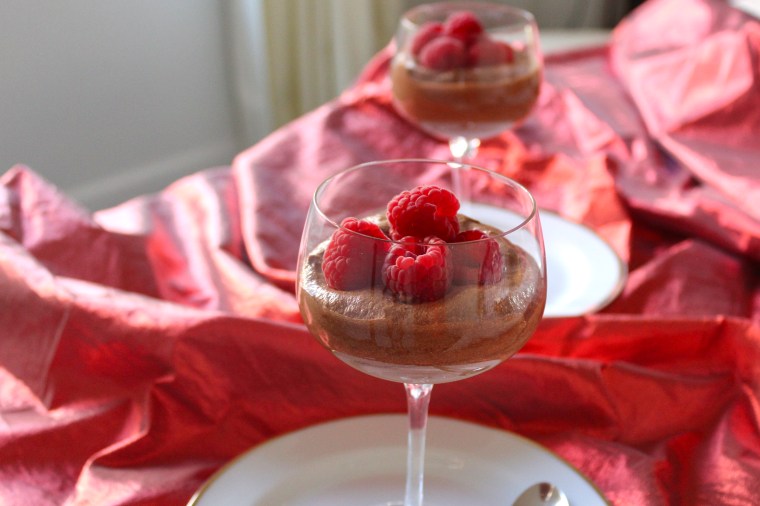
This is one of my favourite desserts because it takes so little effort and you can make it well ahead of time – the perfect set and forget dinner party dessert. I like a hint of Bailey’s Irish Cream in my mousse, but this can be omitted if you’re serving it to children or swapped for any other liqueur of your choice – creme de menthe for a choc-mint or Cointreau for a choc-orange mousse would both work well.
Ingredients (serves 8) 300g good quality dark chocolate
50g butter
3 eggs, separated
1-2 tblspns Bailey’s Irish Cream (optional)
¼ cup caster sugar
300ml thickened cream
Method Melt butter and chocolate in a small saucepan over a low heat until smooth. Remove from heat.
Stir in egg yolks, one a a time, and Bailey’s liqueur. Transfer to a large bowl and leave to cool.
Beat egg whites in a medium bowl until soft peaks form. Add sugar, one tablespoon at a time, beating until it dissolves between additions.
Beat cream until thoroughly whipped and thick. Gently combine with the chocolate mixture and then fold in the egg white mixture in two batches, taking care not to over-mix the mousse.
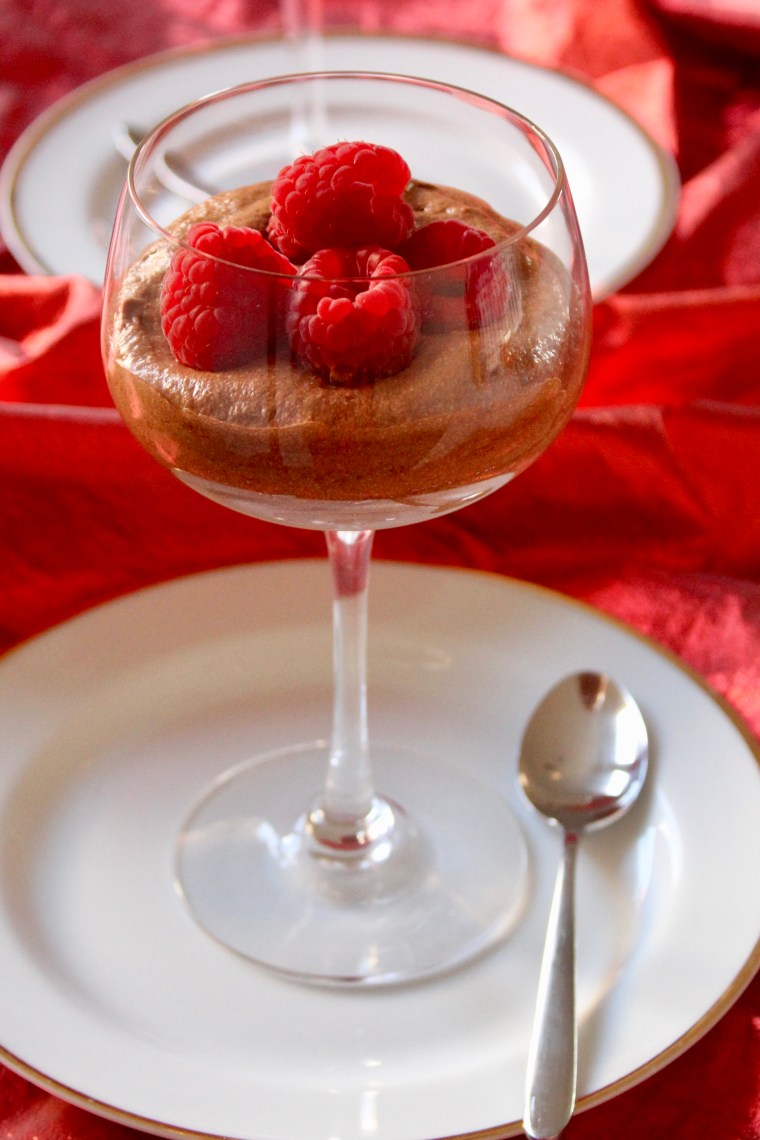
Divide mousse among eight ½-cup serving dishes (I use glasses). Cover with clingfilm and refrigerate until set (at least 2 hours).
Serve with fresh raspberries. Enjoy!
Recipe adapted from The Australian Women’s Weekly Best Food Desserts.
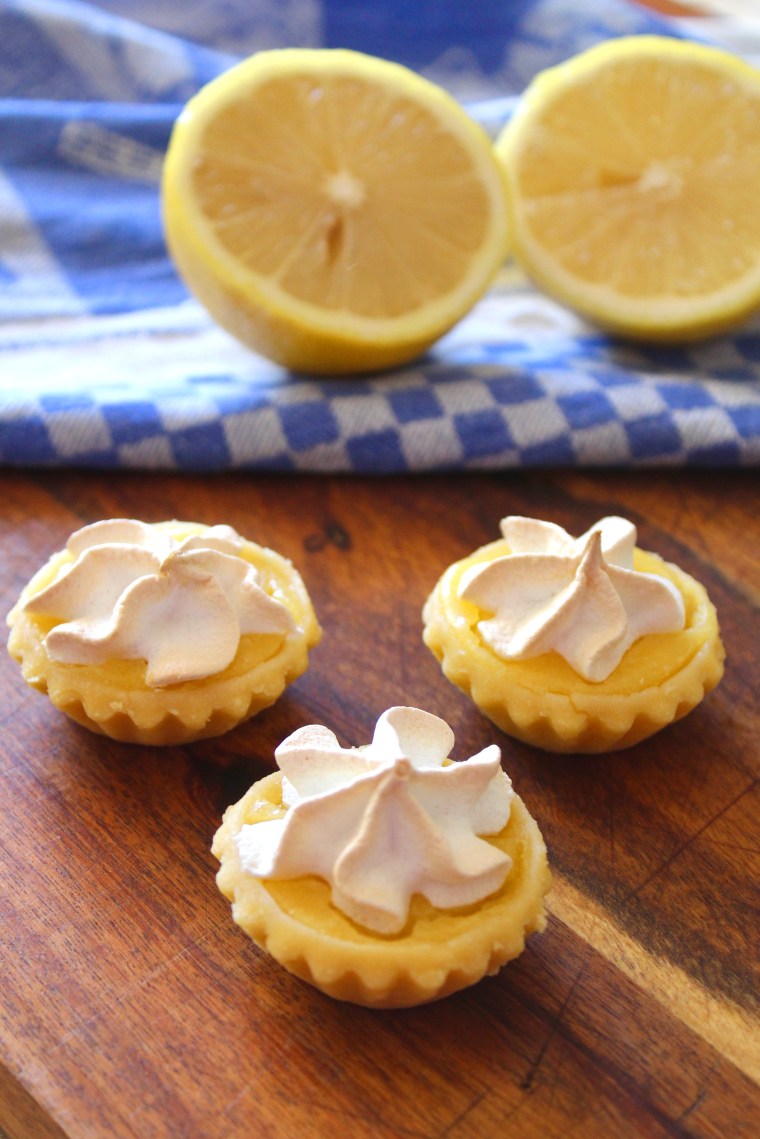
These adorable mini lemon meringue pies make entertaining simple. I use bought miniature pastry cases, filled them with the simplest ever homemade lemon curd and topped them with a dollop of meringue – delicious! The best part is, the recipe makes more lemon curd than is required for the pies so you will have plenty to use in cakes, on scones, to give as a gift, or to eat with a spoon (no shame!)
Note: for best results, make the lemon curd the day ahead
Ingredients (makes 32 mini pies) For the lemon curd 1 cup white sugar
3 eggs
1 cup fresh lemon juice (approx. 4-5 lemons)
zest of 2 lemons
½ cup butter, melted
30 x 5cm tart shells (I use the Baylies Epicurean Delights brand)
2 egg whites
½ cup caster sugar
To make the curd,whisk together the sugar and eggs in a large microwave safe bowl until thoroughly combined. Whisk in lemon juice, zest and melted butter.
Cook in the microwave on full power for 50 second intervals, whisking after each interval. You will know your lemon curd is ready when it coats the back of a metal spoon (approximately 3-5 50 second intervals).
Pour into a sterile jar or container and allow to cool to room temperature before covering it with a lid and storing it in the refrigerator.
To assemble the pies, preheat oven 200°C (180°C fan-forced).
Place egg whites in a large bowl and beat with an electric mixer until soft peaks form. Gradually add the sugar, beating until it dissolved between additions. Spoon meringue into a piping bag with a large star tip nozzle.
Place pastry cases onto a baking tray and carefully fill each with lemon curd. Pipe stars of meringue onto each pie.
Bake in the oven for 8-10 minutes or until the meringue is lightly browned.
Lemon curd recipe adapted from My Baking Addiction and meringue recipe from 9 Honey Kitchen.
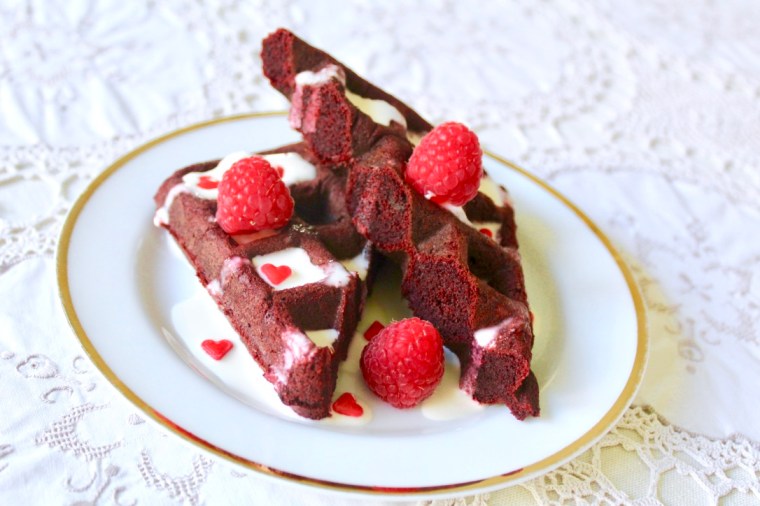
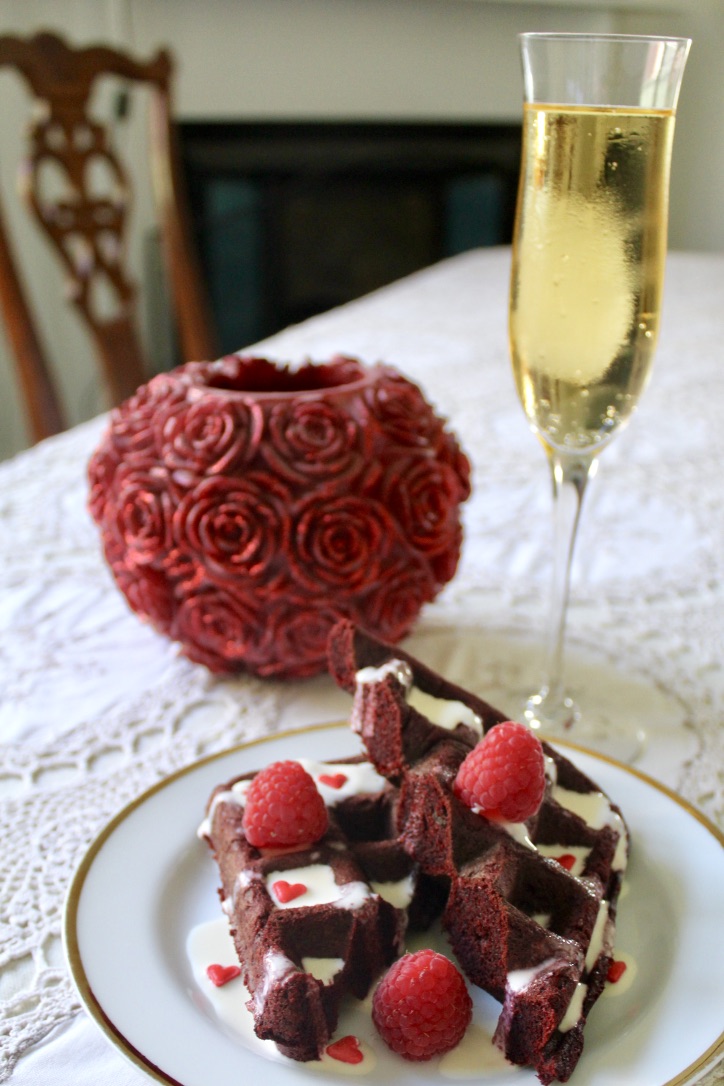
Valentine’s Day is right around the corner and that always gets me in the mood for all things red velvet. Over the years, I’ve posted several red velvet recipes; my favourites being red velvet crinkle cookies and red velvet cupcakes. Today, I present to you my red velvet waffles with a cream cheese glaze. These are extremely quick and easy to make as they use a boxed cake mix, although you could certainly make a cake batter from scratch if you prefer. These waffles are perfect to spoil a loved one (or yourself!) this Valentine’s Day.
Ingredients (makes 6 waffles)
1 x Betty Crocker Devil’s Food Cake mix (or equivalent)
1 tablespoon cocoa powder
2 teaspoons vanilla extract
2 tablespoons red food colouring (or until you are satisfied with the colour) Cream Cheese Glaze
115g cream cheese, softened
60g butter, softened
1½ cups icing sugar
1 teaspoon vanilla extract
½ cup milk To serve
Raspberries
Sugar hearts (optional)
Whip together the cream cheese and butter in a large bowl until smooth. Stir in the icing sugar, vanilla and milk and whisk until smooth. Set aside.
Make cake batter according to the instructions on the box (I use the vegetable oil and milk options). Add cocoa, vanilla and food colouring and whisk until smooth.
Heat your waffle iron according to the manufacturers’ instructions. Spray the waffle iron with cooking oil and then pour the waffle batter onto the iron so that the grid is covered. Cook (I use level 3-4) until the waffles are cooked through and crisp on the outside.
Repeat with the remaining waffle batter.
Serve waffles warm drizzled with the glaze and topped with berries and sugar hearts. Enjoy!
Inspiration from Pinterest, glaze recipe adapted from Kevin Is Cooking.
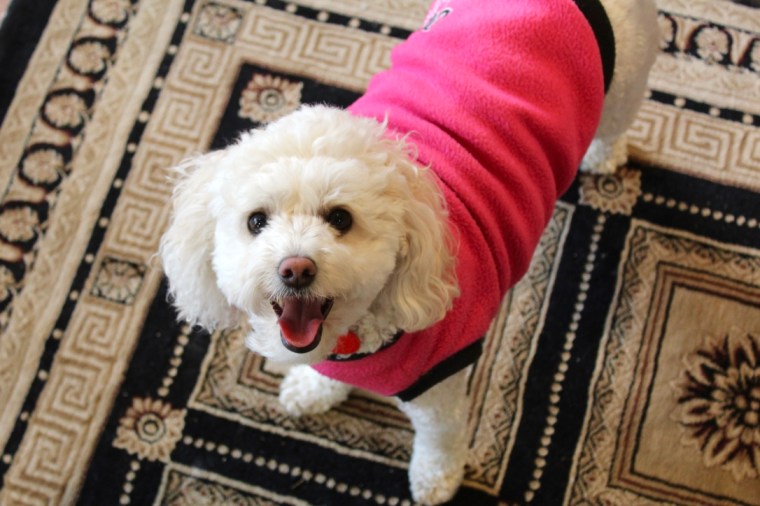
My family has a thing for Baileys. It’s our go-to after dessert liquor, holiday staple, and even the name of our dog!
Our adorable Bailey girl ♥
These waffles celebrate all things Baileys and are the perfect decadent Christmas morning breakfast (or any other breakfast, because every day is worth celebrating, right?!) They would also work well for dessert, perhaps served with chocolate sauce (#cleaneating).
Waffles (makes 8 large square waffles) 2 cups flour
4 teaspoons baking powder
2 eggs, separated
2 tablespoons white sugar
½ cup canola oil
1 cup milk
1 cup Baileys Irish Cream
Whipped Cream 1 cup thickened cream
¼ cup Baileys Irish Cream
1 teaspoon vanilla extract
2 tablespoons icing sugar
Sift the dry ingredients into a large bowl and make a well in the centre.
Whip the egg whites in a medium bowl with a handheld beater until stiff peaks form.
In a separate bowl, combine egg yolks, sugar, oil, milk and Baileys. Pour into the well in the centre of the dry ingredients and mix until there are no more lumps.
Gently fold in the whipped egg whites.
Heat your waffle iron to a medium-high heat and spray generously with cooking oil. Pour the mix into the waffle iron and cook until golden brown. Repeat with remaining mixture.
While the waffles are cooking, make the Baileys whipped cream by beating the cream, Baileys, vanilla and icing sugar with an electric mixer until very thick.
Serve waffles with whipped cream and berries. Enjoy!
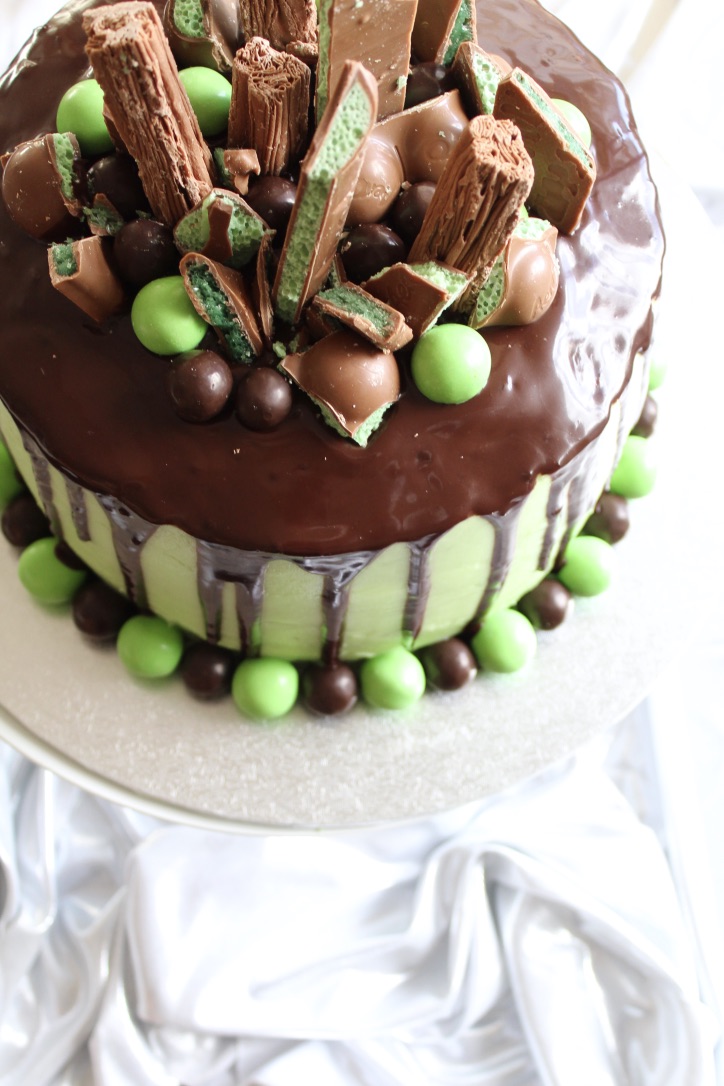
I made this cake for a combined Birthday/Bon Voyage dinner last weekend. I love the combination of chocolate and mint and am always keen to try out large layer cakes when cooking for a crowd.
Keep pieces small to ensure it’s not overly rich – maybe try out this technique from the genius Katherine Sabbath!
Mint Buttercream Frosting 200g butter, softened
½ cup milk
½ teaspoon vanilla extract
8 cups icing sugar
2-3 drops peppermint oil (or to taste)
a few drops of green food colouring
Dark Chocolate Ganache 170g dark chocolate melts
¾ cup cream
1 ½ teaspoons corn syrup
Toppings 2 x Flake bars
3 x Peppermint Crisp bars
3 x double Aero bars
1 x packet Darrell Lea BB’s chocolate mint balls
1 x packet dark Maltesers
Method Make 4 cakes, according to packet instructions, by halving the batter from each cake mix and baking in 20cm cake tins. Carefully trim cooked cakes where necessary to ensure they are perfectly flat, and use the best 3 (freeze the 4th for another time).
To make the frosting, cream the butter for 1-2 minutes. Add the milk, vanilla extract and half of the icing sugar and beat for at least 3 minutes or until the mixture is light and fluffy. Add the remaining icing sugar along with the peppermint oil and food colouring and beat for a further 3 minutes or until light and fluffy.
Attach your base cake to a cake board or serving tray by using a small amount of frosting as glue. Spread a layer of frosting onto the top of the cake and then top with the next cake layer. Repeat.
Spread frosting onto the top and sides of the cake – don’t worry if you get crumbs in it, this is called the crumb coat. Using a spatula or protractor (as I did!), scrape off excess frosting so you have a thin smooth layer. Refrigerate cake for 30 minutes or until frosting is firm.
Add a second layer of frosting onto the top and sides of cake, again scraping off the excess and creating a smooth finish.
Place chocolate melts into medium bowl and set aside. Heat cream in a saucepan over medium-high heat just until it almost starts to simmer. Remove from heat and pour over chocolate. Let sit for about 5 minutes and then stir with a wooden spoon until chocolate is completely melted and smooth. Stir in corn syrup. Allow to cool until slightly thickened.
Use a spoon to add a few purposeful drips over the top edge of the cake. Then spoon more ganache on top of the cake, allowing it to drip at varying points around the cake.
Top cake with Flake pieces, peppermint crisp shards, Aero pieces, Maltesers and bb’s. Alternate Maltesers and bb’s and make a ring around the base of the cake.
I made this pavlova wreath for a friend’s Christmas in July themed Birthday lunch. It’s a great, light way to finish a meal (perfect after a rich Christmas feast!) and looks festive without being kitsch. It’s great for Christmas Day as you can make and decorate it well ahead of time, giving you more time to focus on the main course and mingle with guests.
Ingredients (serves 10-12) 6 large free-range egg whites
350g caster sugar
1 teaspoon white vinegar
1 teaspoon cornflour
For the topping
600ml cream
2 teaspoons vanilla essence
½ – 1 tablespoon icing sugar (to taste)
2 punnets of strawberries
⅔ punnet of raspberries
½ punnet of blueberries
½ punnet blackberries
Mint leaves (optional)
Method Preheat oven to 160°C (140°C fan-forced). Line a large baking tray (or round pizza tray as I used) with baking paper and draw a 30cm circle in the centre.
Whisk egg whites with an electric mixer in a large, clean bowl until soft peaks form. Gradually add the sugar a little at a time, whisking on maximum speed until stiff and glossy. Once all of the sugar has been added, continue mixing for 10 minutes or until all of the sugar has been dissolved (test this by rubbing the meringue mixture between your fingertips and ensuring it is smooth). Mix the vinegar and cornflour in a cup and stir it into the egg whites.
Spoon dollops of meringue mixture onto the prepared circle on the baking paper as below:
Transfer to the oven and immediately reduce the temperature to 140°C (120°C fan-forced). Bake the pavlova for 1 hour–1 ¼ hours, until the outside is hard but still white. Turn the oven off, prop the oven door open with a matchbox and leave the pavlova inside for an hour to cool and dry.
To assemble, whip the cream, vanilla and icing sugar until thickened. Gently spread over the top of the wreath and top with fruit and mint leaves. Enjoy!
Recipe adapted from Mary Berry’s Christmas Pavlova recipe on BBC Food.
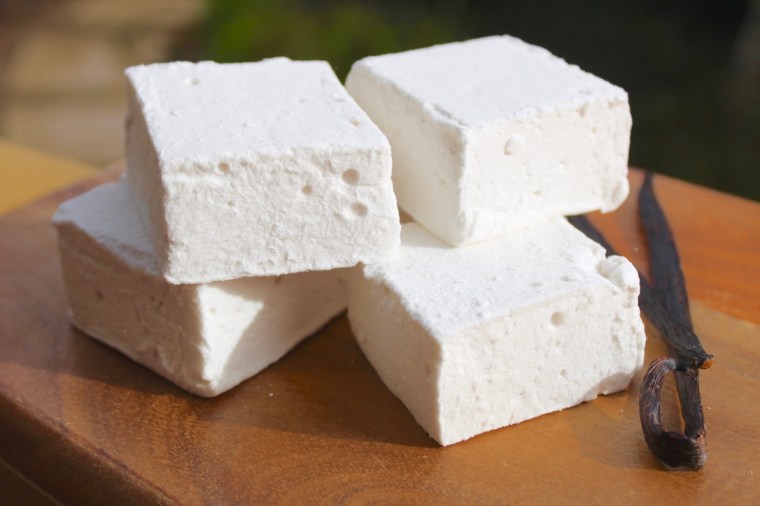
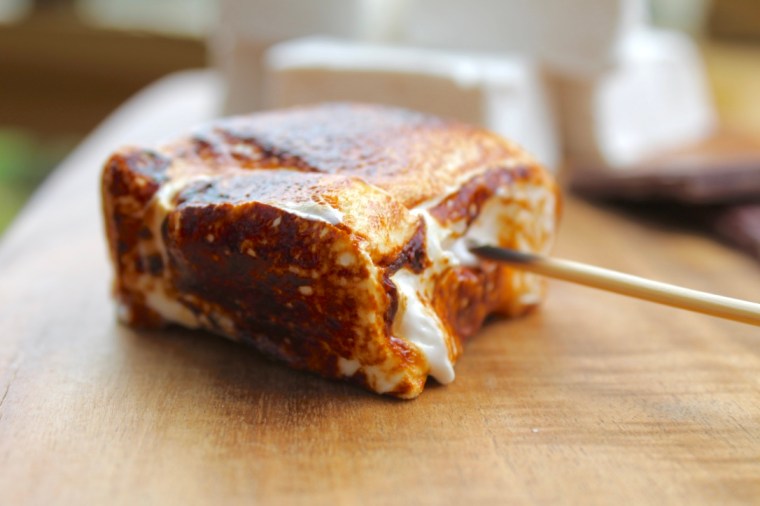
As the weather cools down, I am craving hot chocolates and crisp nights around the campfire, both of which are infinitely improved by the addition of marshmallows. Homemade marshmallows are on an entirely different level to store bought. Their texture is impossibly soft, light and dreamy with none of the powderyness that even the best quality store bought varieties have. These are perfect for eating as is, roasting over a fire, popping into a steaming mug of hot chocolate, or combining with chocolate and graham crackers (or equivalent) to make s’mores. Do yourself a favour and make some, stat! These marshmallows are so good, I am already thinking of how I can use the base recipe to make different flavours and variations (how good would Baileys marshies be?!)
Ingredients (makes ~30)
½ cup warm water
2 tablespoons flavourless, powdered gelatine
1 tablespoon vanilla essence
1 ½ cups caster sugar
⅔ cups liquid glucose
½ cup water, extra
1 cup icing sugar, sifted
Spray a 20cm x 30cm slice tin with cooking oil and line the bottom with baking paper. Place the warm water in the bowl of an electric mixer, add gelatine and vanilla and stir to combine. Set aside.
Place the caster sugar, glucose and extra water in a medium saucepan over a medium heat and cook, stirring, until the sugar is dissolved. Increase heat to high and bring to the boil. Allow to boil, without stirring, for 6–7 minutes until the temperature reaches 115°C on a sugar thermometer. With the electric mixer on high, add the hot syrup to the vanilla gelatine mixture in a thin steady stream, and beat for 5-10 minutes or until white, thick and glossy.
Pour the mixture into the prepared tin. Using a spatula sprayed with cooking oil, smooth the top of the marshmallow.
Refrigerate for 1–2 hours or until set. Gently tip the marshmallow, top-side-down onto a clean, flat surface dusted with icing sugar. Peel off the baking paper and sift icing sugar over the top. Dust a large knife with icing sugar and cut marshmallows into squares. Enjoy!
Can be stored in the fridge for ~1 week
Adapted from Donna Hay’s ‘Caramel Swirl Marshmallows’
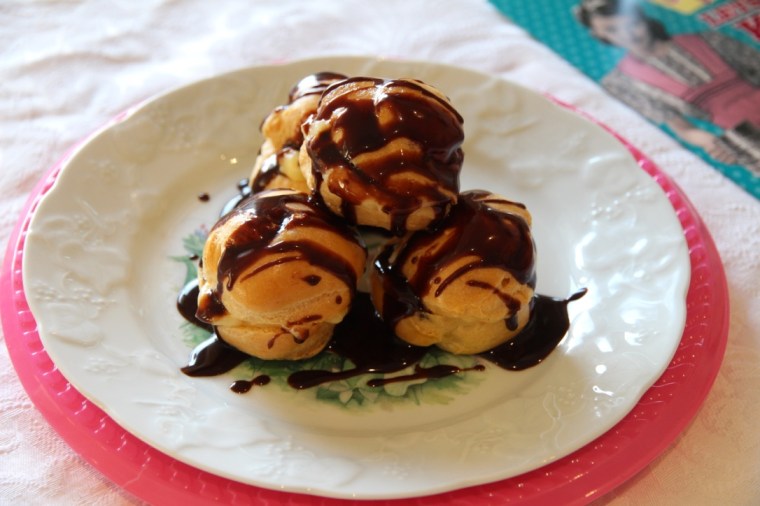
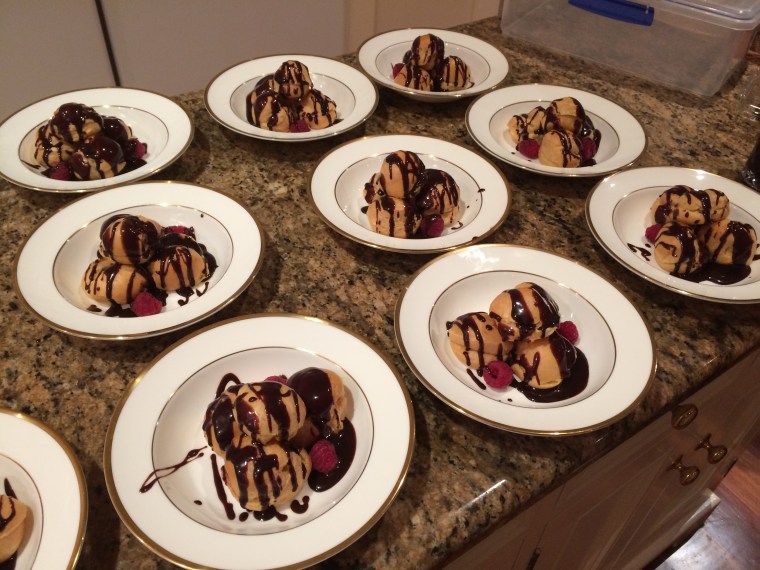
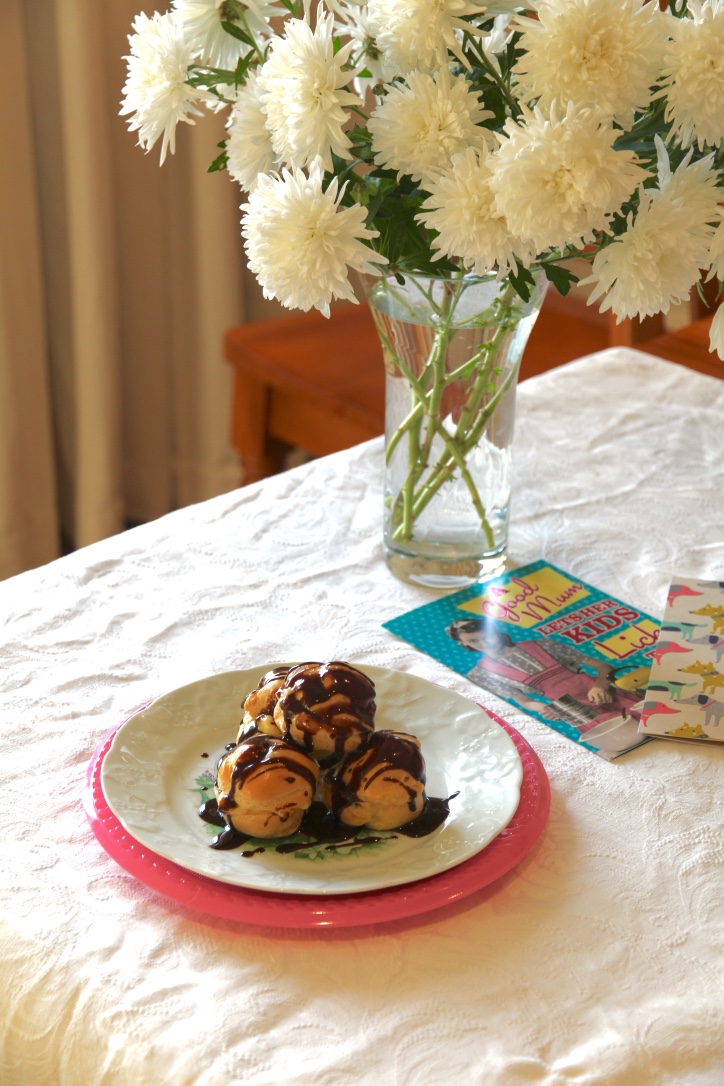
Happy Mother’s Day to all mothers out there! Today I celebrated with one side of my family for a delicious brunch and then had dinner with the other side of the family, and I served these profiteroles for dessert.
Choux pastry has a nasty reputation as being very difficult to make, but Mum has been making this recipe for over 20 years and it has never failed for her. I was surprised by how easy it was to make and using this simple base recipe you can make profiteroles, eclairs or Paris-Brest. If you’re pressed for time you could easily swap the crème pâtissière for sweetened whipped cream, or for a different flavour, you could add a liquor such as Bailey’s Irish cream or Grand Marnier to the filling (although to me, nothing beats a homemade vanilla crème pat). The chocolate sauce could also be changed to berry, lemon, or caramel, or you could dip the profiteroles in toffee à la croquembouche. Basically, the options are endless!
Choux Pastry (makes ~35 profiteroles or 20 eclairs) 1 cup water
60g butter
120g plain flour, sifted
4 eggs
1 extra egg yolk mixed with 1 tablespoon cold water
Chocolate Sauce
300g dark chocolate melts
400ml pouring cream
Line 2 large baking trays with baking paper and add a 1cm nozzle to a piping bag. Preheat oven to 205°C.
In a medium saucepan, bring water and butter to the boil. Lower the heat and add the flour all at once, stirring vigorously with a wooden spoon until the mixture forms a smooth, sticky mass. Remove from the heat and allow to cool for 3 minutes.
Stirring with a wooden spoon, add eggs one at a time, ensuring your mixture is smooth and fully combined.
Fill a piping bag with the mixture and pipe mounds of pastry about 2cm in diameter, 2cm apart. Sprinkle lightly with water (the humidity helps the pastry rise) and then bake in the preheated oven for 20 minutes. Turn down the temperature to 150°C and cook for a further 20 minutes. Turn off the oven and leave to dry in the oven for approximately an hour.
The odd misshapen profiterole is inevitable!
To make the crème pâtissière, mix together the eggs, yolks, sugar and flours. Bring the milk to the boil. Carefully pour it into the egg mixture, whisking well together. Add in the vanilla bean.
Return the mixture to the saucepan and cook over a low heat, stirring constantly with a wooden spoon. After a time, the mixture will thicken quickly – make sure you keep stirring so the mixture on the bottom of the pan doesn’t burn. Beat in the butter a little at a time.
Pour into a bowl, top with cling film and allow to cool.
Once profiteroles and crème pâtissière are fully cool, cut almost in half and fill with crème pâtissière.
Just before serving, make the chocolate sauce by combining the chocolate and cream in a medium saucepan and stirring on a low heat until melted and smooth. Add more cream or chocolate as required until desired consistency is reached.
Serve profiteroles drizzled with chocolate sauce and berries. Enjoy!
Phew, 10 servings with 4 profiteroles each is quite exhausting!
Choux pastry recipe adapted from Gabriel Gaté’s ‘Sweet Treats’ (1995).
Crème pâtissière recipe adapted from Vogue’s ‘Grand Finales’ (1988).
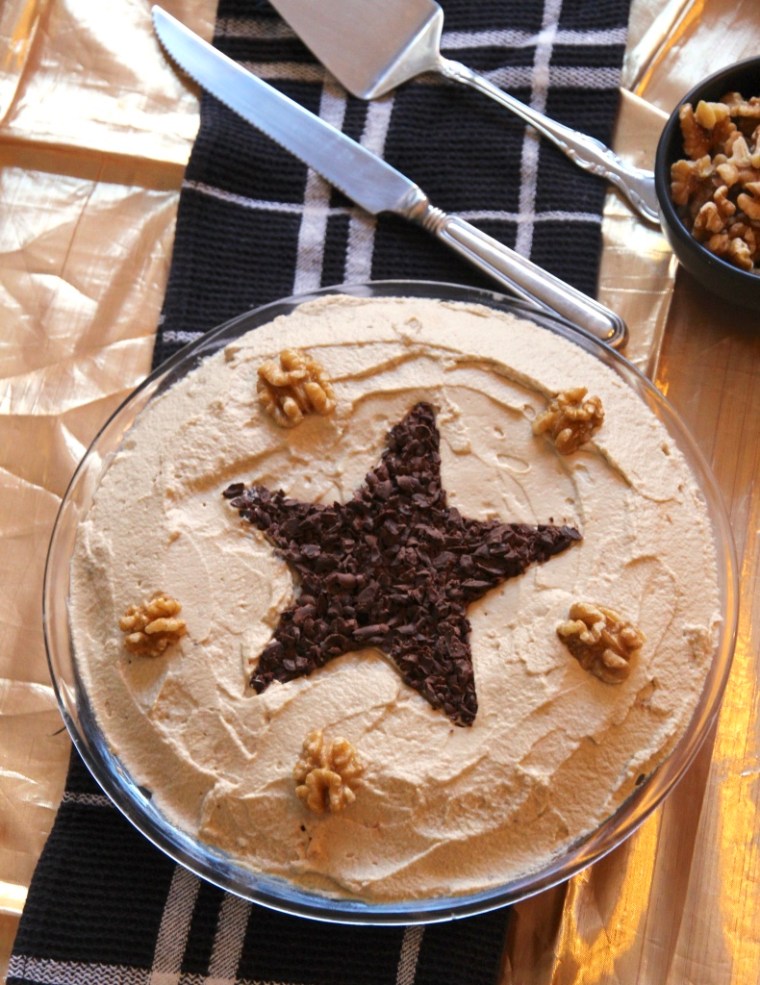
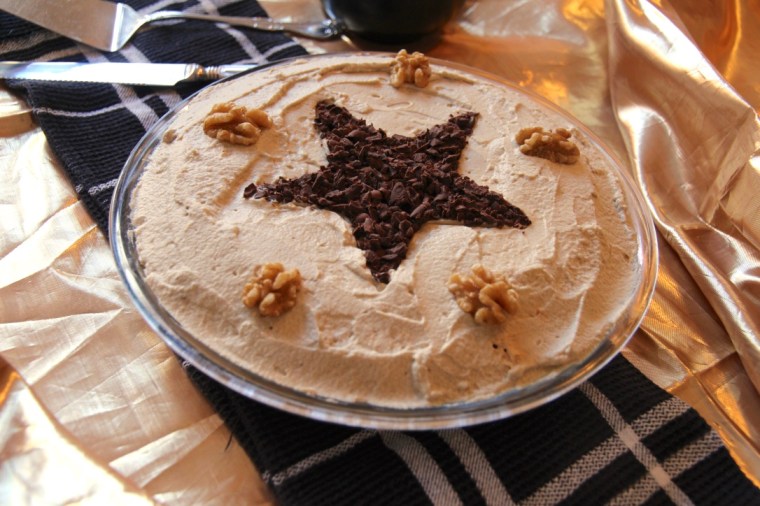
While the ingredients for this torte look a little odd (particularly the Jatz biscuits!) the end result is absolutely delicious – the torte is crisp on the outside and chewy on the inside with a subtle coffee flavour. It’s a firm family favourite that always disappears far too quickly.
Ingredients (serves 6-8) 3 egg whites
1 cup caster sugar
½ teaspoon white vinegar
1 teaspoon vanilla extract
20 Jatz biscuits, crushed
⅔ cup walnuts
1 tablespoon icing sugar
½ teaspoon vanilla extract
1 teaspoon instant coffee (dissolved in a small amount of water)
1 cup cream
Chocolate shavings (to decorate)
Walnuts (to decorate)
Preheat oven to 180°C (160°C fan-forced). Line a 9″ pie plate with baking paper.
Beat egg whites until stiff peaks form. Gradually add caster sugar, vinegar and vanilla and beat until very stiff. Fold in Jatz biscuits and walnuts. Spread in prepared pie plate and smooth the top.
Bake for 35 minutes. Prop open the oven door and allow to cool in the oven for approximately 20 minutes. Then transfer to a wire rack and allow to cool completely. Trim the baking paper so it can no longer be seen.
To make the coffee cream, add icing sugar, vanilla, coffee and cream to a medium bowl and bit until thickened and stiff.
Spread generously over the cooled torte and, if desired, decorate with chocolate shavings and extra walnuts. Keep in the fridge until ready to serve. Enjoy!
This cheat’s apple pie uses pre-made pastry which allows you to spend more time decorating. I used pink lady apples because that’s what we had in the house, but it would work well with granny smith apples instead (but you may want to add in a little more sugar). Happy baking!
Ingredients (serves 8) 5 medium apples peeled, cored and chopped into cubes ½ cup water ¼ cup caster sugar 2 teaspoons lemon rind 3 teaspoons ground cinnamon 3 sheets shortcrust pastry, thawed 1 egg, lightly beaten
Method
Grease a 25cm pie dish. Preheat oven to 180°C.
Peel, core and chop your apples. Place the apples and the water in a large saucepan and bring to the boil. Reduce the heat and simmer, covered, for about 6-7 minutes or until the apples soften. Drain all water. Stir in sugar, lemon rind and cinnamon.
Line pie dish with pastry (you may need to join 2 pieces together) and prick the bottom with a fork. Top with baking paper and pie weights or rice and bake for approximately 20-25 minutes or until lightly golden. Remove the pie weights and allow to cool.
Meanwhile, use the offcuts from the first 2 pieces of pastry to cut out leaves and flowers using cookie cutters.
Using the third piece of pastry, cut 6 thin strips, 2 thick strips and 6 very thin strips (to form 2 braids). Use the excess pastry to cut more leaves and flowers.
Spoon the apple mixture into the cooled pie base. Top with pastry strips and braids in a woven lattice design. Use the pastry leaves and flowers to decorate the edges. Gently brush the pastry with the beaten egg.
Bake for 25-35 minutes or until pastry is golden and crisp. Serve with cream or ice-cream. Enjoy!
Adapted from the Australian Women’s Weekly ‘Apple Pie’.