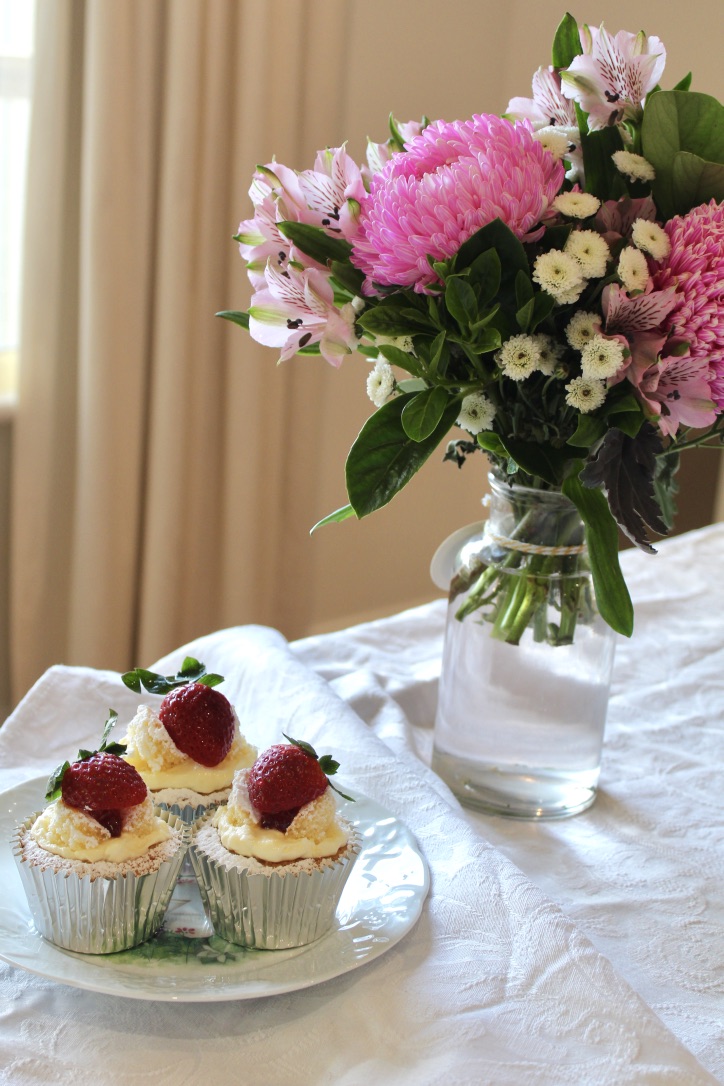
Considering it’s winter, we have been incredibly lucky to have an abundance of delicious, flavoursome strawberries and these cakes take full advantage of them.
These cupcakes are probably the quickest and easiest to make in the history of the world; you simply blitz the ingredients in a food processor, divide into patty pans and bake!
The cakes are very light with a soft, sponge-like texture, which makes them perfect for butterfly cakes. If butterfly cakes aren’t for you, they’re also delicious with a frosting of your choice (try my vanilla buttercream or marshmallow frosting).
Ingredients (makes 12) 1 cup (125g) self-raising flour
⅔ cup (125g) caster sugar
125g butter, softened
2 large eggs
1 teaspoon vanilla extract
2 tablespoons milk
Sweetened thickened cream (or whipped cream)
Good quality strawberry jam
Fresh strawberries, halved (optional)
Icing sugar
Method Preheat oven to 200ºC and line a 12-hole muffin tin with patty pans.
Put all of the ingredients except for the milk into a food processor and blitz until smooth. Pulse while adding the milk until just combined.
Divide batter evenly among the patty pans (I know it doesn’t look like much batter, but they will rise a lot).
Bake for 15-20 minutes or until a skewer inserted comes out clean. Transfer immediately onto a wire rack to cool completely.
If you will be serving the cakes immediately, make your thickened cream and cut up your strawberries while the cakes cool.
Using a sharp knife at a 45 degree angle, cut out a circle from the top of each cake and cut it in half to make the butterfly wings. Fill the holes with a teaspoon or so of strawberry jam and then top with cream, butterfly wings and another line of jam. If you like, you can serve them like this in the traditional butterfly cake style (below).
For me though, I love fresh strawberries so I top each cake with a strawberry half and then sprinkle with icing sugar. Enjoy!
NB: filled cakes are best eaten with 6 hours
Recipe adapted from Nigella Lawson’s ‘Cupcakes’ in How to Be a Domestic Goddess.
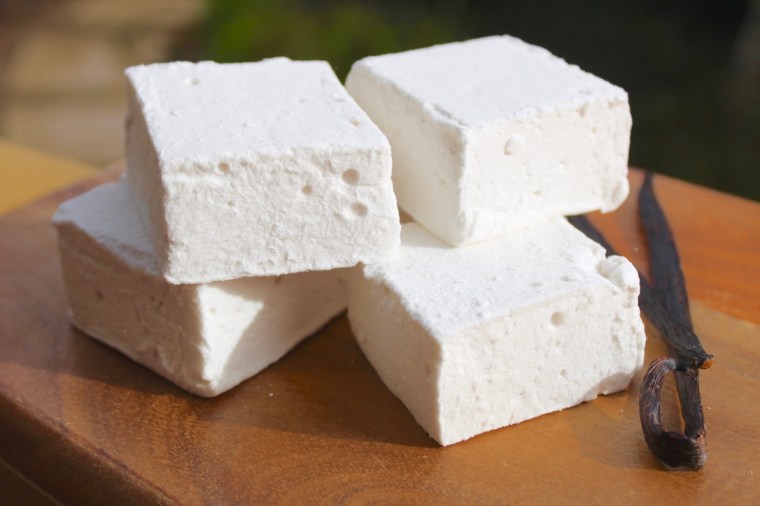
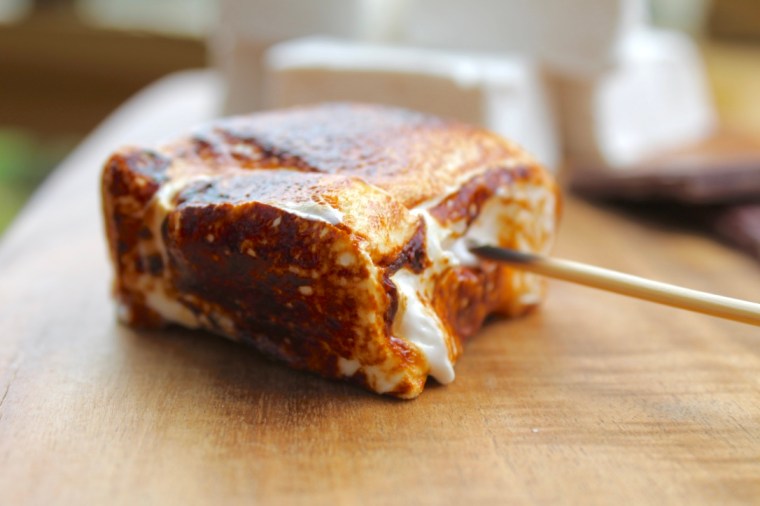
As the weather cools down, I am craving hot chocolates and crisp nights around the campfire, both of which are infinitely improved by the addition of marshmallows. Homemade marshmallows are on an entirely different level to store bought. Their texture is impossibly soft, light and dreamy with none of the powderyness that even the best quality store bought varieties have. These are perfect for eating as is, roasting over a fire, popping into a steaming mug of hot chocolate, or combining with chocolate and graham crackers (or equivalent) to make s’mores. Do yourself a favour and make some, stat! These marshmallows are so good, I am already thinking of how I can use the base recipe to make different flavours and variations (how good would Baileys marshies be?!)
Ingredients (makes ~30)
½ cup warm water
2 tablespoons flavourless, powdered gelatine
1 tablespoon vanilla essence
1 ½ cups caster sugar
⅔ cups liquid glucose
½ cup water, extra
1 cup icing sugar, sifted
Spray a 20cm x 30cm slice tin with cooking oil and line the bottom with baking paper. Place the warm water in the bowl of an electric mixer, add gelatine and vanilla and stir to combine. Set aside.
Place the caster sugar, glucose and extra water in a medium saucepan over a medium heat and cook, stirring, until the sugar is dissolved. Increase heat to high and bring to the boil. Allow to boil, without stirring, for 6–7 minutes until the temperature reaches 115°C on a sugar thermometer. With the electric mixer on high, add the hot syrup to the vanilla gelatine mixture in a thin steady stream, and beat for 5-10 minutes or until white, thick and glossy.
Pour the mixture into the prepared tin. Using a spatula sprayed with cooking oil, smooth the top of the marshmallow.
Refrigerate for 1–2 hours or until set. Gently tip the marshmallow, top-side-down onto a clean, flat surface dusted with icing sugar. Peel off the baking paper and sift icing sugar over the top. Dust a large knife with icing sugar and cut marshmallows into squares. Enjoy!
Can be stored in the fridge for ~1 week
Adapted from Donna Hay’s ‘Caramel Swirl Marshmallows’
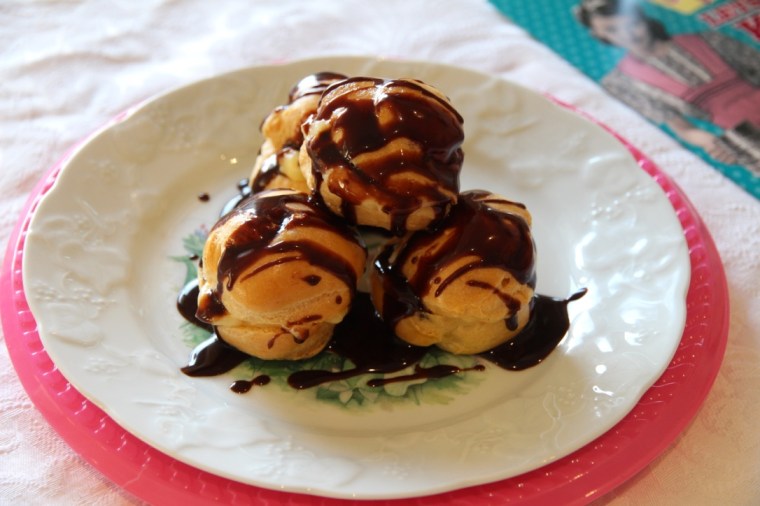
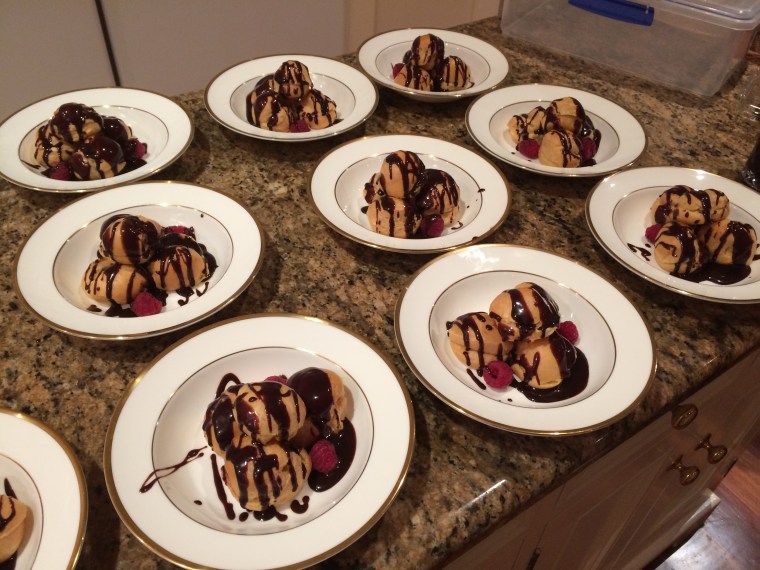
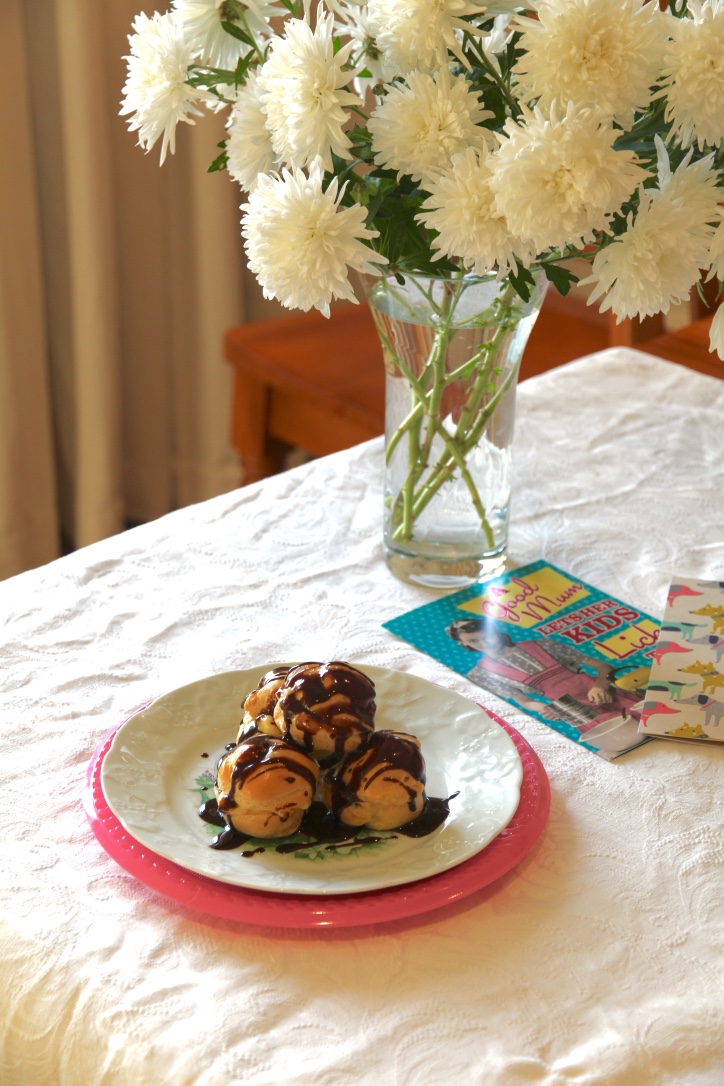
Happy Mother’s Day to all mothers out there! Today I celebrated with one side of my family for a delicious brunch and then had dinner with the other side of the family, and I served these profiteroles for dessert.
Choux pastry has a nasty reputation as being very difficult to make, but Mum has been making this recipe for over 20 years and it has never failed for her. I was surprised by how easy it was to make and using this simple base recipe you can make profiteroles, eclairs or Paris-Brest. If you’re pressed for time you could easily swap the crème pâtissière for sweetened whipped cream, or for a different flavour, you could add a liquor such as Bailey’s Irish cream or Grand Marnier to the filling (although to me, nothing beats a homemade vanilla crème pat). The chocolate sauce could also be changed to berry, lemon, or caramel, or you could dip the profiteroles in toffee à la croquembouche. Basically, the options are endless!
Choux Pastry (makes ~35 profiteroles or 20 eclairs) 1 cup water
60g butter
120g plain flour, sifted
4 eggs
1 extra egg yolk mixed with 1 tablespoon cold water
Chocolate Sauce
300g dark chocolate melts
400ml pouring cream
Line 2 large baking trays with baking paper and add a 1cm nozzle to a piping bag. Preheat oven to 205°C.
In a medium saucepan, bring water and butter to the boil. Lower the heat and add the flour all at once, stirring vigorously with a wooden spoon until the mixture forms a smooth, sticky mass. Remove from the heat and allow to cool for 3 minutes.
Stirring with a wooden spoon, add eggs one at a time, ensuring your mixture is smooth and fully combined.
Fill a piping bag with the mixture and pipe mounds of pastry about 2cm in diameter, 2cm apart. Sprinkle lightly with water (the humidity helps the pastry rise) and then bake in the preheated oven for 20 minutes. Turn down the temperature to 150°C and cook for a further 20 minutes. Turn off the oven and leave to dry in the oven for approximately an hour.
The odd misshapen profiterole is inevitable!
To make the crème pâtissière, mix together the eggs, yolks, sugar and flours. Bring the milk to the boil. Carefully pour it into the egg mixture, whisking well together. Add in the vanilla bean.
Return the mixture to the saucepan and cook over a low heat, stirring constantly with a wooden spoon. After a time, the mixture will thicken quickly – make sure you keep stirring so the mixture on the bottom of the pan doesn’t burn. Beat in the butter a little at a time.
Pour into a bowl, top with cling film and allow to cool.
Once profiteroles and crème pâtissière are fully cool, cut almost in half and fill with crème pâtissière.
Just before serving, make the chocolate sauce by combining the chocolate and cream in a medium saucepan and stirring on a low heat until melted and smooth. Add more cream or chocolate as required until desired consistency is reached.
Serve profiteroles drizzled with chocolate sauce and berries. Enjoy!
Phew, 10 servings with 4 profiteroles each is quite exhausting!
Choux pastry recipe adapted from Gabriel Gaté’s ‘Sweet Treats’ (1995).
Crème pâtissière recipe adapted from Vogue’s ‘Grand Finales’ (1988).
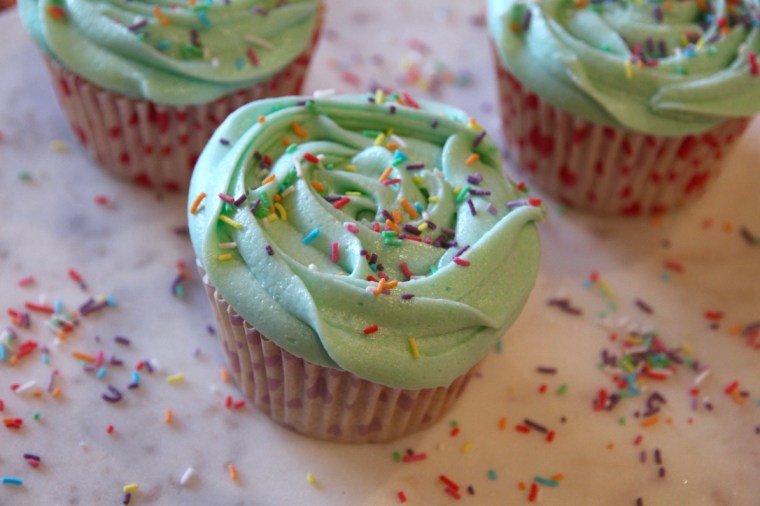
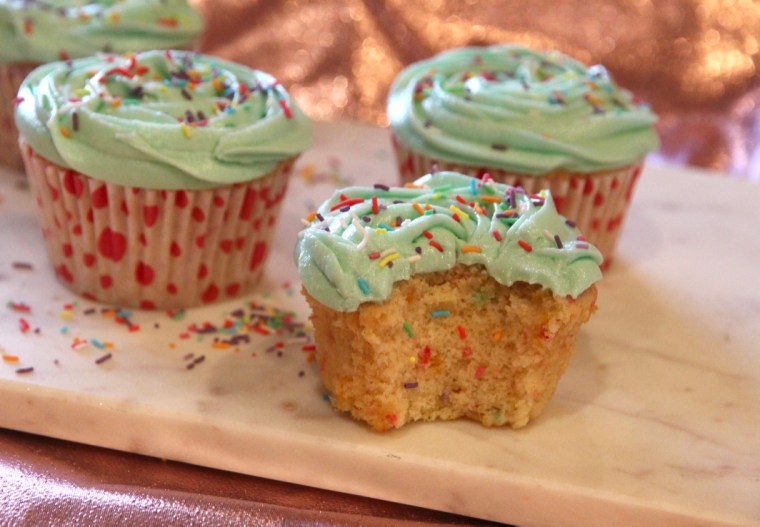
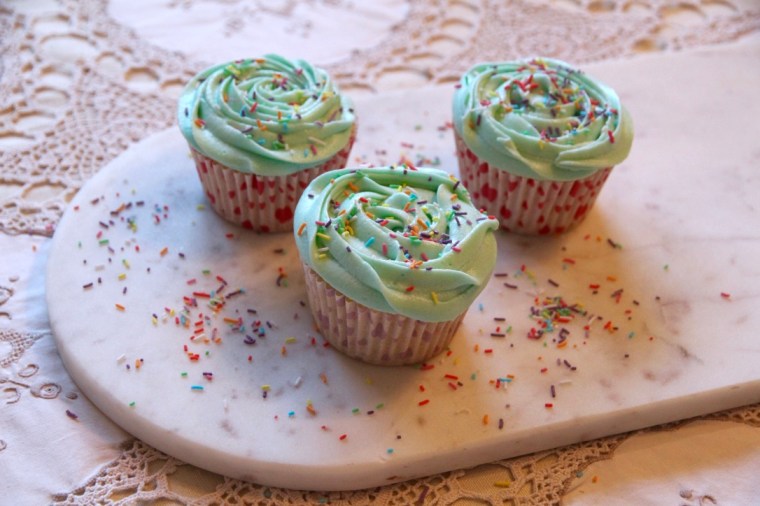
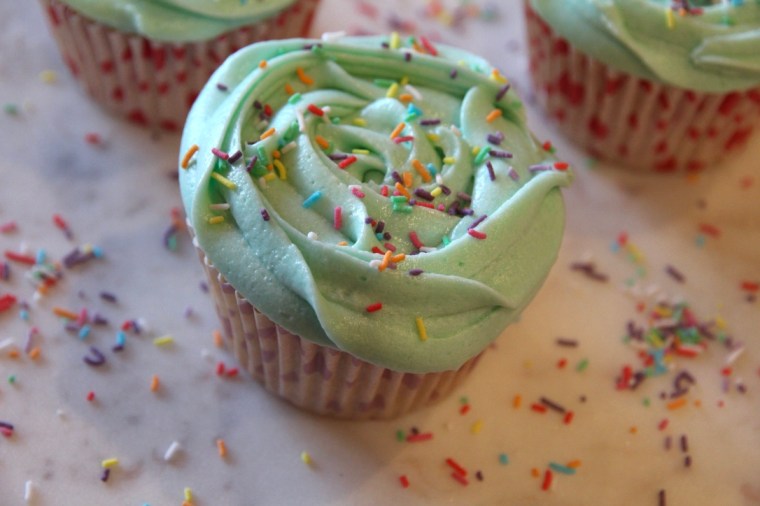
These delicious vanilla cupcakes are made even better by the addition of sprinkles! Perfect for birthdays, baby showers or any time you feel like celebrating.
Vanilla Buttercream Frosting 200g butter, softened
½ cup milk
1 tblspn vanilla extract
8 cups icing sugar
A few drops of food colouring as desired
Sprinkles, to decorate
Method Preheat the oven to 170°C (approximately 150°C fan-forced). Line two 12 hole muffin trays with patty pans.
Sift together the flour and baking powder. In a different bowl, cream the butter for 1-2 mins. Add the caster sugar about a third at a time, beating for 2mins after each addition. After the last of the sugar has been beaten, beat until the mixture is light and fluffy and the sugar dissolved. Add the eggs one at a time, beating for 1 min after each addition or until the mixture is light and fluffy. Add the vanilla and beat until just combined.
Add approximately a third of the flour mixture to the creamed mixture and beat on a low speed until combined. Add half of the milk and beat until combined. Repeat this process until all of the flour and milk is thoroughly combined but be careful not to overbeat (this will toughen the mixture). Add in the sprinkles and gently stir through until evenly dispersed.
Spoon mixture into the patty pans (filling each about 3/4 full) and bake for about 18-20mins or until the top springs back when touched. Remove the cupcakes from the trays immediately and cool on a wire rack for at least half an hour before icing.
To make the frosting, cream the butter for 1-2 mins in a large bowl using an electric mixer. Add the milk, vanilla and half of the icing sugar and beat for at least 3 mins (until the mixture is light and fluffy). Add the remaining icing sugar and beat for a further 3 mins or until of a spreadable consistency. Add extra milk if too dry or extra icing sugar if too wet. Add colouring and beat in until combined and the desired colour has been achieved.
Using a piping bag with a Wilton 2D tip, pipe buttercream in a swirl on the cupcakes and decorate with extra sprinkles.
Enjoy!
Recipes adapted from The Crabapple Cupcake Bakery Cookbook.
Well.. I lied. I completely intended to blog more in the last few weeks (as evidenced by my last post!) but I’ve just been too busy. I had my 21st Birthday to plan, uni assessments galore, the Psychology ball to organise, and now Laura’s 18th is coming up in a couple of weeks. Yikes, I get exhausted just thinking about it all! However, while I haven’t been blogging, I have been baking.
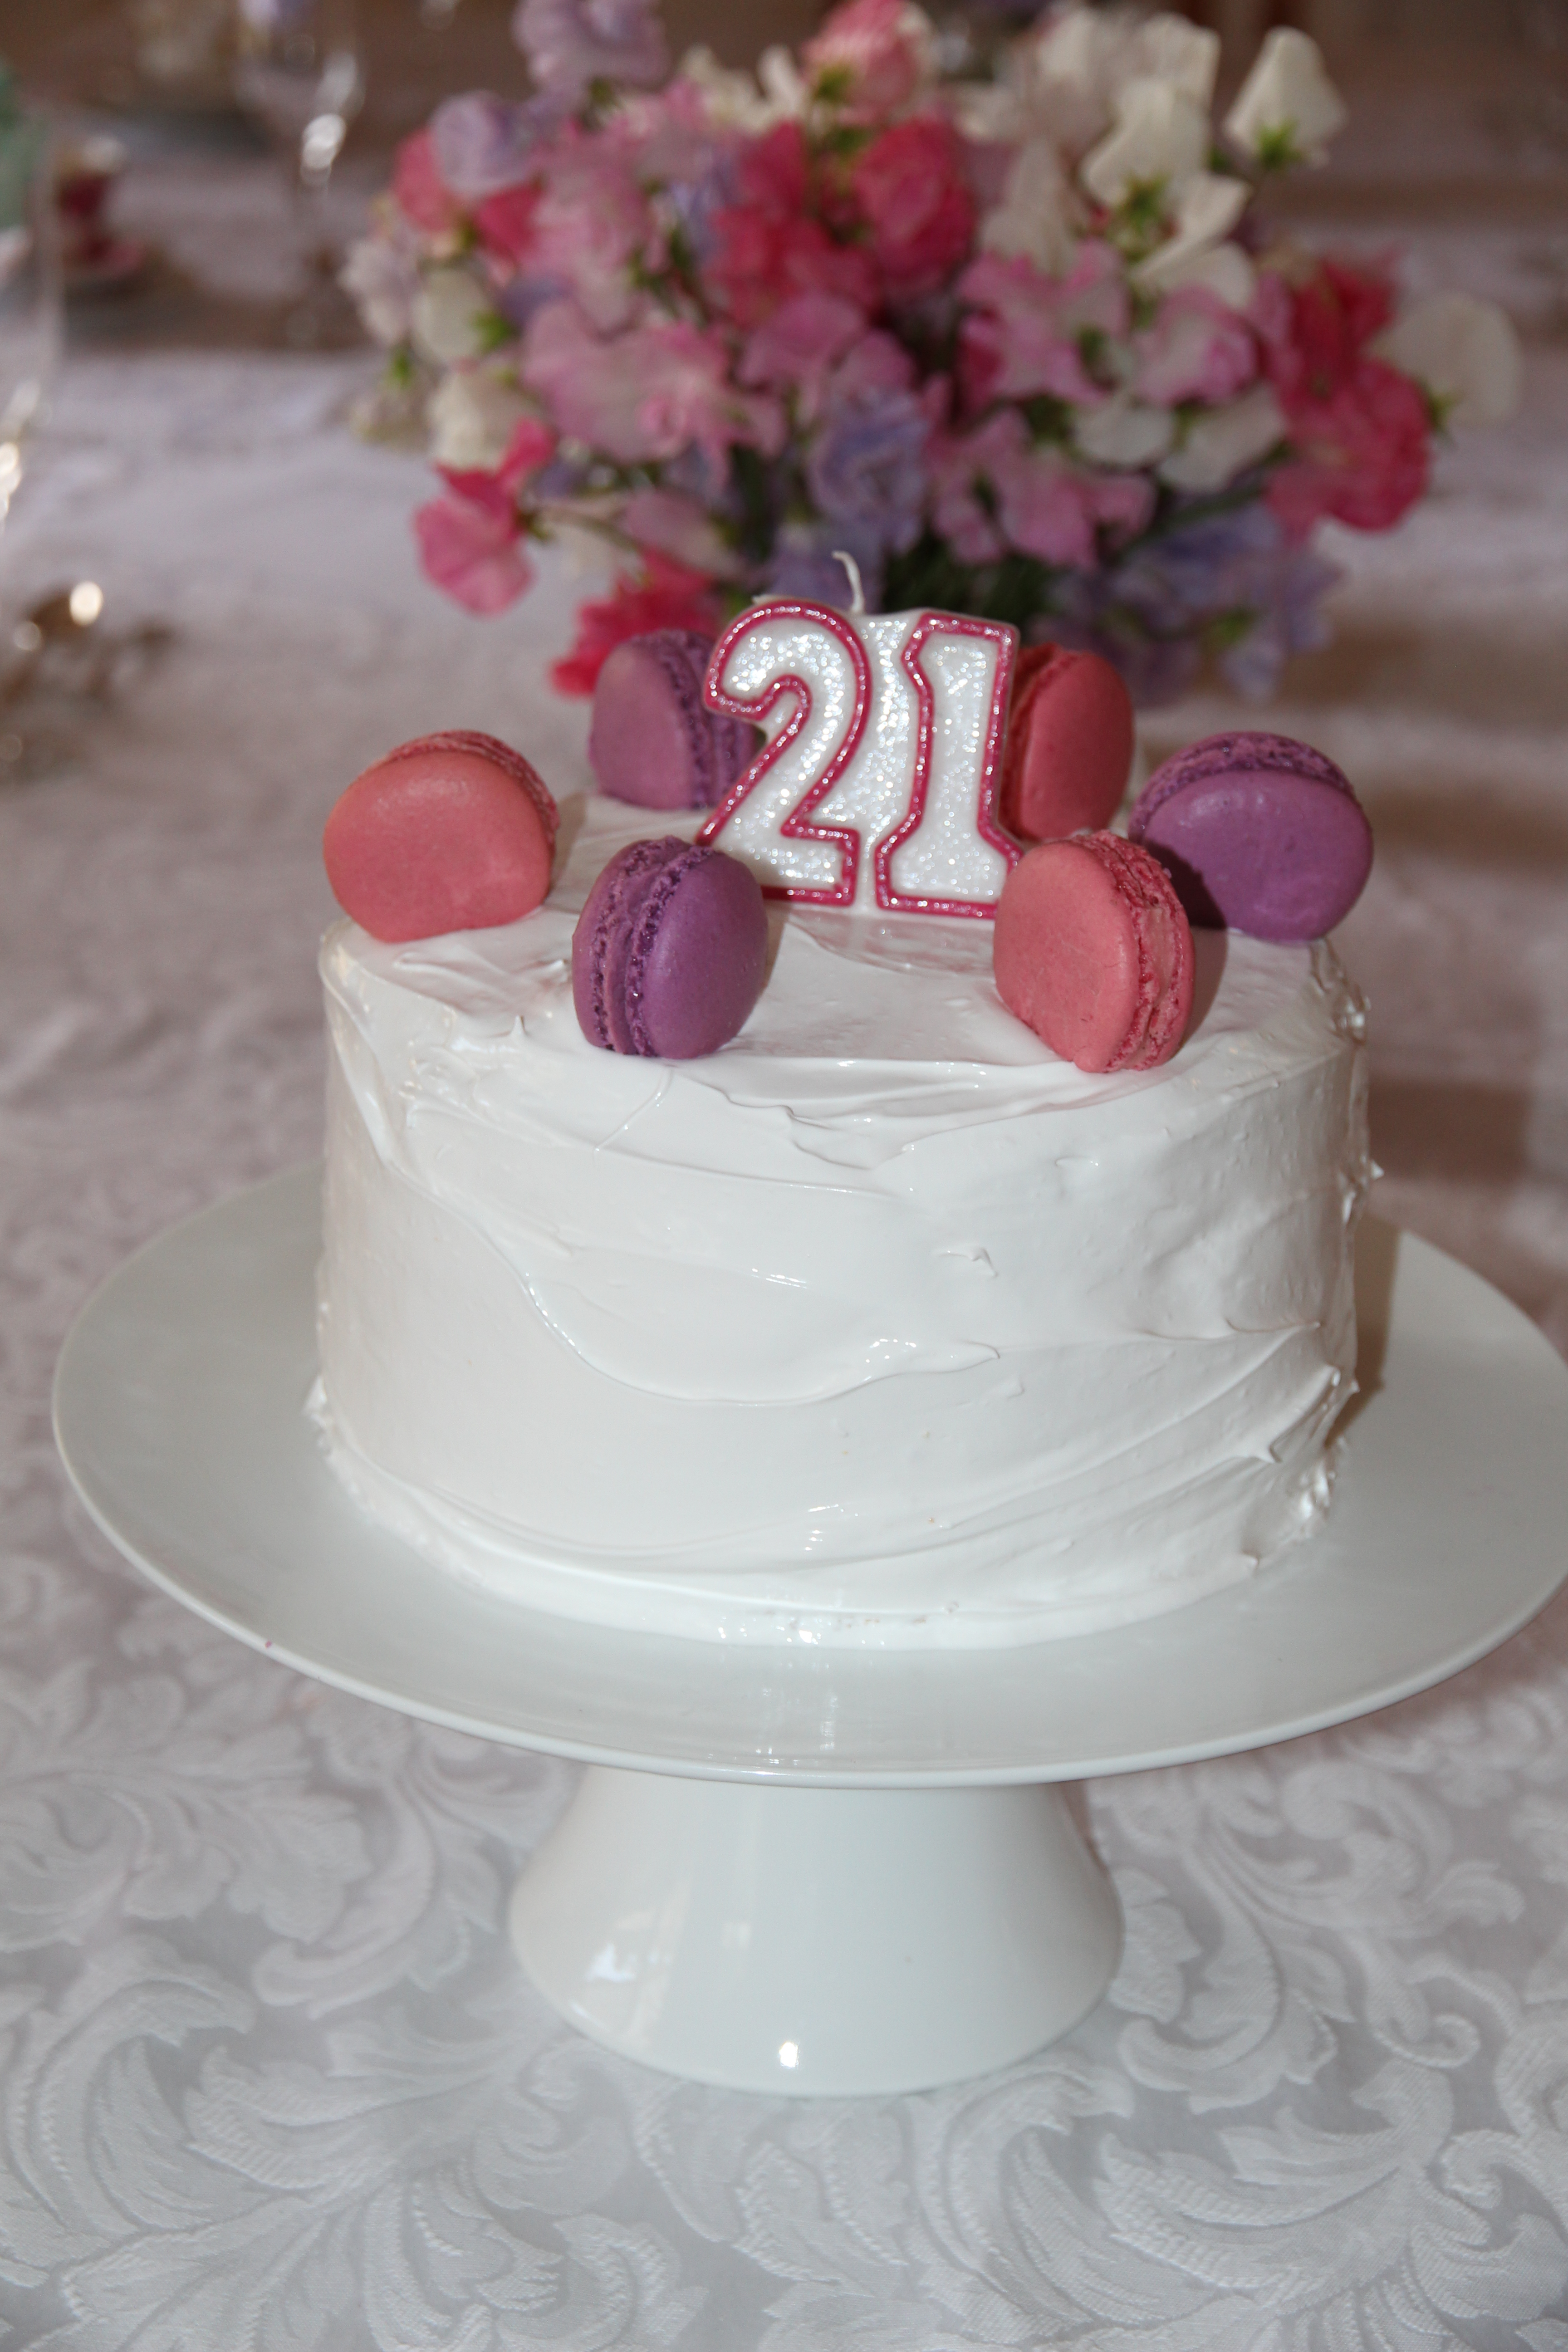
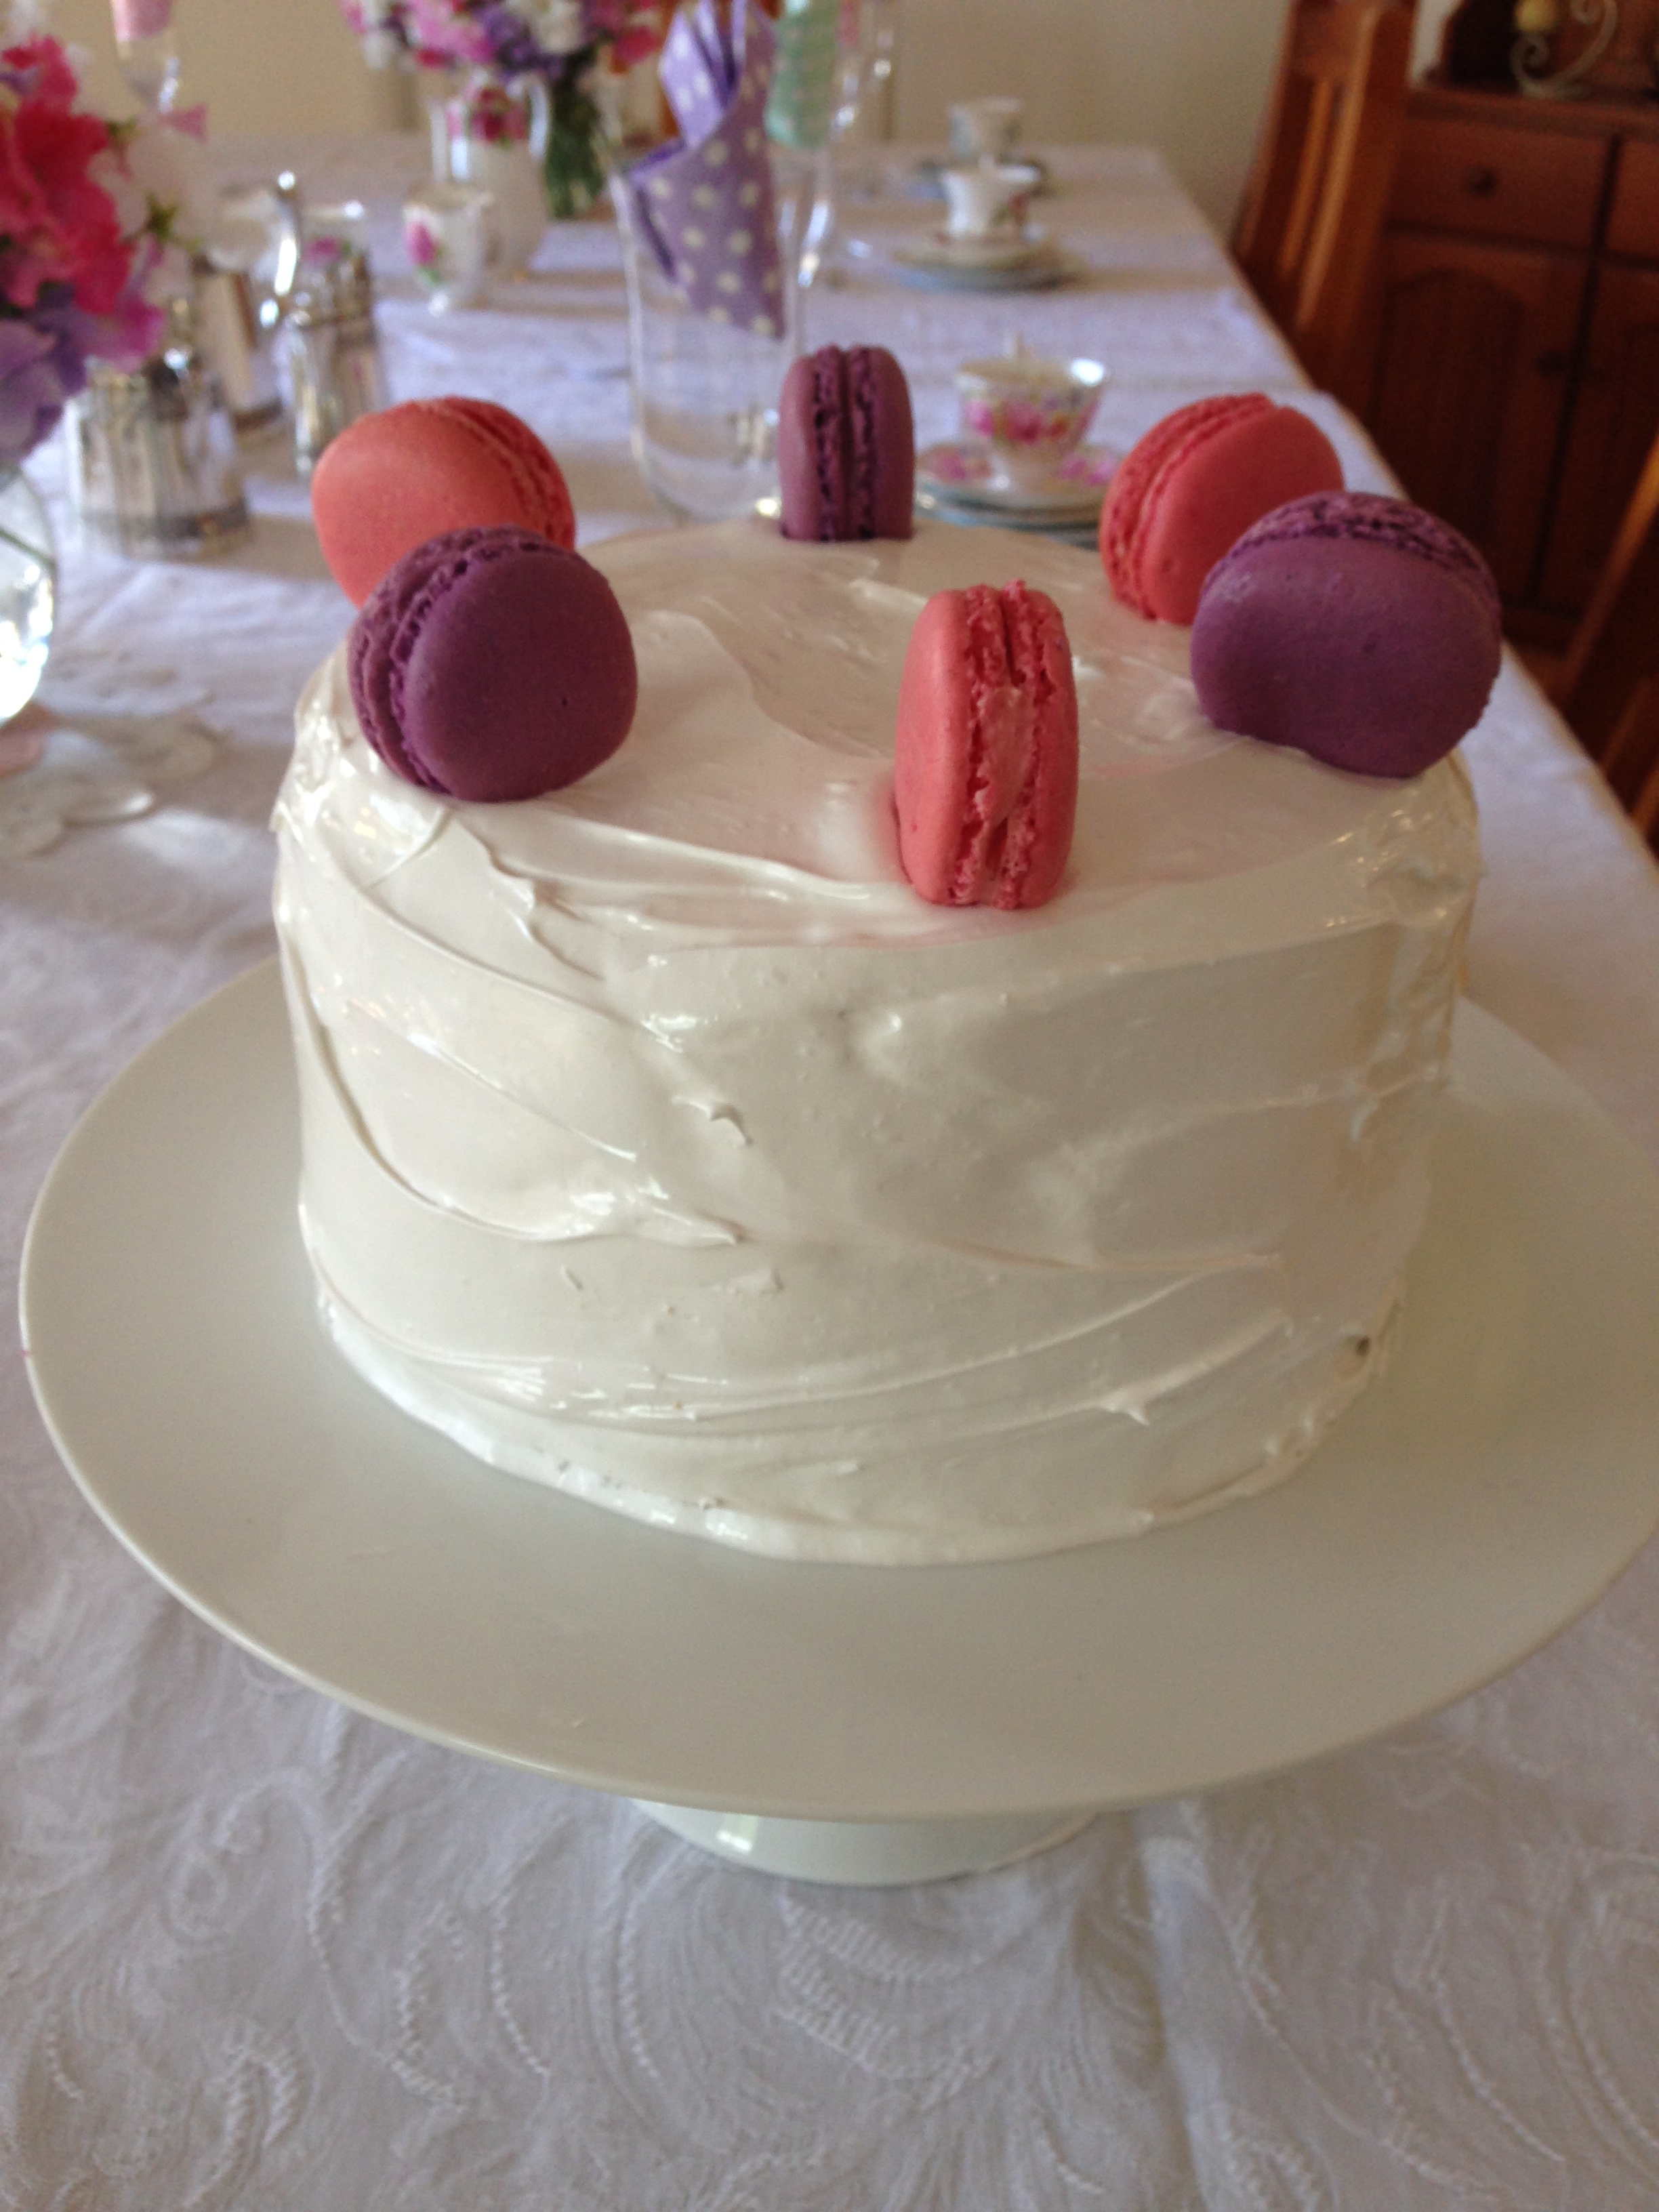
Here is the cake I made for my 21st Birthday afternoon tea – triple layer vanilla cake with a tangy raspberry filling & super glossy meringue frosting, topped with vanilla bean macarons. The raspberry filling was perfect as, otherwise, this cake was going to be too sweet, so I would certainly recommend leaving it (or perhaps substituting it for a tangy lemon curd if you’re not a raspberry fan) to cut the sweetness from the frosting.
Don’t worry, the empty plates in the background didn’t stay empty!
For my 21st birthday cake, I used 2 packets of Betty Crocker’s SuperMoist Vanilla cake mix, with some extra vanilla added so they tasted more ‘home-made’ divided into 3 20cm lined pans. I did this for 2 main reasons; it saved a lot of time (and time was precious as I had so much other cooking to do!), and because it reliably produces an even, stable, fine-crumbed cake that is easy to work with. If you don’t want to use cake mixes, just make a double batch of your favourite vanilla/butter cake and that will work as well 🙂
The raspberry filling needs to be made at least a day ahead but keeps well in the fridge so can be made up to a week ahead.
I also made the macaron shells a couple of days ahead to save me some stress on the actual party day.
The frosting should be made the day of serving as it does not keep particularly well.
Ingredients
For the raspberry filling (make at least a day ahead)
340g frozen raspberries
⅔ cups water
½ cup white, granulated sugar
1 tblspn lemon juice
2 ½ tblspns cornstarch dissolved in ¼ cup of water
For the cake
2 boxes Betty Crocker’s SuperMoist Vanilla cake mix (made following instructions, so add the eggs, milk, butter etc. as specified by the box)
½ tablespoon vanilla extract
For the meringue frosting
6 egg whites
1 ¾ cups caster sugar
2 tblspns liquid glucose (or light corn syrup)
¼ teaspoon cream of tartar
2 teaspoons vanilla extract
Method To make the raspberry filling:
In a saucepan combine the raspberries, water, sugar, and lemon juice. Bring to boil and simmer for 15-20mins or until the raspberries have broken down.
Remove the mixture from the heat and strain with a fine mesh sieve. Return the stained mixture to the heat. Dissolve the cornstarch in water. Whisk the cornstarch mix into the raspberry mixture.
Bring the mixture back to a boil and simmer for 5 more minutes, stirring occasionally. Remove from heat and cool completely.
Refrigerate overnight to set.
To make the cakes: Line & grease 3 20cm cake pans. Set oven to temperature specified by the cake mix boxes. Make cakes according to box instructions, add ½ teaspoon of vanilla extract to each cake mix & divide mixture among the three pans. Bake for specified time, or until a skewer inserted comes out clean.
To assemble the cake: Carefully place a cake layer on your serving platter. Top with a generous amount of raspberry filling and spread gently using a spatula to make an even layer. Top with another cake layer and repeat. Finally, top with the final cake, ready to be frosted.
To make the meringue frosting: Add egg whites, sugar, liquid glucose and cream of tartar, and simmer over a pot of water (not boiling), whisking constantly but gently, until temperature reaches 54°C on a thermometer (be patient, it does get there eventually!).
Beat heated mixture with electric beaters on a low speed for 2 minutes, then increase the speed to medium and beat for 2 more minutes. Increase the speed to high and beat until it is very thick and glossy, about 5 minutes.
Add vanilla and beat to combine.
Frost cake immediately by piling the frosting on top of the cake and, using a metal spatula, gently spreading from the top down. Smoothe as much as possible with your spatula.
Top with 6 macarons, 3 of each colour and a candle (if desired).
Serve each piece with a macaron & enjoy!
Raspberry filling recipe adapted from: Pinterest (various sources with the same basic recipe)
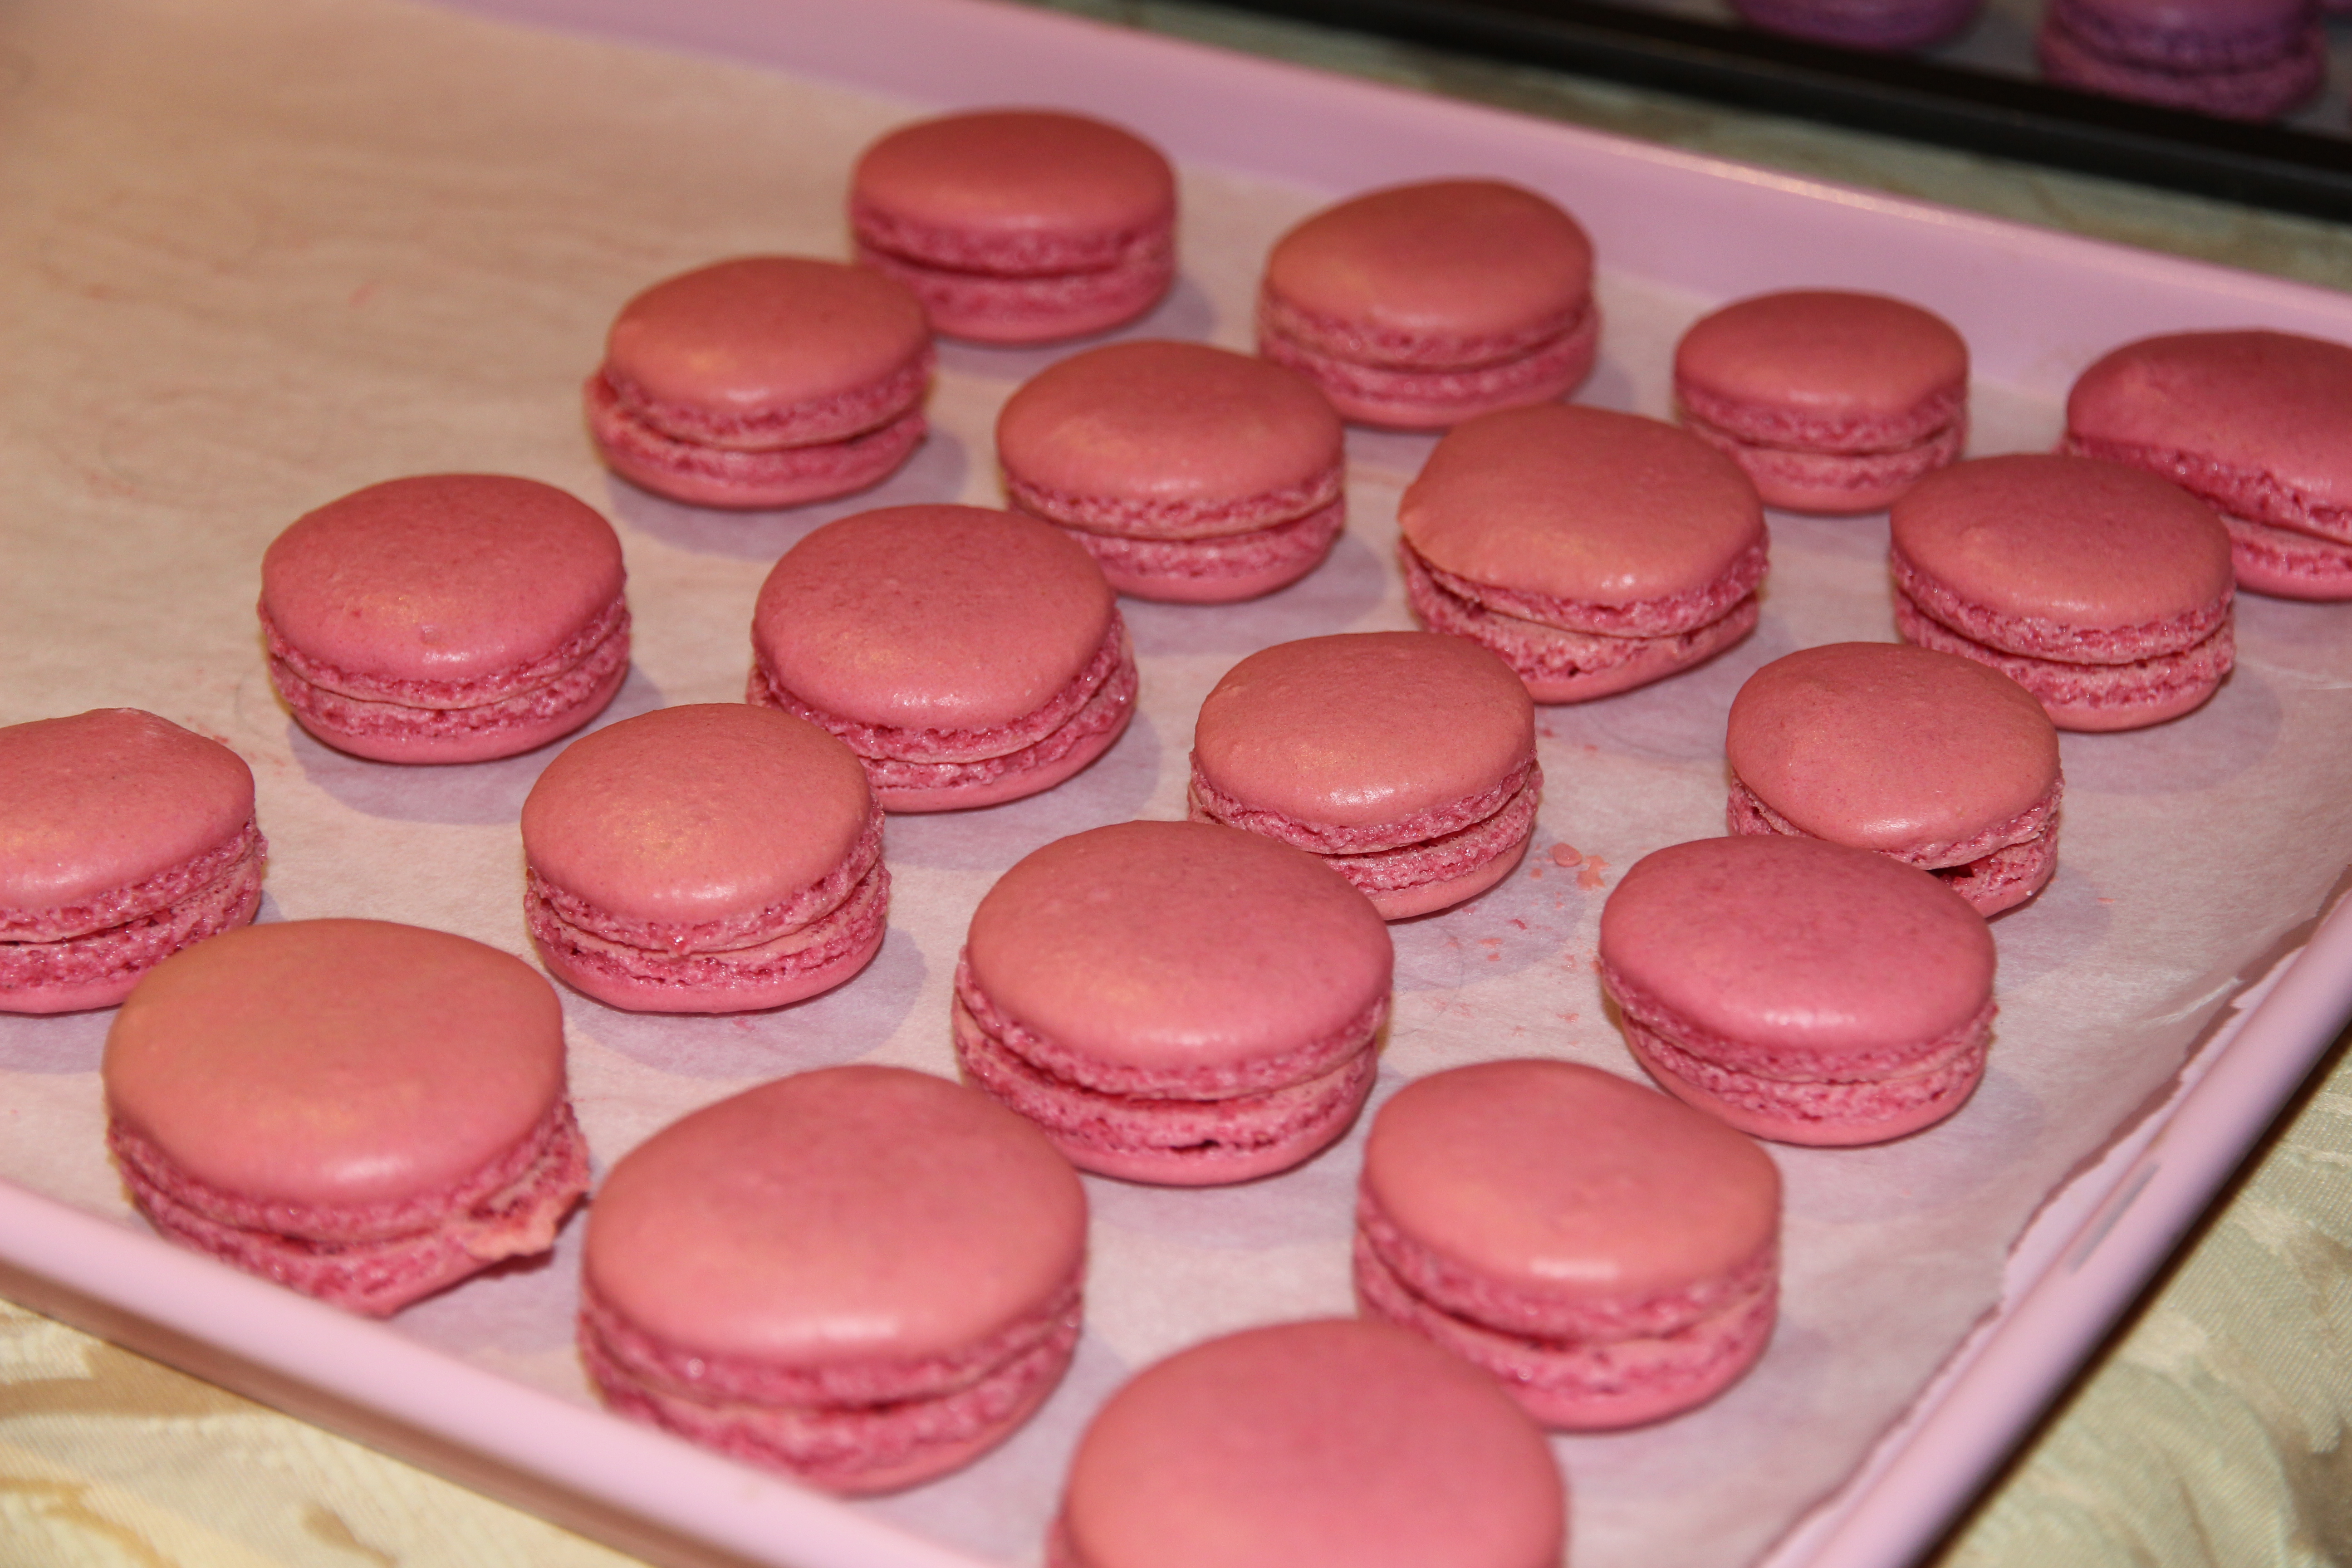
I made these particular macarons to sit on top of my 21st birthday cake (and because I think no afternoon tea is complete without them!) Feel free to adapt the colours or flavours as you wish.
Ingredients (makes around 40 macarons, 20 paired) Macaron shells
225g pure icing sugar
130g almond meal
115g egg whites
60g caster sugar
1g bicarb soda
A few drops of rose pink & violet food colouring
Vanilla bean filling
100g butter, softened
¼ cup milk
½ tblspn organic vanilla bean paste
4 cups icing sugar
Rose pink & violet food colouring
Method Preheat oven to 150°C fan forced. Grease and line two large baking trays with baking paper.
Separately sift icing sugar and almond meal into medium bowls or over sheets of baking paper. Repeat process 3 times and re-weigh ingredients (I know this seems excessive but trust me, it’s worth it). You will need to top up the ingredients as you may have lost some in the sifting process. Sift icing sugar and almond meal into a bowl and repeat, ensure there are no lumps.
Whisk egg whites until doubled in size using electric beaters or an electric stand mixer. While still whisking, gradually add caster sugar and bicarb, whisking until mixture forms very stiff peaks.
Gently fold almond meal mixture into meringue using a spatula until incorporated.
Divide mixture into 2 bowls. Add food colouring (pink to one, purple to the other) one drop at time, stirring very gently with a spatula, until desired colour reached.
Spoon into a piping bag fitted with a 9mm round nozzle (approximately). Hold nozzle close to the baking tray and pipe 3cm diameter circles onto prepared trays – don’t make a circular motion àla soft serve. Tap the underside of the tray to allow macarons to settle and air bubbles to escape. If there is still a little peak on top, dip a teaspoon in water and use the back to smooth the surface. Repeat with other colour.
Leave to rest for at least 20-30 minutes or until the macarons form a skin and the top is no longer shiny or sticky to the touch (this is VERY important as it will give your macaron its lovely ‘foot’).
Bake for 12 minutes. Remove trays from the oven and allow macarons to cool on the tray. They will still be soft at this stage but will firm up on cooling.
To make the buttercream, cream the butter for 1-2 mins. Add the milk, vanilla and half of the icing sugar and beat for at least 3 mins (until the mixture is light and fluffy).
Add the remaining icing sugar and beat for a further 3 mins or until of a spreadable consistency. Add extra milk if too dry or extra icing sugar if too wet.
Halve the mixture and add a drop of rose food colouring to one half and a drop of violet colouring to the other.
Pipe a generous amount of buttercream onto half the macarons and sandwich with a second macaron.


