Homemade Vanilla Marshmallows

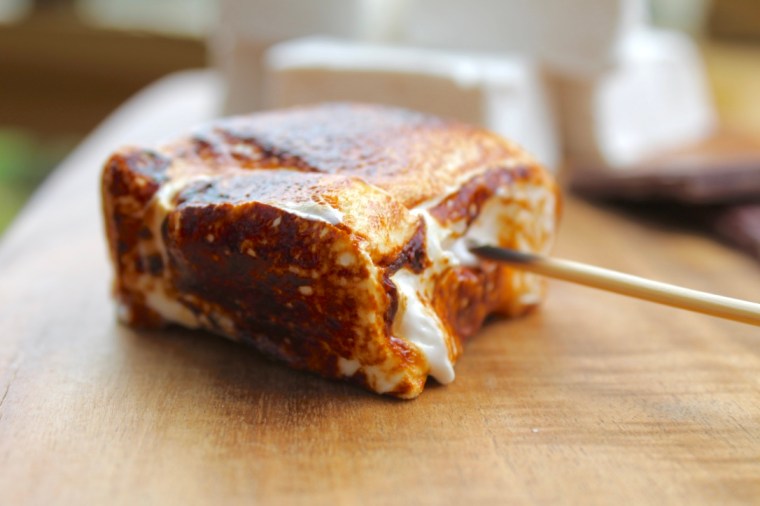
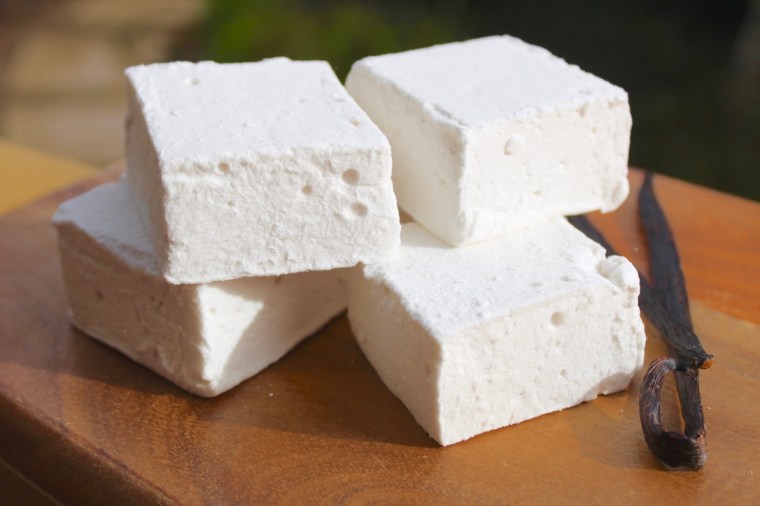
As the weather cools down, I am craving hot chocolates and crisp nights around the campfire, both of which are infinitely improved by the addition of marshmallows. Homemade marshmallows are on an entirely different level to store bought. Their texture is  impossibly soft, light and dreamy with none of the powderyness that even the best quality store bought varieties have. These are perfect for eating as is, roasting over a fire, popping into a steaming mug of hot chocolate, or combining with chocolate and graham crackers (or equivalent) to make s’mores. Do yourself a favour and make some, stat! These marshmallows are so good, I am already thinking of how I can use the base recipe to make different flavours and variations (how good would Baileys marshies be?!)

thumb_IMG_0120_1024

Ingredients (makes ~30)
½ cup warm water
2 tablespoons flavourless, powdered gelatine
1 tablespoon vanilla essence
1 ½ cups caster sugar
⅔ cups liquid glucose
½ cup water, extra
1 cup icing sugar, sifted

thumb_IMG_0107_1024

Spray a 20cm x 30cm slice tin with cooking oil and line the bottom with baking paper.  Place the warm water in the bowl of an electric mixer, add gelatine and vanilla and stir to combine. Set aside.

Place the caster sugar, glucose and extra water in a medium saucepan over a medium heat and cook, stirring, until the sugar is dissolved. Increase heat to high and bring to the boil. Allow to boil, without stirring, for 6–7 minutes until the temperature reaches 115°C on a sugar thermometer. With the electric mixer on high, add the hot syrup to the vanilla gelatine mixture in a thin steady stream, and beat for 5-10 minutes or until white, thick and glossy.

Pour the mixture into the prepared tin. Using a spatula sprayed with cooking oil, smooth the top of the marshmallow.

Refrigerate for 1–2 hours or until set. Gently tip the marshmallow, top-side-down onto a clean, flat surface dusted with icing sugar. Peel off the baking paper and sift icing sugar over the top. Dust a large knife with icing sugar and cut marshmallows into squares. Enjoy!

thumb_IMG_0099_1024

Can be stored in the fridge for ~1 week

Adapted from Donna Hay’s ‘Caramel Swirl Marshmallows’

thumb_IMG_0122_1024

Banana & Nutella Swirl Muffins

These muffins are the perfect way to use up ‘dead’ bananas as they use 4 in one hit. They’re also my favourite kind of bake; one where you bung a whole heap of ingredients in a bowl, combine and then bake. From start to finish they take approximately 30 minutes and they fill your home with a heavenly aroma.

I’ve cut down the sugar significantly from the original recipe (which had a cup of sugar), as I found that the bananas and Nutella are sweet enough for me. Of course, feel free to add more sugar to taste.

thumb_IMG_0022_1024

Ingredients (makes 12 large muffins)
4 medium over-ripe bananas, mashed
½ cup packed brown sugar
1 large egg
¼ cup vegetable oil
2 tspns vanilla extract
2 cups flour
1 tspn baking soda
1 tspn baking powder
½ cup chopped walnuts (optional)
12 tspns Nutella

thumb_IMG_0023_1024

Preheat oven to 180°C. Spray a 12-hole muffin tin liberally with cooking oil.

In a large bowl, whisk together banana, sugars, egg, oil and vanilla. Add in your dry ingredients and mix until it is lump free. Fold through walnuts if desired.

Spoon the mixture into the muffin tin and top each muffin with approximately 1 teaspoon of Nutella. Using a toothpick, swirl the Nutella into the batter.

Bake the muffins for 15-20 minutes or until a skewer inserted into the centre comes out clean.

Leave to cool in the tray for 5 minutes before transferring onto a wire rack to cool completely. Enjoy!

thumb_IMG_0027_1024

Adapted from The Novice Chef’s ‘Nutella Banana Swirl Muffins’

Profiteroles with Vanilla Crème Pâtissière & Chocolate Sauce

Happy Mother’s Day to all mothers out there! Today I celebrated with one side of my family for a delicious brunch and then had dinner with the other side of the family, and I served these profiteroles for dessert.

Choux pastry has a nasty reputation as being very difficult to make, but Mum has been making this recipe for over 20 years and it has never failed for her. I was surprised by how easy it was to make and using this simple base recipe you can make profiteroles, eclairs or Paris-Brest. If you’re pressed for time you could easily swap the crème pâtissière for sweetened whipped cream, or for a different flavour, you could add a liquor such as Bailey’s Irish cream or Grand Marnier to the filling (although to me, nothing beats a homemade vanilla crème pat). The chocolate sauce could also be changed to berry, lemon, or caramel, or you could dip the profiteroles in toffee à la croquembouche. Basically, the options are endless!

thumb_IMG_3879_1024

Choux Pastry (makes ~35 profiteroles or 20 eclairs)
1 cup water
60g butter
120g plain flour, sifted
4 eggs
1 extra egg yolk mixed with 1 tablespoon cold water

Crème Pâtissière
2 eggs
2 egg yolks
140g white sugar
Seeds from 1 vanilla bean
2 heaped dessertspoons flour
2 heaped dessertspoons cornflour
500ml milk
70g butter

Chocolate Sauce
300g dark chocolate melts
400ml pouring cream

thumb_IMG_3869_1024

Line 2 large baking trays with baking paper and add a 1cm nozzle to a piping bag. Preheat oven to 205°C.

In a medium saucepan, bring water and butter to the boil. Lower the heat and add the flour all at once, stirring vigorously with a wooden spoon until the mixture forms a smooth, sticky mass. Remove from the heat and allow to cool for 3 minutes.

FullSizeRender-1 2

Stirring with a wooden spoon, add eggs one at a time, ensuring your mixture is smooth and fully combined.

Fill a piping bag with the mixture and pipe mounds of pastry about 2cm in diameter, 2cm apart. Sprinkle lightly with water (the humidity helps the pastry rise) and then bake in the preheated oven for 20 minutes. Turn down the temperature to 150°C and cook for a further 20 minutes. Turn off the oven and leave to dry in the oven for approximately an hour.

IMG_6708
The odd misshapen profiterole is inevitable!

To make the crème pâtissière, mix together the eggs, yolks, sugar and flours. Bring the milk to the boil. Carefully pour it into the egg mixture, whisking well together. Add in the vanilla bean.

Return the mixture to the saucepan and cook over a low heat, stirring constantly with a wooden spoon. After a time, the mixture will thicken quickly – make sure you keep stirring so the mixture on the bottom of the pan doesn’t burn. Beat in the butter a little at a time.

IMG_6706

Pour into a bowl, top with cling film and allow to cool.

Once profiteroles and crème pâtissière are fully cool, cut almost in half and fill with crème pâtissière.

Just before serving, make the chocolate sauce by combining the chocolate and cream in a medium saucepan and stirring on a low heat until melted and smooth. Add more cream or chocolate as required until desired consistency is reached.

Serve profiteroles drizzled with chocolate sauce and berries. Enjoy!

IMG_6710.JPG
Phew, 10 servings with 4 profiteroles each is quite exhausting!

thumb_IMG_3891_1024

thumb_IMG_3874_1024

Choux pastry recipe adapted from Gabriel Gaté’s ‘Sweet Treats’ (1995).
Crème pâtissière recipe adapted from Vogue’s ‘Grand Finales’ (1988).

Bacon, Caramelised Onion & Thyme Piroshki

thumb_IMG_3749_1024

Piroshki (also known as pirozhki or pyrizhky), literally translating to ‘small pie’, are individual-sized buns with either a sweet or savoury filling. There are many variants of piroshki across Eastern Europe, but this recipe most closely resembles the Russian version. These piroshki are baked rather than fried and stuffed with the dreamy combination of bacon, caramelised onion and thyme. We usually serve these as hors d’oeuvres but they are great for lunches and picnics as they are easily transportable and don’t make a mess.

While they do take time and effort to make, they more than make up for it in terms of flavour and I find the baking process is very rewarding. There’s something so satisfying about making things from scratch and I’m always left feeling very self-righteous (plus who doesn’t love kneading dough? So fun and therapeutic). Next time you have a free afternoon, try making a batch – your tastebuds will definitely thank you for it!

thumb_IMG_3740_1024

Ingredients (makes 35-40)
60g fresh yeast
2 tablespoons sugar
315ml lukewarm milk
375g plain flour
Salt & pepper
125g melted butter
3 large brown onions, chopped
55g butter, extra
250g bacon
2 tablespoons fresh thyme leaves
1 egg, beaten

Method
Combine the yeast and sugar; stir in the milk.

In a large bowl, mix flour and 2 teaspoons salt and make a well in the centre. Pour the yeast mixture and the melted butter into the centre. Beat well for 3 minutes until a smooth batter is formed. Cover with Gladwrap and leave in a warm place for 1 hour or until doubled in size.

Gently cook onions in extra butter until golden. Chop bacon finely and add to the onions along with a teaspoon of pepper and the thyme leaves.

Knead the risen dough lightly and then divide into 35 to 40 portions. Wrap a teaspoon of the bacon filling into each portion of the dough. Allow the buns to prove in a warm place on greased trays for 15 minutes.

Preheat oven to 230°C.

Brush each bun with egg and bake in the prepared oven for 10-15 minutes or until golden brown. Enjoy!

thumb_IMG_3745_1024

thumb_IMG_3752_1024

Recipe adapted from Hors D’Oeuvres (1988) by June Budgen.

Easter Reblog: Figolli (Maltese Easter Biscuits)

These rich buttery biscuits with a chewy almond-citrus filling are my favourite Easter treat. Topped with a simple icing and a mini egg, they are gorgeous to give as gifts, or to eat yourself. They also give some relief from the chocolate-laden treats so abundant at Easter time. Happy baking!! xx

ON97+3tZRPe7d6dM2gB8eQ_thumb_2901

Ingredients (makes 36)
Pastry
400g plain flour, sifted
175g caster sugar
200g butter
2 egg yolks
Grated rind of ½ a lemon

Filling
300g icing sugar, icing
300g ground almonds
2 egg whites
Grated rind of 1 lemon
2-2½ teaspoons orange blossom water

wyHme7j4Qsye8nGn9Bo6Mw_thumb_28f8

Method
In a food processor, blitz flour, sugar & butter until it resembles fine breadcrumbs.

Add egg yolks, lemon zest & sufficient cold water to bring together. Knead gently to form a smooth ball and then cover in cling film and refrigerate for 20mins.

Meanwhile, add the lemon zest, orange blossom water, egg whites & sugar to the ground almonds. Mix until combined.

Preheat oven to 180°C or 160°C fan-forced.

Roll pastry out to a 2-3mm thickness on a lightly floured surface. Cut out 2 circles using a 7cm  diameter round cutter.

Spread almond paste on one half and lay matching shapes on top, pressing the edges together.

Bake for approximately 20 mins or until golden brown.

Allow to cool before decorating with glacé icing & mini easter eggs or speckled eggs.

yl7ijVZiR6yuXhIukZDwWQ_thumb_28fd

Adapted from ‘The Food and Cookery of Malta’ (1999)

dfMv4W+jQtecrwPu2fE8wA_thumb_28ff

Parmesan & Fennel Seed Biscuits

These crumbly, flavoursome biscuits are perfect for entertaining. Try them on a cheese platter or serve by themselves with a good red wine. Delicious!

thumb_IMG_3709_1024

Ingredients (makes ~35 medium stars)
120g parmesan cheese, roughly chopped
1 cup plain flour
1 tablespoon cornflour
150g cold butter, chopped
2⅓ teaspoons fennel seeds, plus extra for decoration
1 tablespoon milk, plus extra for brushing

thumb_IMG_3695_1024

Blitz the parmesan in a food processor until finely grated. Add flour and cornflour and process until combined. With the motor running, add the butter and blitz until fine crumbs form. Add fennel seeds and milk and blitz until a dough forms.

Turn out onto a lightly floured surface and knead for 20 seconds. Cover dough in Gladwrap and refrigerate for 30 minutes.

Preheat oven to 180°C (~160°C fan-forced). Line 3 baking trays with baking paper.

Roll dough out with a rolling pin until approximately 5mm thick. Cut out medium stars (or other shape of your choosing) and place on prepared trays. Brush each biscuit with a small amount of milk and sprinkle with extra fennel seeds.

Bake for 12-15 minutes or until golden. Enjoy!

thumb_IMG_3714_1024

thumb_IMG_3697_1024

Adapted from Donna Hay’s ‘Fennel and Parmesan Biscuits’.

Coffee & Walnut Torte

While the ingredients for this torte look a little odd (particularly the Jatz biscuits!) the end result is absolutely delicious – the torte is crisp on the outside and chewy on the inside with a subtle coffee flavour. It’s a firm family favourite that always disappears far too quickly.

thumb_IMG_3532_1024

Ingredients (serves 6-8)
3 egg whites
1 cup caster sugar
½ teaspoon white vinegar
1 teaspoon vanilla extract
20 Jatz biscuits, crushed
⅔ cup walnuts

1 tablespoon icing sugar
½ teaspoon vanilla extract
1 teaspoon instant coffee (dissolved in a small amount of water)
1 cup cream
Chocolate shavings (to decorate)
Walnuts (to decorate)

thumb_IMG_3524_1024

Preheat oven to 180°C (160°C fan-forced). Line a 9″ pie plate with baking paper.

Beat egg whites until stiff peaks form. Gradually add caster sugar, vinegar and vanilla and beat until very stiff. Fold in Jatz biscuits and walnuts. Spread in prepared pie plate and smooth the top.

Bake for 35 minutes. Prop open the oven door and allow to cool in the oven for approximately 20 minutes. Then transfer to a wire rack and allow to cool completely. Trim the baking paper so it can no longer be seen.

To make the coffee cream, add icing sugar, vanilla, coffee and cream to a medium bowl and bit until thickened and stiff.

Spread generously over the cooled torte and, if desired, decorate with chocolate shavings and extra walnuts. Keep in the fridge until ready to serve. Enjoy!

thumb_IMG_3533_1024

Recipe from Kaye Potter.

Apple Pie

This cheat’s apple pie uses pre-made pastry which allows you to spend more time decorating. I used pink lady apples because that’s what we had in the house, but it would work well with granny smith apples instead (but you may want to add in a little more sugar). Happy baking!

Ingredients (serves 8)
5 medium apples peeled, cored and chopped into cubes
½ cup water
¼ cup caster sugar
2 teaspoons lemon rind
3 teaspoons ground cinnamon
1 egg, lightly beaten

Method

Grease a 25cm pie dish. Preheat oven to 180°C. 

Peel, core and chop your apples. Place the apples and the water in a large saucepan and bring to the boil. Reduce the heat and simmer, covered, for about 6-7 minutes or until the apples soften. Drain all water. Stir in sugar, lemon rind and cinnamon.

Line pie dish with pastry (you may need to join 2 pieces together) and prick the bottom with a fork. Top with baking paper and pie weights or rice and bake for approximately 20-25 minutes or until lightly golden. Remove the pie weights and allow to cool.

Meanwhile, use the offcuts from the first 2 pieces of pastry to cut out leaves and flowers using cookie cutters.

Using the third piece of pastry, cut 6 thin strips, 2 thick strips and 6 very thin strips (to form 2 braids). Use the excess pastry to cut more leaves and flowers.

Spoon the apple mixture into the cooled pie base. Top with pastry strips and braids in a woven lattice design. Use the pastry leaves and flowers to decorate the edges. Gently brush the pastry with the beaten egg.

Bake for 25-35 minutes or until pastry is golden and crisp. Serve with cream or ice-cream. Enjoy!

Adapted from the Australian Women’s Weekly ‘Apple Pie’.

The Port Elliot Bakery – the Best in South Australia

It is a truth universally acknowledged that the Port Elliot Bakery is the best in South Australia*. Yes, it’s a bold statement considering SA’s dozens of award-winning bakeries, but the Port Elliot Bakery’s consistent 5 star reviews, 4000-strong “Port Elliot Bakery appreciation society” Facebook group, and regular 50m+ queues set it apart from the rest and are a testament to its excellence. The bakery is located on the main street of Port Elliot, a small town on the Fleurieu Peninsular about an hour’s drive south of Adelaide, and is a must-visit when you’re in the area.

screen-shot-2017-02-12-at-3-34-11-pm
Just some of the delicious offerings from the Port Elliot Bakery. (Image: Michael Mangahas)

photo_731_1415318658
The unassuming shopfront of the Port Elliot Bakery – although you will never see it this empty! (Image: travelguide.net.au)

The Port Elliot Bakery was established in 1989 by the Gormon-Horrocks family, who still own and operate it today. However the site has hosted a bakery since the 1860s, and its tradition of using fresh produce and baking  daily on the premises is maintained, along with the original wood fired oven.

screen-shot-2017-02-12-at-2-58-03-pm
The original Port Elliot bakers, the Bebee family (Image: portelliotbakery.com)  

I am fortunate enough to have visited the Port Elliot Bakery regularly for over 20 years, as it is located about 10mins drive away from my family’s holiday house. I can honestly say that I have never left disappointed as the food is always delicious and the service is quick and friendly (no matter how long the line-up is).

The pies, pasties and sausage rolls come in a wide range of delicious flavours and always have perfect crisp, flaky pastry, and the enormous array of beautiful and tempting sweets is sure to impress the harshest of critics.

338630_134786679959935_1365775407_o
A selection of their savoury goods. (Image: The Port Elliot Bakery Facebook page)

While everything I’ve tried has been excellent, my go-to is their steak and bacon pie** (so mouthwateringly tender and flavoursome) with a chocolate doughnut and a Farmer’s Union ice-coffee – perfection!

img_5256
Look at that perfect pastry…

img_5260
Melt in your mouth steak paired with bacon and a rich flavour-packed gravy… what more could you ask for?!

fullsizerender-4
With a deep golden exterior, soft fluffy interior and a dark chocolate icing, these are the doughnuts of my dreams

img_5269
Bailey is always more than happy to assist in eating Port Elliot Bakery goods!  

One of the reasons I love the bakery so much, is that it’s constantly innovating and updating its menu. The bakery offers a new “pie of the month” each month, and its recent Nutella and Oreo doughnut additions already have cult followings!

14590525_923272104444718_1839979544938360214_n
The bakery’s new Oreo cookies & cream doughnuts (Image: The Port Elliot Bakery Facebook Page)

The bakery has also developed a range of vegan options including ‘Fruchoc’, ‘Bounty’ and ‘Snickers’ slices, bliss balls, and salads.

14479703_918723174899611_4919212302071358403_n
“Fruchoc slice” a vegan option. (Image: the Port Elliot Bakery Facebook page)

Next time you’re down in the Fleurieu area, make sure you give the Port Elliot Bakery a visit. My advice is to get in early to avoid disappointment as the bakery is so popular that many items sell-out before 1pm. There is seating outside the bakery, but we like to drive to the Freeman Lookout and eat our bakery goodies with a magnificent ocean view where, between May and October, you might even be lucky enough to see whales.

horshoe-bay-lookout
Freeman Lookout

Port Elliot Bakery

Open: 7am-5:30pm every day but Christmas Day, Proclamation Day, New Year’s Day and Good Friday.
Location: 
31 North Terrace, Port Elliot, South Australia
Phone: (08) 8554 2475
Price: from $2.50
Rating: 5/5 cupcakes
5-star

screen-shot-2017-02-12-at-4-27-40-pm
* I’m sure if Jane Austen had tried their baked goods she would agree!

**tragically, as of January 2023, they are no longer offering the steak and bacon pie so I have had to adapt and opt for the steak, cheese and bacon pie #notquitethesame #bringbacksteakandbacon

Funfetti Cupcakes

These delicious vanilla cupcakes are made even better by the addition of sprinkles! Perfect for birthdays, baby showers or any time you feel like celebrating.

thumb_img_2909_1024

Ingredients (makes 24+ cupcakes)
2 ¾ cups plain flour
2 tspns baking powder
200g unsalted butter, softened
1 ¾ cups caster sugar
4 eggs
1 tblspn vanilla extract
1 cup milk
1 cup rainbow sprinkles

Vanilla Buttercream Frosting 
200g butter, softened
½ cup milk
1 tblspn vanilla extract
8 cups icing sugar
A few drops of food colouring as desired
Sprinkles, to decorate

thumb_img_2913_1024

Method
Preheat the oven to 170°C (approximately 150°C fan-forced). Line two 12 hole muffin trays with patty pans.

Sift together the flour and baking powder. In a different bowl, cream the butter for 1-2 mins. Add the caster sugar about a third at a time, beating for 2mins after each addition. After the last of the sugar has been beaten, beat until the mixture is light and fluffy and the sugar dissolved. Add the eggs one at a time, beating for 1 min after each addition or until the mixture is light and fluffy. Add the vanilla and beat until just combined.

Add approximately a third of the flour mixture to the creamed mixture and beat on a low speed until combined. Add half of the milk and beat until combined. Repeat this process until all of the flour and milk is thoroughly combined but be careful not to overbeat (this will toughen the mixture). Add in the sprinkles and gently stir through until evenly dispersed.

Spoon mixture into the patty pans (filling each about 3/4 full) and bake for about 18-20mins or until the top springs back when touched. Remove the cupcakes from the trays immediately and cool on a wire rack for at least half an hour before icing.

To make the frosting, cream the butter for 1-2 mins in a large bowl using an electric mixer. Add the milk, vanilla and half of the icing sugar and beat for at least 3 mins (until the mixture is light and fluffy). Add the remaining icing sugar and beat for a further 3 mins or until of a spreadable consistency. Add extra milk if too dry or extra icing sugar if too wet. Add colouring and beat in until combined and the desired colour has been achieved.

Using a piping bag with a Wilton 2D tip, pipe buttercream in a swirl on the cupcakes and decorate with extra sprinkles.

Enjoy!

thumb_img_2902_1024

thumb_img_2908_1024

Recipes adapted from The Crabapple Cupcake Bakery Cookbook.