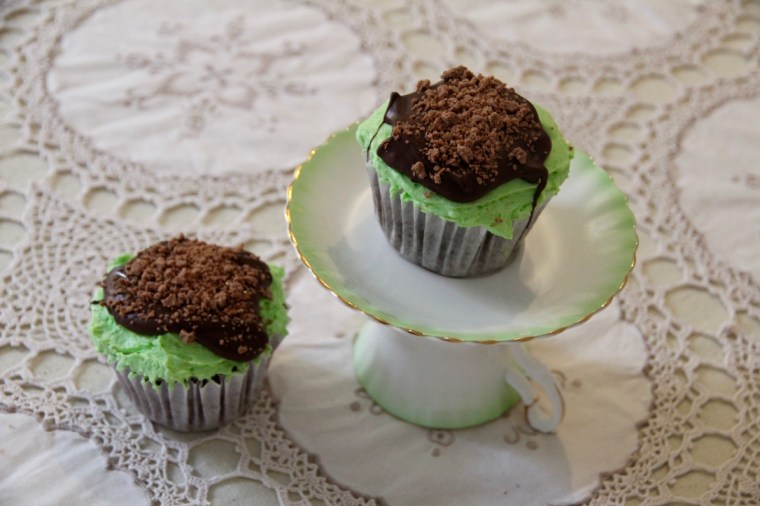
Chocolate and mint are a match made in heaven and these cupcakes combine them in one deliciously compact package. The cupcakes are a dark chocolate mudcake which, to me, are the perfect blend of light and rich. They are then topped with a generous layer of fluffy mint buttercream (which tastes exactly like peppermint ice-cream I might add), melted dark chocolate and a crumbled Flake bar – what’s not to love?! These are also a gorgeous shade of green – perfect for St Patrick’s Day!
Ingredients (makes 12) 90g softened butter
1 cup brown sugar, firmly packed
2 eggs
⅔ cup self-raising flour
2 tablespoons cocoa powder
⅓ cup almond meal
⅔ cup water
60g dark chocolate melts, melted
Peppermint Buttercream Frosting
125g butter, softened
1 ½ cups icing sugar
2 tablespoons milk
Peppermint essence
Green food colouring
To decorate 1 large Flake bar, crumbled
30g dark chocolate melts, melted
Method Preheat the oven to 170°C (150°C fan-forced). Line a 12-hole muffin tin with patty pans.
Beat butter, sugar & eggs in a large bowl with electric mixer until light and fluffy. Add in sifted flour and cocoa, almond meal, water and melted chocolate.
Fill each patty pan approximately ⅔ of the way full. Bake for around 25 minutes or until a skewer inserted comes out clean. Stand cakes in tin for 5 minutes before transferring them to a wire rack to cool.
Once cakes are fully cool, you can make the frosting. Beat butter in a medium bowl with electric mixer until light and fluffy. Beat in icing sugar and milk and a drop each of peppermint essence and green food colouring (or until desired colour and flavour reached).
Ice cupcakes with a generous layer of frosting. To decorate, dollop each cupcake with dark chocolate and spread it so that it looks as though it is dripping slightly down the cakes. Top with crumbled Flake.
Enjoy!
Adapted from The Australian Women’s Weekly ‘Cupcakes by Colour’ cookbook
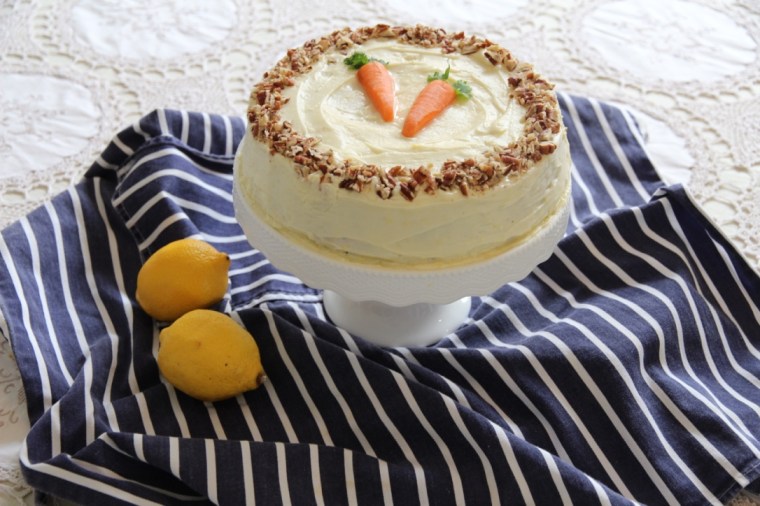
I love this cake, it’s so quick and effortless to put together and is absolutely delicious (also, because it contains carrot it’s basically a salad, right?!). It’s great at any time of year but is particularly good as a treat around Easter for someone who doesn’t like chocolate or for people who are chocolated out!
Ingredients (serves 8-10)
1 ½ cups grated carrot (lightly packed)
½ cup chopped walnuts
1 cup plain flour
2 eggs
1 teaspoon bicarb soda
1 cup caster sugar
1 teaspoon mixed spice
¾ cup vegetable oil
½ teaspoon salt
½ teaspoon vanilla
To decorate (if desired): Extra chopped walnuts
The thin end of a small carrot cut into 2 halves
4 sprigs of coriander
Method Preheat oven to 180°C (160°C fan-forced).
Grease an 8″ round cake pan with margarine and line the base with baking paper.
Combine eggs, sugar, oil, vanilla & sifted dry ingredients in a large bowl & beat on low speed.
Stir in carrots & walnuts. Mix well.
Pour mixture into the prepared cake tin and bake in the oven for approx. 40 – 45mins or until a skewer inserted in the middle of the cake comes out clean.
Let the cake cool in the tin for 5-10 minutes, before placing it on a wire rack to cool completely.
To make the cream cheese frosting, beat butter & cream cheese until smooth and creamy. Add in the lemon rind and icing sugar and beat until smooth. Spread evenly over the top and sides of the cake.
If desired, decorate by placing the finely chopped walnuts around the edge of the cake and the carrot pieces in the centre of the cake with two coriander sprigs above each carrot. Enjoy!
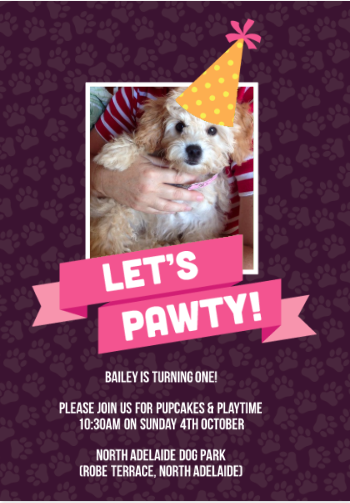
This may seem like an odd thing to post, but anyone who knows me knows that I’m a very devoted ‘dogmother’ to gorgeous toy cavoodle named Bailey:
Bailey turned one on Thursday and we hosted a ‘pawty’ for her at a local dog park (check our her invitations below!!).
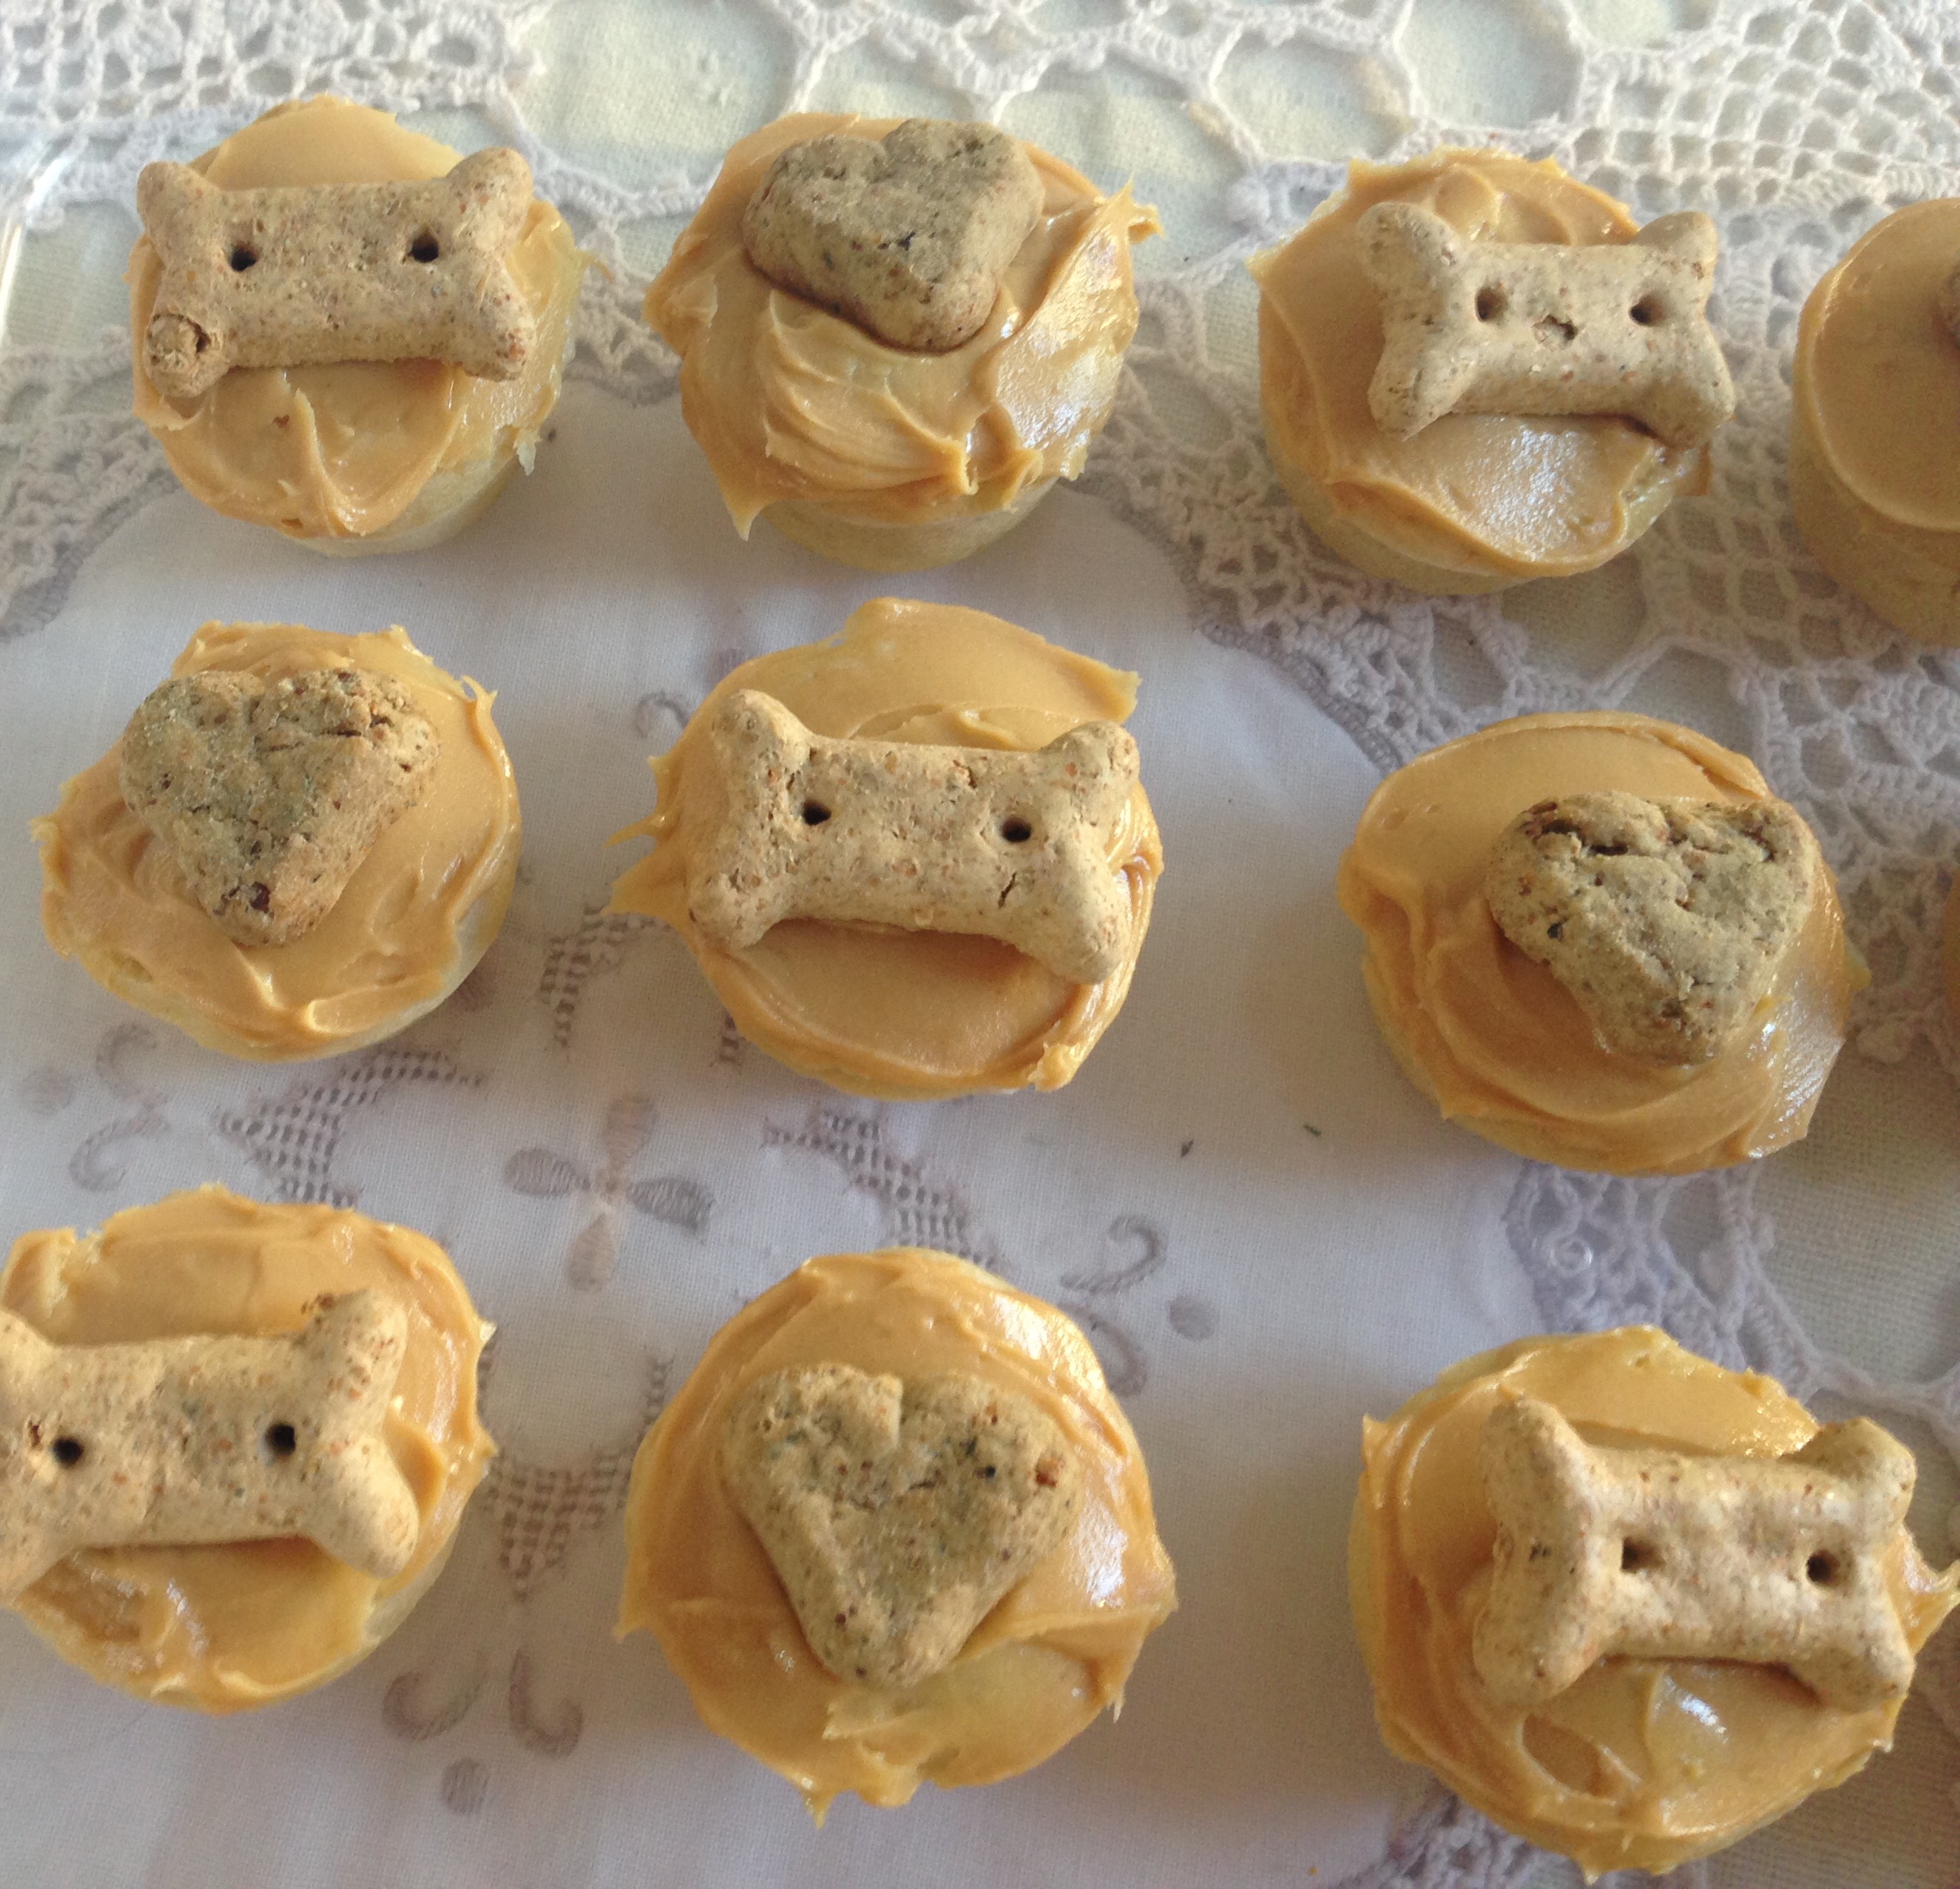
To celebrate the occasion I made a batch of mini ‘pupcakes’ iced with Bailey’s beloved peanut butter. There are a huge number of dog-friendly cupcake recipes out there but this one appealed to me as it’s relatively healthy, refined sugar free & uses ingredients I had on hand.
1x the recipe made 4 large cupcakes & 24 mini cakes. The texture is very dense as the the binding agents are banana & apple sauce, but they certainly passed the puppy taste test! They also don’t brown much in the oven (even when they’re done) as there’s no refined sugar to ‘caramelise’, so insert a skewer to ensure they’re cooked.
Ingredients Coconut oil (to grease pans)
1 ½ cups wholemeal flour (or white flour if desired)
1 ½ teaspoons baking powder
1 very ripe banana, mashed
¼ cup unsweetened apple sauce
1 tablespoon pure maple syrup
1 cup water
To decorate
Organic, smooth peanut butter
Small dog biscuits
One of the pawty guests, GB, enjoying a pupcakeBailey eating a pupcake
Method Preheat oven to 180°C (or 160°C fan-forced). Grease a 24-hole mini muffin tin & 4 holes of a muffin tin, with coconut oil/canola oil.
In a medium bowl, combine flour and baking powder.
In a large bowl, cream the applesauce, banana and maple syrup with electric beaters. Add a quarter of the flour mixture, followed by ¼ cup water and beat until combined. Repeat until all is incorporated.
Bailey was more than happy to taste test!
Spoon the mixture into the prepared tins, filling the mini muffin trays to very near the top and filling the muffin tins ¾ full.
Bake the mini cakes for 10-15 minutes or until a skewer inserted comes out clean. Cook the large cupcakes for approximately 25 minutes.
Once cool, “ice” with a thin layer of smooth peanut butter and top with a dog biscuit.
Watch your furry friend enjoy!
Happy Birthday Bailey!!
Recipe adapted from a number online; largely from Morsels & Moonshine.
Well.. I lied. I completely intended to blog more in the last few weeks (as evidenced by my last post!) but I’ve just been too busy. I had my 21st Birthday to plan, uni assessments galore, the Psychology ball to organise, and now Laura’s 18th is coming up in a couple of weeks. Yikes, I get exhausted just thinking about it all! However, while I haven’t been blogging, I have been baking.
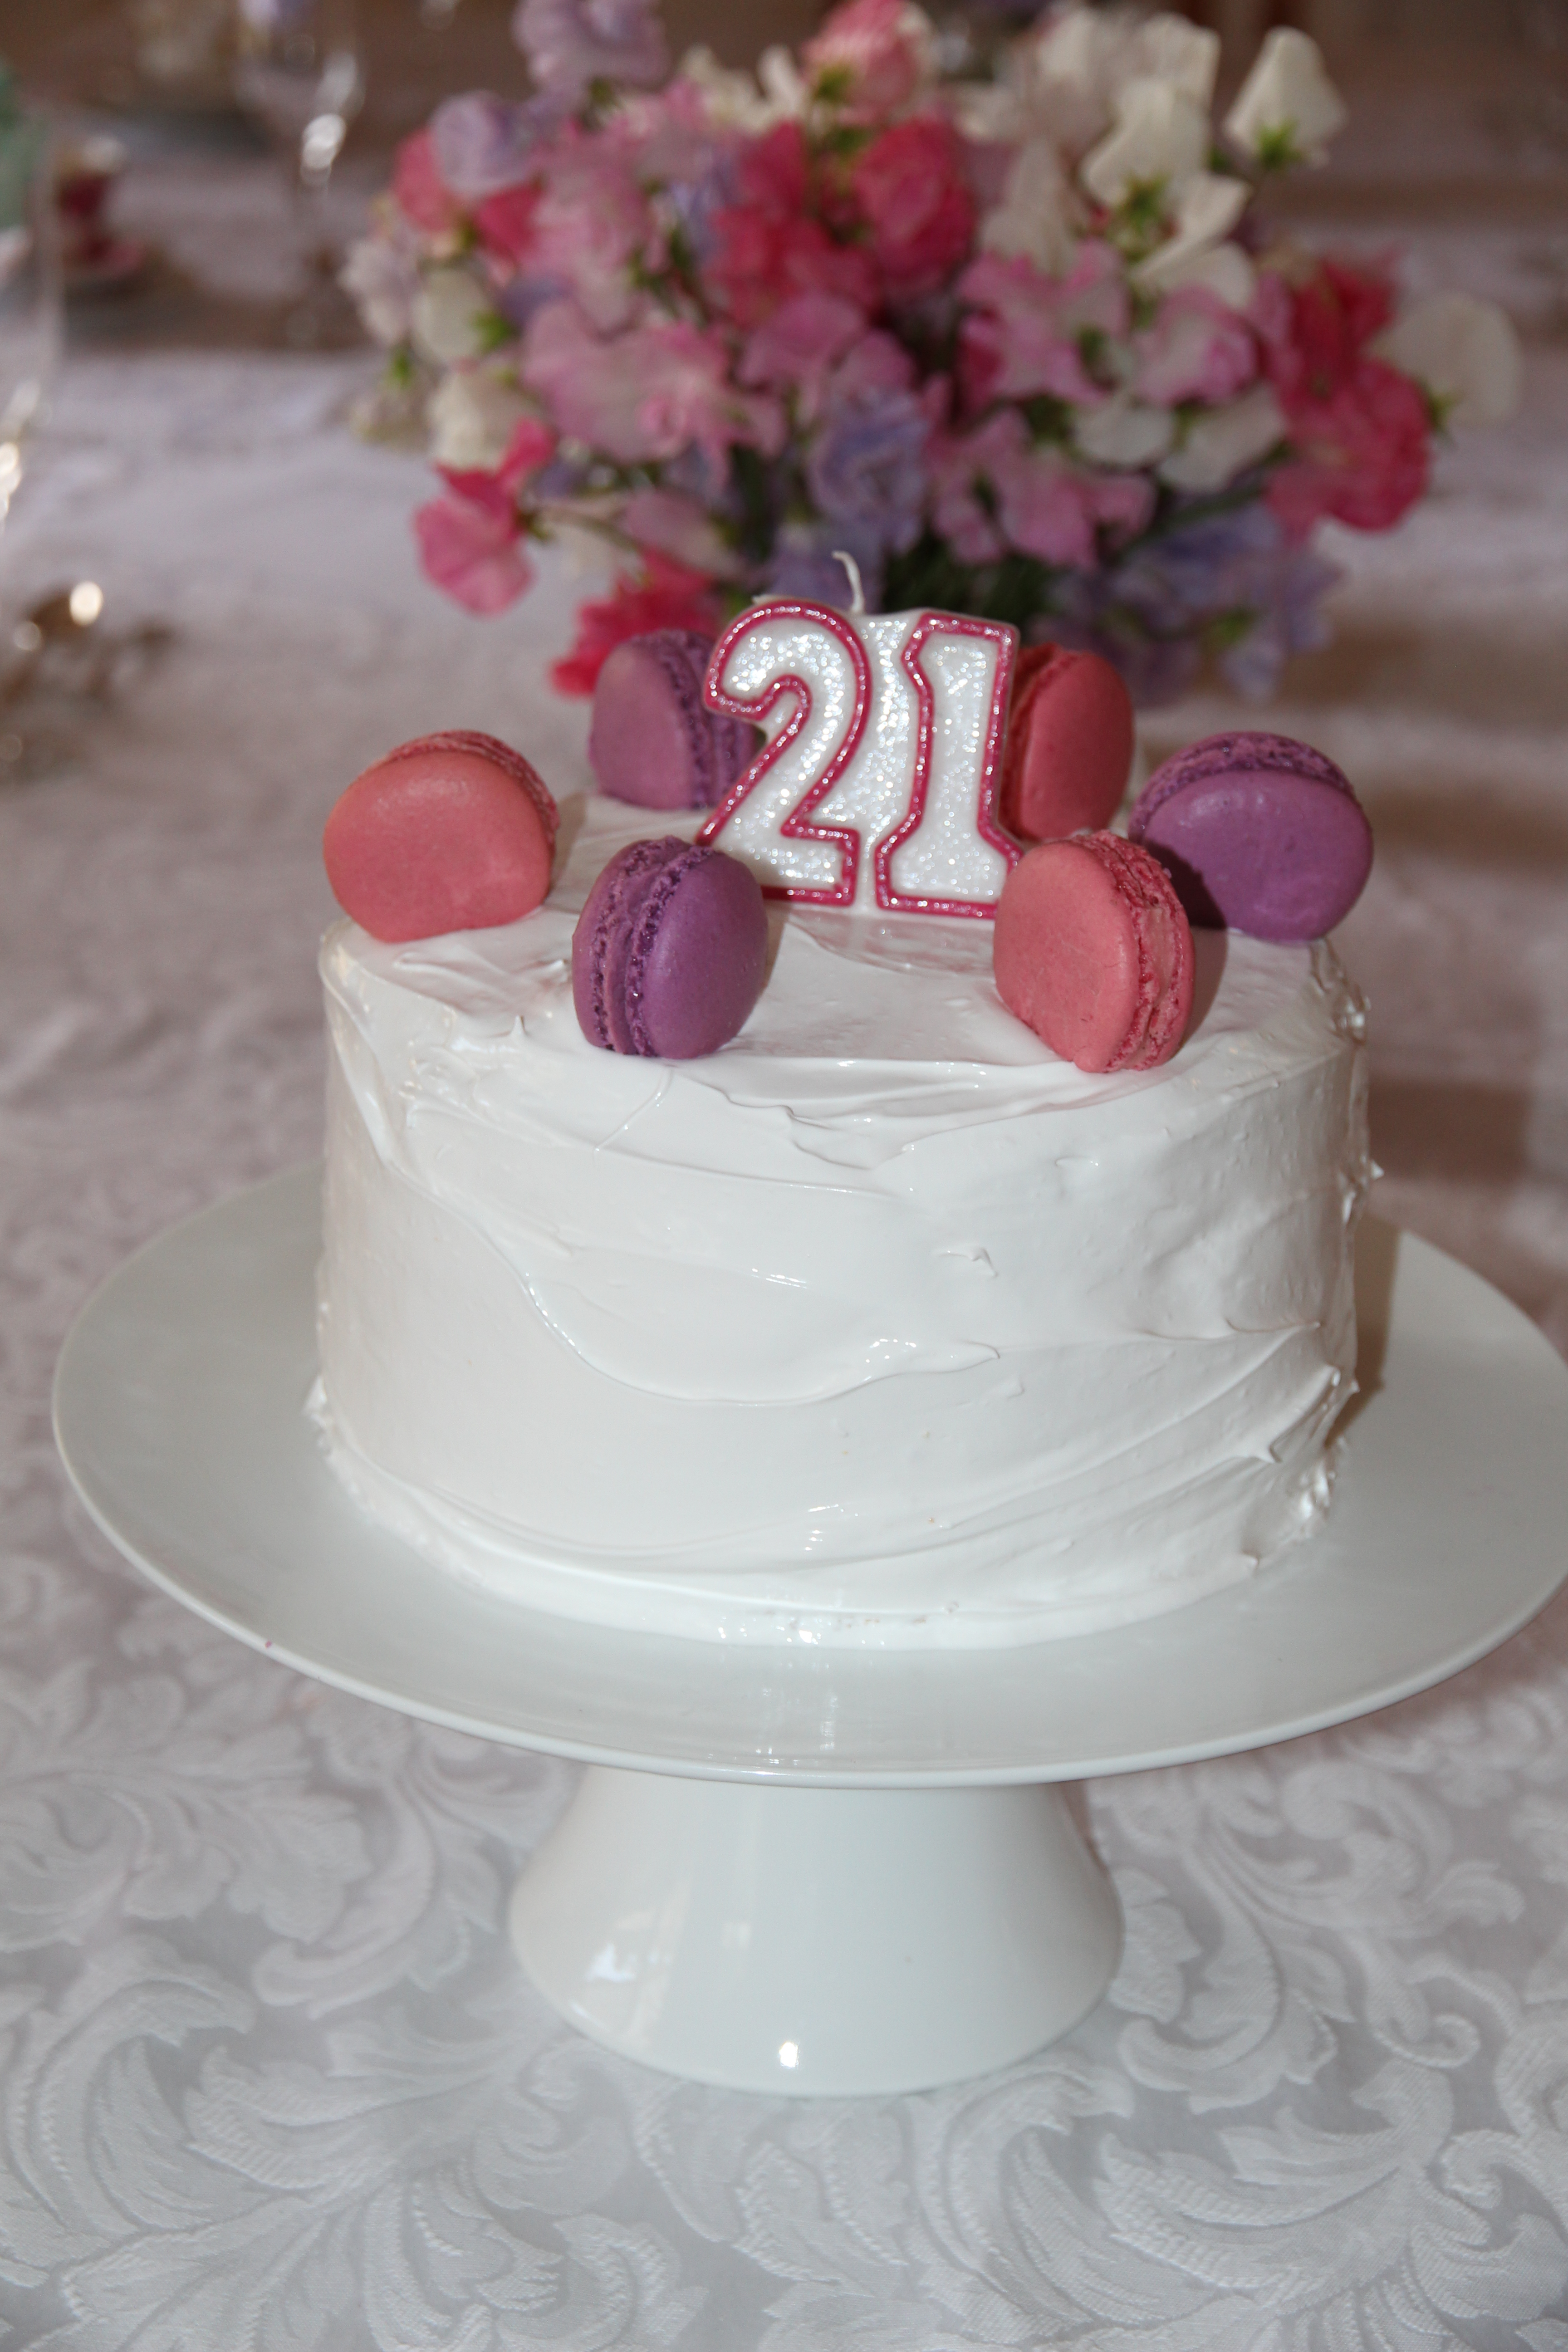
Here is the cake I made for my 21st Birthday afternoon tea – triple layer vanilla cake with a tangy raspberry filling & super glossy meringue frosting, topped with vanilla bean macarons. The raspberry filling was perfect as, otherwise, this cake was going to be too sweet, so I would certainly recommend leaving it (or perhaps substituting it for a tangy lemon curd if you’re not a raspberry fan) to cut the sweetness from the frosting.
Don’t worry, the empty plates in the background didn’t stay empty!
For my 21st birthday cake, I used 2 packets of Betty Crocker’s SuperMoist Vanilla cake mix, with some extra vanilla added so they tasted more ‘home-made’ divided into 3 20cm lined pans. I did this for 2 main reasons; it saved a lot of time (and time was precious as I had so much other cooking to do!), and because it reliably produces an even, stable, fine-crumbed cake that is easy to work with. If you don’t want to use cake mixes, just make a double batch of your favourite vanilla/butter cake and that will work as well 🙂
The raspberry filling needs to be made at least a day ahead but keeps well in the fridge so can be made up to a week ahead.
I also made the macaron shells a couple of days ahead to save me some stress on the actual party day.
The frosting should be made the day of serving as it does not keep particularly well.
Ingredients
For the raspberry filling (make at least a day ahead)
340g frozen raspberries
⅔ cups water
½ cup white, granulated sugar
1 tblspn lemon juice
2 ½ tblspns cornstarch dissolved in ¼ cup of water
For the cake
2 boxes Betty Crocker’s SuperMoist Vanilla cake mix (made following instructions, so add the eggs, milk, butter etc. as specified by the box)
½ tablespoon vanilla extract
For the meringue frosting
6 egg whites
1 ¾ cups caster sugar
2 tblspns liquid glucose (or light corn syrup)
¼ teaspoon cream of tartar
2 teaspoons vanilla extract
Method To make the raspberry filling:
In a saucepan combine the raspberries, water, sugar, and lemon juice. Bring to boil and simmer for 15-20mins or until the raspberries have broken down.
Remove the mixture from the heat and strain with a fine mesh sieve. Return the stained mixture to the heat. Dissolve the cornstarch in water. Whisk the cornstarch mix into the raspberry mixture.
Bring the mixture back to a boil and simmer for 5 more minutes, stirring occasionally. Remove from heat and cool completely.
Refrigerate overnight to set.
To make the cakes: Line & grease 3 20cm cake pans. Set oven to temperature specified by the cake mix boxes. Make cakes according to box instructions, add ½ teaspoon of vanilla extract to each cake mix & divide mixture among the three pans. Bake for specified time, or until a skewer inserted comes out clean.
To assemble the cake: Carefully place a cake layer on your serving platter. Top with a generous amount of raspberry filling and spread gently using a spatula to make an even layer. Top with another cake layer and repeat. Finally, top with the final cake, ready to be frosted.
To make the meringue frosting: Add egg whites, sugar, liquid glucose and cream of tartar, and simmer over a pot of water (not boiling), whisking constantly but gently, until temperature reaches 54°C on a thermometer (be patient, it does get there eventually!).
Beat heated mixture with electric beaters on a low speed for 2 minutes, then increase the speed to medium and beat for 2 more minutes. Increase the speed to high and beat until it is very thick and glossy, about 5 minutes.
Add vanilla and beat to combine.
Frost cake immediately by piling the frosting on top of the cake and, using a metal spatula, gently spreading from the top down. Smoothe as much as possible with your spatula.
Top with 6 macarons, 3 of each colour and a candle (if desired).
Serve each piece with a macaron & enjoy!
Raspberry filling recipe adapted from: Pinterest (various sources with the same basic recipe)
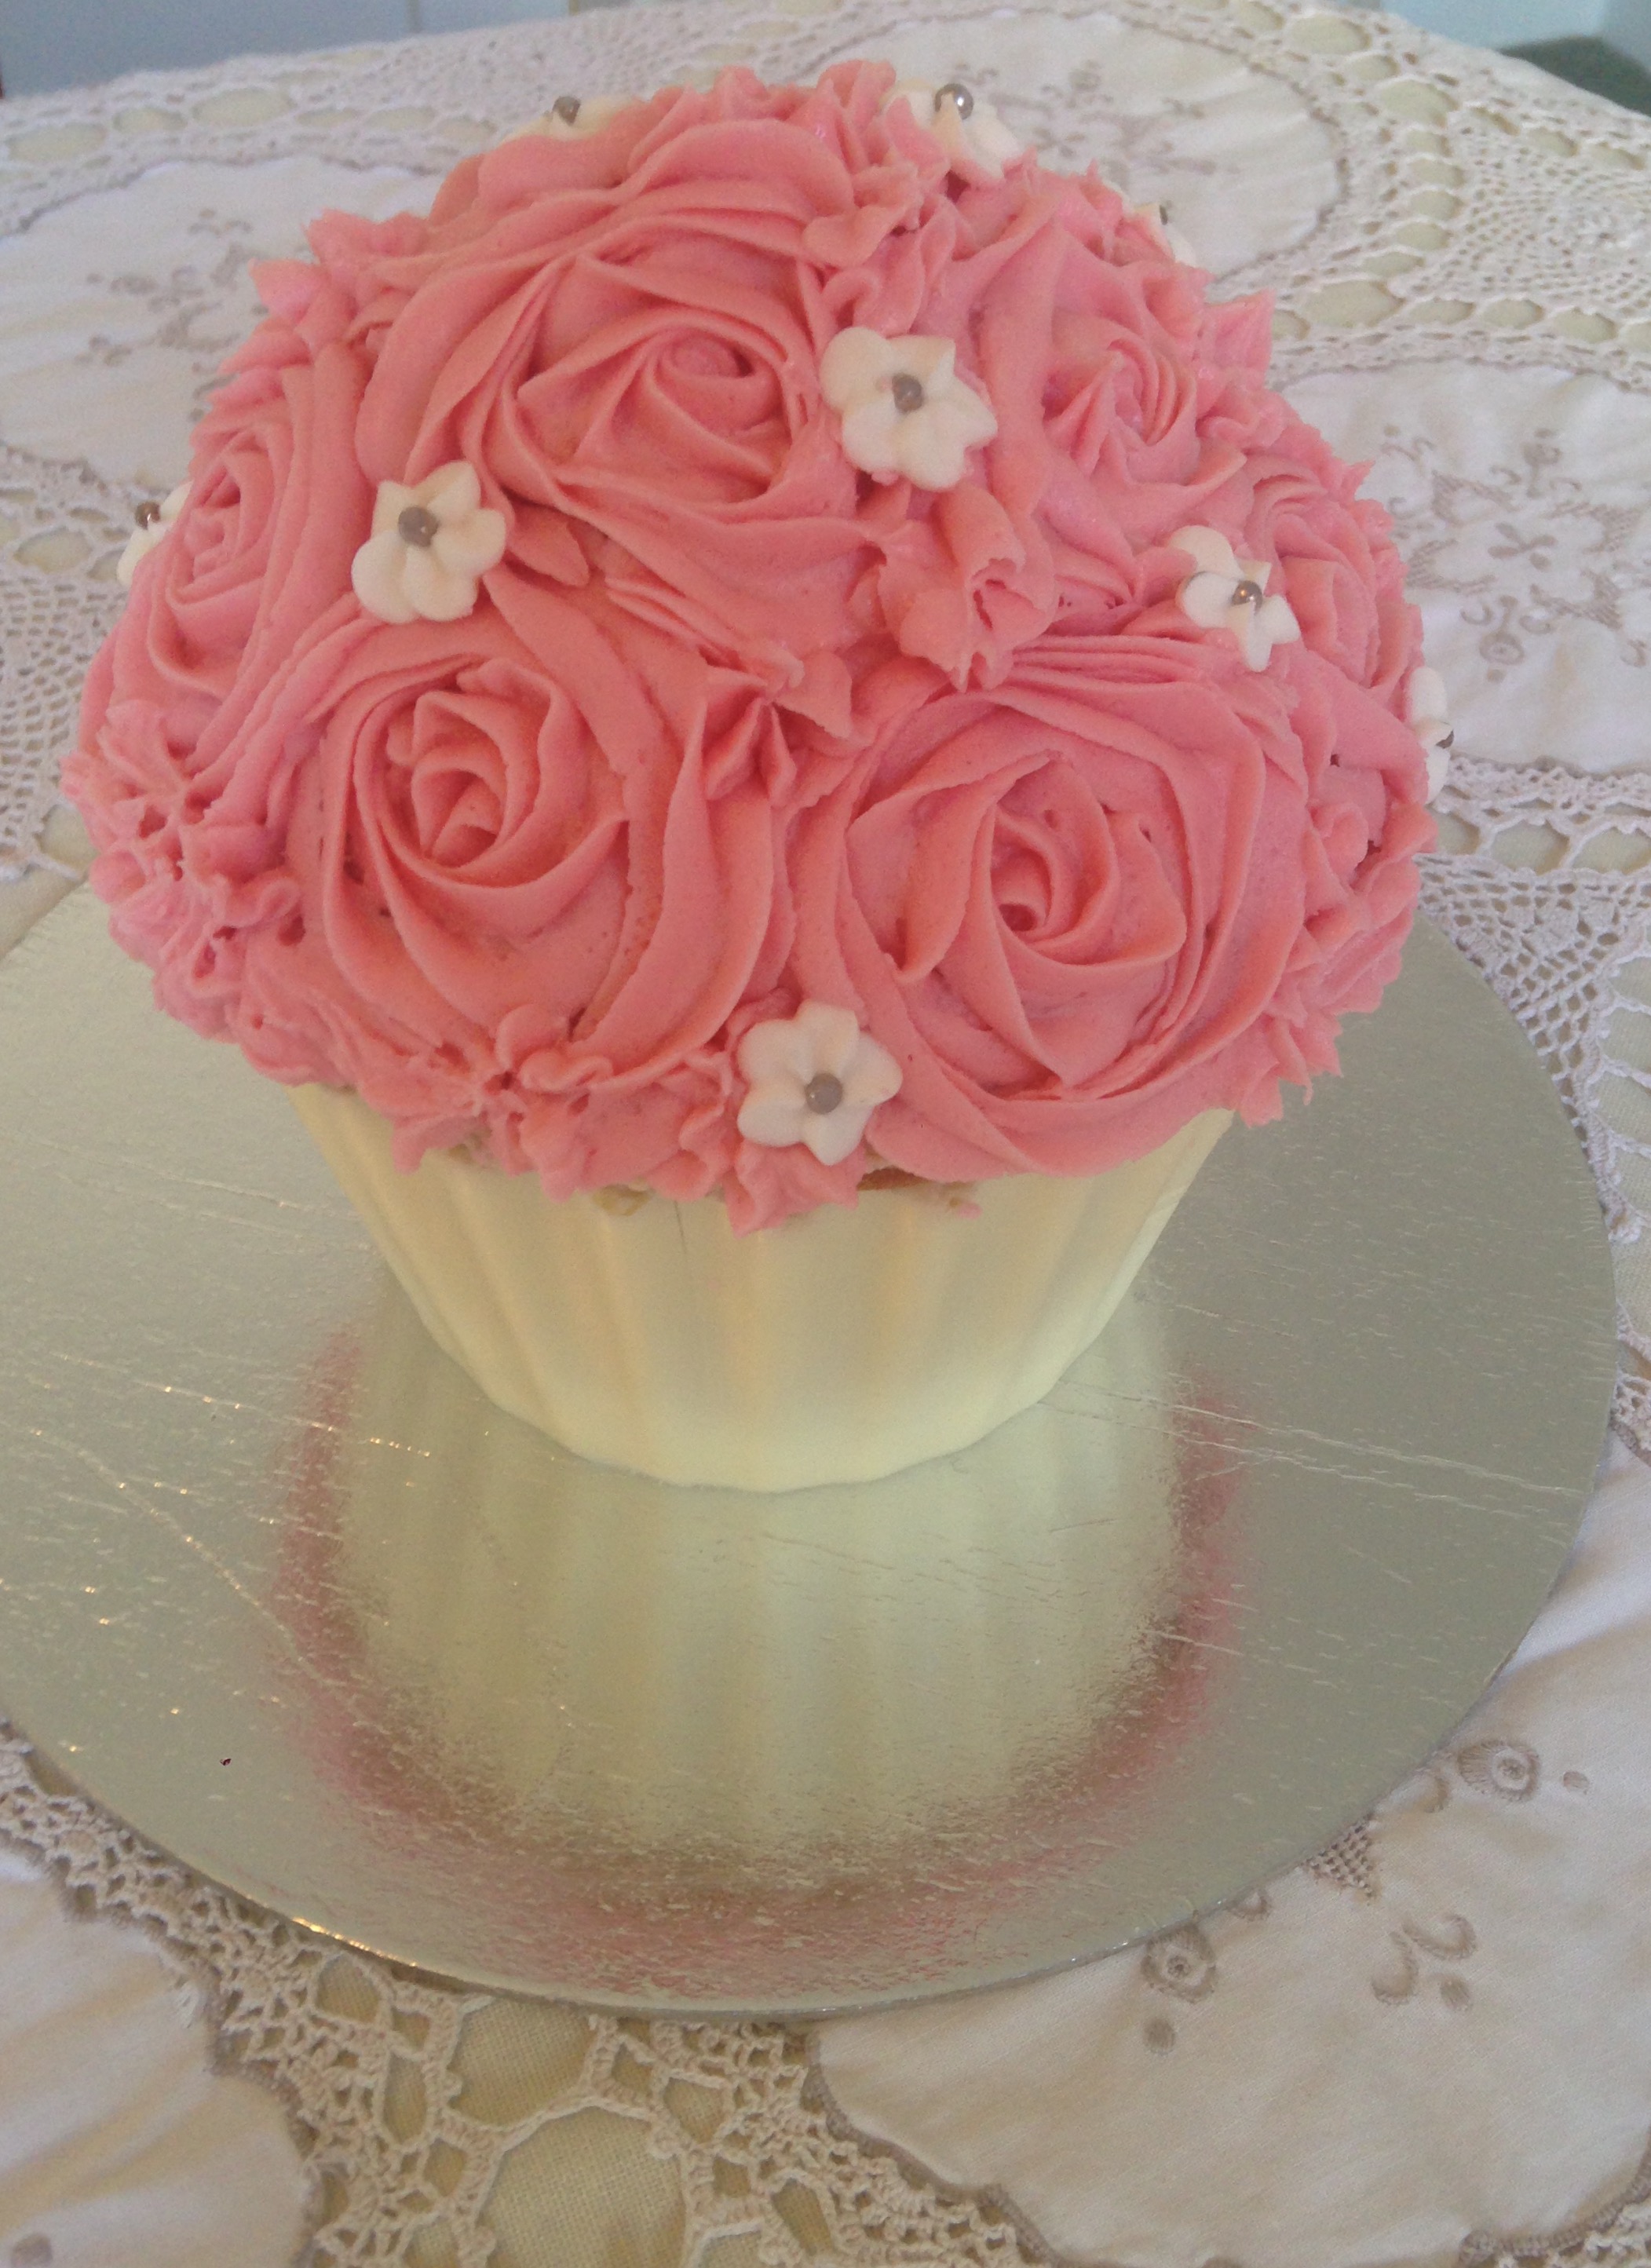
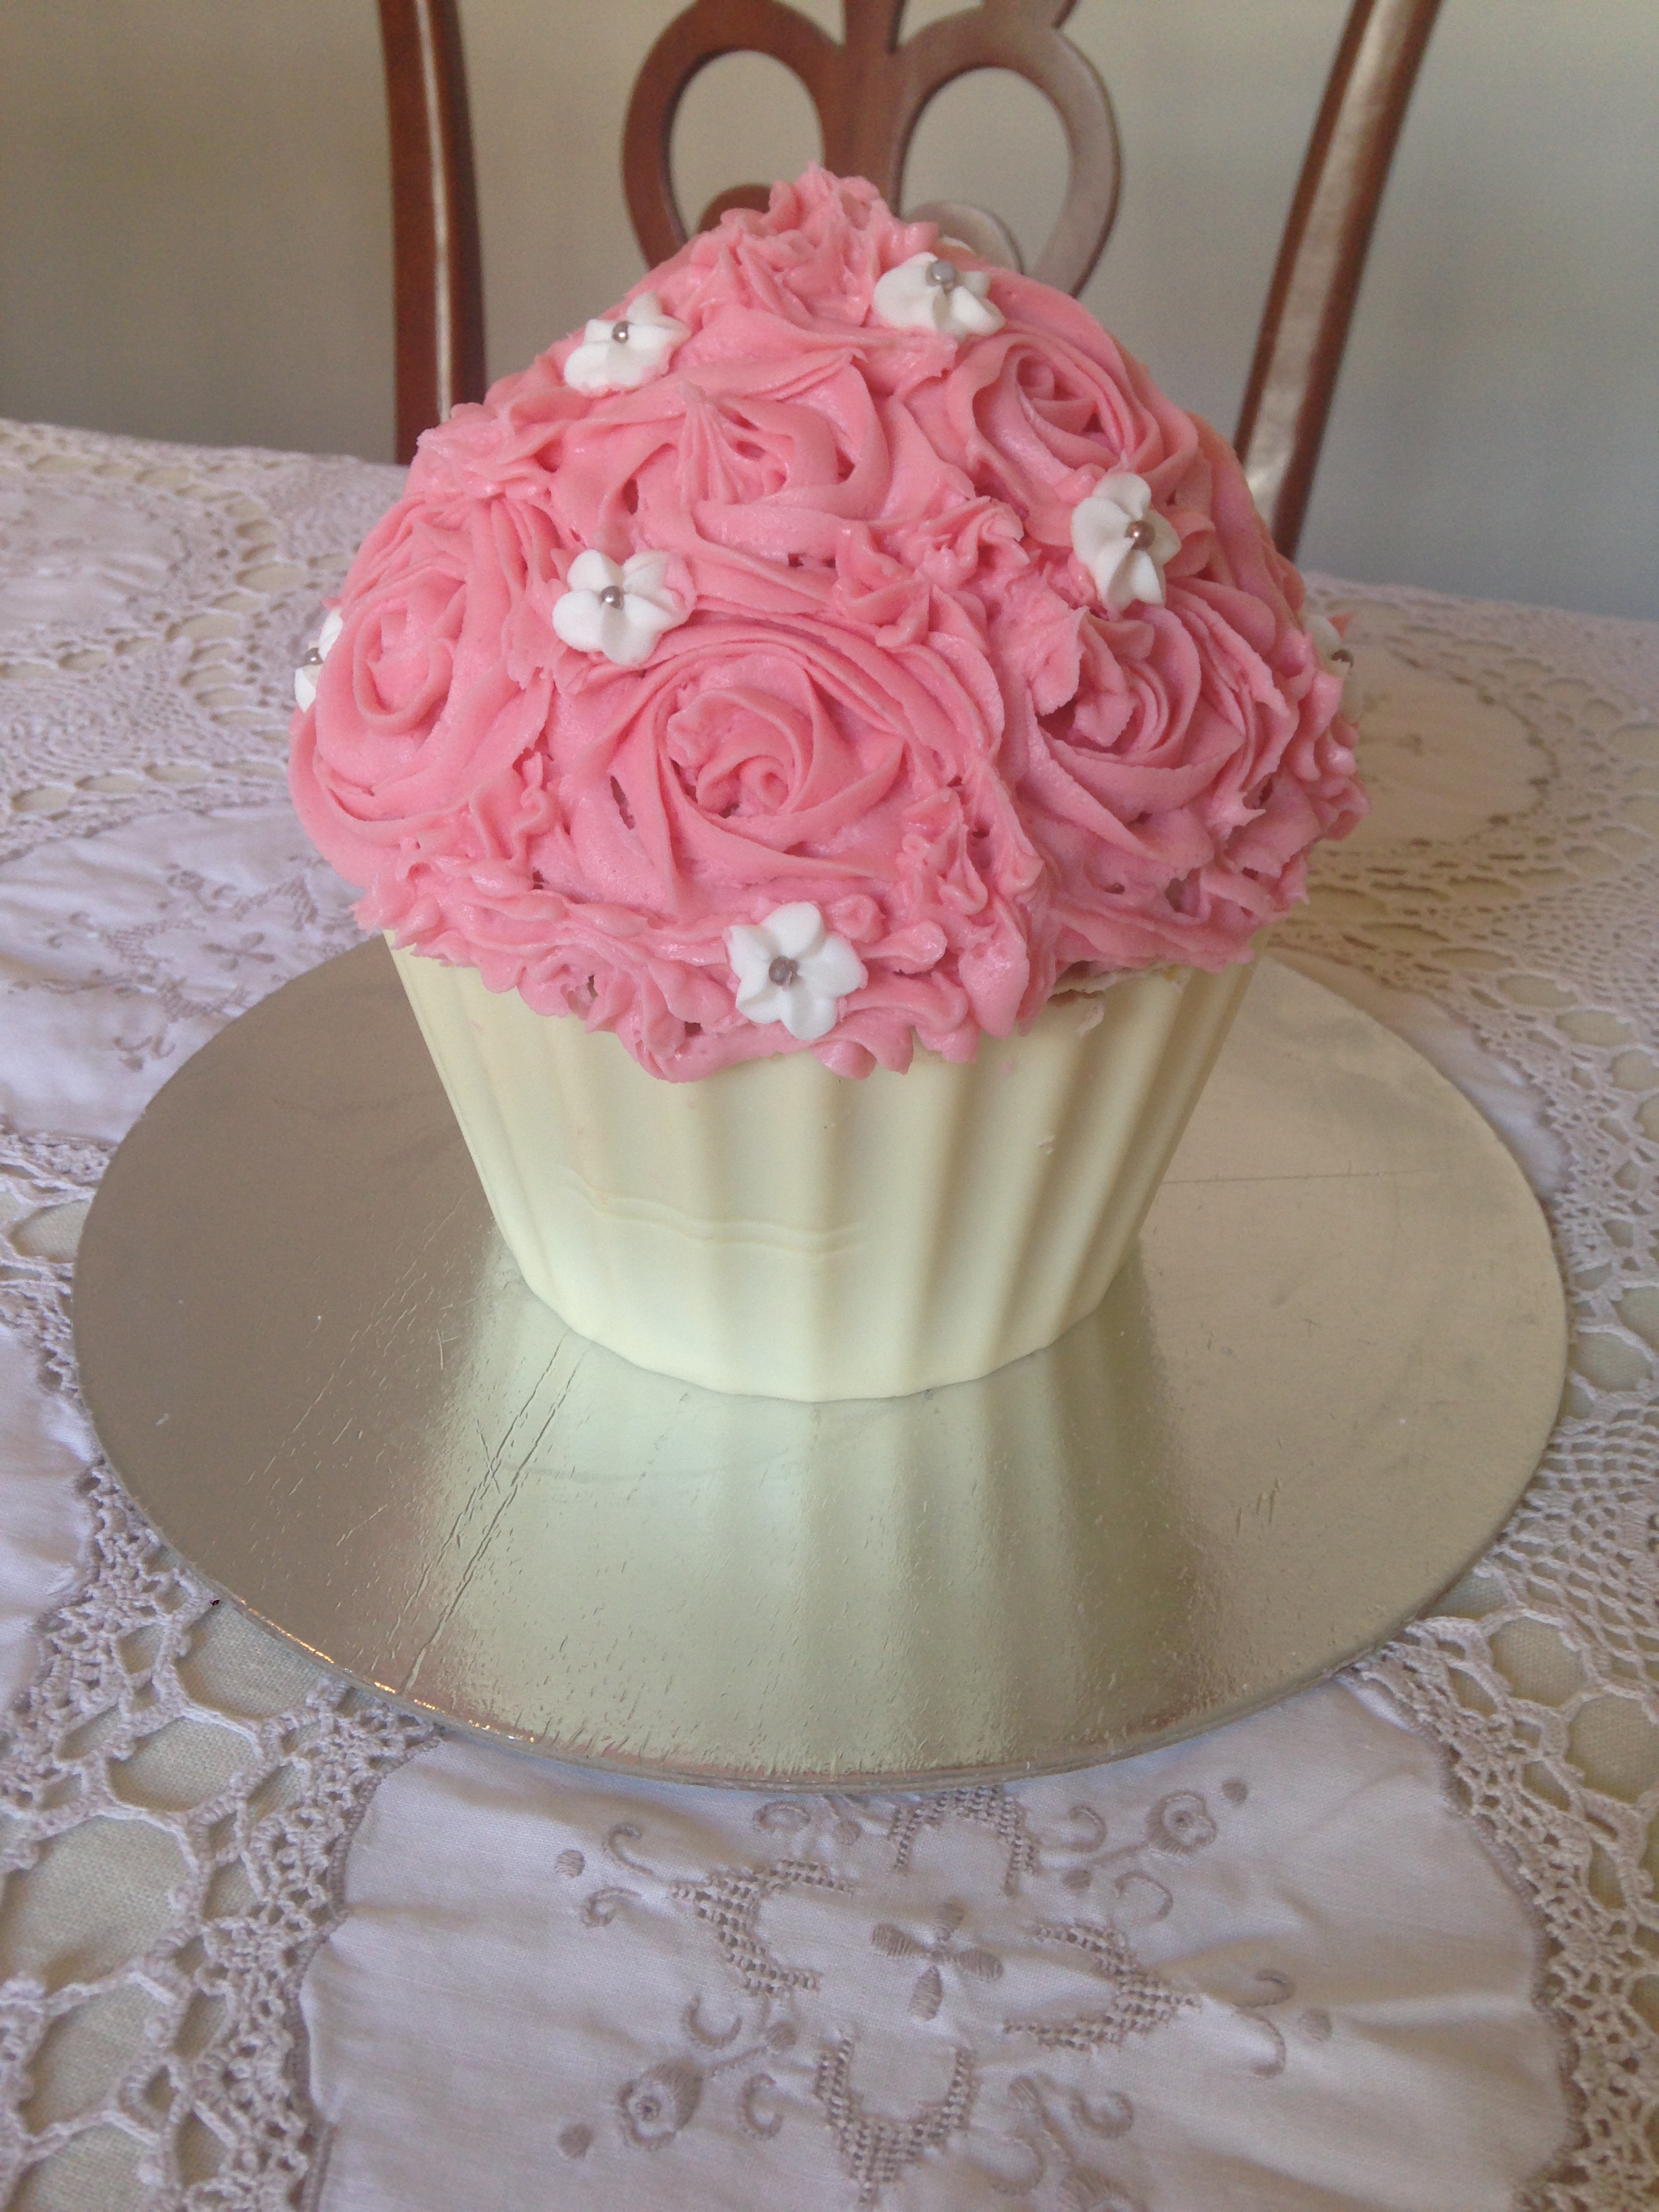
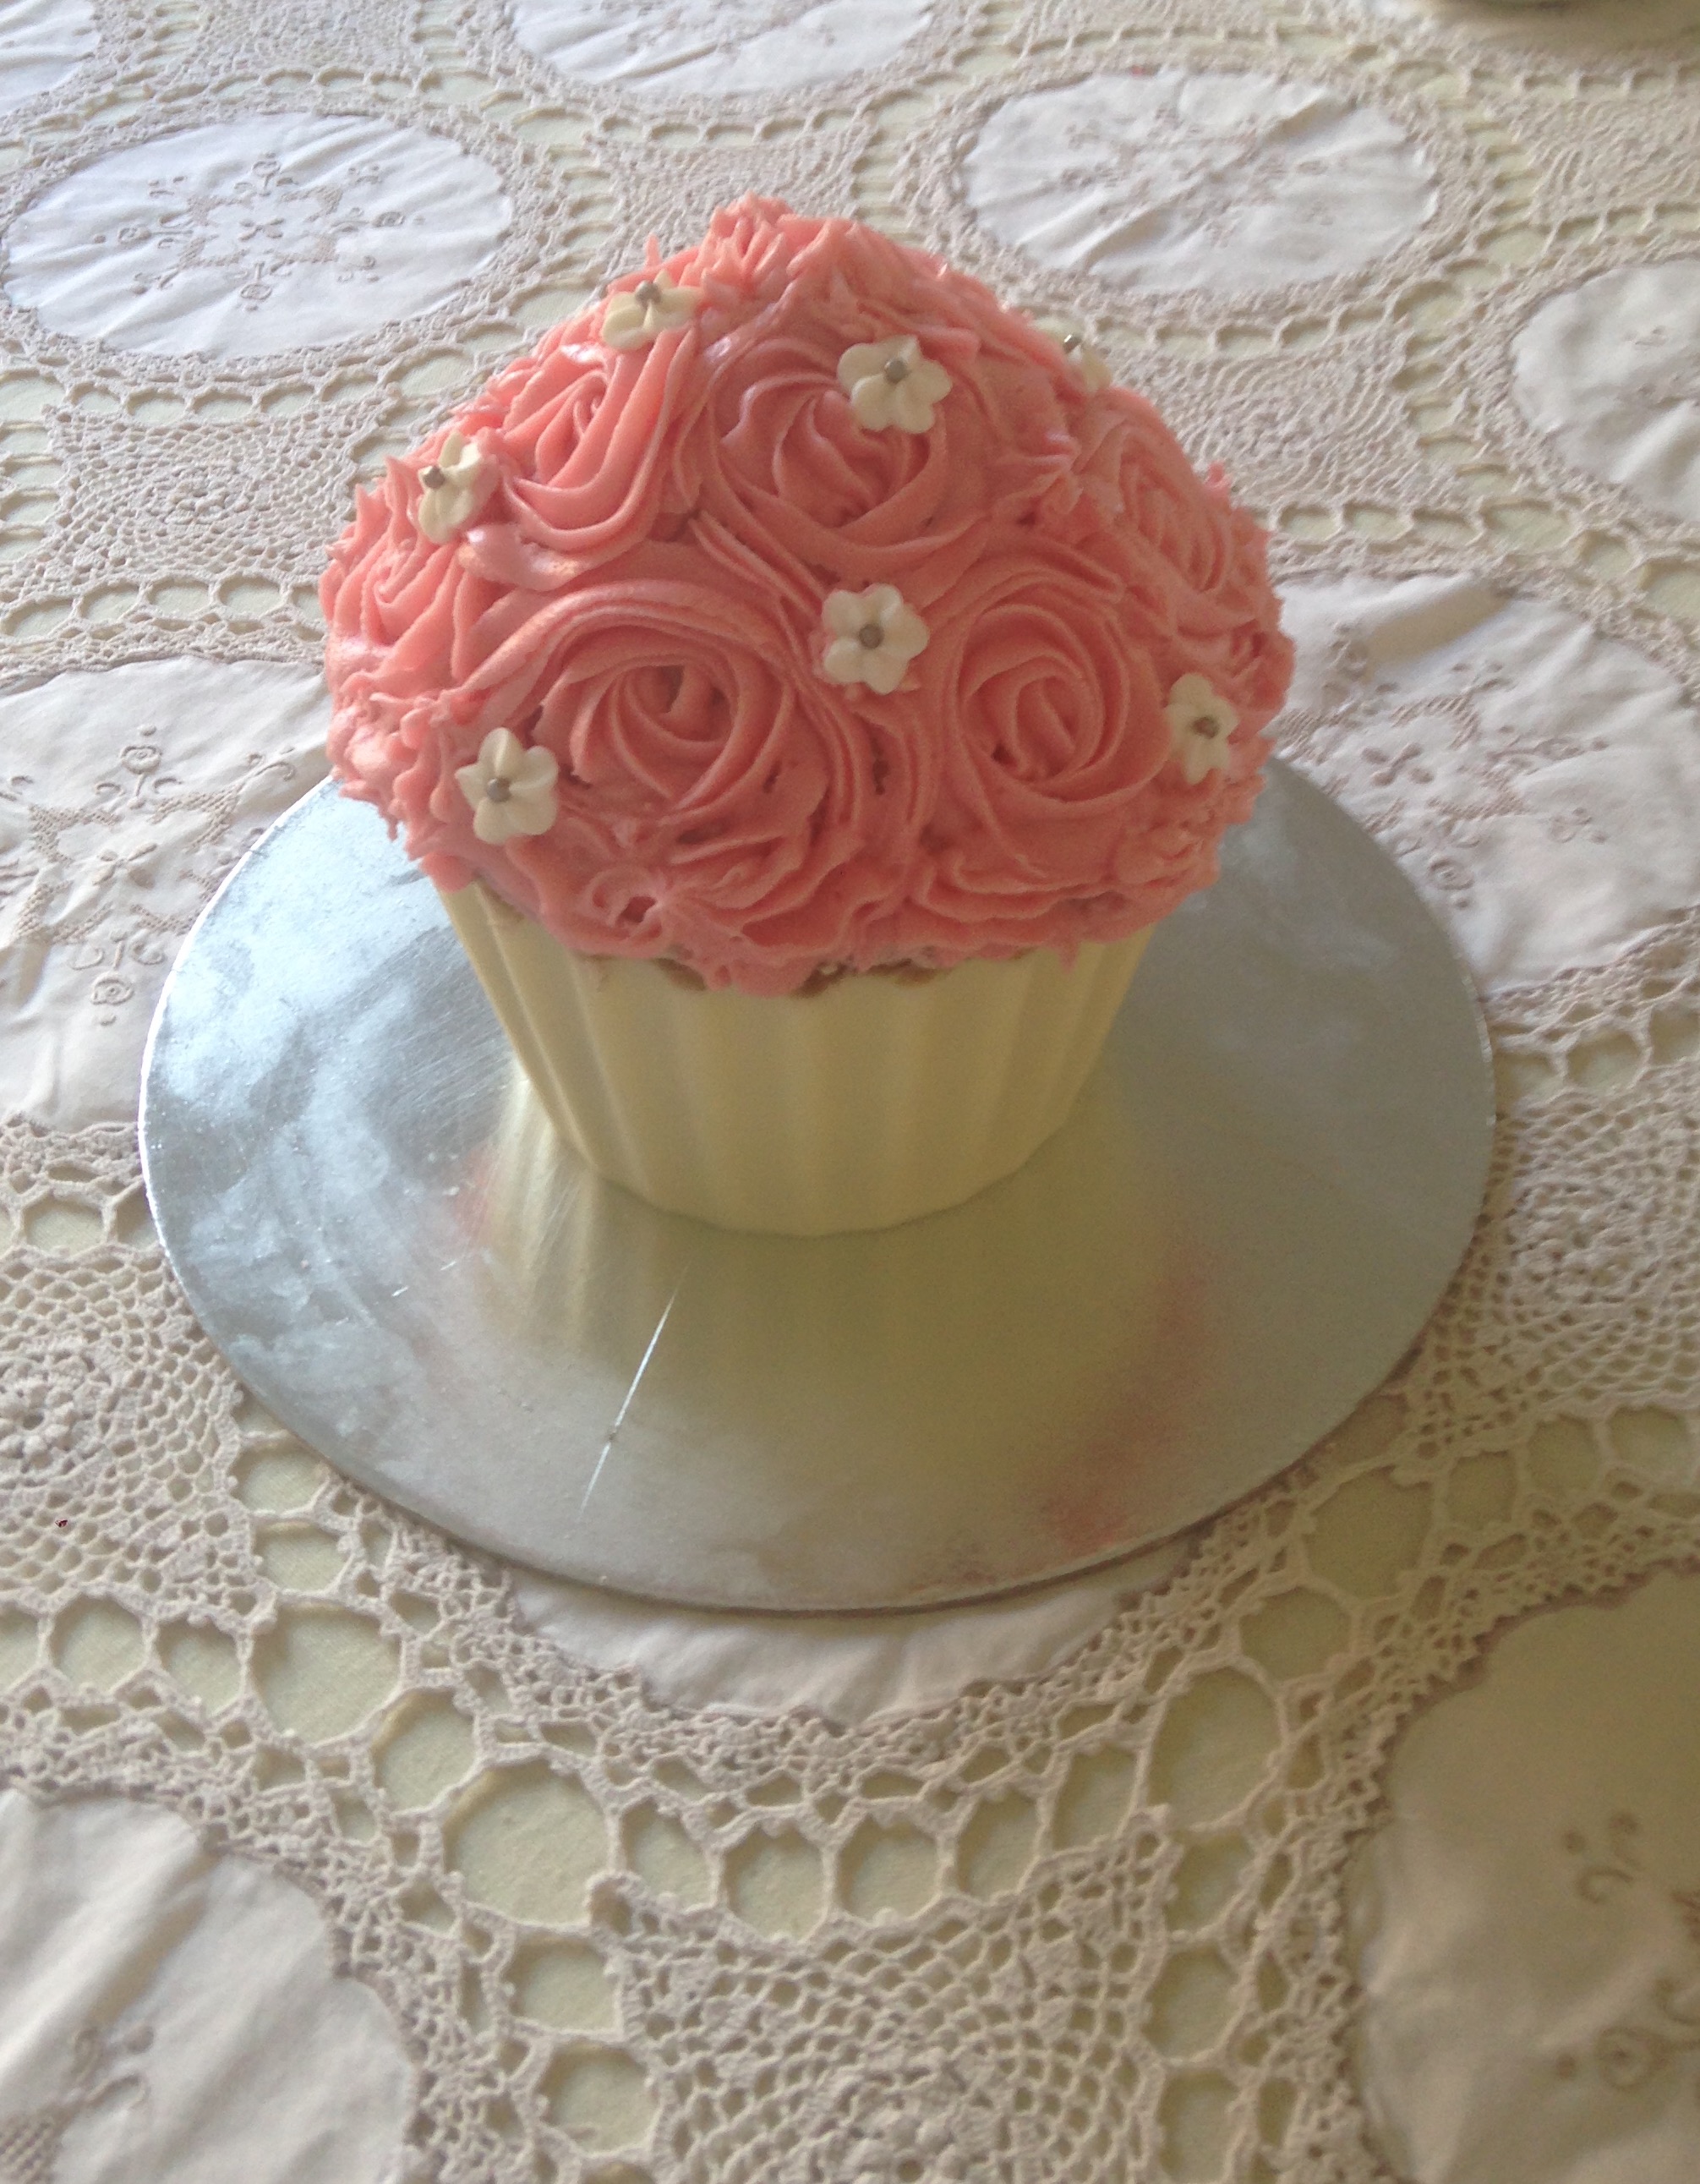
I haven’t made a giant cupcake for about 18 months but I’m so glad I found my giant cupcake cases again because they’re so much fun to make (and eat!) They’re also really easily adaptable as you can make them any flavour you like and decorate them in a million different ways. This time I’ve used buttercream roses but you could ice it as simply (or complexly) as you like – there’s a link to my fondant ‘soft serve’ icing instructions at the bottom of the page.
Cupcake Case 375g white chocolate melts or Wilton candy melts
Buttercream icing 250g butter, softened
800g icing sugar
1 ½ tablespoons vanilla extract
4 tablespoons of milk
Food colouring
Method Spray silicone giant cupcake pan liberally with canola oil and preheat oven to 160°C fan-forced.
Cream together butter and sugar with an electric mixer until light and fluffy. Add in vanilla and then eggs, one at a time, ensuring that each egg is fully incorporated before adding the next. Add in half of the flour followed by two tablespoons of the milk, and then add remaining flour and milk. Mix until just combined.
Fill the giant cupcake pans, starting with the cupcake top. Fill until approximately 2cm shy of the top of the pan. Then fill the bottom pan with the remaining batter.
Bake in the oven for between 40-70 minutes, checking regularly. Note: the cupcake top will bake faster than the bottom so take it out before the bottom is done. The cake is ready when a skewer inserted into the middle of the cake comes out clean.
Leave cakes in their pans for at least 20 minutes before gently peeling the silicone off and allowing the cakes to cool completely on a cooling rack.
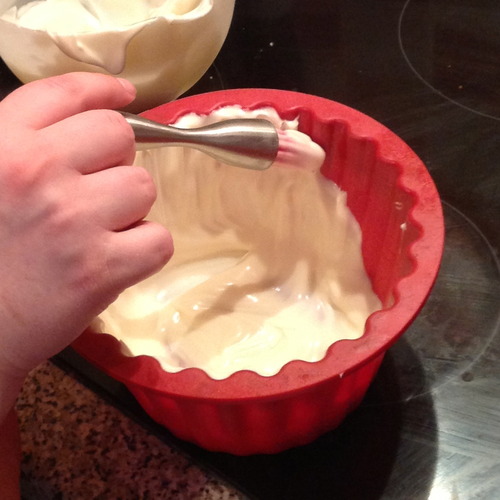
Image credit: The Pink Whisk
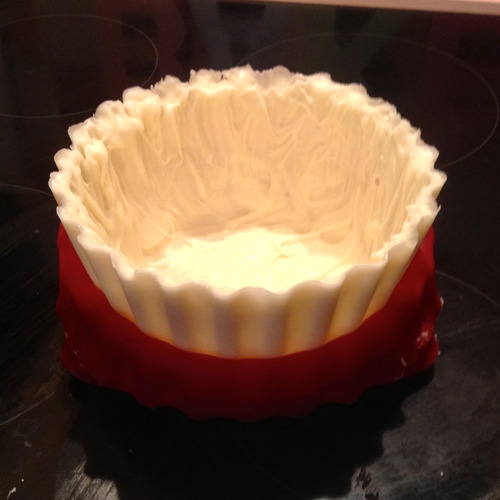
While the cakes are cooling, wash and dry the bottom cupcake pan ready to make the cupcake case. Melt half the chocolate/candy melts and pour into the bottom cupcake pan. Spread evenly up the sides using a pastry brush. Refrigerate for 20 minutes and then repeat with the remaining melts. Refrigerate for 30 minutes and then gently peel off the silicone mould.
Image credit: She Who BakesImage credit: She Who BakesImage credit: She Who Bakes
Using a serrated bread knife, trim around bottom cake so all crunchy edges are removed. Level top (of base) and then cut base in half. Cut off bottom layer off top piece. Level base (of top).
Make buttercream by beating all ingredients but the food colouring until light and fluffy. Set half aside for the crumb coat, and then add the food colouring to the remaining buttercream.
Put a 1cm thick coating of the uncoloured buttercream between 2 bottom layers of cake and then between the base and top (ensure level – cut if necessary). Then put a thin layer of buttercream on the inside of the chocolate case and gently ease cake into it. Cover top of cake liberally with buttercream to form a protective barrier against crumbs.
Put the coloured buttercream into a piping bag fitted with a Wilton 2D nozzle (to make roses) or equivalent, and pipe icing in a rose swirl pattern, starting from the bottom of the cake and working your way up.
Decorate with icing flowers, sprinkles, silver cachous, glitter… basically whatever you like!