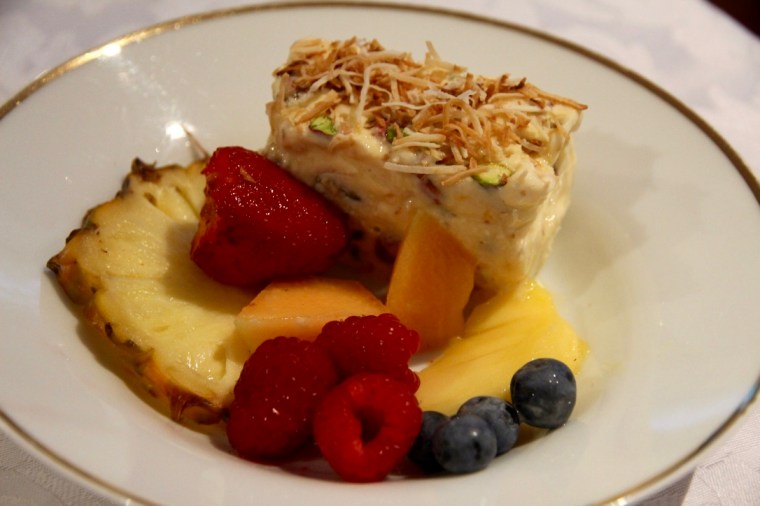
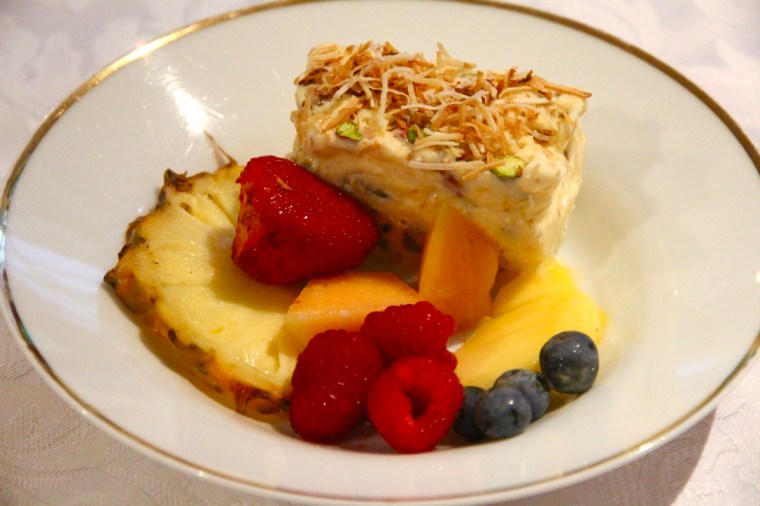
This delicious, easy dessert has all the tastes of summer and is perfect served with fresh fruit on a balmy evening. Ingredients (serves 6-8) 1 litre good quality vanilla ice cream
100g unsalted pistachio nuts
¾ cup desiccated coconut
Pulp of 2 passionfruit
2 tablespoons honey
Fresh fruit, to serve
Method Allow ice cream to soften at room temperature until just soft.
Remove pistachio nuts from shells. Cover nuts with boiling water and remove their dark skins. Dry thoroughly.
Place coconut in a dry pan and cook over a gentle heat until golden, stirring constantly. Remove from pan.
Combine ice-cream, nuts, ½ cup of the coconut, passionfruit pulp and honey. Place in a glad-wrap lined container (I use a log tin), cover and freeze for at least 2 hours
Serve topped with the remaining toasted coconut and fresh fruit. Enjoy!
It is a truth universally acknowledged that the Port Elliot Bakery is the best in South Australia*. Yes, it’s a bold statement considering SA’s dozens of award-winning bakeries, but the Port Elliot Bakery’s consistent 5 star reviews, 4000-strong “Port Elliot Bakery appreciation society” Facebook group, and regular 50m+ queues set it apart from the rest and are a testament to its excellence. The bakery is located on the main street of Port Elliot, a small town on the Fleurieu Peninsular about an hour’s drive south of Adelaide, and is a must-visit when you’re in the area.
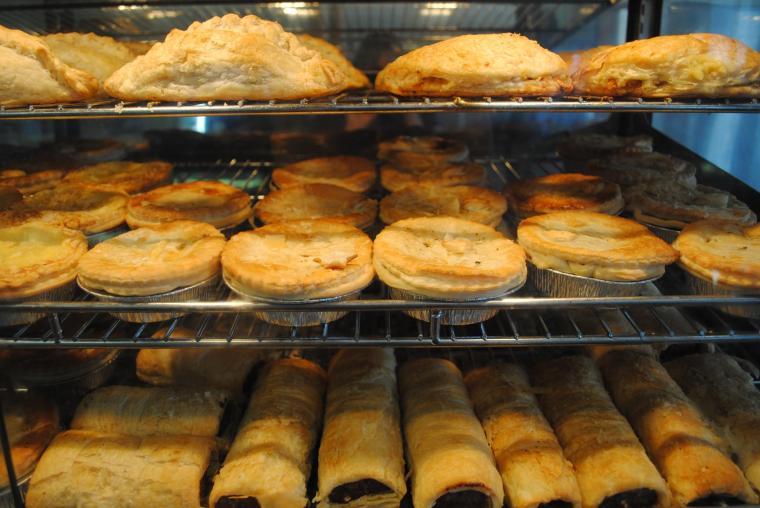
Just some of the delicious offerings from the Port Elliot Bakery. (Image: Michael Mangahas)The unassuming shopfront of the Port Elliot Bakery – although you will never see it this empty! (Image: travelguide.net.au)
The Port Elliot Bakery was established in 1989 by the Gormon-Horrocks family, who still own and operate it today. However the site has hosted a bakery since the 1860s, and its tradition of using fresh produce and baking daily on the premises is maintained, along with the original wood fired oven.
The original Port Elliot bakers, the Bebee family (Image: portelliotbakery.com)
I am fortunate enough to have visited the Port Elliot Bakery regularly for over 20 years, as it is located about 10mins drive away from my family’s holiday house. I can honestly say that I have never left disappointed as the food is always delicious and the service is quick and friendly (no matter how long the line-up is).
The pies, pasties and sausage rolls come in a wide range of delicious flavours and always have perfect crisp, flaky pastry, and the enormous array of beautiful and tempting sweets is sure to impress the harshest of critics.
A selection of their savoury goods. (Image: The Port Elliot Bakery Facebook page)
While everything I’ve tried has been excellent, my go-to is their steak and bacon pie** (so mouthwateringly tender and flavoursome) with a chocolate doughnut and a Farmer’s Union ice-coffee – perfection!
Look at that perfect pastry…Melt in your mouth steak paired with bacon and a rich flavour-packed gravy… what more could you ask for?!With a deep golden exterior, soft fluffy interior and a dark chocolate icing, these are the doughnuts of my dreamsBailey is always more than happy to assist in eating Port Elliot Bakery goods!
One of the reasons I love the bakery so much, is that it’s constantly innovating and updating its menu. The bakery offers a new “pie of the month” each month, and its recent Nutella and Oreo doughnut additions already have cult followings!
The bakery’s new Oreo cookies & cream doughnuts (Image: The Port Elliot Bakery Facebook Page)
The bakery has also developed a range of vegan options including ‘Fruchoc’, ‘Bounty’ and ‘Snickers’ slices, bliss balls, and salads.
“Fruchoc slice” a vegan option. (Image: the Port Elliot Bakery Facebook page)
Next time you’re down in the Fleurieu area, make sure you give the Port Elliot Bakery a visit. My advice is to get in early to avoid disappointment as the bakery is so popular that many items sell-out before 1pm. There is seating outside the bakery, but we like to drive to the Freeman Lookout and eat our bakery goodies with a magnificent ocean view where, between May and October, you might even be lucky enough to see whales.
Freeman Lookout
Port Elliot Bakery
Open: 7am-5:30pm every day but Christmas Day, Proclamation Day, New Year’s Day and Good Friday.
Location: 31 North Terrace, Port Elliot, South Australia Phone: (08) 8554 2475 Price: from $2.50 Rating: 5/5 cupcakes
* I’m sure if Jane Austen had tried their baked goods she would agree!
**tragically, as of January 2023, they are no longer offering the steak and bacon pie so I have had to adapt and opt for the steak, cheese and bacon pie #notquitethesame #bringbacksteakandbacon
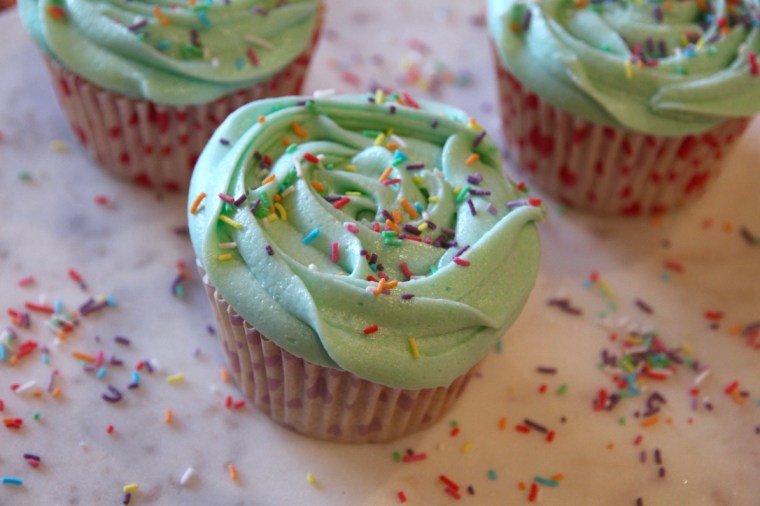
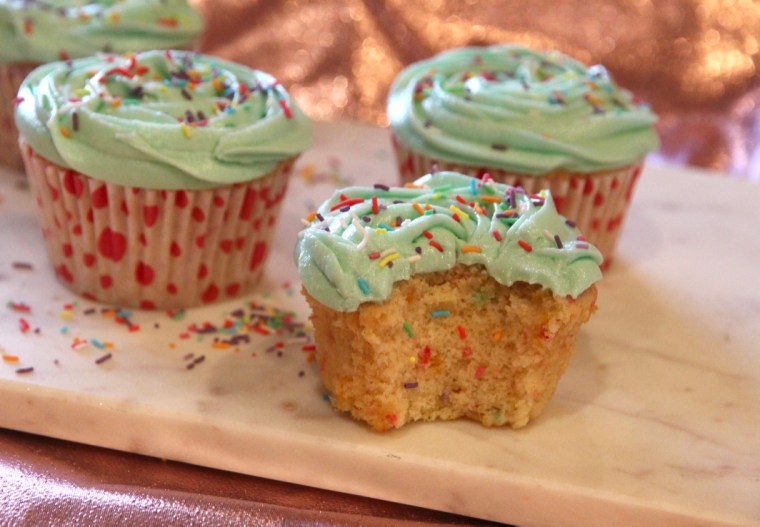
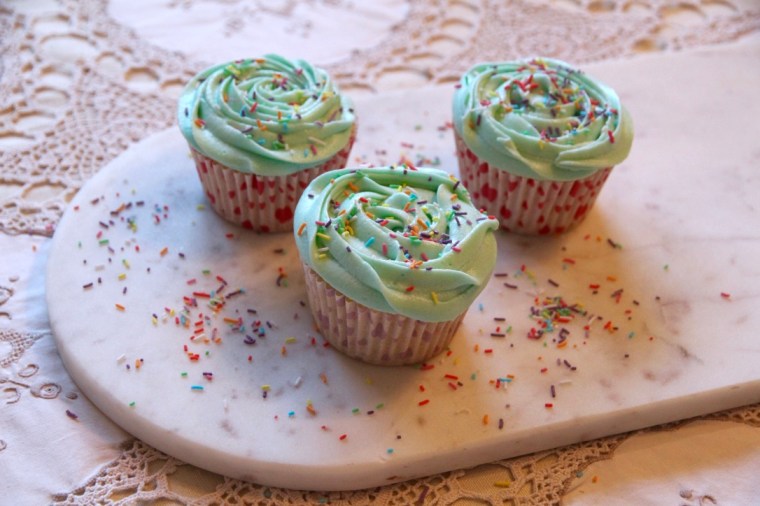
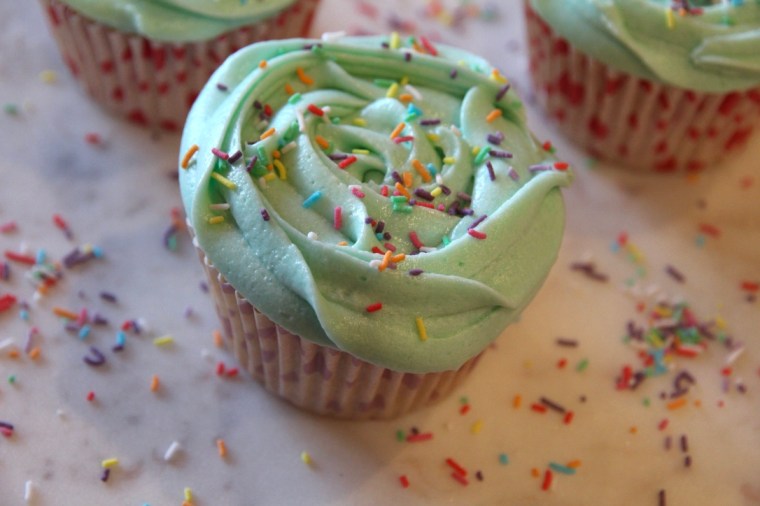
These delicious vanilla cupcakes are made even better by the addition of sprinkles! Perfect for birthdays, baby showers or any time you feel like celebrating.
Vanilla Buttercream Frosting 200g butter, softened
½ cup milk
1 tblspn vanilla extract
8 cups icing sugar
A few drops of food colouring as desired
Sprinkles, to decorate
Method Preheat the oven to 170°C (approximately 150°C fan-forced). Line two 12 hole muffin trays with patty pans.
Sift together the flour and baking powder. In a different bowl, cream the butter for 1-2 mins. Add the caster sugar about a third at a time, beating for 2mins after each addition. After the last of the sugar has been beaten, beat until the mixture is light and fluffy and the sugar dissolved. Add the eggs one at a time, beating for 1 min after each addition or until the mixture is light and fluffy. Add the vanilla and beat until just combined.
Add approximately a third of the flour mixture to the creamed mixture and beat on a low speed until combined. Add half of the milk and beat until combined. Repeat this process until all of the flour and milk is thoroughly combined but be careful not to overbeat (this will toughen the mixture). Add in the sprinkles and gently stir through until evenly dispersed.
Spoon mixture into the patty pans (filling each about 3/4 full) and bake for about 18-20mins or until the top springs back when touched. Remove the cupcakes from the trays immediately and cool on a wire rack for at least half an hour before icing.
To make the frosting, cream the butter for 1-2 mins in a large bowl using an electric mixer. Add the milk, vanilla and half of the icing sugar and beat for at least 3 mins (until the mixture is light and fluffy). Add the remaining icing sugar and beat for a further 3 mins or until of a spreadable consistency. Add extra milk if too dry or extra icing sugar if too wet. Add colouring and beat in until combined and the desired colour has been achieved.
Using a piping bag with a Wilton 2D tip, pipe buttercream in a swirl on the cupcakes and decorate with extra sprinkles.
Enjoy!
Recipes adapted from The Crabapple Cupcake Bakery Cookbook.
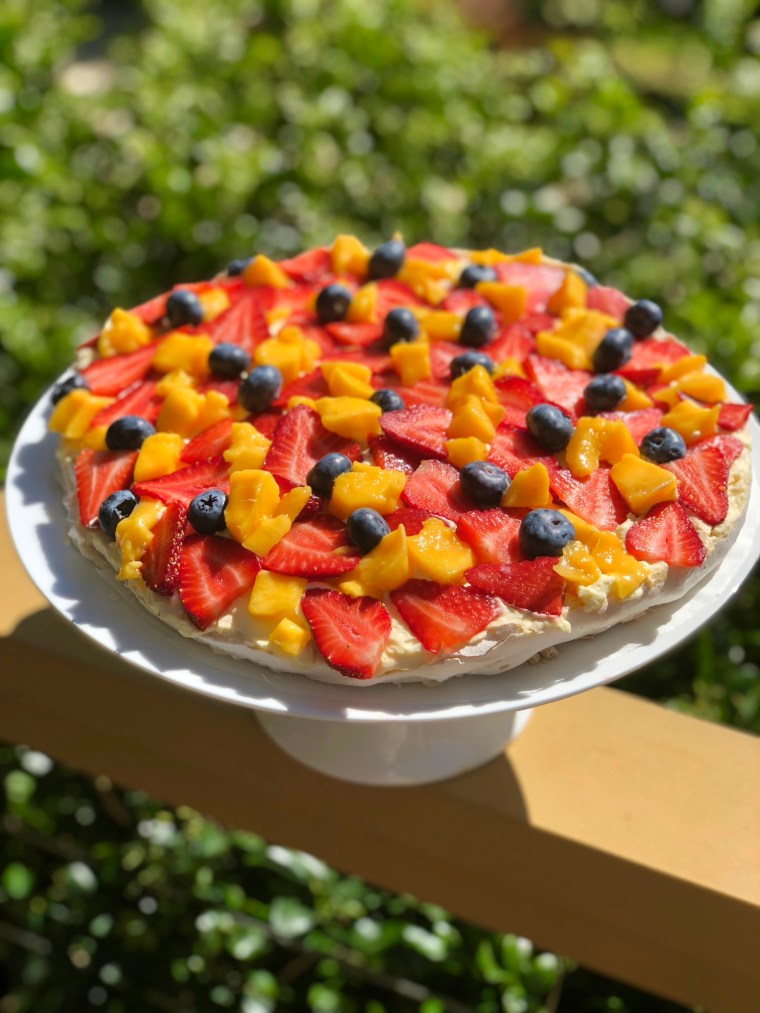
The pavlova is a quintessential Aussie dessert that is said to have been inspired by the Russian ballet dancer Anna Pavlova after a chef saw her perform on her world tour in 1926. A good pavlova has a beautiful high, crisp crust and a soft, pillowy marshmallow inside. It is one of my favourite summer desserts, especially when topped with seasonal fruit.
Ingredients (Serves 6-8) 1 large cup of sugar
1 teaspoon vanilla
1 teaspoon white vinegar
1 teaspoon cornflour
2 egg whites (at room temperature)
4 tablespoons boiling water
300ml cream, thickened
Fresh fruit (this time I used a mango, strawberries and blueberries)
Method Preheat the oven to 180°C. Line a large tray with baking paper and trace a circle around the bottom of an 18cm cake tin (or other round object of the desired size). Turn the baking paper over (so it is pencil side down).
Add eggs whites to a large bowl. Put cornflour and caster sugar to one side of the bowl. Add boiling water to egg whites, pour in vanilla and white vinegar, and beat on high for 10-20 minutes until thick, glossy and the sugar has dissolved (you can test this by putting a small amount of mixture on your index finger and rubbing it with your thumb, if you can feel the sugar, keep beating). **It is hugely important that you have the sugar dissolved, otherwise the pavlova may crack and weep during cooking**
Using the circle on the baking paper as your guide, spoon the pavlova mixture onto the tray and shape.
Cook at 180°C for about 8 minutes and then reduce heat to 90°C and cook for another 45 minutes. Turn the oven off and leave the pavlova to cool in the oven for at least an hour, to prevent collapsing.
When fully cool and you’re ready to serve it (keep the meringue free of toppings until right before serving), gently spread the thickened cream over the top and decorate with fruit.
Recipe from my lovely Grandmother, Margaret Payne.
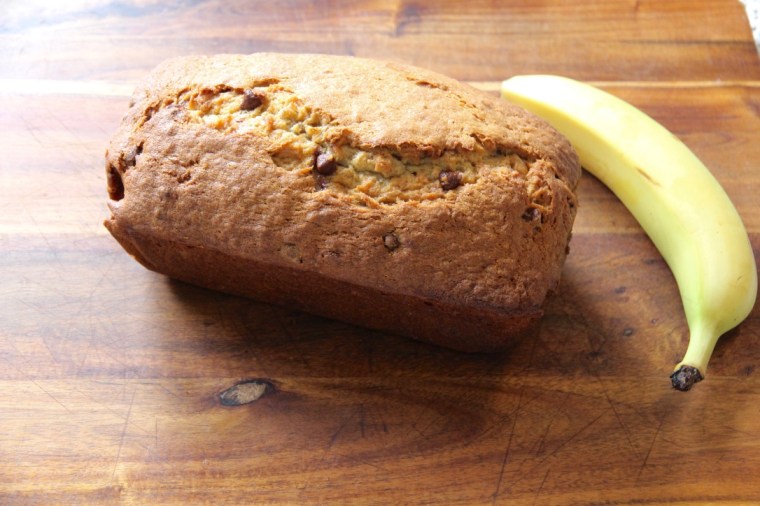
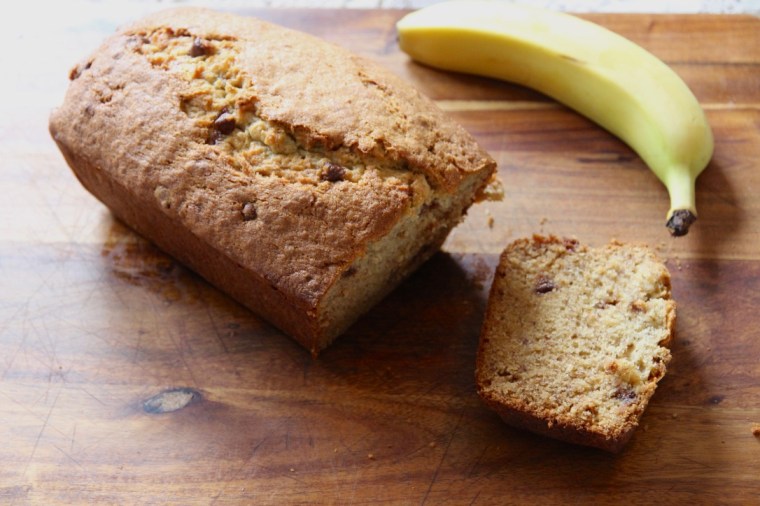
This banana bread is super simple to make and is a perfect way to use up ‘dead’ bananas. It travels well so is great in kids’ lunch boxes, and will last for ~2 months in the freezer.
Ingredients (serves 8-10) 125g butter, softened
¾ cup caster sugar
2 eggs
2 teaspoons vanilla essence
3 overripe bananas
1 ¾ cups plain flour
1 teaspoon bicarb soda
½ cup milk chocolate chips (optional)
Method Preheat your oven to 180°C (160°C fan-forced). Grease and line a 1-litre loaf pan.
Cream the butter and sugar with a handheld mixer until pale and thick. Beat in the eggs, vanilla and banana, followed by the flour and bicarb soda, beating until just combined. If desired, stir through the chocolate chips until evenly dispersed.
Pour the mixture into your prepared pan, smooth over the top and then bake for 55-60 minutes or until a skewer inserted in the thickest part of the bread comes out clean.
Allow to cool in the tin for 5 minutes before transferring to a wire rack to cool completely.
Enjoy! I love mine fresh for the first few days and then toasted with a bit of margarine.
Adapted from Matt Preston’s “Rock Star Banana Bread” from his Cook Book.
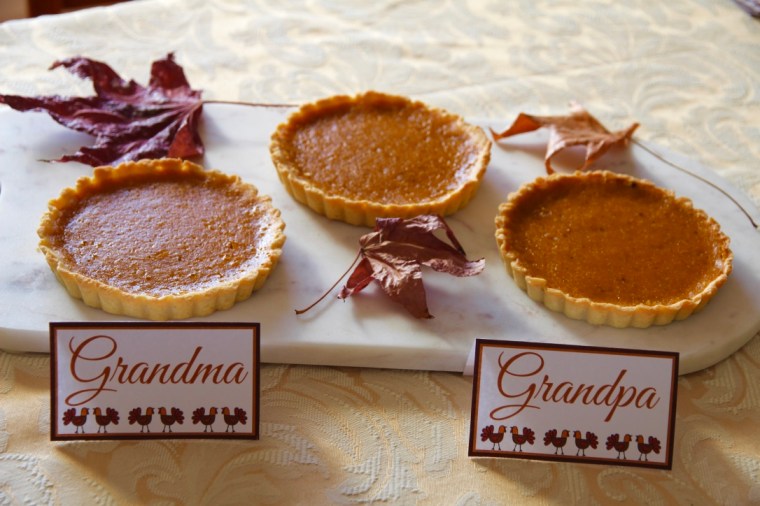
Thanksgiving is almost upon us and while my family doesn’t celebrate it, we have developed a fondness for pumpkin pie since the first pumpkin pie I made for “Chrisgiving” in 2014. To change things up this year, I decided to make individual pies for everyone and for crunch, added a brûlée topping. Yum!
It was my first time using a blowtorch so some bits got a little darker than anticipated – lots of fun though!
Filling 2 cups pumpkin puree (made by roasting 1 whole butternut pumpkin (skinless), blitzing it into a smooth paste in a blender and then putting it in a sieve for an hour to remove the excess juice)
3 large eggs
½ cup sugar
⅓ cup brown sugar
¾ cup cream
1 ½ teaspoons vanilla extract
1 ½ teaspoons ground cinnamon
1 teaspoon ground nutmeg
½ teaspoon ground ginger
¼ teaspoon ground cloves
A pinch of salt
1 quick grind of pepper
Brûlée Topping Caster sugar
Method For the pastry, place flour, butter and icing sugar in a food processor and process until the mixture resembles fine breadcrumbs. Add egg yolk and 2 tblspns cold water and process until the mixture comes together in a smooth ball. Enclose in a plastic wrap and chill for 30mins.
Preheat the oven to 190°C. Grease 8 10cm loose-bottomed tart pans well with margarine and canola oil spray.
Roll out pastry on a lightly floured surface and lift pastry into a tin, easing into the sides & trimming the excess. Repeat with the remaining tins. Chill the pastry in the tins for 15mins. Line the pastry with baking paper and fill with pastry weights. Blind-bake for 10mins, then remove paper and weights and return to the oven for 5mins or until crisp and lightly golden. Allow to cool slightly.
Meanwhile, whisk eggs and sugar until smooth. Add the pumpkin puree, cream, vanilla and spices and stir until all incorporated.
Remove the baking paper and pie weights and pour mixture into pastry cases. Bake pies in the oven for 10 minutes before reducing the heat to 160°C fan-forced and baking for a further 20-25 minutes, or until the filling has set.
Allow to cool completely before gently removing pies from the tins. These can be served without the brûlée topping as mini pumpkin pies.
To create the brûlée topping, sprinkle the tops of the pies liberally with caster sugar and then heat with a blowtorch until the sugar has melted and formed a crisp coating. Serve with ice cream or whipped cream. Enjoy!
Pastry recipe adapted from the delicious. ‘Sweet’ cookbook and pumpkin pie filling recipe from Inspired Taste.net
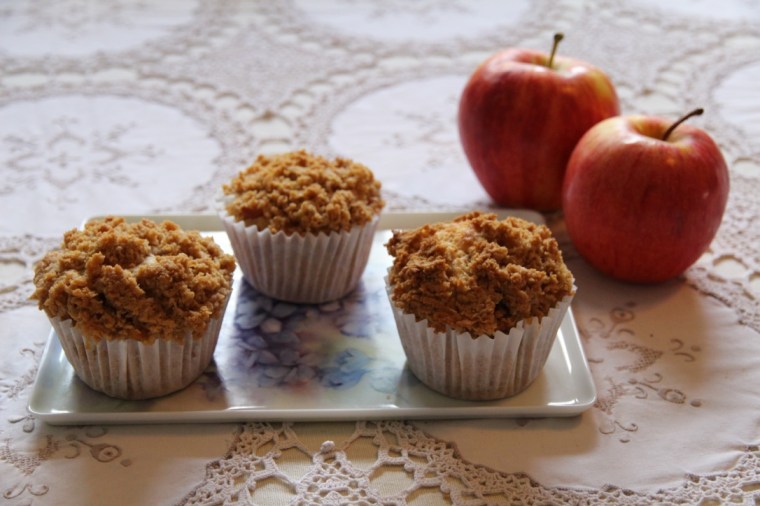
We’ve had an abundance of delicious apples this season and so I wanted a recipe to showcase them, preferably in an easily portable package so we can take them to uni and work for lunches this week. These muffins fitted the bill perfectly, and smelled absolutely divine while baking. I love the crispy streusel topping as a contrast to the soft apple and fine crumb of the muffins.
Ingredients (makes 12-14) Streusel Topping ⅓ cup self-raising flour
⅓ cup plain white flour
⅓ cup firmly packed brown sugar
2 teaspoons ground cinnamon
80g cold butter, chopped coarsely
40g butter
3 large apples, peeled, cut into 1cm pieces
2 cups self-raising flour
½ teaspoon mixed spice
1 teaspoon ground cinnamon
⅔ cup caster sugar
80g butter, melted, extra
¾ cup buttermilk
1 egg
Method Make streusel topping by processing flours, sugar and cinnamon. Add butter and process until combined. Roll dough into a ball, wrap in glad-wrap and freeze until required.
Melt butter in a large frying pan; cook apple, stirring about 5mins or until lightly browned. Add brown sugar and cook, stirring for an additional 5mins or until the mixture thickens.
Preheat oven to 200°C/180°C fan-forced. Line a 12-hole muffin pan with patty pans.
Sift flour, spices and sugar in a large bowl. Stir in the combined, extra butter, buttermilk and egg. Do not overmix. Stir in half the apple mixture.
Divide mixture among patty pans. Top with remaining apple mixture. Coarsely grate streusel topping over muffin mixture. Bake ~20mins.
Stand muffins in tray for 5mins before turning out, top-side up, onto wire racks to cool. Enjoy!
Recipe adapted from the Australian Women’s Weekly ‘Little Pies and Cakes’ cookbook.
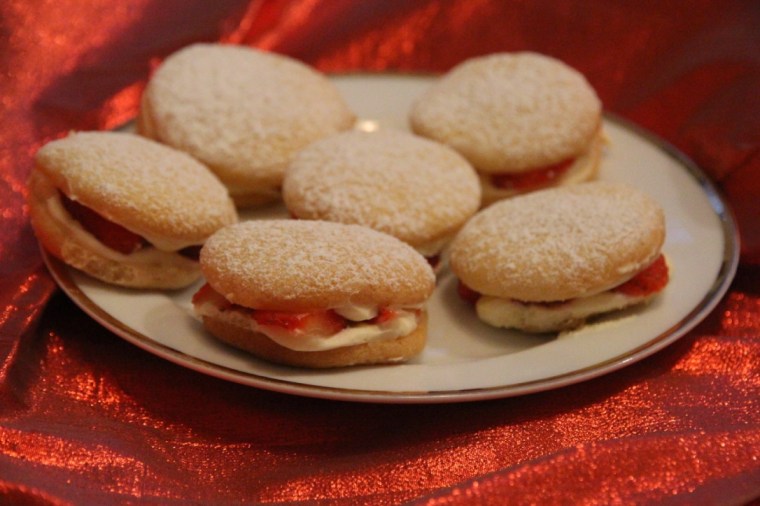
This is probably my most requested recipe and I feel terrible for having kept it in the Bills/Payne/James/Hockney family vault for so long! My Mum (and her mother and grandmother before her) makes powder puffs for special occasions and they are always incredibly popular. They’re dead easy to make and the “sponge biscuits” keep in an airtight container for ages**. The only trick is to fill them with cream far enough in advance so they soften up – then they’re like eating sweet, fluffy clouds. I love them filled with strawberries and cream, lightly dusted with icing sugar, but you could fill them with just about anything.
Ingredients (makes approximately 45 sandwiched powder puffs) 3 eggs
¾ cup sugar
½ cup plain flour
½ cup cornflour
1 teaspoon cream of tartar
½ teaspoon bicarb soda
To fill Whipped, sweetened cream flavoured with a drop or two of vanilla extract
Strawberries, thinly sliced
Method Preheat the oven to 200°C (or 180°C fan-forced). Line 3 large baking trays with baking paper (you will fill approximately 6 trays due to spreading, but I just rotate and re-use the trays).
Beat eggs and sugar in a large bowl with electric mixers until light and fluffy. Add in sifted flours, cream of tartar and bicarb soda and mix until just combined.
Drop ½ teaspoons’ worth of the mixture onto the prepared trays, leaving plenty of room to spread (I usually fit 12-15 on my large trays). Bake for 6 minutes* and then leave to cool slightly, before removing from the tray with a metal spatula and letting them cool completely on a wire cake rack. Repeat this process with the remaining mixture.
2-3 hours before serving, match each sponge biscuit with another of approximately equal size. Spread each ‘biscuit’ generously with thickened, sweetened cream and add sliced strawberries to one half before sandwiching them together.
Dust with a little icing sugar just before serving. Enjoy!
Notes:
*They will harden like a biscuit (they’re supposed to, don’t worry), but will soften when you add the cream later.
** Store in an airtight container with grease-proof paper between each layer so they don’t stick
White chocolate ganache frosting
½ cup cream
300g white chocolate melts
~ 2 cups icing sugar
To decorate 20 squares of thin dark chocolate
20 Maltesers
20 small pieces of black liquorice, cut to look like tassles
Method Fill cupcake tins with 20 large patty pans.
Sift flour & baking powder in a large bowl. Make a well in the centre and set aside.
Put butter, milk, caster sugar and white chocolate into a medium saucepan over medium heat. Stir continuously until the chocolate and butter have melted, and the sugar has fully dissolved. Remove from heat and cool until just warm.
Preheat the oven to 155°C.
Add the eggs and vanilla extract to the cooled chocolate mixture and stir until just combined. Pour into the well in the flour, and gently mix until combined.
Divide mixture evenly between cupcake cases (filled almost to the top, they don’t rise much). Bake for approx. 25-30 minutes, or until a skewer inserted comes out clean.
Cool completely on wire racks before icing.
While the cakes cool, divide your chocolate squares (if needed) and cut the liquorice to make tassels of an appropriate size for your chocolate squares.
To make the frosting, melt the white chocolate and add the cream. Stir to combine. Add the icing sugar, half a cup at a time, until desired consistency reached.
Ice the cupcakes with the frosting and then top with a Malteser just off-centre. Attach a liquorice tassel to each chocolate square using left over frosting (make sure you wipe away any excess that may leak out) and then sit the ‘hat’ on an angle on top of the Malteser.
Enjoy!
Recipes adapted from the ‘Crabapple Bakery Cupcake Cookbook’s.
Decoration ideas from the Australian Women’s Weekly ‘Classic Cupcakes’ cookbook.
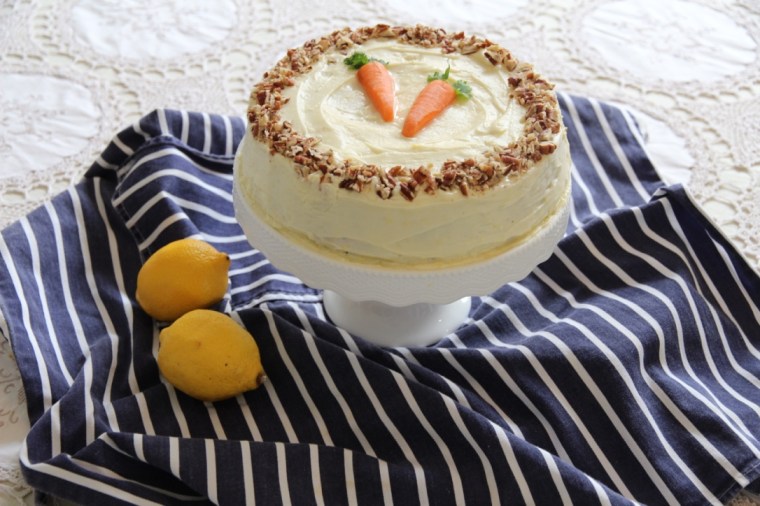
I love this cake, it’s so quick and effortless to put together and is absolutely delicious (also, because it contains carrot it’s basically a salad, right?!). It’s great at any time of year but is particularly good as a treat around Easter for someone who doesn’t like chocolate or for people who are chocolated out!
Ingredients (serves 8-10)
1 ½ cups grated carrot (lightly packed)
½ cup chopped walnuts
1 cup plain flour
2 eggs
1 teaspoon bicarb soda
1 cup caster sugar
1 teaspoon mixed spice
¾ cup vegetable oil
½ teaspoon salt
½ teaspoon vanilla
To decorate (if desired): Extra chopped walnuts
The thin end of a small carrot cut into 2 halves
4 sprigs of coriander
Method Preheat oven to 180°C (160°C fan-forced).
Grease an 8″ round cake pan with margarine and line the base with baking paper.
Combine eggs, sugar, oil, vanilla & sifted dry ingredients in a large bowl & beat on low speed.
Stir in carrots & walnuts. Mix well.
Pour mixture into the prepared cake tin and bake in the oven for approx. 40 – 45mins or until a skewer inserted in the middle of the cake comes out clean.
Let the cake cool in the tin for 5-10 minutes, before placing it on a wire rack to cool completely.
To make the cream cheese frosting, beat butter & cream cheese until smooth and creamy. Add in the lemon rind and icing sugar and beat until smooth. Spread evenly over the top and sides of the cake.
If desired, decorate by placing the finely chopped walnuts around the edge of the cake and the carrot pieces in the centre of the cake with two coriander sprigs above each carrot. Enjoy!

 Ingredients (serves 6-8)