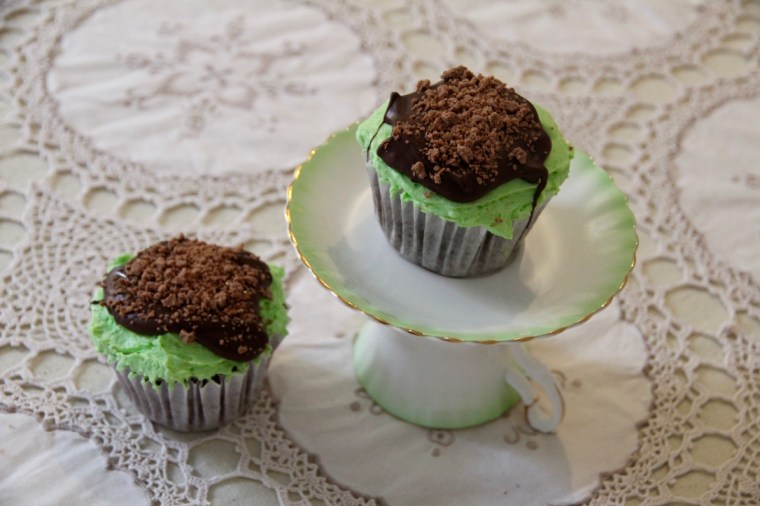
Chocolate and mint are a match made in heaven and these cupcakes combine them in one deliciously compact package. The cupcakes are a dark chocolate mudcake which, to me, are the perfect blend of light and rich. They are then topped with a generous layer of fluffy mint buttercream (which tastes exactly like peppermint ice-cream I might add), melted dark chocolate and a crumbled Flake bar – what’s not to love?! These are also a gorgeous shade of green – perfect for St Patrick’s Day!
Ingredients (makes 12) 90g softened butter
1 cup brown sugar, firmly packed
2 eggs
⅔ cup self-raising flour
2 tablespoons cocoa powder
⅓ cup almond meal
⅔ cup water
60g dark chocolate melts, melted
Peppermint Buttercream Frosting
125g butter, softened
1 ½ cups icing sugar
2 tablespoons milk
Peppermint essence
Green food colouring
To decorate 1 large Flake bar, crumbled
30g dark chocolate melts, melted
Method Preheat the oven to 170°C (150°C fan-forced). Line a 12-hole muffin tin with patty pans.
Beat butter, sugar & eggs in a large bowl with electric mixer until light and fluffy. Add in sifted flour and cocoa, almond meal, water and melted chocolate.
Fill each patty pan approximately ⅔ of the way full. Bake for around 25 minutes or until a skewer inserted comes out clean. Stand cakes in tin for 5 minutes before transferring them to a wire rack to cool.
Once cakes are fully cool, you can make the frosting. Beat butter in a medium bowl with electric mixer until light and fluffy. Beat in icing sugar and milk and a drop each of peppermint essence and green food colouring (or until desired colour and flavour reached).
Ice cupcakes with a generous layer of frosting. To decorate, dollop each cupcake with dark chocolate and spread it so that it looks as though it is dripping slightly down the cakes. Top with crumbled Flake.
Enjoy!
Adapted from The Australian Women’s Weekly ‘Cupcakes by Colour’ cookbook
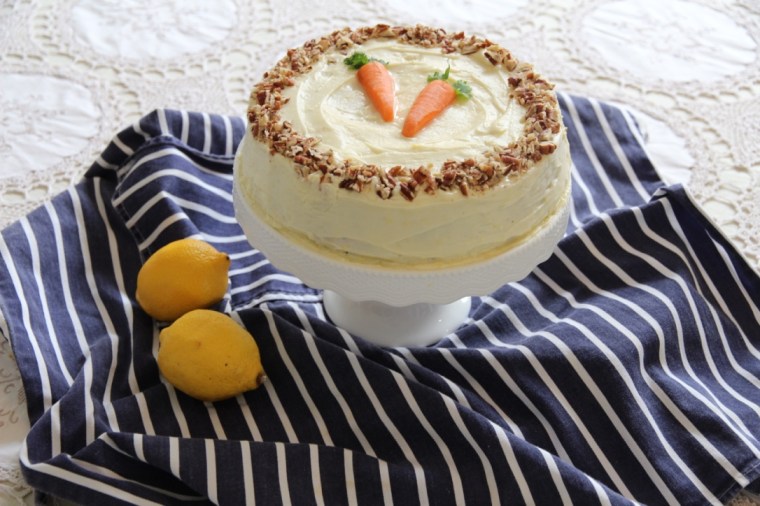
I love this cake, it’s so quick and effortless to put together and is absolutely delicious (also, because it contains carrot it’s basically a salad, right?!). It’s great at any time of year but is particularly good as a treat around Easter for someone who doesn’t like chocolate or for people who are chocolated out!
Ingredients (serves 8-10)
1 ½ cups grated carrot (lightly packed)
½ cup chopped walnuts
1 cup plain flour
2 eggs
1 teaspoon bicarb soda
1 cup caster sugar
1 teaspoon mixed spice
¾ cup vegetable oil
½ teaspoon salt
½ teaspoon vanilla
To decorate (if desired): Extra chopped walnuts
The thin end of a small carrot cut into 2 halves
4 sprigs of coriander
Method Preheat oven to 180°C (160°C fan-forced).
Grease an 8″ round cake pan with margarine and line the base with baking paper.
Combine eggs, sugar, oil, vanilla & sifted dry ingredients in a large bowl & beat on low speed.
Stir in carrots & walnuts. Mix well.
Pour mixture into the prepared cake tin and bake in the oven for approx. 40 – 45mins or until a skewer inserted in the middle of the cake comes out clean.
Let the cake cool in the tin for 5-10 minutes, before placing it on a wire rack to cool completely.
To make the cream cheese frosting, beat butter & cream cheese until smooth and creamy. Add in the lemon rind and icing sugar and beat until smooth. Spread evenly over the top and sides of the cake.
If desired, decorate by placing the finely chopped walnuts around the edge of the cake and the carrot pieces in the centre of the cake with two coriander sprigs above each carrot. Enjoy!
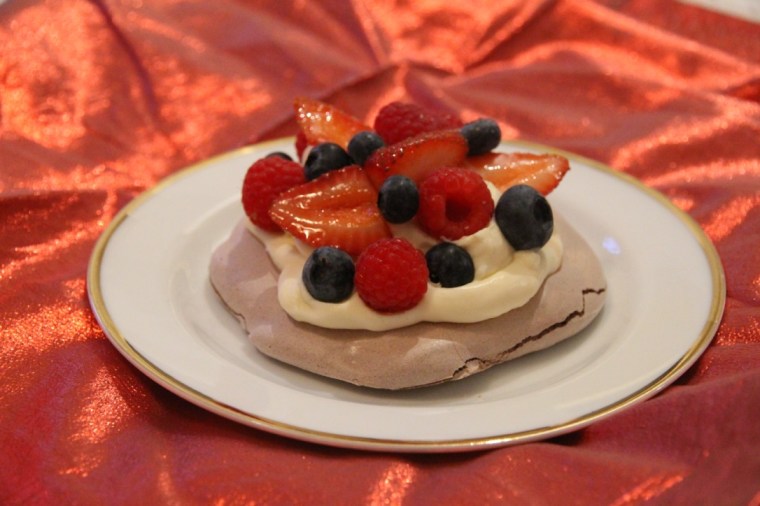
These meringue nests are the perfect conclusion to a summer dinner party or BBQ. They are light, flavoursome and not too sweet when paired with fresh berries and whipped cream. I especially love that they look like you’ve gone to a lot of effort (when they’re really very simple to make) and they don’t heat up the house too much while baking!
Ingredients (makes 4) 3 egg whites
¾ cup (165g) caster sugar
1 ½ teaspoons vanilla essence
1 tablespoon dark dutch cocoa powder
300ml thickened cream, whipped
Fresh berries, to decorate (I used strawberries, raspberries and blueberries)
Method Preheat oven to 120 degrees C (~100 degrees C fan-forced). Line a large oven tray with baking paper.
Beat egg whites in a medium bowl with an electric mixer or mixmaster until soft peaks form. Add caster sugar, a tablespoon at a time, beating until the sugar dissolves between each addition. Add in vanilla essence and cocoa powder.
Divide the meringue mixture into 4 roughly equal sized dollops on the baking tray, and spread into circles approximately 11cm in diameter.
Bake in the oven for approximately 45 minutes or until meringues are firm. Turn off the oven and let meringues cool for 5 minutes, before letting them cool completely with the door ajar.
Top meringues with whipped cream and berries. Enjoy!
Adapted from ‘Chocolate Berry Meringues’ in The Australian Women’s Weekly cookbook ‘Best Food’, 2005 reprint.
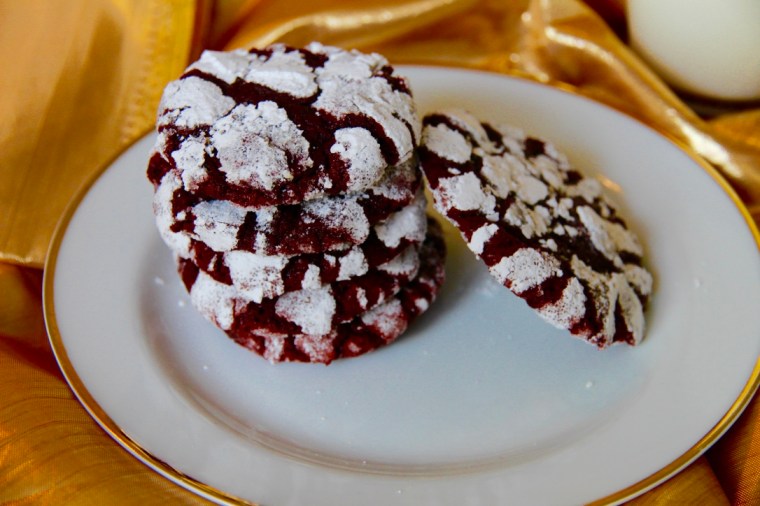
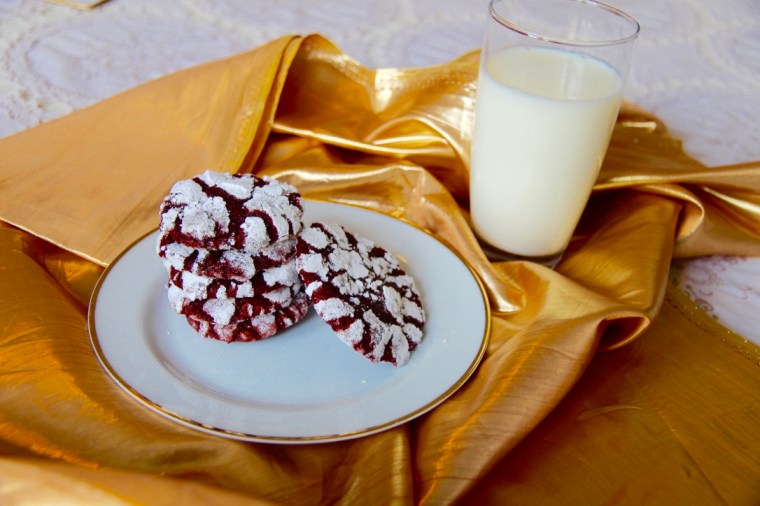
Gosh these are good. So good in fact that I’m reblogging them and I STRONGLY urge to make yourself a batch, stat! You can thank me later…
Ingredients (makes approx. 36 cookies) 100g butter
1 ½ cups brown sugar
1 tspn vanilla extract
2 eggs
100g dark chocolate, melted
1 ¼ cups flour, sifted
2 tspns baking powder, sifted
¼ cup cocoa, sifted
1 tablespoon red food colouring (depending on strength & desired colour, mine could have been a bit redder)
150g extra dark chocolate, roughly chopped
¼ cup sugar
¼ cup icing (powdered) sugar
Method Place butter, brown sugar & vanilla in a large bowl and beat with an electric mixer for 3-5mins or until light and well combined. Add eggs one at a time, beating well after each addition. Add the melted chocolate and beat until combined. Slowly add the flour, baking powder, cocoa and food colouring and beat until a smooth dough forms.
Fold through the chocolate chunks and refrigerate, covered, for an hour.
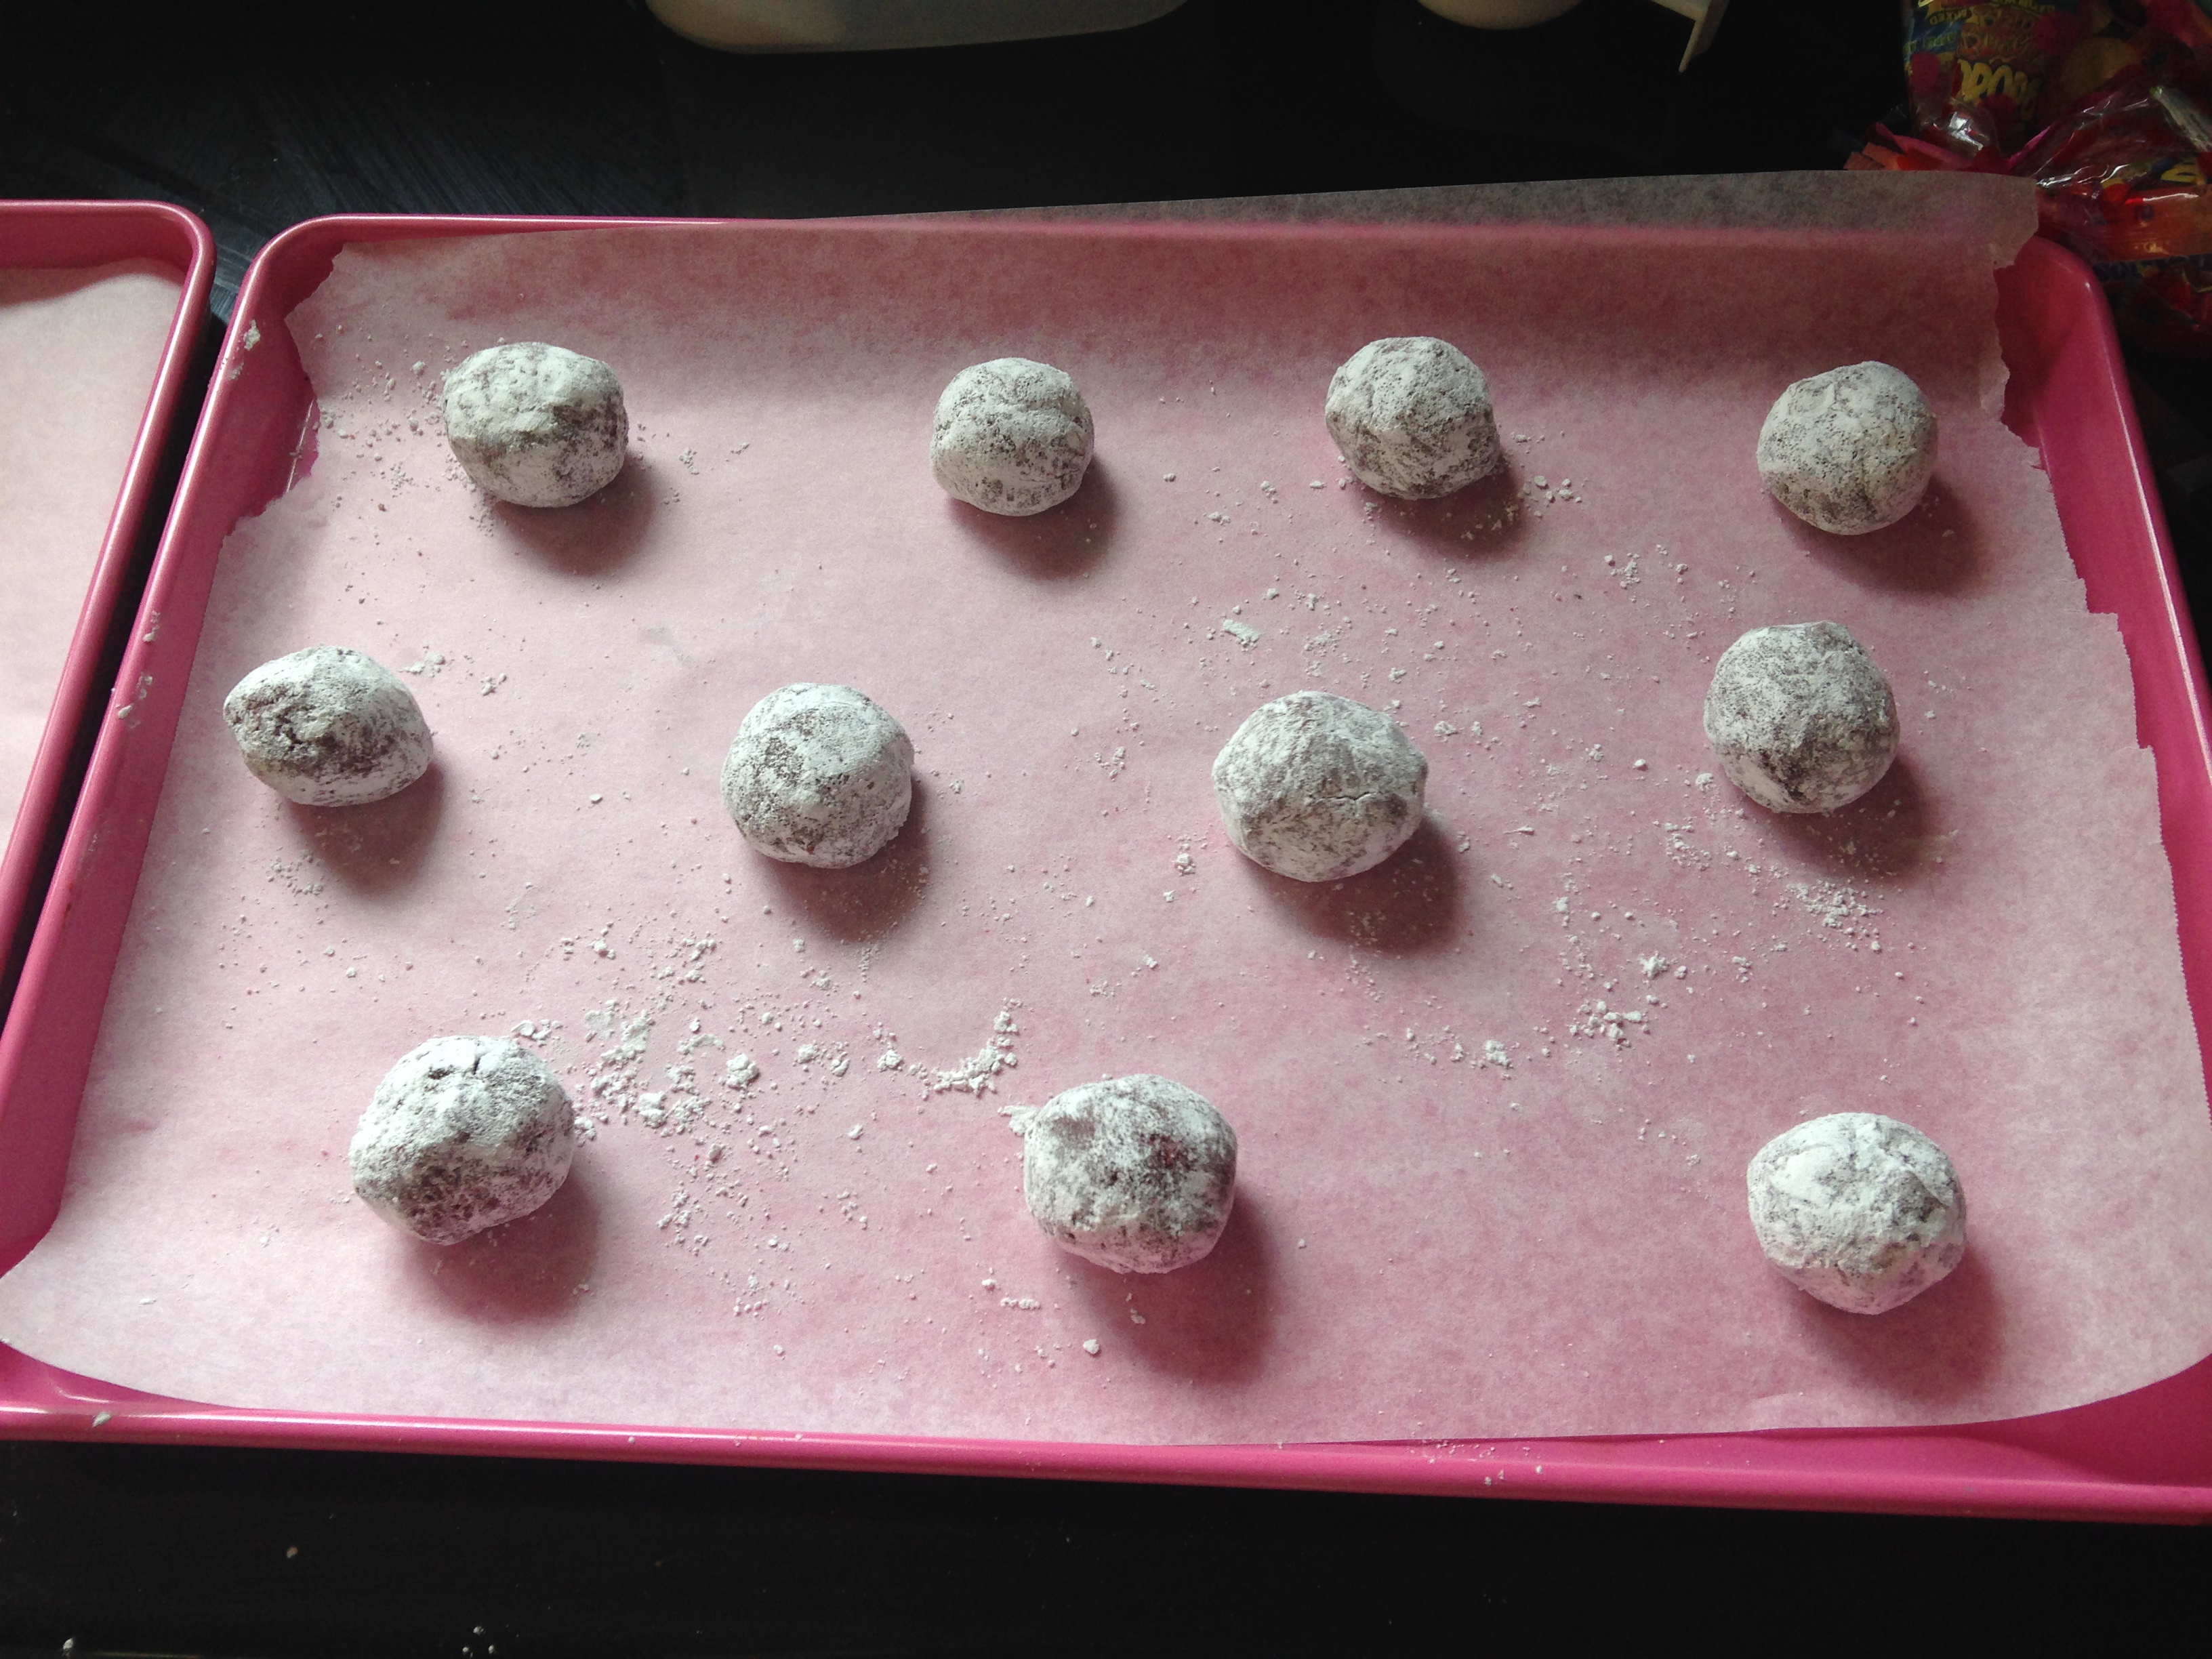
Preheat oven to 160°C fan-forced. Roll dessert spoons of the dough into the white sugar, shape them gently into balls and then toss in icing sugar. Place them on lined baking trays allowing plenty of room for spreading.
Bake the cookies for 12-14mins or until the surface is cracked and the edges are slightly crispy. Don’t worry if the centre of the cookies looks undercooked, it will harden while cooling and be deliciously chewy. Enjoy!
Adapted from the Red Velvet Crackle Cookies recipe in the Donna Hay Magazine Dec/Jan 2014
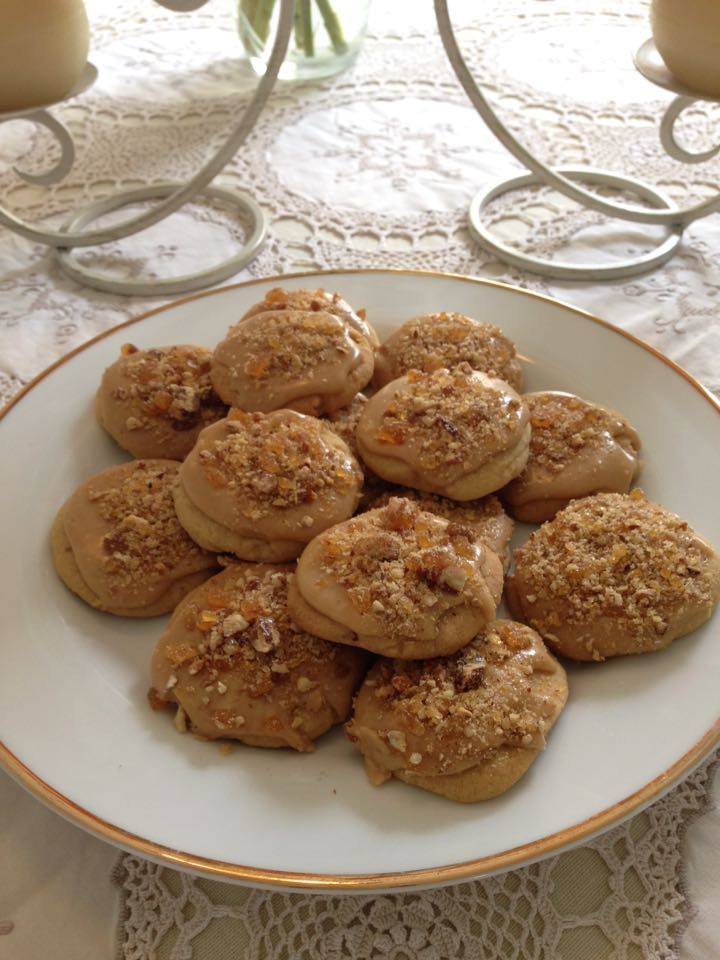
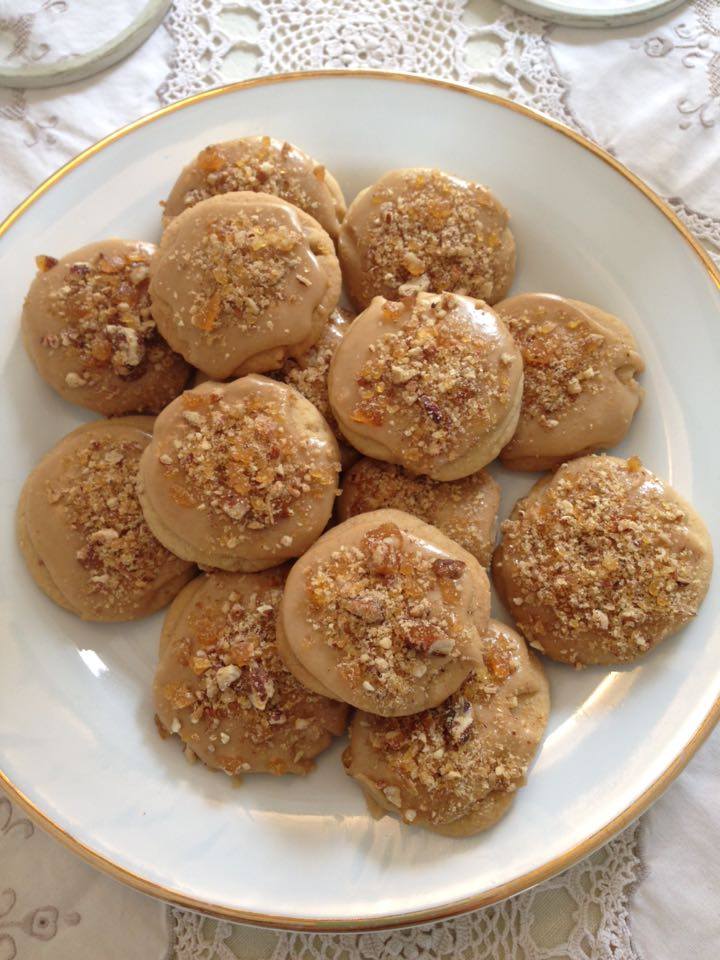
These cookies are soft and buttery, topped with a brown sugar frosting & crunchy pecan praline. I made these ready for having with tea & coffee at out ‘Chrisgiving’ celebration tonight and I must say I am pleasantly surprised – they are very more-ish and feel appropriately Thanksgiving-y.
Ingredients (Makes around 35-45 cookies) For the cookies
250g butter, softened
½ cup white sugar
½ cup packed brown sugar
1 large egg
1 tsp vanilla
2 cups plain flour
½ tsp baking soda
½ cup finely chopped pecans
For the praline
1 cup pecans
½ cup white sugar
2 tablespoons water
For the icing
1 cup packed brown sugar
½ cup milk
1 tbsp butter
2 cups icing sugar, sifted
Method In a large bowl, beat together butter and sugars until light and fluffy. Add in the egg and vanilla and beat until combined.
Add the flour and baking soda and beat until combined. Gently stir in the chopped pecans.
Cover the dough in cling wrap and refrigerate for at least 30mins.
While the dough is chilling, make the pecan praline. To make the praline, combine all ingredients in a frying pan over a moderate heat and stir well. Continue to stir as the water evaporates and the pecans become covered in white sugar. Continue stirring as the sugar melts to form a toffee around the pecans. Once all of the almonds are coated in toffee, pour onto a tray lined with baking paper to cool. Once cool, cut up with a knife or blitz in a food processor to make a fine crumb.
I then blitzed these in the food processor for a few seconds to get a finer crumb
Preheat the oven to 160°C fan-forced. Line 3 large baking trays with baking paper. Shape dough into roughly golf-ball sized balls, flatten them with the palm of your hand and place them approximately 4cm apart on the lined baking trays.
Bake for 10-15 mins or until fully cooked and lightly browned at the edges. Cool for 10 mins on their trays before transferring to a cooling rack.
To make the icing combine brown sugar and milk in a small saucepan over a medium heat. Bring to a boil and boil for approximately 3 mins, stirring constantly. Remove from the heat and stir in butter.
Add in the icing sugar and beat with an electric mixer until smooth. If the frosting is too thin, add more icing sugar (but leave it for a few minutes before doing this as it will thicken over time). If too thick, add more milk.
Spread icing on each cookie and top with praline. Let the icing set fully before storing in an airtight container. Enjoy!
Adapted from ‘Brown Sugar Pecan Cookies’ from The Recipe Rebel
Pic from Inspired Taste (mine got eaten too quickly!)
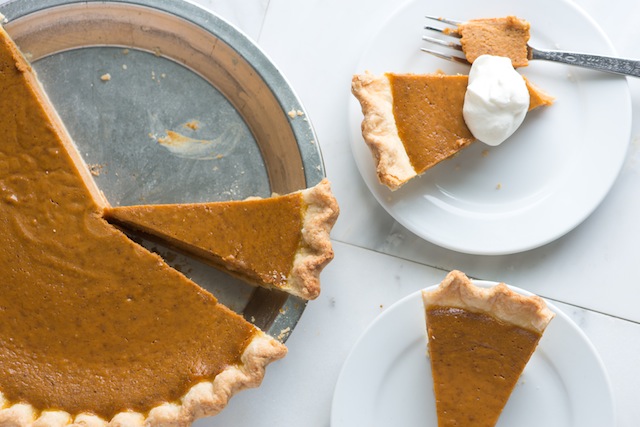
Even though Thanksgiving isn’t really a holiday celebrated here in Australia, this year my family decided to get in on the action anyway as a number of us will be away over Christmas (and we like to party with or without good reason). So, in keeping with tradition, I made a pumpkin pie for dessert. I had no idea what to expect having never tried one before, but gave a highly rated recipe I found online a go and was really pleased with the result. If I didn’t know there was pumpkin in there (and it wasn’t orange) I wouldn’t pick it because it’s really the vanilla and spices that come to the fore, with the pumpkin providing a creamy, sweet back note. Pumpkin-y or not it was delicious and I’ll probably make it again when pumpkins are in season.
Filling
2 cups pumpkin puree (made by roasting pumpkins, scooping out the flesh, blitzing it into a smooth paste in a blender and then putting it in a sieve for an hour or so to remove the excess juice)
3 large eggs
½ cup sugar
⅓ cup brown sugar
¾ cup cream
1 ½ teaspoons vanilla extract
1 ½ teaspoons ground cinnamon
1 teaspoon ground nutmeg
½ teaspoon ground ginger
¼ teaspoon ground cloves
A pinch of salt
1 quick grind of pepper (i.e. a really small amount, sounds odd but it works!)
Method To make the pastry, put the flour, icing sugar, butter, yolk & water into a food processor and process until it just comes together. Press into a ball, knead gently on a floured surface until smooth & then refrigerate, covered in clingfilm, for 30 mins.
Preheat the oven to 200°C fan-forced. Lightly grease a 23cm flan tin or pie dish.
When the pastry has chilled, roll dough on a floured surface until large enough to line the tin (I often have a bit left over). Lift pastry into tin, ease into the sides & then trim the excess.
Cover the pastry with a sheet of baking paper and fill with pie weights or uncooked rice. Bake in the oven for 10 minutes.
Meanwhile, whisk eggs and sugar until smooth. Add the pumpkin puree, cream, vanilla and spices and stir until all incorporated.
Pour mixture into pastry case (obviously remove the baking paper and pie weights first!!) and smooth over the top. I ended up having a bit of pumpkin filling left over that I might use in muffins or something (if I don’t eat it all first :P)
Bake pie in the oven for 10 minutes before reducing the heat to 160°C fan-forced for around 30-40 minutes, or until a skewer inserted comes out clean.
Let cool completely before transferring to a serving platter and then serve at room temperature with whipped cream or ice cream. Enjoy!
Pic from Inspired Taste (mine got eaten too quickly!)
Pastry recipe from the Australian Women’s Weekly Lemon Meringue Pie Recipe & Filling Recipe from Inspired Taste.net
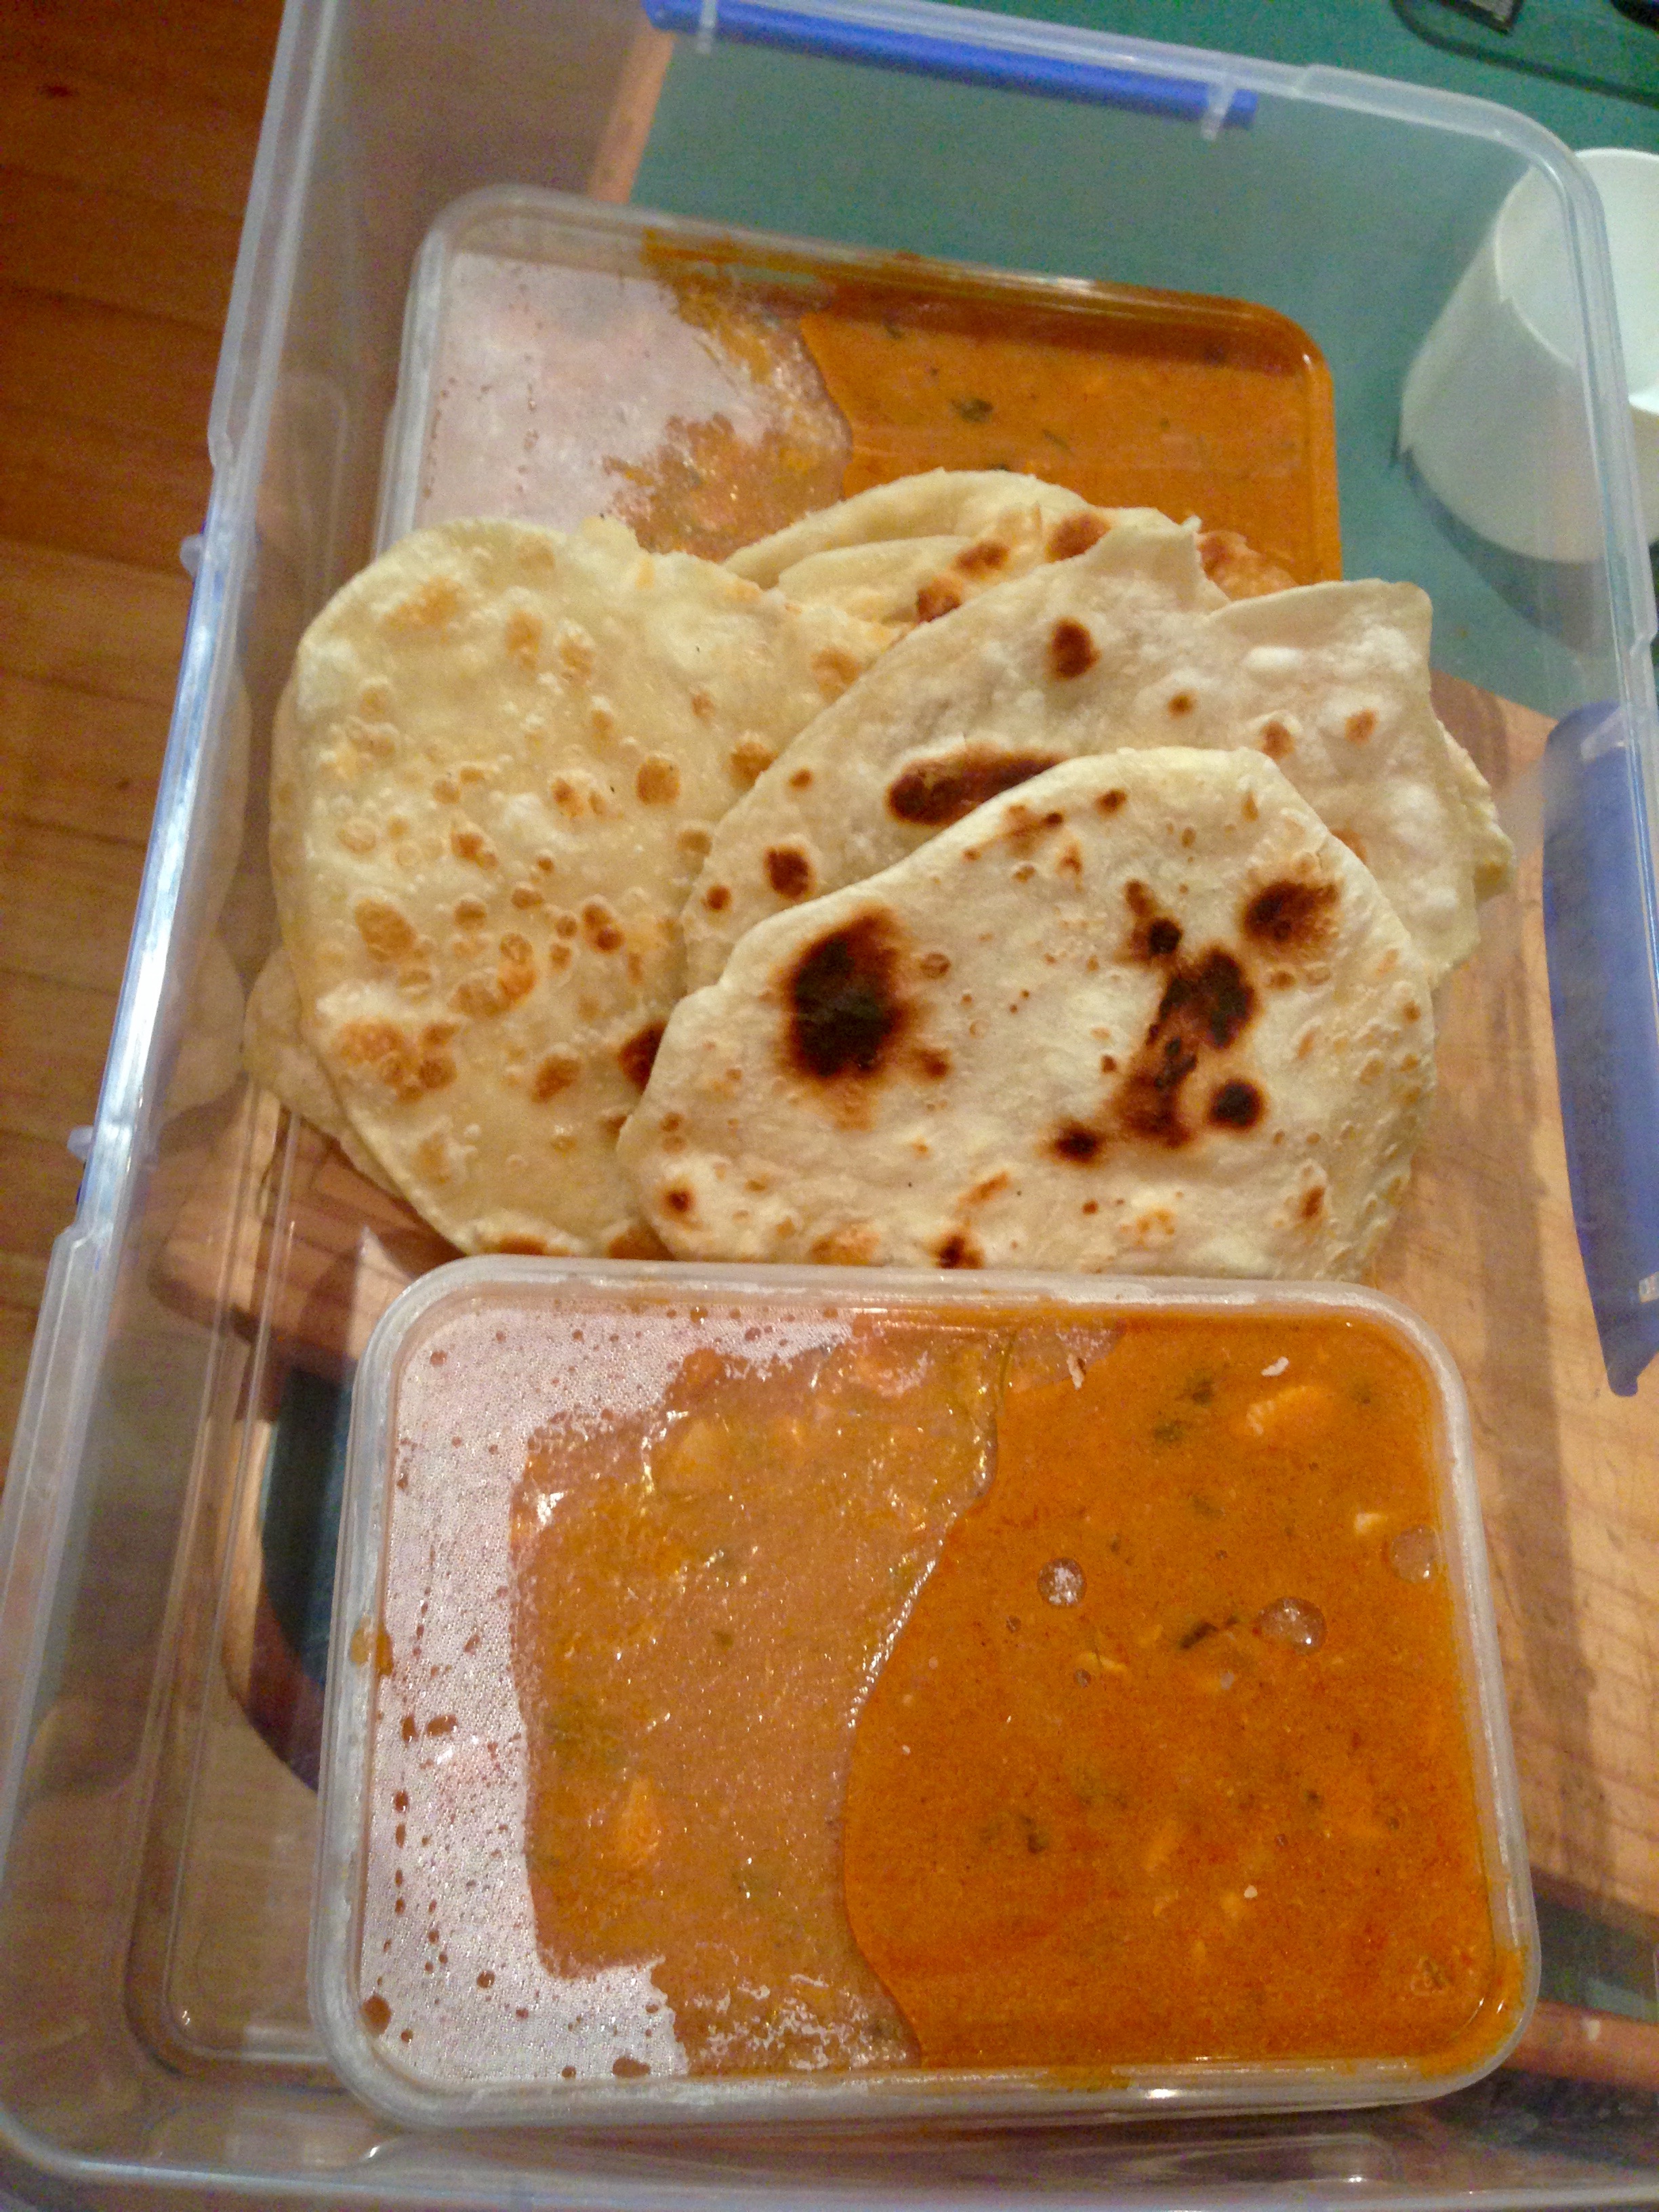
This recipe really gets a workout in our household because 1. we love Indian food, 2. we especially love having it with bread to soak up all the curry sauce deliciousness, & 3. this recipe is incredibly quick, easy & non-scary as it doesn’t involve yeast. We make rotis particularly when having butter chicken, but it’s great with all kind of curries. Thankfully, it only takes about 15-20 minutes from start to finish so is perfect for while your curry is simmering away.
It also travels really well as I discovered last week when we took butter chicken & rotis over to my grandparents’ house for dinner (see pic below), and will keep in cling wrap at room temperature for a couple of days (perfect for any leftover curry!)
Ingredients (makes 12 rotis) 1 ½ tablespoons vegetable oil
2 cups plain flour
½ teaspoon salt
200ml water
Method In a medium bowl, stir together flour, salt, water and oil until the mixture pulls away from the sides of the bowl. Turn the dough out onto a flat, floured surface and knead until smooth and pliable (around 10 minutes).
Preheat frying pan on medium-high heat.
Divide the dough into 12 equal parts, form into rounds and then roll each out to 15-20cm rounds with a rolling pin.
Cook the roti for about a minute on each side, or until it has some dark brown spots on each side. Serve warm.
I’ve wanted to start the savoury baking section of my blog for a while now, but unlike with sweet baking, my savoury baking is almost never planned (and consequently not photographed). Finally, after months & months of struggling to decide which recipe to put up as my first in the section, I decided on one of my all-time favourites: peking duck pancakes.
If I’m honest, they are a bit time-consuming to make, and duck breasts certainly aren’t cheap, but considering how much you can pay for these babies in a restaurant, it’s certainly worth your while having a go at home, and they’re absolutely delicious!
The recipe I have written here is enough for a main meal for 4, but feel free to halve it if it’s just for an entrée, or double it to make it serve more.
Ingredients (makes approximately 40 small pancakes) For the pancakes:
4 ½ cups plain flour
1½ -2 cups boiling water
Sesame oil
For the duck:
4 duck breasts
Salt
To serve:
1 large cucumber, cut into batons
The green tops of 2-3 spring onions, julienned
Coriander/cilantro
Hoisin sauce (aka the greatest thing ever)
Method To make the pancakes, place the flour in a large bowl and stir in the boiling water. Knead until the dough is smooth.
Place the dough into a clean bowl, cover with a clean,damp cloth and allow to stand for at least 30mins.
Knead again for about 5mins, then divide into approximately 40 balls.
Dip one side of a ball into a little sesame oil. Press the oiled ball together with another (unoiled) dough ball, oiled side towards the centre, and roll out to form a 15cm circle. Repeat with the remaining dough balls.
Fry the pancakes in a lightly oiled pan over a low heat, turn and lightly cook the other side. Both sides should be only very little browned (sort of like a mini tortilla).
Carefully peel the pancakes apart (careful not to burn yourself!) and keep warm until ready to serve.
Preheat oven to 200°C and 2 frypans to a medium-high heat. Prepare the duck by scoring the skin with a sharp knife and lightly salting it.
I know I said 4… and this is 6. But I had 2 left over for another time
Place 2 breasts in each pan, skin-side down and cook for 3-4 minutes or until the skin is golden. Turn and cook for a further minute.
Transfer the duck breasts onto a lightly oiled baking tray and cook in the preheated oven for a further 8-10 minutes.
While the duck is cooking, prepare your vegetables.
Once the duck is cooked, rest it for 5 minutes and then slice.
To assemble the pancakes, put approximately a teaspoon of hoisin sauce onto the middle of the pancake, top with 2 slices of duck, some cucumber, spring onion & coriander and roll. Enjoy!
Pancake recipe adapted from ‘The World’s Finest Food’ by Ann Creber, Elisabeth King & Phil Wymant
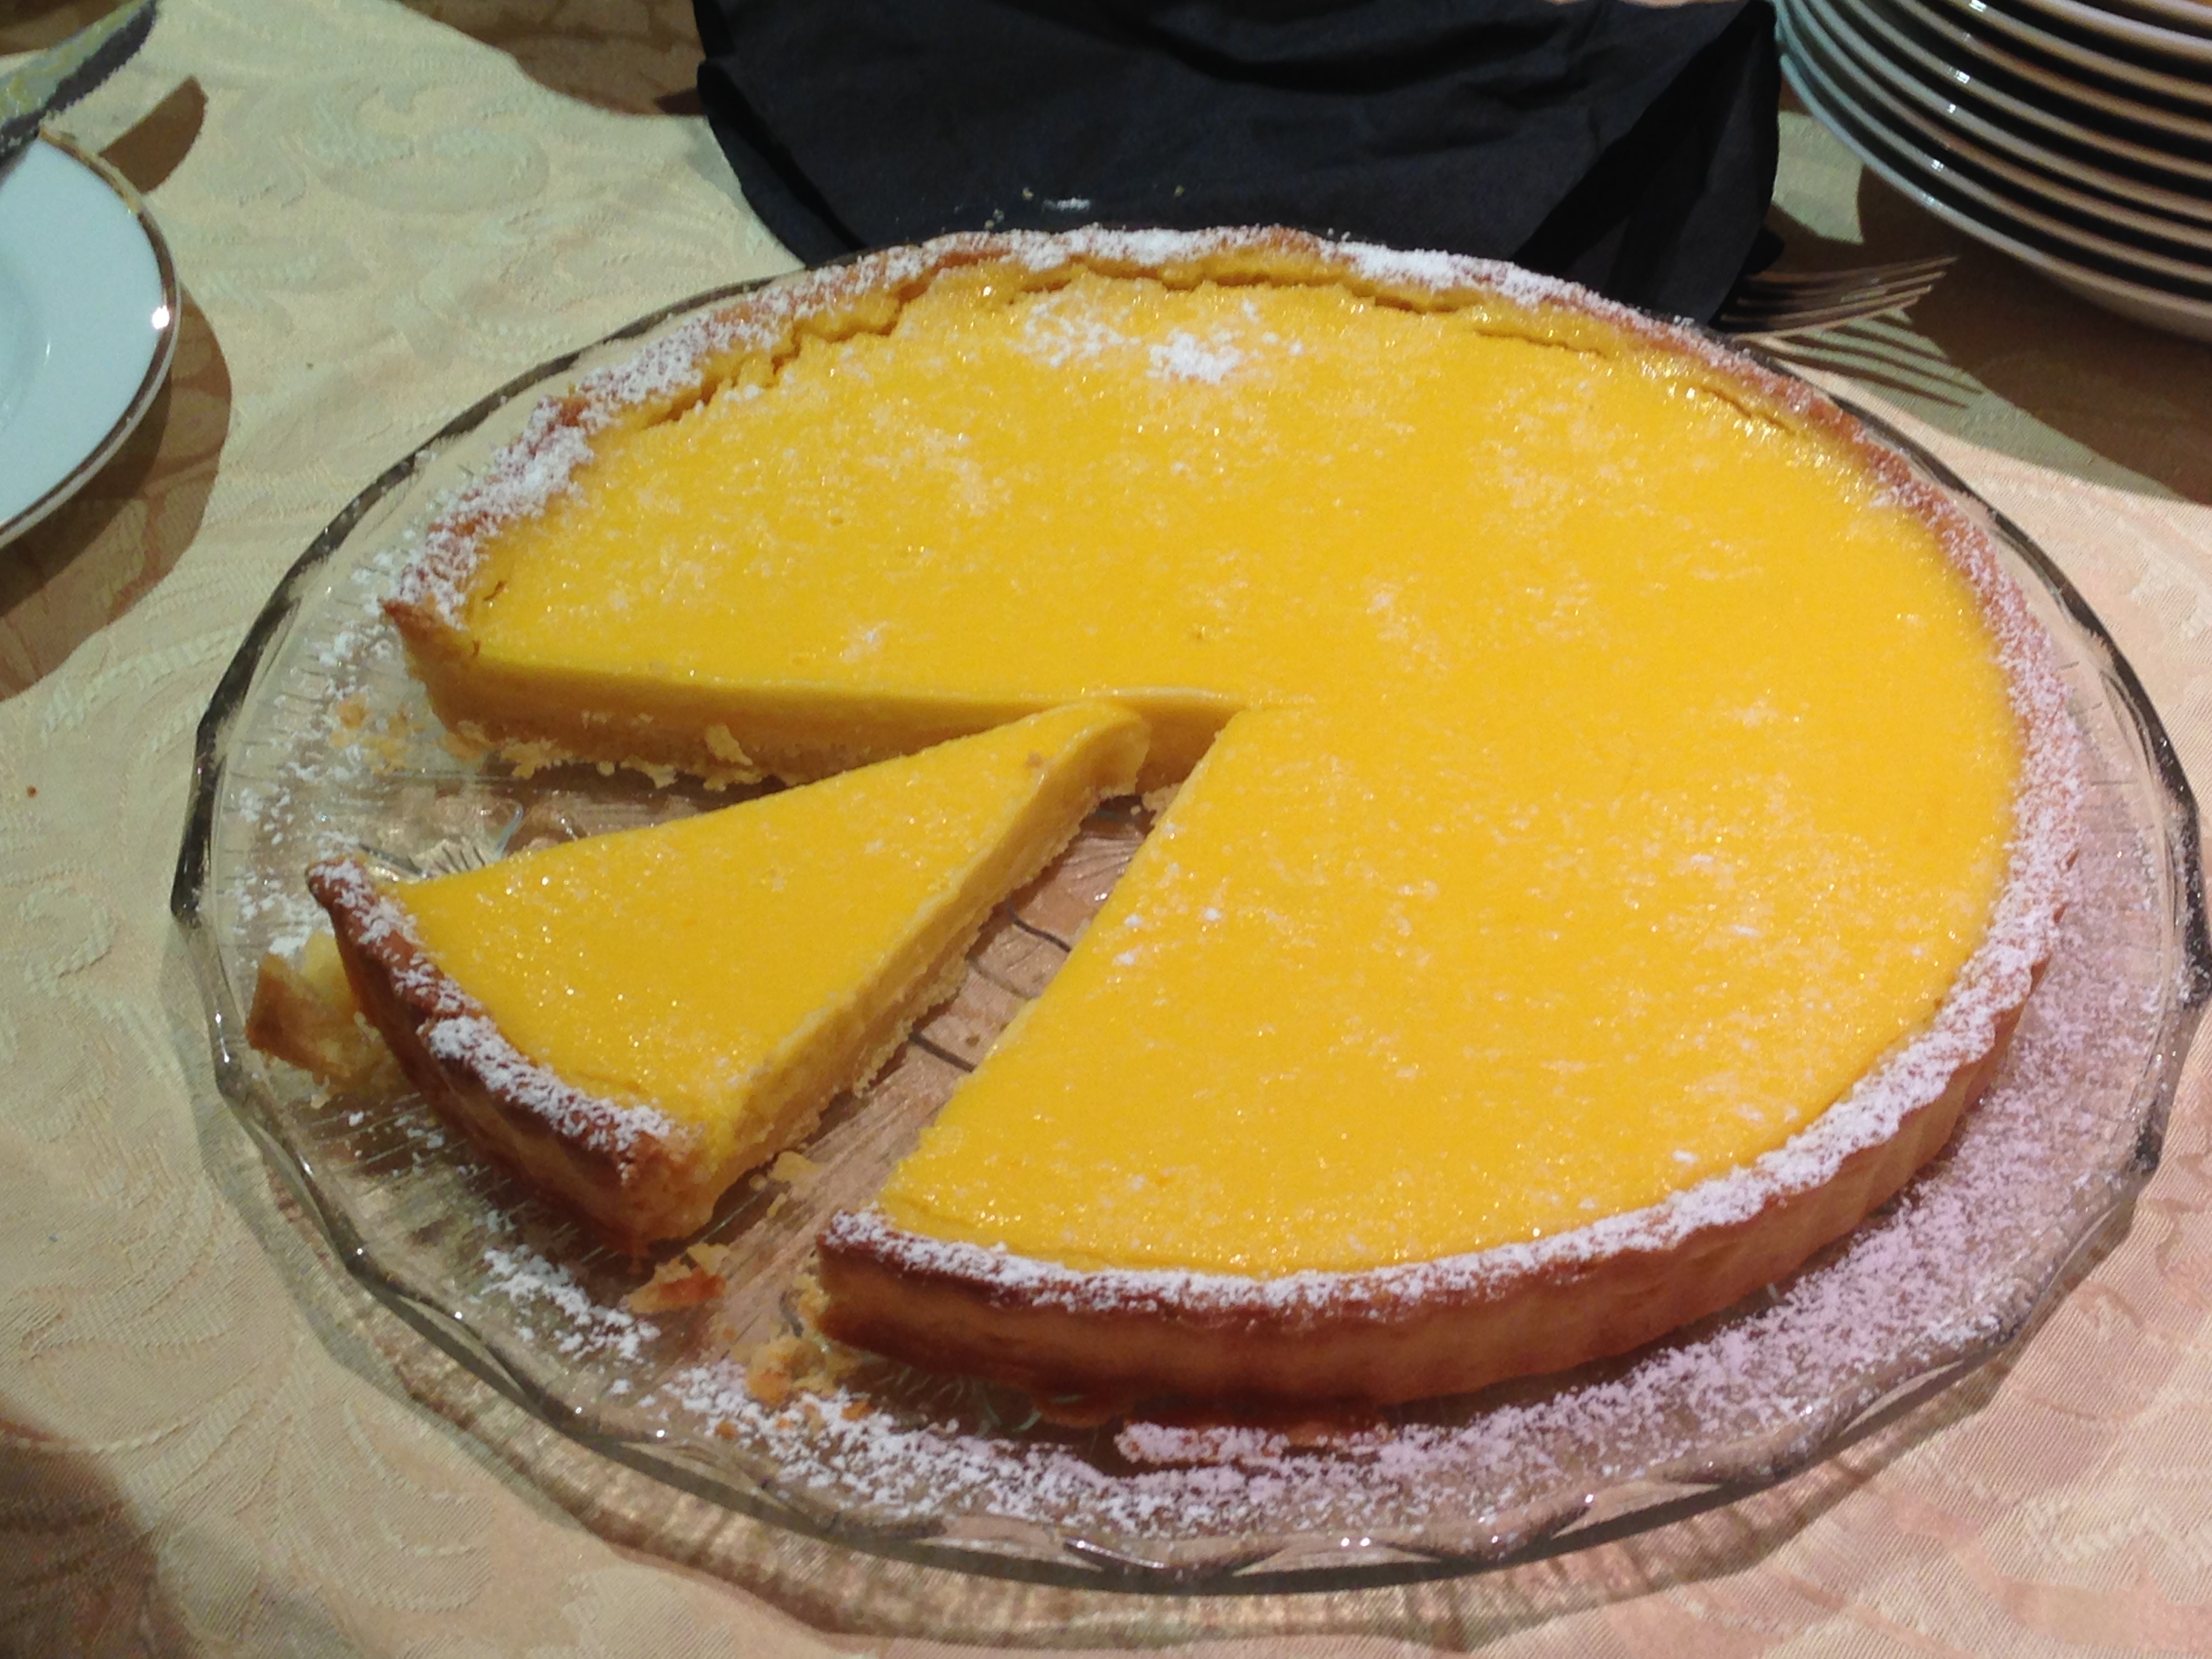
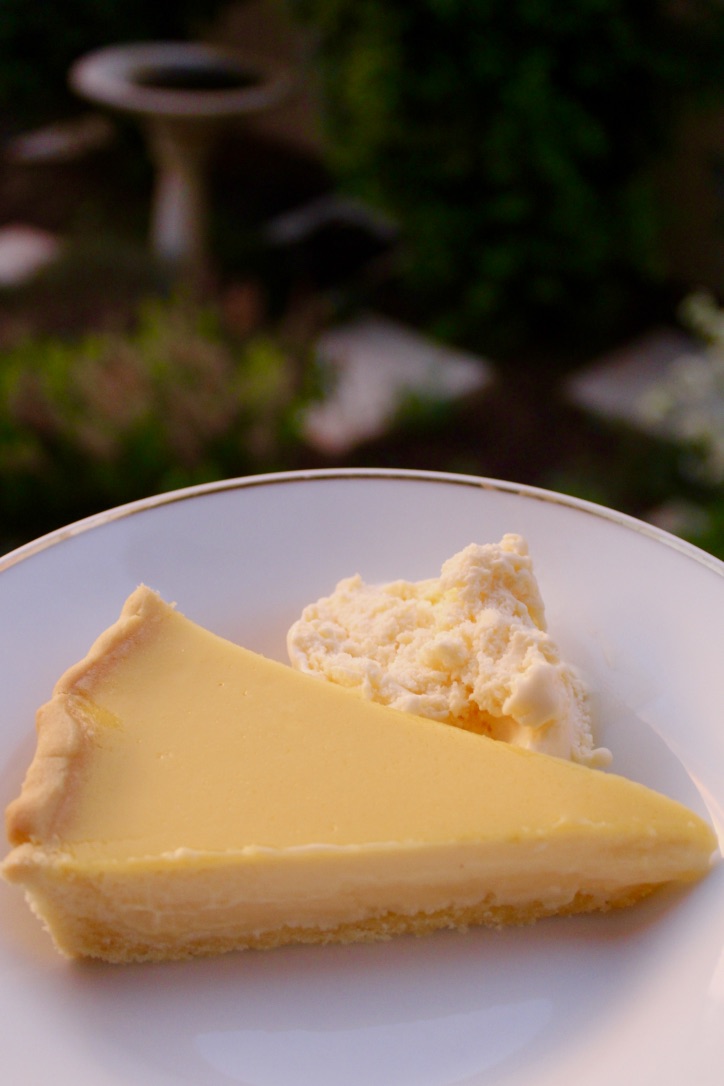
Since moving to Adelaide, I’ve been lucky enough to have access to an abundance of homegrown lemons. In our rental house in 2013, our lemon tree provided perfect fruit almost all year round, and my Aunt & Uncle also grow outstanding citrus and always seem to have plenty to give away. This has meant lots of experimentation with lemon desserts and this one has to be one of my most popular! This tart has a strong, slightly tart lemon flavour and gorgeously short, melt-in-your-mouth pastry. Serve dusted with icing sugar and with thickened cream or ice cream for a perfect dinner party dessert.
Icing sugar, to dust
Double cream or vanilla ice cream, to serve
Method To make the pastry, process the flour, icing sugar & butter in a food processor until the mixture resembles breadcrumbs. Add the egg and process until the mix just comes together. Form the pastry into a disc, wrap in glad wrap and refrigerate for at least 2 hours.
Preheat oven to 180°C (160°C fan-forced). Spray a 27cm tart pan with a removable base with cooking oil. Roll out pastry on a lightly floured surface until 4mm thick and use to line the prepared pan. Trim the edge, then line with baking paper and fill with pastry weights (or dried rice). Bake for 15mins then remove weights and paper and cook for a further 5mins until golden. Set aside.
Reduce oven to 150°C.
To make lemon filling, place eggs, yolks & sugar into a bowl and stir until just combined (try to avoid creating bubbles). Gently stir in lemon and orange juices. Pour cream into a small saucepan and bring almost to the boil, then stir it into egg mixture. Using a fine sieve, strain lemon filling into a jug. Place tart shell onto an oven tray and pour in the filling.
Bake for 15mins, then carefully rotate to ensure even cooking. Bake for a further 10mins or until just set. To check, gently shake the tart; it should be slightly wobbly in the centre.
Cool the tart to room temperature, then dust with icing sugar and serve with double cream or ice cream.
Adapted from Matt Moran’s Lemon Tart featured in MasterChef Magazine – Issue 3, July 2010.
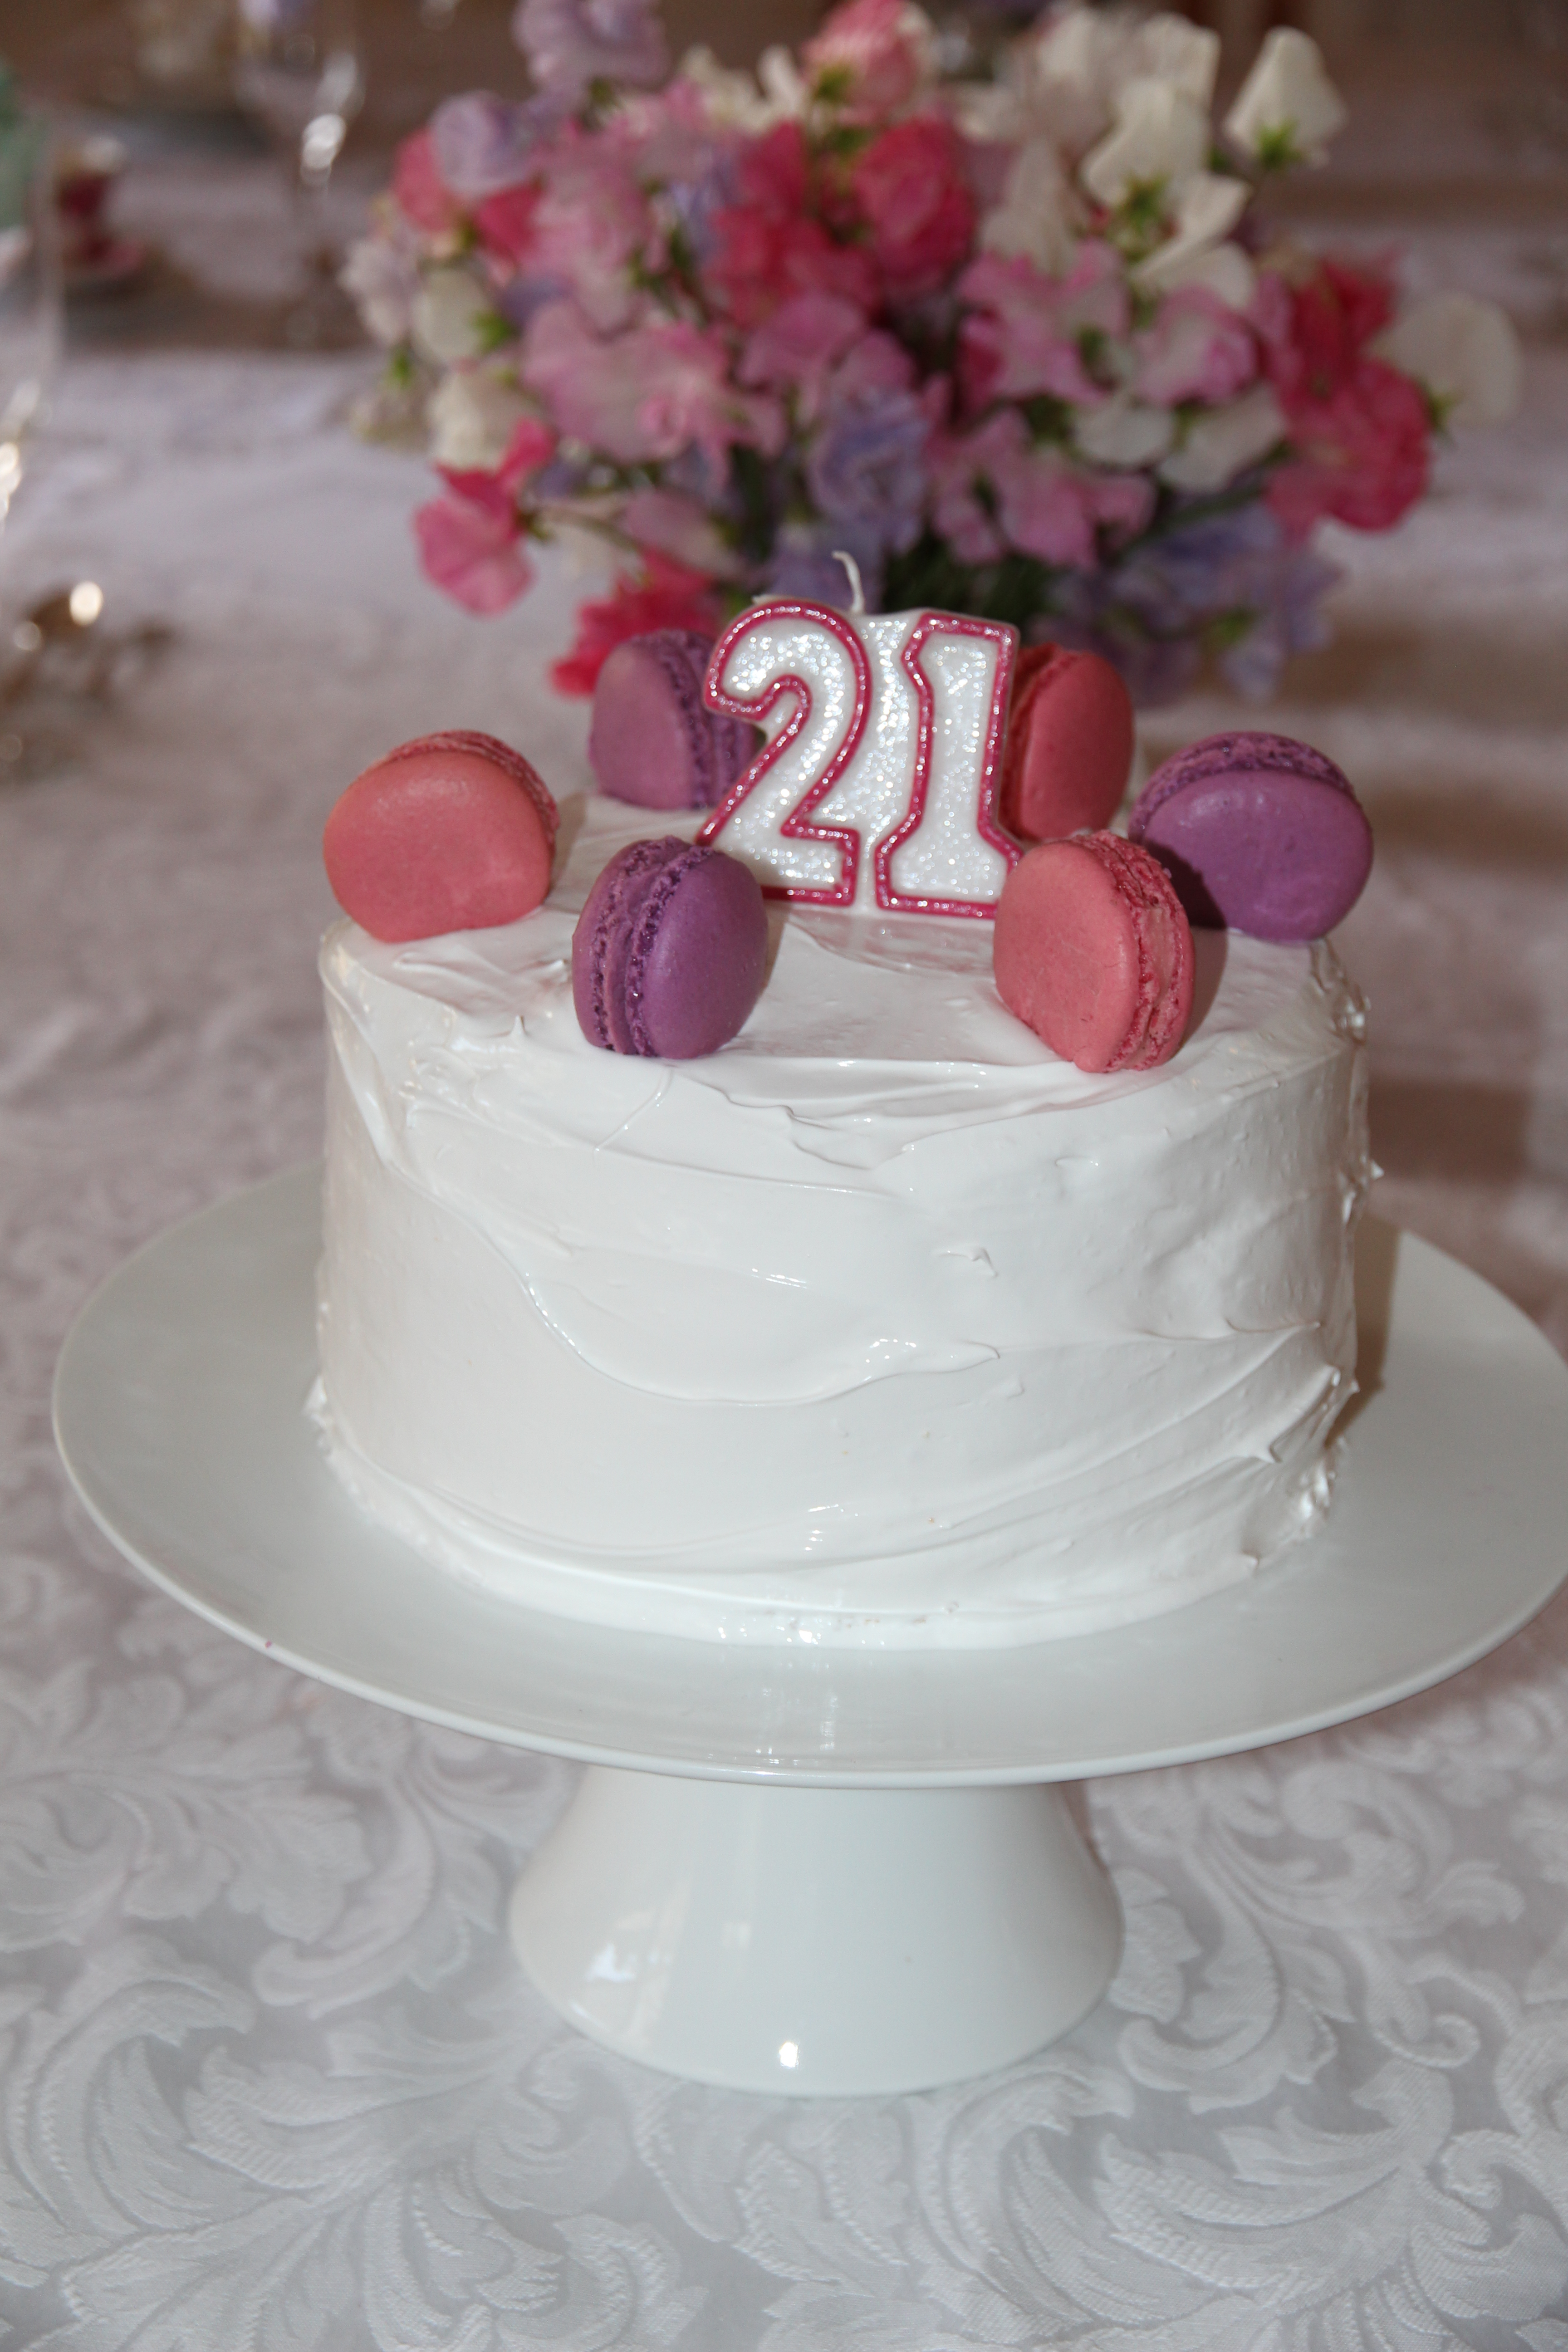
Well.. I lied. I completely intended to blog more in the last few weeks (as evidenced by my last post!) but I’ve just been too busy. I had my 21st Birthday to plan, uni assessments galore, the Psychology ball to organise, and now Laura’s 18th is coming up in a couple of weeks. Yikes, I get exhausted just thinking about it all! However, while I haven’t been blogging, I have been baking.
Here is the cake I made for my 21st Birthday afternoon tea – triple layer vanilla cake with a tangy raspberry filling & super glossy meringue frosting, topped with vanilla bean macarons. The raspberry filling was perfect as, otherwise, this cake was going to be too sweet, so I would certainly recommend leaving it (or perhaps substituting it for a tangy lemon curd if you’re not a raspberry fan) to cut the sweetness from the frosting.
Don’t worry, the empty plates in the background didn’t stay empty!
For my 21st birthday cake, I used 2 packets of Betty Crocker’s SuperMoist Vanilla cake mix, with some extra vanilla added so they tasted more ‘home-made’ divided into 3 20cm lined pans. I did this for 2 main reasons; it saved a lot of time (and time was precious as I had so much other cooking to do!), and because it reliably produces an even, stable, fine-crumbed cake that is easy to work with. If you don’t want to use cake mixes, just make a double batch of your favourite vanilla/butter cake and that will work as well 🙂
The raspberry filling needs to be made at least a day ahead but keeps well in the fridge so can be made up to a week ahead.
I also made the macaron shells a couple of days ahead to save me some stress on the actual party day.
The frosting should be made the day of serving as it does not keep particularly well.
Ingredients
For the raspberry filling (make at least a day ahead)
340g frozen raspberries
⅔ cups water
½ cup white, granulated sugar
1 tblspn lemon juice
2 ½ tblspns cornstarch dissolved in ¼ cup of water
For the cake
2 boxes Betty Crocker’s SuperMoist Vanilla cake mix (made following instructions, so add the eggs, milk, butter etc. as specified by the box)
½ tablespoon vanilla extract
For the meringue frosting
6 egg whites
1 ¾ cups caster sugar
2 tblspns liquid glucose (or light corn syrup)
¼ teaspoon cream of tartar
2 teaspoons vanilla extract
Method To make the raspberry filling:
In a saucepan combine the raspberries, water, sugar, and lemon juice. Bring to boil and simmer for 15-20mins or until the raspberries have broken down.
Remove the mixture from the heat and strain with a fine mesh sieve. Return the stained mixture to the heat. Dissolve the cornstarch in water. Whisk the cornstarch mix into the raspberry mixture.
Bring the mixture back to a boil and simmer for 5 more minutes, stirring occasionally. Remove from heat and cool completely.
Refrigerate overnight to set.
To make the cakes: Line & grease 3 20cm cake pans. Set oven to temperature specified by the cake mix boxes. Make cakes according to box instructions, add ½ teaspoon of vanilla extract to each cake mix & divide mixture among the three pans. Bake for specified time, or until a skewer inserted comes out clean.
To assemble the cake: Carefully place a cake layer on your serving platter. Top with a generous amount of raspberry filling and spread gently using a spatula to make an even layer. Top with another cake layer and repeat. Finally, top with the final cake, ready to be frosted.
To make the meringue frosting: Add egg whites, sugar, liquid glucose and cream of tartar, and simmer over a pot of water (not boiling), whisking constantly but gently, until temperature reaches 54°C on a thermometer (be patient, it does get there eventually!).
Beat heated mixture with electric beaters on a low speed for 2 minutes, then increase the speed to medium and beat for 2 more minutes. Increase the speed to high and beat until it is very thick and glossy, about 5 minutes.
Add vanilla and beat to combine.
Frost cake immediately by piling the frosting on top of the cake and, using a metal spatula, gently spreading from the top down. Smoothe as much as possible with your spatula.
Top with 6 macarons, 3 of each colour and a candle (if desired).
Serve each piece with a macaron & enjoy!
Raspberry filling recipe adapted from: Pinterest (various sources with the same basic recipe)